Quantcast
Channel: Envato Tuts+ Design & Illustration
Viewing all 6352 articles
Browse latest View live

Interview With Matte Painter Leonk

$
0
0

Recently, we had the opportunity to chat with matte painter LeonK. In our discussion LeonK shares his views on several topics including why he decided to become a matte painter, and how he improved his technique. Please take a moment to review this excellent interview.


Q Welcome to Psdtuts+, please introduce yourself. Could you tell us where you’re from and how you got started in the field?

Hello everybody! I’m Leo and I’m a self-taught digital artist coming from Brescia, Italy. It all began a couple of years ago when, by chance, I found some Italian design forums and was fascinated by the signatures and avatars which at that time looked really awesome. I decided to start experimenting with Photoshop. At the beginning it was quite difficult, but I was able to improve pretty fast since then and reach a quite good level.

Q Your collection of art features several Matte Paintings. Could you give us a small look into what exactly a matte painter does opposed to just a painter? And how does the art differ between the two?

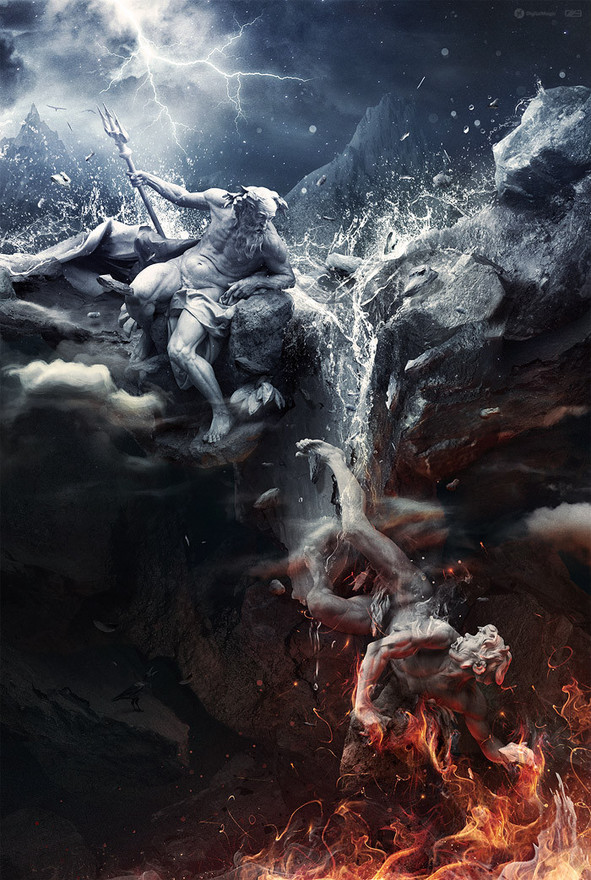
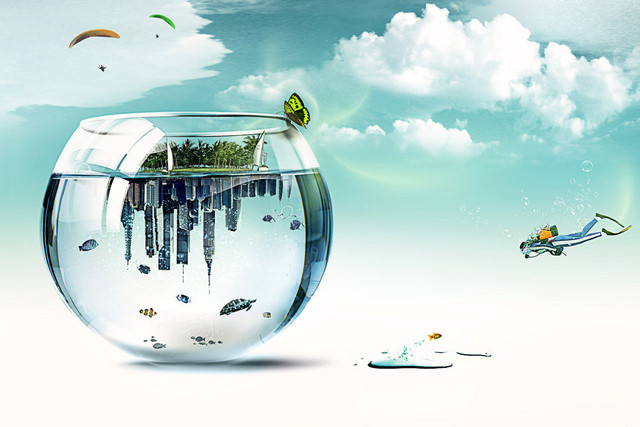
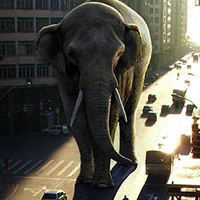
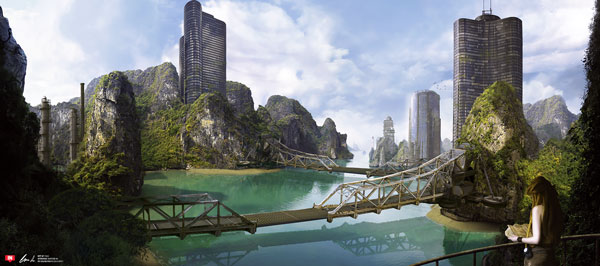
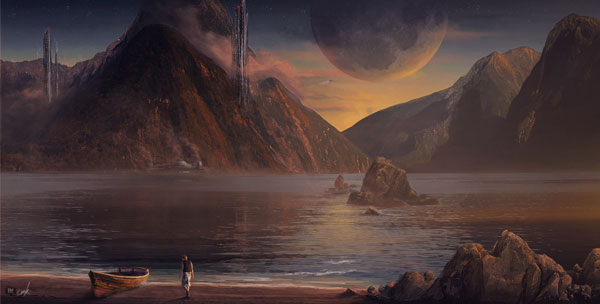
Since I moved to large art I was attracted by matte painting because of it’s capacity to combine different techniques, such as photo manipulation and digital painting. Making a good matte painting isn’t as easy as someone may think! Your skills have to work together, you have to be good at blending photos, at making a good use of textures and finally, you have to be good at drawing the details your artwork needs to look really epic; but what really distinguishes a matte painter from a digital one is that a matte painter really focuses on making the large piece as real as a photography; the matte painter really has to work a lot on the paintings in order to make the viewers say “Wow, that looks so realistic!”.

Q Have you always been artistic from childhood? Or did it start to appear later in life?

To be honest I always loved drawing, since I was young, and this was probably because I found it a way to spend some free time and put my ideas down on paper. All this is mainly due to my father, which showed me how many things you can do with just a pencil and a piece of paper.

Q You are currently part of the design collective Intrinsic Nature, what would you say are the benefits to a designer joining a group like this and submitting art on a regular basis.

I think that being part of an art collective is extremely important, especially for young designers because thanks to comments and critique they receive from the members they can improve their artworks faster and, at the same time, they learn new things and can get to the next level quicker!

In my opinion critique is the key of an art group: giving and receiving it from members really helps in the creation of a piece; it just gives you an idea of what’s wrong with your artworks, what actually isn’t working on your piece and how you can make it better instead, which things you should remove and which ones you should add, and so on. An art group just gives you the opportunity to keep improving your skills and, why not, make a name for yourself in short time!

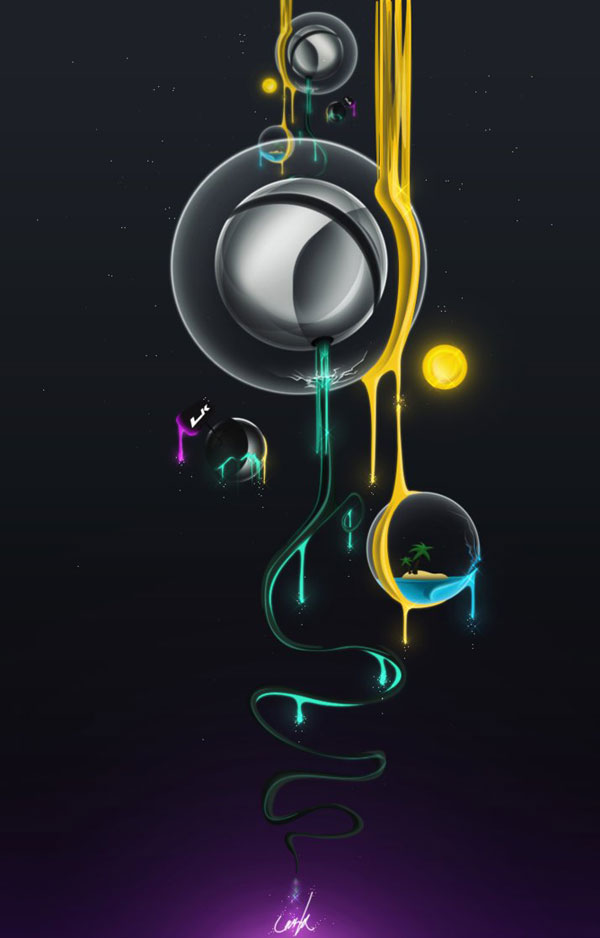
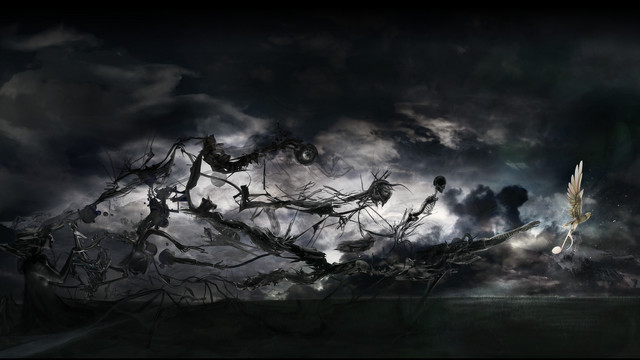
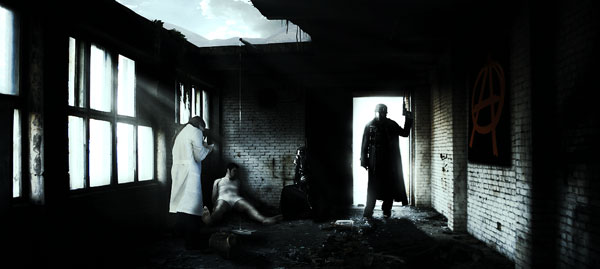
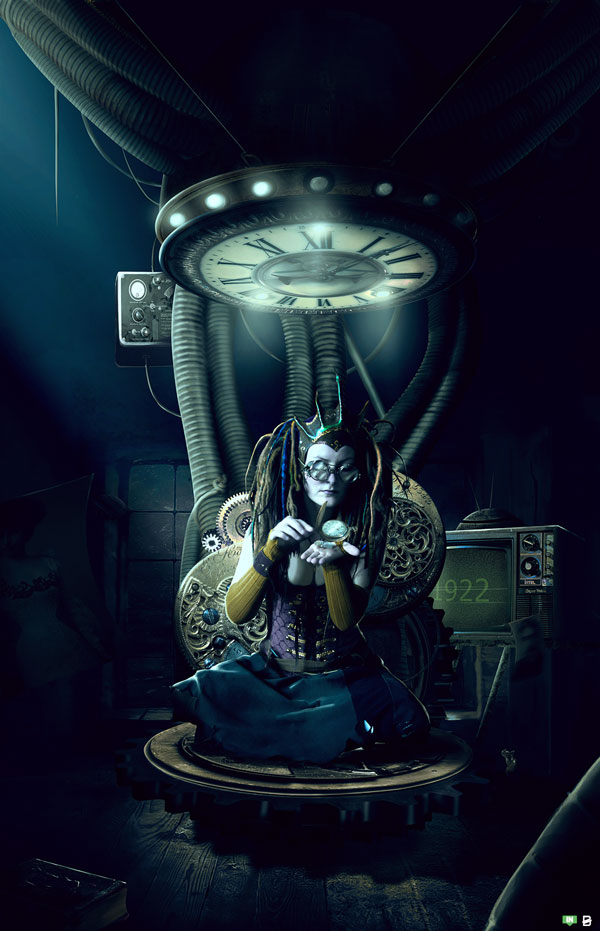
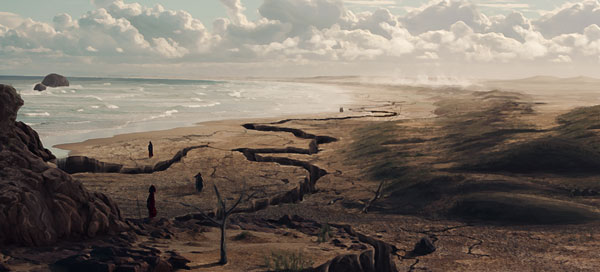
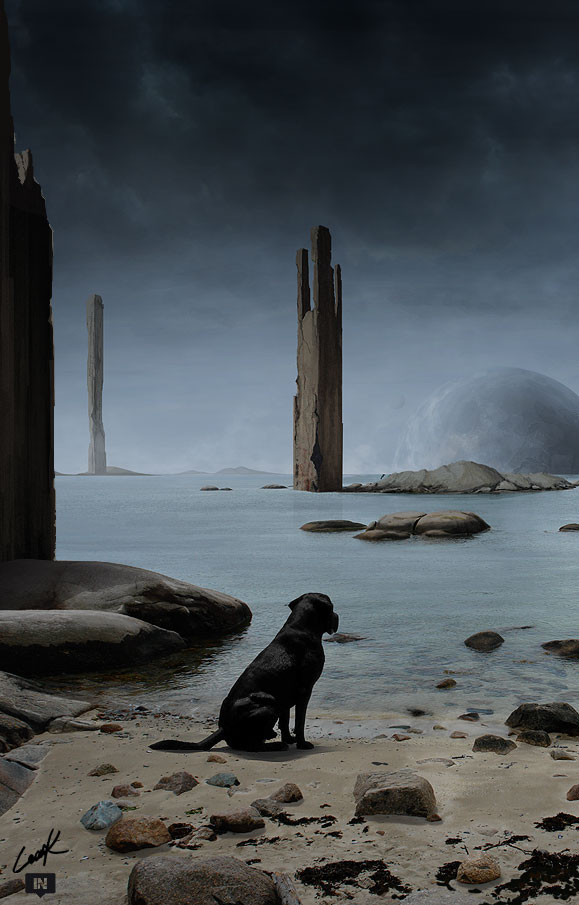
Q “Loneliness” is another one of your matte paintings that evokes the same emotion it is named after, please walk us through how you created this amazing illustration and what the inspiration behind it was.

It’s actually quite interesting how “Loneliness” came out: in fact it could sound a bit strange, but in that piece I was inspired by Napoleon’s conquests in Italy, while my history professor was talking about them! My illustration mirrors what human beings can do by using their “intelligence”, their force, that they are able to devastate entire countries for glory and so.

The dog was added just after a while. At the beginning I thought that some ordinary people influenced by wars would have been perfect; only in a second moment I realized that they probably wouldn’t have underlined the real meanings of loneliness better that a dog, an animal that, in my opinion, always wants to play, to have fun and is moving around all the time. It’s actually sad to see them being unable to do such things and that’s why I decided to bring the animal in my piece istead of people.

Q Who or what were your main influences that made you pursue the field of designing?

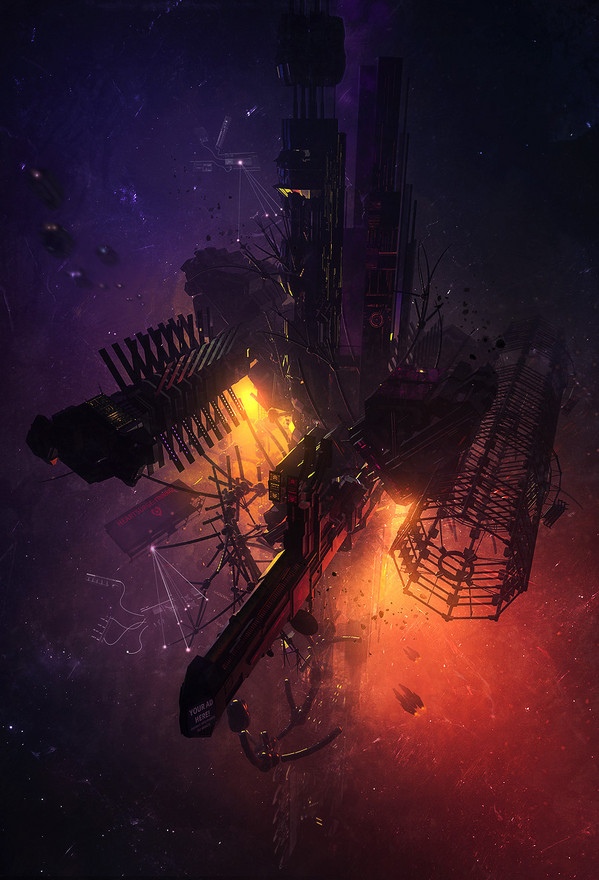
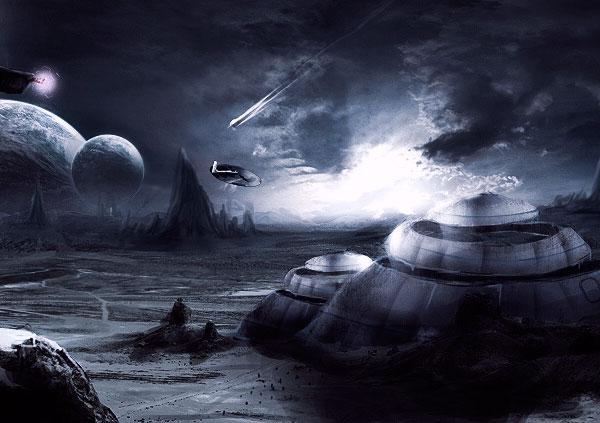
This is a good question. To be honest I think that one important thing that made me pursue the field of designing is that I always wanted to learn new things, especially in what I liked most. This is why, for example, I wanted to have Photoshop! While surfing the net and watched cool movie trailers, in particularly sci-fi, I just wanted to know how people could have done such stunning surreal landscapes. This motivated me, of course, to learn always more and more new things, motivated me to keep improving my skills in Photoshop.

Q All digital painters use tablets when designing, so tell us what tools you use to create your amazing paintings? What does your specific equipment bring to your design that you wouldn’t get with another tablet?

To be honest I have quite a unique way of working. My design equipment actually features just a couple of things, Photoshop CS4 and… my mouse. It might sound really weird that a painter still uses his mouse instead of a cool, big, extremely useful tablet for drawings, I know; but don’t worry, I’m going to get one very soon!

Q Thanks again for providing Psdtuts+ with this opportunity to interview you. Any final thoughts for our readers?

Thanks for having me! What I would recommend people is to never give up from what you are doing even when things don’t go how you would like to. Just have a break from what you are doing and look for inspiration by watching movie trailers and checking out art collectives’ exhibitions.


Where to find Leonk on the Web


Best of Tuts+ in September

$
0
0

Each month, we bring together a selection of the best tutorials and articles from across the whole Tuts+ network. Whether you’d like to read the top posts from your favourite site, or would like to start learning something completely new, this is the best place to start!


    Psdtuts+ — Photoshop Tutorials

  • Create Animal Textured Typography

    Create Animal Textured Typography

    In this tutorial we are going to create fun, realistic, animal textured, 3D typography in Photoshop using CS5′s Repousse tool. Let’s get started!

    Visit Article

  • Create a Detailed User Interface for an iPad Application

    Create a Detailed User Interface for an iPad Application

    In this tutorial we will show you how to design a detailed user interface for an audio-themed iPad application. We will design this application using a retina display resolution and will make use of Photoshop’s shape layers and layer styles. Let’s get started!

    Visit Article

  • How to Apply Light, Shading, and Shadow to Round Objects

    How to Apply Light, Shading, and Shadow to Round Objects

    Photoshop is an excellent tool for manipulating photographs but it can also be used as a means to create stunning digital art. This tutorial is part of a 25-part video tutorial series demonstrating everything you will need to know to start producing digital art in Photoshop. Digital Art for Beginners, by Adobe Certified Expert and Instructor, Martin Perhiniak will begin by teaching you how to draw in Photoshop. At the conclusion of this series you will know all you need to produce your own concept art and matte paintings in Photoshop.

    Visit Article


  • Nettuts+ — Web Development Tutorials

  • 14 Ways you can be Sure you’ve Married a Geek

    Ways you can be Sure you’ve Married a Geek

    Everyone knows that when you get married, your life changes. When Jeffrey and I recently tied the knot, we were advised by the older and wiser that the first year of marriage is the hardest. But so far, it has been fantastic. Dont get me wrong; just because married life is proving to be bliss does not mean there havent been any of those aforementioned changes. Recently, I realized that the ’married life changes” that I am adjusting to are all coincidentally related to the fact that Jeffrey is a web developer, a.k.a Geek.

    Visit Article

  • Is Conference Pricing Out of Control?

    Is Conference Pricing Out of Control?

    You’ve surely experienced the letdown of registering for a conference, only to find that it costs $1,000 (or more) to attend (not including travel expenses). Isn’t that a bit extreme for two days worth of training? Then again, is that the only way the conference organizers can cover the high cost of planning such an event? Let’s see…

    Visit Article

  • The Best Way to Learn JavaScript

    The Best Way to Learn JavaScript

    Learning something new is scary. For me, the biggest issue with picking up a new skill is that I don’t know what I don’t know. Given that, it’s often useful to find a plan for learning whatever you’re interested in. That’s what this post is: your blueprint, your roadmap, your plan of action for learning JavaScript! You don’t have to worry about finding the best resources, sorting out the bad ones, and figuring out what to learn next. It’s all here. Just follow it, step by step.

    Visit Article


  • Vectortuts+ — Illustrator Tutorials

  • 150+ Free, Vintage Vector, Medieval Heraldry Graphics

    Free, Vintage Vector, Medieval Heraldry Graphics

    It’s free vector graphics time, my favorite hour of the day! We’ve roundup up a truckload of heraldry graphics available in EPS, SVG, AI and other vector formats for free download. These medieval packs are composed of emblems, crests, shields, dragons, knights, helms, armor, swords, flourishes, banners, and all sorts of vintage design elements. Whether you’re designing a stylish brochure for your favorite client or your personal portfolio website, these graphics could add the perfect stylish touch your project is needing.

    Visit Article

  • Top Tips and Secrets from Talented Vector Artists

    Top Tips and Secrets from Talented Vector Artists

    Today we share top tips and secrets from talented vector artists, which can help add insight into their processes and can give us the advice we need to improve in our own artwork.

    Visit Article

  • Playing with Stationery Art Brushes and the Live Paint Bucket

    Playing with Stationery Art Brushes and the Live Paint Bucket

    In today’s tutorial I’m going to show you how to create some line art style stationery art brushes. You’ll then learn to combine them with the Live Paint Bucket to create a typography piece.

    Visit Article


  • Webdesigntuts+ — Web Design Tutorials

  • A Beginner’s Guide to Successful Conversion

    A Beginner’s Guide to Successful Conversion

    Converting visitors into valuable users is arguably the most fundamental element of managing a website. We’re going to take a closer look at conversion, discuss what it is, cover some common pitfalls, and tackle improving your site’s conversion rates.

    Visit Article

  • Sign-in or Register: Form Design From Scratch (Day 1)

    Sign-in or Register: Form Design From Scratch (Day 1)

    We deal with web forms all the time; when we log in to YouTube, Facebook, or any other web service, we have to get through a login or sign up process. Often this can be difficult because some forms are too long, or too cluttered. We’re going to build a stylish, straightforward login form, and today we’ll be looking at the Photoshop side of things.

    Visit Article

  • Weekend Freebie! The Aureus Landing Page (PSD)

    Weekend Freebie! The Aureus Landing Page (PSD)

    I originally designed the Aureus Landing Page for ThemeForest. However, I changed my mind and decided to share it with all of you guys instead – I love giving back to the design community!

    Visit Article


  • Phototuts+ — Photography Tutorials

  • More than 60 Amazing Examples of Black & White Portraiture

    More than 60 Amazing Examples of Black & White Portraiture

    The life of the monochrome portrait contains a rich history dating back to the birth of photography itself. Upon the invention of the camera, it was the portrait that took precedence. The opportunity to capture fellow man in a moment in time on film was finally a reality. So when put into context, appreciating the continued importance and wide scale exploitation of black and white portraiture today, it’s clear that the art is not lost and has survived the test of time.

    Visit Article

  • Travel Portraits: Methods for Making a Connection

    Travel Portraits: Methods for Making a Connection

    If you love to travel and take photographs, you have likely come across the dilemma of what to do when photographing people. Most see it as a catch 22. If you ask permission (as I believe is proper) then the person is not being ‘natural’ as they were before you asked, doing whatever it was that caught your eye. If you snap away, you risk being seen as rude and offending your subject which, for one reason or another, you thought of highly enough to take a photo. So what to do?

    Visit Article

  • FlashMasters: Off-Camera Flash

    FlashMasters: Off-Camera Flash

    Off-camera flash holds a tremendous amount of potential. With the ability to remove the flash from the same axis as the camera, off-camera lighting gives a photographer more creative options than ever before. Today, we’re going to learn about getting started with off-camera flash.

    Visit Article


  • Cgtuts+ — Computer Graphics Tutorials

  • “The Warrior” – Part 1

    The Warrior” – Part 1

    In this tutorial you’ll go through the entire character creation pipeline using Zbrush, Maya, UVLayout and Photoshop. We’ll go through the whole process of creating the “Warrior” character including texturing and rendering with Metalray. This tutorial is divided into 8 parts and in the first part, we’ll start blocking out the character in Zbrush using Zspheres.

    Visit Article

  • Create A Realistic Candle & Flame In 3D Studio Max

    Create A Realistic Candle & Flame In 3D Studio Max

    In this tutorial, regular author Chandan Kumar will show you how to create a realistic candle and flame in 3d Studio Max. The candle’s flame will be made entirely in 3dsmax using built-in tools, rather then expensive third-party plugins! Let’s take a look!

    Visit Article

  • An Introduction To Vue 9 xStream – Day 1

    An Introduction To Vue 9 xStream – Day 1

    When you first start using a new software package, you’re a little bit lost. As you don’t really know where to start, what the options and parameters stand for, what the buttons do, etc… This tutorial series was made to introduce you to the best software for creating Natural 3D Environments, that software is: Vue 9 xStream. We’ll take a in-depth look of every aspect of Vue 9, starting with the user interface and working up to very complex environments!

    Visit Article


  • Aetuts+ — After Effects Tutorials

  • Kaleidoscope Of Dancing Veggies Using Echospace – Day 1

    Kaleidoscope Of Dancing Veggies Using Echospace – Day 1

    Today’s tutorial is on how to create a colorful motion graphic piece meant for a food show or cooking program. With the often forgotten Trapcode Echospace you can turn as many photos as you want into one cheerful looking animation. I feel this two part tutorial has principles that could carry over into endless unique results. I hope you enjoy the tut!

    Visit Article

  • A Look At Hollywood’s Biggest VFX – Part 1

    A Look At Hollywood’s Biggest VFX – Part 1

    This is a brief introduction of some of the most unbelievable Visual Effects in Hollywood’s biggest movies. This “Part 1″ will describe the making of movies: 2012, Avatar, Alice in Wonderland and The Lord of the Rings.

    Visit Article

  • Walking Through 3d Text – AE Premium

    Walking Through 3d Text – AE Premium

    In today’s tutorial we’re going show how to create the super popular effect of having a person walk right through a 3d logo or text. We’ll cover shooting tips, matchmoving principles, and a whole lot of other helpful info to pull this shot off right! We’ll also show you a way to create this effect without using ANY expensive 3rd party plug-ins!

    Visit Article


  • Audiotuts+ — Audio & Production Tutorials

  • Dubstep for Beginners – Part 1: The Drums

    Dubstep for Beginners – Part 1: The Drums

    With three equally important focal points, this tutorial series will initiate you each of these areas of dubstep and how to start producing your own grooves. This first tutorial will focus around the drum beats and what makes the dubstep beats unique. Get ready for some head nodding grooves!

    Visit Article

  • How to Get The Most Out of Your Drum Loops

    How to Get The Most Out of Your Drum Loops

    I’m really bad at creating beats. I prefer to use a real drummer, and when that isn’t an option, I try to use loops. When I’m sketching ideas for a song, trying to create an arrangement and such, I like to throw a few loops into the DAW and play over that. I’m really bad at using a metronome or a click track so a drum loop is a much more comfortable option for me.

    After I’ve recorded the rough chords and arrangement into my audio program I like spicing up the drum tracks a little bit. Logic Pro makes this easy for me as they have all sorts of different loops and corresponding fills I can use. I usually throw some loops together to create a somewhat fluid arrangement and then create from there. I don’t really end up using those drum loops because I always want to record some actual drums instead, but during the creation process, using loops can really help.

    Visit Article

  • Do Artists Really Need Managers Anymore?

    Do Artists Really Need Managers Anymore?

    Over time the music industry has been constantly evolving and managers have continued to play a pivotal role in the accomplishments of the artist they represent. But do artists really need managers anymore?

    Visit Article


  • Activetuts+ — Flash, Flex & ActionScript Tutorials

  • Learn HTML5 With This Simple Avoider Game Tutorial

    Learn HTML5 With This Simple Avoider Game Tutorial

    In this tutorial (the first of a series), you’ll learn the basics of HTML5 game development with JavaScript and the <canvas> element. You don’t need to have any programming experience, or even any HTML experience (apart from this one article). Let’s get started!

    Visit Article

  • Exclusive Freebie: Tr.ace(), an Excellent AS3 Debugging Utility

    Exclusive Freebie: Tr.ace(), an Excellent AS3 Debugging Utility

    We’ve got another Activetuts+ Exclusive Freebie for you! This time, Matt Stuttard (aka MSFX) is offering you his brand new debugging utility, Tr.ace(), which adds some very useful extra features to Flash’s trace() function. Read on to find out more, and to download your copy.

    Visit Article

  • An Introduction to FlashPunk: The Basics

    An Introduction to FlashPunk: The Basics

    Learn the basics of how FlashPunk works – an amazing library to save you time and help you create the perfect game!

    Visit Article


  • Wptuts+ — WordPress Tutorials

  • Customizing the WordPress Dashboard For Your Clients

    Customizing the WordPress Dashboard For Your Clients

    Have you recently started using WordPress for your client’s project and want to further impress your client with better packaging? This article will focus on packaging WordPress so that, in just few minutes after completion of a project, it will feel more unique to the client and not have the generic feel.

    Visit Article

  • Developing BuddyPress Themes – Part 1 : Working with the BuddyPress API and Loops

    Developing BuddyPress Themes – Part 1 : Working with the BuddyPress API and Loops

    Last month, we looked at the basics of BuddyPress and how you can use it to increase social networking in your projects. The response was great and many requested theming tutorials. So, in this three part series, we’ll explain some core elements of the BuddyPress API and unpack how to create a custom child theme that will survive both BuddyPress and WordPress updates.

    Visit Article

  • 10 Steps to Securing Your WordPress Installation

    Steps to Securing Your WordPress Installation

    WordPress is open source which means that everyone, including hackers with a malicious intent, can scour the source code looking for holes in its security. That is why I’m going to show you some good precautionary steps to take to protect you, your WordPress and most importantly, your users.

    Visit Article


  • Mobiletuts+ — Mobile Development Tutorials

  • Android Futures: Preparing For Ice Cream Sandwich

    Android Futures: Preparing For Ice Cream Sandwich

    The next major version of the Android SDK, codenamed Ice Cream Sandwich, is due out within the next couple of months. While were waiting for the release, here are some quick tips to future-proof your applications.

    Visit Article

  • Full Screen Web Apps

    Full Screen Web Apps

    One of the first problems encountered when building a mobile web app from scratch is the amount of space consumed by the browser’s address bar. This tutorial will demonstrate how to reclaim the screen real estate otherwise lost to the address bar while accounting for orientation changes, content height problems, and internal document links.

    Visit Article

  • iOS SDK: Adding a Table of Contents to an iPad Reader

    iOS SDK: Adding a Table of Contents to an iPad Reader

    This is the third installment in a series on creating an iPad PDF reader for the book The War of the Worlds. In today’s tutorial, I will demonstrate how to add a Table of Contents to the project. In doing so, I’ll cover working with plist files, layering subviews, basic UIView animations, and manually creating interface components.

    Visit Article


  • FreelanceSwitch — News, Tutorials & Jobs for Freelancers

  • Top 10 Free Online Storage Apps

    Cloud computing oppens new opportunities for freelancers. One of them is free online file synchronization and storage. Nowadays you can sync your PC files and manage your documents on the go. Share files with your employer or other freelancers. Make an online backup or roll back to previous file version. All these actions are possible with modern online file sharing applications.

    Visit Article

  • 5 Ways to Find Freelancing Virtual Assistants

    As a freelancer, I’m not really in a position to hire someone as a full-time employee and pay all the payroll taxes and other expenses that go along with such an arrangement. Hiring someone on a contract basis, like a virtual assistant, for just those hours that I need her, is the simplest solution. From there, it becomes a matter of finding the right virtual assistant.

    Visit Article

  • 7 Sins of Website Copywriting That Send Prospects Fleeing

    Remember: your website is your virtual salesperson. The design is the way that salesperson is dressed. It makes the first impression. But the copy are the words coming out of that salesperson’s mouth: that’s what will make or break the sale.

    When a prospect is looking at your site, they have a question in their mind: “Do I want to hire this person?” Your copy’s job is to make sure the answer is “Yes!” as often as possible.

    Visit Article


Thanks for Reading!

We love bringing you the latest and greatest tutorials each month, and would like to take this opportunity to say thanks for reading, subscribing, and offering your feedback. If you have any suggestions for tutorials, or Tuts+ in general, feel free to leave them below in the comments!

As ever, the best way to support the sites (and get your hands on superb, industry-leading tutorials) is to join our Premium program. It costs just $9 per month, and will be the best few dollars you ever spend! There’s also no risk, thanks to our 100% money-back guarantee.


Create a Stitched Text Effect for an iPad Wallpaper

$
0
0

In this tutorial we will show you how to create a custom stitched text effect for an iPad Wallpaper. Let’s get started!


Step 1

We are going to start by creating the fabric. Create a New Document at any size (I’ve created a 250 px by 250 px canvas).


Step 2

Using the Rectangle Tool, make a small black rectangle on a new layer.


Step 3

To create some texture for this shape, add the following layer styles:

The result is the building block of our texture.


Step 4

Make multiple instances of this shape and position as shown.


Step 5

Flatten the image and use the Rectangular Marquee Tool to make a selection. Notice that I have made a selection that will result in a seamless pattern.


Step 6

Once you are comfortable with the selection you have made, go to Edit > Define Pattern. Name the Pattern and click OK.


Step 7

Now that we have a pattern, we will use it to create a larger swatch of fabric that we will add to our final scene. Create a New Document 2500 px by 2500 px.


Step 8

Go to Edit > Fill. Select Pattern from the drop down and choose the new Custom Pattern we just created (it should be at the bottom of the list).


Step 9

To add some color, give this layer the following Layer Style:


Step 10

I want to add a little bit of variation to my pattern. Start by creating a new layer filled with white. Add Noise set to 100% and give it a Motion Blur with a setting of 40 px at a 55 degree angle. Set the Blending Mode to Multiply and the Opacity to 75%.


Step 11

To continue adding some variations to our texture, create another layer and Render Clouds (Filter > Render Clouds). Set the Blending Mode and Opacity as shown.


Step 12

Select all layers in the Layer Panel and Right-Click and select Convert to Smart Object. Rename the Smart Object to “Fabric” and save this file.


Step 13

We need to create a new document for our iPad Wallpaper. The resolution of the iPad is 1024 px by 768 px, which means that when rotated horizontally or vertically, it will be at most 1024 wide or 1024 tall. To make sure that our wallpaper will fit the screen at any orientation, we need to create a new document 1024 px by 1024 px.


Step 14

To help me visually, I have created a new group that contains guides for both the horizontal and vertical orientations of the iPad.


Step 15

For now, we can hide the guides. Import Smart Object of the fabric pattern into this scene. Transform (Command/Ctrl + T) this texture to a desirable perspective. Save your document.


Step 16

We need to create the stitches in a separate document. We also need to make sure the document is large enough so that there will be little distortion when we place this into perspective. The overall size of your document will depend on your text or logo. For this project I have created a new document 2200 px by 500 px.


Step 17

Find a logo or some text that you like and paste it into your scene. Scale it (Command/Ctrl + T) to fill the space.


Step 18

We will now create the individual stitches. If you are familiar with Illustrator, it may be easier to create them there (especially with the Blend Tool), but since this is a Photoshop Tutorial, I will create them in here. As you can see, I’ve changed the Opacity of the Logo layer so that it will be easier to see my work. On a new layer, use the Line Tool to draw stitches over your graphic as shown.

To cut down on your work, draw one line and make a copy of it (Command/Ctrl +J). Press Command/Ctrl + T to enter the Transform mode. Move the line up slightly and press enter to set the changes. Now press Command/Ctrl + Alt + Shift + T to repeat the transformation. Keep pressing this shortcut until you have a line of stitches.

This process will result in multiple layers. Make sure to merge these together then use these stitches to fill in the appropriate areas of your logo.


Step 19

Continue to draw in stitches for round areas of your logo.


Step 20

Now that we have a logo converted to lines, we need to make the ends of each line round. Add the Median Filter (Filter > Noise > Median) with a setting of 1 px.


Step 21

You may notice that the filter caused some stitches to blend together. Just use the eraser tool to clean up these areas. Now that the stitches are done, we can finish building our wallpaper.


Step 22

Load the stitches into our iPad Wallpaper scene and Transform (Command/Ctrl + T) into perspective on top of the fabric background. Make sure to turn on the guides to check how the positioning will look in both the horizontal and vertical orientations.


Step 23

We need to add the appearance of stitches raised above the surface. To do this, we will use the Liquify Filter to add a slight bend to the stitching. Go to Filter > Liquify and, with the Forward Warp Tool selected, set the Brush Density to 99 and the Brush Pressure to 10.


Step 24

Start with a Brush Size of 76 and start to push the stitches so that they appear raised. Work your way through all the stitches, changing the Brush Size as necessary.

The result should resemble this:


Step 25

Since we want the stitches to be white, go ahead and adjust the Levels (Command/Ctrl + L) using the bottom sliders.


Step 26

Make a copy of this layer and add the Noise Filter with an amount of 100%. Next, go to Filter > Blur > Blur More to soften the noise. This will give us that rough texture of a course stitch.


Step 27

Merge these two layers and rename to “Stitches.”


Step 28

To add some dimension to this layer, add the following Layer Style:


Step 29

Make a copy of the “Stitches” layer and rename it to “Shadow.” Remove the Layer Style and adjust the Levels (Command/Ctrl + L) until it is pure black. Position this new layer under the “Stitches” layer.


Step 30

Give this layer a Gaussian Blur of 14 px and set the Blending Mode to Multiply and the Opacity to 50%.


Step 31

Next, make another copy of the “Stitches” layer and add the following Layer Styles (note that we are replacing the existing Layer Styles by doing this):

The result should look like this:


Step 32

Rename this layer to “Stitch Texture” and use your arrow keys to nudge this layer up and to the right.


Step 33

With the “Stitch Texture” layer selected, Command/Ctrl-Click the layer’s thumbnail to select its contents.


Step 34

On a new layer, fill the selection with white. Add Noise with an Amount of 87% and go to Filter > Blur > Blur. Finally set the Blending Mode to Screen and the Opacity to 35%.


Step 35

To finish the stitches, make a copy the “Stitches” layer. Remove the Layer Styles and adjust the Levels (Command/Ctrl + L) until it is pure black—just like we did in Step 29. Move this layer below the “Stitches” layer and apply a Gaussian Blur with a setting of 1.8 px. Lastly, set the Opacity to 71% and nudge the layer down a bit so that it becomes more visible. This is a subtle effect that will help ground the stitches to the fabric.


Step 36

The last thing we need to do is apply a depth-of-field effect to the image. Start be merging a copy of the layers (Shift + Command/Ctrl + Alt + E).


Step 37

On a new layer, use the Gradient Tool with the Reflected Gradient option selected to make the following gradient.


Step 38

Select All (Command/Ctrl + A) and Copy (Command/Ctrl +C) this layer and go to the Channels Panel. Create a new layer in the Channels Panel and Paste (Command/Ctrl + V) the selection. We will use this newly created alpha channel when we add the Lens Blur.


Step 39

Go ahead and trash the gradient layer; we no longer need this. Select the merged scene and go to Filter > Blur > Lens Blur. Add the following settings:


Conclusion

Lastly, I’ve added a custom black vignette to finish the scene. Your image should resemble the following:


Envato Networking Event in New York City

$
0
0

If you live in or near New York City, we would like to invite you to join Psdtuts Editor Grant Friedman, Nettuts Editor Jeffrey Way, and Envato Marketplace Site Manager Mark Brodhuber for an informal networking event in midtown Manhattan with food, drinks, free t-shirts, and fun.

The event will be held on Wednesday, October 19 at Jack Demsey’s at 36 West 33rd Street (33rd Street between 5th and 6th Ave) in New York City.


RSVP

If you would like to attend you can RSVP on our Meetup or Facebook pages.

Note: Unfortunately, the event is for ages 21 and up. If you are under age, we apologize, but the venue won’t admit individuals younger than 21.


Inspirational Digital Art From Shadowness

$
0
0

Making a name for yourself in the design industry can be a challenging task. In addition to producing work that stands out from the pack, it’s also important to display your work in places where it will be seen. Today, we would like to introduce you to Shadowness, a place where you can upload and share your work with other designers. In this round up we have hand-picked some well-known artists from the Shadowness community and have displayed them below for you to enjoy. You may recognize some of these artists as Psdtuts authors, professional Photoshop users, and art collective members. Enjoy!


Wojciech Magierski (m4gik) – Divine Boundaries


Richard Roberts (Theotherstream) – Zen


Saad Moosajee (Saadart) – Invincible


Finn MacManus (finnianm) – Sovereign


Nekro – Music for my Eyes


Martin Grohs (grohsARTig) – Angel Tears


Jerico Santander (Jericosantander) – Own World


Jennifer Cirpici (JenniferCirpici) – Grow


José Paulo Amorim Reis (Zepaulo) – Aquarium World


Asdrubal Piedra Carvajal (asdrubalpc) – Dreamzcape


Wanchana Intrasombat (Victorior) – To the Waterfall


Andreas Zafiratos (albino-Z) – Nir Universe 003


Natascha Röösli (Kyena) – The Wax Dragon


Amanda Redmond (shebid) – Too Bright to See


Vincent Rhafael Aseo (Aseo) – Dance of the Ringwaltz


Sharon Milne (ChewedKandi) – Suicide Blonde


Roy Bourke (iGod) – The Never Ending Beat


Oliver Wetter (fantasio) – Call of Cthulhu


Maciej Zelaznowski (rabin) – I’m on a Horse


Leonardo Dentico (leox912) – Stairway to Heaven


Sketch a Spaceship in Perspective With Photoshop

$
0
0

Photoshop is an excellent tool for manipulating photographs but it can also be used as a means to create stunning digital art. This tutorial is part of a 25-part video tutorial series demonstrating everything you will need to know to start producing digital art in Photoshop. Digital Art for Beginners, by Adobe Certified Expert and Instructor, Martin Perhiniak will begin by teaching you how to draw in Photoshop. At the conclusion of this series you will know all you need to produce your own concept art and matte paintings in Photoshop.

Today’s tutorial Part 11: Sketch a Spaceship in Perspective With Photoshop will explain the three most important digital art skills that we have learned: sketching, drawing in perspective, and shading objects. In this lesson we will draw a concept sketch of a spaceship based on a thumbnail we did in the last tutorial. Let’s get started!


Create a Mystic Japanese Temple in Photoshop – Psd Premium Tutorial

$
0
0

In this Psd Premium tutorial, author Tony Aube will demonstrate the process needed to create a mystic Japanese temple. We’ll learn a lot of professional and advanced image blending techniques and we’ll get to play with some new and powerful features from Photoshop CS5. This tutorial is available exclusively to Premium Members. If you are looking to take your photo manipulation and composition skills to the next level then Log in or Join Now to get started!


Professional and Detailed Instructions Inside

Premium members can Log in and Download! Otherwise, Join Now! Below are some sample images from this tutorial.


Final Image


Psd Premium Membership

Our premium membership gives members access to the Source files for tutorials as well as periodic extra tutorials, like this one! You’ll also get access to Net Premium and Vector Premium, too. If you’re a Premium member, you can Log in and Download the Tutorial. If you’re not a member, you can of course Join Today!


Realistic Portrait Retouching With Photoshop

$
0
0

Today’s designers and photographers need to have a varied skill set that sets them apart from the pack. One common skill that both can use is portrait photography retouching. This tutorial will make you a more effective retoucher and help keep your portraits looking clean and realistic. Subtlety is – going too far will only make the results noticeable. The best comment you can get after presenting a final image is "I didn’t even notice you did that". Let’s get started!


Tutorial Assets

The following assets were used during the production of this tutorial.


Step 1

Step 1 does not involve using a tool at all. Before you start retouching an image, you should open and evaluate the image and come up with a mental roadmap of what need be done. I’ve illustrated the steps necessary to retouch this portrait below.

The areas to retouch are: 1. Age spots, skin blemishes and other skin issues; 2. Forehead wrinkles; 3. Laugh lines and deep wrinkles; 4. Bags under eyes and crows feet; 5. Thinning eyebrows; 6. Stained teeth


Step 2

First, we need to work non-destructively. Duplicate the layer in the Layers Panel, by either dragging the background layer to the New Layer icon at the bottom of the Layer Panel, or by using the keyboard shortcut Command/Ctrl + J to duplicate the Layer Via Copy. This will give us "Layer 1". Double click the layer name and rename "Retouched". This will be the layer we will do all our retouching on, leaving the Background untouched.


Step 3

The first tool we will be using is the Spot Healing Tool shown in the Tool Bar below or with the tool shortcut "J".

The Spot Tool utilizes local texture and tone to blend over flawed areas in your image. There are several settings in the Options Bar at the top of your window. There are only two that we are going to need to focus on however. The first is the Brush Picker (1) and the Type (2).

First, Access the Brush Picker via the drop down arrow on the right side of the button. The only control we need to adjust in this window is the Hardness, which we will set it to 50%. 50% will blend the tool with the existing image better than 100%, which looks like a paper punch, but will not soften the brush too much. 0% will blend too much and diminish the effectiveness of the tool. Hit enter/return to exit the window – do not click off to the side to close the panel or you may accidentally affect your image. Next, make sure you are on "Proximity Match" for this portion of the tutorial. Photoshop CS5 has an added feature – "Content-Aware", but we are not going to use that (yet).

We are now ready to start retouching the image. The Spot Tool is a brush-based tool and only needs to be slightly larger that the small flaws we are repairing. To adjust the brush size, use your bracket keys to change the size. Left bracket [ makes the brush smaller and right bracket ] makes it larger. (You can also adjust the hardness by adding the Shift key, but we want to keep this at 50%). Center your brush over your flaw, click and release. It should cover the flaw and blend in flawlessly. If it does not, make sure that your brush is properly sized and that you are not overlapping another texture, like hair or darker skin tones, etc.

Repeat this step until all skin small blemishes are removed. If you have larger areas (the vein on the cheek) leave those for now, and concentrate on smaller spots, freckles, moles, etc. Remember to adjust the brush using the bracket keys as you go. Keep it small – if you increase your brush size tool large, the tool will fail by mixing too much information and you will end up with a mess. No worries, there are tools designed for larger areas.


Step 4

After repairing the small spots, it’s time to move up to the larger flaws – forehead wrinkles, larger skin defects and laugh lines. To repair these areas, we will be using the Healing Brush Tool, which can be found under the Spot Healing Tool. Click and hold on the tool in the toolbar to access the additional healing tools. The Healing Brush tool repairs similar to the Spot Tool, but it splits the workload in two. Texture is now designated by the user (you) and tone is blended locally after you use the tool.

Once you select the tool, again access the Brush Picker in the Options Bar and make sure the Hardness is set to 50%. Make sure the "Align" option is checked to the right of the Options Bar. You can use the bracket key shortcut to change the size as needed.

We will start with the forehead wrinkles. Move your brush to a clean area of skin texture – usually you can find this between the wrinkles. We want to make sure that we have enough room to move and not run into other textures, like his hair or other wrinkles.

Hold down your Opt (Mac)/Alt (PC) key and click once to designate the texture source. Then take your tool and align the brush over the beginning of the wrinkle. Change your brush size to a size slightly wider the wrinkle. Click and hold, then brush across the flaw. Notice that your source icon is following your every move, offset based on your source. Try to paint in one mouse-click if possible, but if you notice that your source is getting close to another texture, you can release. When you release, the tool blends the tone locally making the new texture blend in with the existing surroundings. The "Align" feature will keep your source offset exactly where you designated it, until you choose another source. With each flaw, you should Opt/Alt-Click another source area and then paint over the flaw.

For the laugh lines, align the source slightly above the flaw and offset enough that you can paint over the entire wrinkle in one motion. Cover the initial wrinkle first, then blend the tone with additional strokes. Always be aware of your surroundings. If you get too large of a brush, you could accidentally blend in the lighter color of the mustache or other areas. Adjust your size as needed.


Step 5

The eyes present the biggest challenge on any portrait. Flaws are usually are so close to the eye and other areas (eyelashes, eyebrows, etc.) that using the Healing Brush is almost impossible given the size constraints. This is where the Patch Tool comes in. The third healing tool of the group, the Patch Tool is not brush based at all- it is selection based. Choose the Patch Tool under the Healing Brush Tool in the Tool Bar.

The only setting we have to check on this tool is that it is set to "Source" in the Options Bar.

Start by using the Patch tool to make a selection around the bag under the right eye. I like to dissect the eye wrinkles into sections. This gives me a more effective result than trying to select around the entire eye at one time.

Next click and drag the selection to a clean area of skin texture, like the forehead, and release. The new texture blends with the local tone and the wrinkle is gone. Repeat around the eye, selecting sections (left, right, top, bottom) individually and dragging the selection to a clean texture source.


Step 6

After you have the eyes completed, this is what the finished "Retouched" layer should look like:

But as you can see, this looks completely unrealistic. The trick is to use a Layer Mask to blend the original image back into the retouched layer.

Start by clicking the Layer Mask button at the bottom of the Layers Panel. This will give you a Layer Mask on the Retouched Layer.

Then, using the Eraser tool we will blend back in some of the flaws from the original image. Set your background color to Black (or hit "D" for default colors) and change your Eraser opacity to 33%. Make sure you are using a soft-edged brush (at least 50% Hardness).

Start by erasing over the laugh lines in one stroke. Choose a brush size that will encompass the flawed area. This will slowly bring back the flaw. I like to go over the entire wrinkle once, then on the second pass starting at the nose, I go halfway down the wrinkle giving it 66% coverage. Lastly I go right next to the nose on another pass making it 99%. This technique fades the wrinkle away as it moves further away from the nose. Repeat on the other side.

For the eyes, I use the same technique, but start at the corner of the eye closest to the nose and blend away from the nose. Remember to build slowly back into the area, we do not want to bring the entire flaw back at 100%. For the crows feet, I only went with one pass since they were so defined.

This is how the blended face looks after masking:


Step 7

After blending the face, I noticed that his eyebrows were pretty thin and I wanted to add some more definition back into that area. We can do this using a new process in Photoshop CS5 – Puppet Warp. First, make a selection around his beard using the lasso tool like so:

Next click on the Retouched layer icon in the Layers panel (deselecting the mask) and duplicate the selection onto a new layer using Command/Ctrl + J. Name the layer "Eyebrow". Move the image up to the eyebrow area and rotate to the approximate angle using Edit > Transform.

Next, go to Edit > Puppet Warp. This will create a mesh over your eyebrow. Click on the two ends of the eyebrow, dropping pins on the mesh. Click and drop a third pin in the middle of the eyebrow.

Click and drag the pins to warp the eyebrow to match the contour of the existing shape. And hit Enter/Return to accept the warp.

Finally, drop the opacity on the Eyebrow layer and using a soft eraser, blend the edges of the new eyebrow to the portrait. Repeat the steps for the other eyebrow.


Step 8

To whiten the teeth, simply make a rough selection using the lasso tool. Next, go to the Adjustments Panel and create a new Hue/Saturation Adjustment Layer.

Adjust the Saturation setting to the negative side, desaturating the yellow teeth. Do not go too far, you still want some color. Adjust brightness if needed. Do not adjust the Hue.


Final Image

Here is the final image. Wrinkles are nice and blended, new eyebrows for our friend and a whiter smile.


Take the 2011 Web Design Survey for a Chance to Win!

$
0
0

Do you design websites? Got five minutes? We want to hear from you! Take the 2011 Web Design survey hosted by Rockable Press and Webdesigntuts+ and get the chance to win the grand prize: an Apple iPad 2 and the entire library of Rockable Press e-books. What’s more, we’ll give every respondent a 50% off coupon for the up-coming book just for participating! Interested? Take the survey and read on for details.

Last year, we polled 3,200 FreelanceSwitch readers on the hard truths of freelancing. The data from that survey eventually became the basis of Freelance Confidential, published by Rockable Press, which explored questions every freelancer asks: How much to charge? Where to find work? How are other freelancers working? This time around, we want to explore the state of the web design industry, but we can’t do it without your input. With a brand new survey for those who design websites, it’s your turn to have your say!


The Details

We’re working on a brand new book to give the inside scoop on the web design industry–but we need your help! We need the input of everyone who designs websites on common questions: How exactly do you work? Where do you find inspiration? What makes a good web designer?

To participate, simply take the 2011 survey on web design–open to anyone who creates websites. Whether you’re a full-time web designer working in industry, a freelancing pro, or simply design websites on the side, we want to hear what you think! And make sure you enter your email so you can receive your coupon and be entered in the grand prize drawing.


The Prizes

To thank you for participating, every respondent in the survey will receive a 50% coupon for the ebook edition of “Web Design Confidential,” published by Rockable Press. What’s more, you’ll be entered to win the grand prize, which includes the ENTIRE Rockable Press e-book library. That’s a copy of every current title in the Rockable library, 20 books valued at over $500. And you’ll need something to read all those great books on, so you’ll also win a brand new 32GB wifi Apple iPad 2! That’s a grand prize valued over $1100 USD.


The Fine Print

  • Although it’s optional in the survey, you must provide valid email address to receive your coupon and enter the grand prize drawing. (Email addresses will ONLY be used to deliver coupon and notify winner of grand prize drawing. We respect your privacy!)
  • You only need to complete the survey once. Grand prize drawing only eligible once per participant. Multiple entries will be disqualified from the grand prize drawing.
  • The winner will be randomly selected from survey participants directly following the close of the survey. Winner will be notified via e-mail and given one week to respond.
  • The winner will be announced on Webdesigntuts+ once confirmed.
  • If winner is unable to easily receive a prize shipment in his or her country of residence, Rockable Press reserves the right to award an equal cash value instead.
  • 50% off coupon will be awarded once per participant and is good towards any e-junkie purchase of “Web Design Confidential,” sold by Rockable Press. Coupons will be emailed to participants once the book is available and will be eligible for a limited time after launch.
  • Employees and staff of Envato are not eligible to win.

So what are you waiting for? Head on over and take the 2011 Web Design survey to let us know what you think!


Test Your Photoshop Knowledge #3

$
0
0

We know how much you guys like to test your knowledge of Photoshop so today we are giving you an opportunity to do so with another quiz from Martin Perhiniak. Please take a moment to complete this 10-question quiz and see if you’re prepared to pass our test! Good luck!

Editor’s note: this quiz is for Photoshop CS5.


30 Days to Learn HTML and CSS: a Free Tuts+ Premium Course

$
0
0

If you’ve ever wanted to learn how to build websites and web apps, HTML and CSS are the first skills you should learn. They are so fundamental that we believe everyone has the right to learn these skills for free.

We set ourselves the challenge of designing the most effective and enjoyable way to learn HTML and CSS in one month. The result is 30 Days to Learn HTML and CSS, a free Tuts+ Premium course. We’re really excited to share this with you today! (Plus, get a sneak peek at the new Tuts+ Premium.)


How it works

30 Days to Learn HTML and CSS is a thirty-day video course designed to be completed over one month. Veteran web developer and trainer Jeffrey Way will take you through a new topic each day, giving you the building blocks you need to eventually code an entire website based on a PSD design.

If you’ve ever wanted to learn HTML and CSS, but either didn’t have the time, didn’t know where to start, or didn’t quite ‘get it’, we’re pretty sure you’re going to love this free course. All you need to give us in return is 10 minutes a day to go through each video and build your knowledge.


Part of the new Tuts+ Premium

In the next few weeks we’ll be launching a complete reinvention of Tuts+ Premium, including a massive redesign and UX overhaul, member forums, a library of eBooks and in-depth courses teaching you skills from the inside out.

We’ve also drastically improved the way you access the content you know and love, with the ability to quickly filter content based on topic, difficulty, format, and estimated completion time.

30 Days to Learn HTML and CSS is one of the courses that will be available as part of the new Tuts+ Premium. This course is free, but the rest of the courses are available to members. We’ll be covering topics like HTML5, CSS3, WordPress, digital painting, web design and web typography.

For now, here are a few glimpses at the new Tuts+ Premium!


Selecting a topic allows you to filter by sub-category, format, difficulty, and estimated completion time.

Members can view content in their browser, rather than having to download it.

Full members get access to educational eBooks worth more than $400.

One of many upcoming courses.

Juicy tabs!

Stay up to date and win a 5-year scholarship

If you’re a Tuts+ Premium member and want to be notified about the new Tuts+ Premium, or an interested non-member who’d like to learn more, you can sign up to our notification list. Every subscriber will have the opportunity to win one of 10 x Five-year scholarships to the new Tuts+ Premium, including access to 670+ tutorials, top-selling eBooks, 1,201 source files and a library of in-depth courses.

To get notified and learn more about the competition, join the web design and dev courses mailing list.


How to Paint Clouds With Photoshop

$
0
0

Photoshop is an excellent tool for manipulating photographs but it can also be used as a means to create stunning digital art. This tutorial is part of a 25-part video tutorial series demonstrating everything you will need to know to start producing digital art in Photoshop. Digital Art for Beginners, by Adobe Certified Expert and Instructor, Martin Perhiniak will begin by teaching you how to draw in Photoshop. At the conclusion of this series you will know all you need to produce your own concept art and matte paintings in Photoshop.

Today’s tutorial Part 15: How to Paint Clouds With Photoshop will explain how to paint a simple scene that features some friendly clouds on a blue sky using the Brush Tool, Mixer Brush Tool, and Dodge and Burn Tools. Let’s get started!


Did You Catch Photo Effects Week?

$
0
0

Last week we published a bumper series of photo effects tutorials, teaching you about amazing photo portrait retouching techniques, colour correcting photographs, how to create a photo montage, photo cut-outs, and much more… We’ve also announced a fantastic competition for you to show off the techniques that you’ve learned (you still have time to enter!). Read on to see a quick summary of the tutorials published over the course of the week!


Photo Effects Week Tutorials

  • Photo Effects Week: Create a Lamb’s Coat in Photoshop

    Photo Effects Week: Create a Lamb’s Coat in Photoshop

    This week we are celebrating the launch of PhotoDune, Envato’s new stock photography website with a series of photo effect and photo manipulation tutorials that showcase the images from our new marketplace. In this tutorial we will demonstrate how to create a lamb’s coat in Photoshop using several stock photos that are available for free for Psd Premium Members. Let’s get started!

    Visit Article

  • Photo Effects Week: Create a Cutout Photograph in Photoshop

    Photo Effects Week: Create a Cutout Photograph in Photoshop

    This week we are celebrating the launch of PhotoDune, Envato’s new stock photography website with a series of photo effect and photo manipulation tutorials that showcase the images from our new marketplace. In this tutorial we will demonstrate how to create a cutout photo using simple selections and advanced transformations. The photos used in this tutorial are available for free for Psd Premium Members. Let’s get started!

    Visit Article

  • Photo Effects Week: Turn a Portrait Photo Into a Painting

    Photo Effects Week: Turn a Portrait Photo Into a Painting

    This week we are celebrating the launch of PhotoDune, Envato’s new stock photography website with a series of photo effect and photo manipulation tutorials that showcase the images from our new marketplace. In this tutorial we will turn a photo into a digital painting using several techniques to achieve a mixed media look. For this workflow you don’t necessarily need to be good at freehand drawing as we won’t start from scratch but use the photo as the base of our artwork. The photo used in this tutorial is available for free for Psd Premium Members. Let’s get started!

    Visit Article

  • 20 Photo Manipulation and Montage Tutorials for Photoshop

    Photo Manipulation and Montage Tutorials for Photoshop

    This week we are celebrating the launch of PhotoDune, our new stock photography marketplace. Today, we want to present you with a list of some of our favorite photo manipulation, photomontage, and photo effect tutorials from our site and across the web. We hope that this list will inspire you to create some fantastic photo-based designs of your own. Please take a look, and enjoy!

    Visit Article

  • Color Correcting Photographs Using the Curves Adjustment

    Color Correcting Photographs Using the Curves Adjustment

    There are a number of ways that you can color correct an image in Photoshop. The method that we are going to be demonstrating in this tutorial is through the use of a curves adjustment layer. Some of the advantages of using a curves adjustment layer for this type of correction is that the image file size is minimally impacted and you can easily go back at anytime to modify your adjustments if your not satisfied with the results. Let’s get started!

    Visit Article

  • Photo Effects Week: Create a Fantasy Miniature World in Photoshop

    Photo Effects Week: Create a Fantasy Miniature World in Photoshop

    This week we are celebrating the launch of PhotoDune, Envato’s new stock photography website with a series of photo effect and photo manipulation tutorials that showcase the images from our new marketplace. In this tutorial we’ll demonstrate how to create a miniature world using some interesting techniques. Many of the photos used in this tutorial are available for free for Psd Premium Members. Let’s get started!

    Visit Article

  • Photo Effects Week: Create a Print-Ready Environmental Poster – Psd Premium Tutorial

    Photo Effects Week: Create a Print-Ready Environmental Poster – Psd Premium Tutorial

    This week we are celebrating the launch of PhotoDune, Envato’s new stock photography website with a series of photo effect and photo manipulation tutorials that showcase the images from our new marketplace. In this Psd Premium tutorial, author Mark Mayers will walk you through the entire process of creating a poster design with a strong environmental message. You’ll use Photoshop to assemble the illustration, then add the text and graphics with InDesign to produce error-free artwork.

    Visit Article

  • Photo Effects Week: Apply a Color Effect to a Photo

    Photo Effects Week: Apply a Color Effect to a Photo

    This week we are celebrating the launch of PhotoDune, Envato’s new stock photography website with a series of photo effect and photo manipulation tutorials that showcase the images from our new marketplace. In this tutorial we will learn how to apply a color effect to a photo. The photo used in this tutorial is available for free for Psd Premium Members. Let’s get started!

    Visit Article

  • Photo Effects Week: Use Curves Adjustment to Turn Day Into Night

    Photo Effects Week: Use Curves Adjustment to Turn Day Into Night

    This week we are celebrating the launch of PhotoDune, Envato’s new stock photography website with a series of photo effect and photo manipulation tutorials that showcase the images from our new marketplace. Adjustment layers are a powerful feature in Photoshop. They prove their usefulness time and time again. In this tutorial you will use a Curves Adjustment layer and additional techniques to change a scene from day to night. Let’s get started!

    Visit Article

  • Photo Effects Week: Create a Planet Using Photoshop’s 3D Capabilities

    Photo Effects Week: Create a Planet Using Photoshop’s 3D Capabilities

    This week we are celebrating the launch of PhotoDune, Envato’s new stock photography website with a series of photo effect and photo manipulation tutorials that showcase the images from our new marketplace. The 3D tools in Photoshop CS5 Extended make it easy for anyone to add 3D elements to their images. In this tutorial you will create a planet using a 3D Sphere, and utilize the new Repousse feature to extrude objects in 3D space. Let’s get started!

    Visit Article

  • Show Off Your Talent! Enter the PhotoDune Photo Manipulation Competition

    Show Off Your Talent! Enter the PhotoDune Photo Manipulation Competition

    Last week we celebrated the launch of PhotoDune, Envato’s new stock photography marketplace with a series of photo effect, photo manipulation, and photo montage tutorials. Now that Photo Effects Week has come to an end, we wanted to give you the opportunity to put your newly learned skills to the test with a Photo Manipulation Competition that is open to all Psdtuts+ readers.

    Visit Article


Boost Your Income with PhotoDune

Envato’s top authors make between $20,000 and $40,000 per month selling stock! Imagine shooting the images you want, when you want, making passive income whether you’re working or not. Some of our authors sell stock in their free time as a hobby, some do it to get their name out there, and some are able to make it their full time profession.

PhotoDune has an amazing community of photographers, and is the perfect place to sell your images as stock photography. Whether you’re completely new to the concept, or already have a catalog of thousands of images — we think you’ll find the site a pleasure to use. A few good places to start might be look at the top selling images, checking out our author guide, or dropping by the forums.

If you’re ready to learn more, take a look at how to sell your work on PhotoDune. Otherwise, I hope you enjoy the bumper week of photo effects content above!


Create a Scrap Metal Text Effect in Photoshop – Psd Premium Tutorial

$
0
0

Many of you may use 3D applications to help you generate or extrude text for your designs. While 3D applications are always an acceptable solution, many times, Photoshop can accomplish the same effect without the help of third-party apps. In this Psd Premium tutorial, author Wojciech Pijecki will create 3D lettering using Photoshop CS5 and some stock photography. This tutorial is available exclusively to Premium Members. If you are looking to take your typography skills to the next level then Log in or Join Now to get started!


Professional and Detailed Instructions Inside

Premium members can Log in and Download! Otherwise, Join Now! Below are some sample images from this tutorial.


Final Image


Get Instant Access to Tuts+ Premium

Joining Tuts+ Premium will get you instant access to this tutorial as well as all the premium content in our archives. In addition, you’ll have access to all the source files for all of our free and premium content. You will also have free access to the premium content of all the other sites in the Tuts+ Network. If you’re already a premium member, Log in and download the tutorial. Otherwise, you can Join Today!


Create a Powerful Human Disintegration Effect in Photoshop

$
0
0

In this tutorial we will create a powerful, and emotional human disintegration effect in Photoshop. Let’s get started!


Tutorial Assets

The following assets were used during the production of this tutorial.


Step 1

Let’s start by creating a new document in Adobe Photoshop. Choose the size of document you prefer, but try to keep it in a vertical shape, with a transparent background.


Step 2

Then, find a good stock image of a cloudy sky that you can use as a background. You can also do like I did by interweaving several pictures of clouds to create the background you prefer. Make sure that the clouds are "dark" enough for a final atmosphere that will fit with the other elements you will be adding to your creation.


Step 3

The next step is very important since you will have to choose the character that will be the main focus of your whole piece. To do this, go to websites like SXC, Fotolia, iStock, etc.., and choose a model that projects a strong emotion. Be sure to pick a character that really inspires you, as it will be the main focus of your creation and it will play a major role in your final outcome. Once you’ve selected it, cut out the character carefully by using the pen tool (P) and place it in the middle, slightly shifted downwards.


Step 4

Then, using the eraser tool (E) with the “Splatters” shape – which can be found in the tutorial assets – slightly erase the character’s legs.


Step 5

Now, if you are like me and like to change your character’s colors, take the lasso tool (L) and surround the selected areas from your character that you would like to modify. Afterwards, create a layer of fill or adjustment by clicking on the black and white circle situated in the layers tab. In the said tab you will be able to select the method that suits you best. I personally recommend changing the colors with a Gradient Map layer and a Selective Color layer. A tip: avoid fluorescent colors and choose those that resemble your background’s colors.


Step 6

Always with the “Splatters” shape, take your brush tool (B) and, on another layer, create shapes that go above, but also behind the model, as seen in the picture bellow. It is important to use the same colors and shades that you’ve used on your character to create the desired effect of disintegration.


Step 7

There are numerous ways to give a darker aspect to your character and create the impression that he is possessed. Personally, I usually prefer to draw intense red veins on his arms, neck and face, as well as slightly darkening the eyes and mouth with a small black brush adjusted to “Soft Light”.


Step 8

Here, I decided to create a necklace that will later have a supernatural look, suggesting that the character is flying up due to the strength of the accessory. Everything is done with a small brush, by using a graphic tablet.


Step 9

Now this step will give the necklace a supernatural look. In order to achieve that, you will need to create "power waves" emitting from the necklace. On another layer, apply a white area on the necklace using a soft round brush, and then with a smaller soft round shape, erase the middle of that white area. When it’s done, “double click” on the layer to open the “Layer Style” box and enter the data as shown in the picture. Once you’ve done all that, duplicate the layer (Command/Ctrl + J) twice and make them bigger than the previous one. Remember, the more the wave is away from the necklace, the more it’s big and less opaque.


Step 10

To complete the work on the necklace, select the shapes titled “Light” available in the tutorial assets, select your brush (B), and on another layer create a white "light beam" effect coming out of the necklace.


Step 11

With the same brush shapes, create a white "light beam" effect coming out of the model’s torso, as shown in the image. This effect will give out the impression that your character is liberating some sort of supernatural strengths while disintegrating.


Step 12

Now that most of the work on the character is done, you will need to work a little bit more on the atmosphere. With the fill or adjustment layer, at the bottom of the layers tab, darken the colors and make them closer to those of your character. Again, there are several ways to do so, but I suggest the Gradient Map layer and the Selective Color layer.


Step 13

Afterwards, put some action in the scenery by adding meteors coming down from the top. You will find a pack of meteorites in the tutorial assets. Insert them one by one, making sure that their sizes vary and that their colors stick with the atmosphere.


Step 14

This next step will consist in using the blur tool on the meteorites to make them look either close or far. Those that will be situated at the same distance as your character will remain untouched. Basically, the more a meteorite is far from the model, the greater the blur.


Step 15

Now, take the Smudge tool with strength of 5 to 10% and apply it on each of the meteorites, using little movements from bottom to top, to give them a speed effect.


Step 16

To create a source of light coming from above of your character’s body, take a white brush tool (B) with the same “Light” shape used in Step 10 and 11. It is important that the rays coming from above are more intense than those coming from your character’s torso. You can also draw various small shapes that follow the same rays’ movements to make it look more magical.


Step 17

Once you’ve completed the previous step, return to your character to improve it. With the presence of the new light source from above of your character’s body, you must increase the light reflected on its torso and face area by using a soft round white brush adjusted to “Overlay” mode.


Step 18

Now, draw some light effects passing around your model’s body so he can be integrated better within the scenery and be surrounded by more power.


Step 19

You can always add more “Splatters” if you find that the model does not disintegrate the way you want it to.


Step 20

To finalize everything, you can return to the colors, contrast and even intensify the bright areas with the same techniques you’ve used before. Basically, this step consists in putting your last personal touch to your piece! When you feel that your piece is finished, use a sharpness filter, to ensure a better overall quality, by duplicating your final image and by going to Filter > Sharpen > Sharpen.


Final Image


Adobe Adds New Choices With the Adobe Creative Cloud; Changes Upgrade Policy

$
0
0

Earlier this week, Adobe revealed some new details about the Adobe Creative Cloud, a new initiative that they believe will "radically redefine the creative process." It will allow users to purchase a subscription for most of Adobe’s products for about the same price as your current monthly mobile phone plan. In addition, Adobe also announced some changes to their upgrade policy. In this article, we’ll explain what this means for you and how it may affect your plans to upgrade to the next version the Adobe Creative Suite.

What exactly is the Adobe Creative Cloud? The Adobe Creative Cloud is a subscription service that will give you access to every tool that is currently in the Adobe Creative Suite Master Collection such as Photoshop, InDesign, Illustrator, Dreamweaver, Premiere Pro, After Effects, as well as all the apps that are currently in beta such as Adobe Edge and Muse.

You will also have access to the following touch apps including: Adobe Collage, Adobe Kuler, Adobe Carousel, Photoshop Touch, Adobe Debut, Adobe Proto and Adobe Ideas.

In addition, they are also giving members access to the Adobe Publishing Suite for building interactive publications on tablets, and even access to cloud-based fonts from their recent acquisition of Typekit. You will also be able to use their community collaboration features to share your work with other creative cloud members.

Membership to the Adobe Creative Cloud will cost you $49.99 per month for individuals and $69.99 per month per seat for workgroups, both for an annual plan.

What does this all mean? It means that you will be able to rent Adobe’s tools for a monthly fee and use them in the cloud. Subscribers will be able to use any of Adobe’s tools anytime, anywhere, on any computer.

Update: It appears that many of the Adobe apps will not be cloud based. From the FAQ page:

The components included in the Adobe Creative Cloud membership are accessed in multiple ways and are not all “in the cloud.” First, the Creative Suite products will not be cloud based; in fact, the CS applications, Adobe Edge, and Muse will continue to be installed directly on your computer just as they are today. You will not need an ongoing Internet connection to use these products on a daily basis. The Adobe Touch Apps will be downloaded onto your tablet from the Android Marketplace or the Apple App Store. The Digital Publishing Suite and Business Catalyst services are accessible on the Internet. And lastly, the file syncing and sharing features will be in the cloud.

This may be exciting news for those of you who would like to use the latest Adobe apps but can’t afford to invest in the full suite of products, but what about those of you who would prefer to install a local copy of the software on your machine?

The good news is that Adobe will still stick with their current licensing model. So if you would like to purchase your own local copy of the software, you’ll still have that option. The change will be the way in which you can qualify for future upgrades. In order to qualify for upgrade pricing for CS6, you will need to be using CS5 or CS5.5. If you’re not using those versions, Adobe is offering a 20% discount through December 31, 2011 on CS5.5, which would then qualify you for upgrade pricing.


What Does This Mean for You?

Adobe has certainly given us some new options to choose from. The Creative Cloud is an exciting new product that will give us lots of flexibility. Cloud users will never need to upgrade again as long as they maintain their subscription to the cloud. You will also get all the benefits associated with working in the cloud: all your Adobe apps on any machine, across all platforms, both Mac and PC, anywhere in the world. And don’t forget all the touch apps, Typekit, and more.

While there certainly are some new added benefits of the cloud, those of you who prefer to work locally may be at a disadvantage, especially if you chose not to upgrade to CS5. Their new upgrade policies mean you’ll have to upgrade to every new version if you don’t want to pay full price for the full version of the suite the next time around.


What Do You Think?

Tell us your thoughts. What do you think of these new announcements? How will this announcement affect you? Will you be more likely to upgrade? Will you subscribe to the cloud or do you prefer the traditional licensing method?


Interview With Designer Gianluigi Di Giacomo

$
0
0

Gianluigi Di Giacomo is a 21 year old designer with a stunning portfolio. In our interview Gianlugi discusses his process for creating artwork as well as how he initially discovered Photoshop. A lot of great tips and advice are shared in this interview so make sure to check it out.


Q Welcome to Psdtuts+, please introduce yourself. Could you tell us where you’re from and how you got started in the field?

Hello, my name is Gianluigi Di Giacomo, I’m from Italy and I’m 21 years old. My relationship and love with the design world had a pretty random beginning; it all started from a basic error, everything was born from my need to change my school sector at the age of 16 after realizing that a 13 year old does not have the maturity to understand "just what kind" of education he wanted (In Italy, there isn’t the general high school, but school sectors that you have to choose when you are 13 years old). I needed to find something new and that could stimulate me, so the only viable alternative in my view was the art school.

Art has always been present in my life, I entered midway through the third year in the advertising class led by professor Clemente Francavilla (sort of a guru) and I was almost immediately caught by the design world. I began to comb through books, search the web for sources of inspiration, watch my surroundings with a different perspective; I was like a sponge. The rest came naturally, starting from tag making to then matte painting, up to the IN10 release and now this interview.

Q What made you first start doing digital and matte paintings? If you can recall what did your first painting look like? How have you evolved since then?

The story is very simple, my friend, who is also a digital artist (Domenico Carella) showed me the work of Zach Bush taken from a S3 Exhibition, and I was just breathless. I was so captivated by the world of matte painting that it led me to immediately leave tag making (where I had achieved good results) to start working on this kind of work. Obviously I had no idea the amount of work waiting for me! My first job was a simple scenario sci-fi that turned out pretty bad, but at that time it seemed like a masterpiece from my point of view. I began to try and improve in an obsessive way; I had found what I wanted to become my job. Needless to say that in these two years, I devoured many tutorials and psds. I should also thank the Intrinsic Nature crew, they gave me a lot of great help.

Q A lot of your illustrations are shots of scenery in futuristic, and foreign lands. What exactly draws you to painting these types of scenes?

Since childhood I have always loved the world of science fiction and fantasy, I was a big fan of sagas such as Star wars and games like Zelda and Final Fantasy. I’ve always been fascinated by the scenarios and the settings of this particular genre, and from my early work I tried to approach this type of work. Being able to create something that would otherwise be impossible to see and admire was always something exciting for me, this is the main reason why I love to create these landscapes. To tell the truth in this last period I’m going to try something different and try out new styles and to challenge myself. Even though, as they say, you cannot forget your first love.

Q Most designers in your field use PC Tablets, what exactly do you use and how is it more efficient compared to the other products out there?

To be honest I do not have many opportunities to make comparisons, I use a Wacom Bamboo fun pen & touch A5 and I must say I find myself just fine. Of course I am sure an Intuos is certainly an excellent product, but I think to start with a Wacom bamboo pen is enough to get a feel for the tablet.
The product range is so varied that I think it’s more than easy to get lost. The important thing is to know what you are looking for.

Q “The Fallen Empire” takes the viewer to a beautiful realm of fantasy that is unique to your style of art. Please walk us through how you created this illustration and what exactly is going on in it.

When I started working on “The Fallen Empire” I wanted to create a piece with a strong emotional impact. An illustration that could transport the viewer within this scenario. The scene is very simple, this work depicts a knight in search of the origin, he ventures within an empire now fallen from which his descendants hailed.

The realization of this work has lasted several weeks, I wanted to create something special for the IN10 pack and I wanted to venture into a fantasy matte painting. I made some sketches on paper but none of them impressed me, until I found a stock base that I liked. As it begins the phase of sketches on stock base ideas have come out by themselves, of course, there have been several reviews, especially in terms of composition, but in the end I stuck to the original, the sense of loneliness, the epic atmosphere and drama of the work, communicating the right mix of feelings. The whole Intrinsic Nature community also helped me out to further develop this piece.

Q What is one of the most important lessons you have learned that you have applied to your paintings and designing?

During my personal journey, I realized that to get good in the graphics industry, as well as in all others, you must have your own method of work or at least an order of mind. If you have a precise and methodical working process, this gives you the opportunity to carry out work really recognizable with your own identity, and then you are able to update your working process with new techniques and tricks, in an orderly manner, being able to fully learn the steps.

I personally try to rename each layer inside of my psd, and catalog them in areas such as macro sketch, composition, color, quality and end-end adjustments. This way I can make the psd very understandable, so you can review even after many months in order to see the steps used in a particular job, and see the differences or improvements over previous ones. In short it is a kind of archive, and this helped me a lot to improve.

Q What are some of the current projects you are working on? And what can we see from you later in the year?

In the near future I plan to work on some personal projects for new releases of Intrinsic Nature. Also trying something new and fresh that goes beyond my usual matte painting. I recently worked with the Metadesignstudio Beijing and I hope to find other work to freelance where I can apply what I learned at a professional level.

Q Thanks again for providing Psdtuts+ with this opportunity to interview you. Any final thoughts for our readers?

Thank you for this opportunity, I’m a fan of Tuts + and is a pleasure for me to speak to the community.

I would first like to thank everyone who has come to read this entire interview with me, I can not give real advice but just say to all those who plan to approach the world of matte painting to learn to assimilate and to observe all that surrounds them and everything that can be a source of inspiration, from a simple landscape, a sunset, or a painting. Everything could help you grow and improve your sensitivity and your creativity. The important thing is to do everything with patience and passion and not chasing the results as a final goal, so “enjoy the journey” and not just the goal.


Where to find Gianluigi on the Web


Create a Winter-Themed Holiday Card in Photoshop – Tuts+ Premium Tutorial

$
0
0

In this Tuts+ Premium tutorial, author Stephen Petrany will demonstrate how to use various techniques to create a winter-themed holiday card in Photoshop. This tutorial will creatively utilize Photoshop filters and transformations to create a fantastic winter illustration. This tutorial is available exclusively to Tuts+ Premium Members. If you are looking to take your design skills to the next level then Log in or Join Now to get started!

Tuts+ Premium Members can login now for instant access to this tutorial. Membership to Tuts+ Premium gets you access to hundreds of exclusive premium tutorials, top selling ebooks, in-depth courses, member forums, and much more. To learn more about Tuts+ Premium, Take the Tour or Join Today.


Best of Tuts+ in November 2011

$
0
0

Each month, we bring together a selection of the best tutorials and articles from across the whole Tuts+ network. Whether you’d like to read the top posts from your favourite site, or would like to start learning something completely new, this is the best place to start!


Huge Improvements to Tuts+ Premium

As many of you know, Tuts+ is accompanied by an online educational membership called Tuts+ Premium. We’re very excited to announce that the membership has received a huge upgrade, including a new library of courses, 27 top-selling educational eBooks, member forums, and a completely redesigned UI.

You can check out all the changes here, and find out about all the fantastic new content available!

Our new premium website is a drastic improvement over the old system. It includes a slick and polished user interface and presents all of our tutorials the way that you would expect, from within your browser. We are now providing courses and ebooks from within Tuts+ Premium to make it even more valuable. So what are you waiting for? Head over to the new Tuts+ Premium site and let us know what you think.

Take a Tour of Tuts+ Premium


    Psdtuts+ — Photoshop Tutorials

    • Create Detailed Vintage Typography with Illustrator and Photoshop

      Create Detailed Vintage Typography with Illustrator and Photoshop

      In this tutorial we will demonstrate how to customize a typeface in Illustrator and then use Photoshop to create a stunning vintage detailed typographic design. Let’s get started!

      Visit Article

    • Realistic Portrait Retouching With Photoshop

      Realistic Portrait Retouching With Photoshop

      Today’s designers and photographers need to have a varied skill set that sets them apart from the pack. One common skill that both can use is portrait photography retouching. This tutorial will make you a more effective retoucher and help keep your portraits looking clean and realistic. Subtlety is – going too far will only make the results noticeable. The best comment you can get after presenting a final image is "I didn’t even notice you did that". Let’s get started!

      Visit Article

    • How to Paint Clouds With Photoshop

      How to Paint Clouds With Photoshop

      Photoshop is an excellent tool for manipulating photographs but it can also be used as a means to create stunning digital art. This tutorial is part of a 25-part video tutorial series demonstrating everything you will need to know to start producing digital art in Photoshop. Digital Art for Beginners, by Adobe Certified Expert and Instructor, Martin Perhiniak will begin by teaching you how to draw in Photoshop. At the conclusion of this series you will know all you need to produce your own concept art and matte paintings in Photoshop.

      Visit Article


    • Nettuts+ — Web Development Tutorials

    • How to Create a Sublime Text 2 Plugin

      How to Create a Sublime Text 2 Plugin

      Sublime Text 2 is a highly customizable text editor that has been increasingly capturing the attention of coders looking for a tool that is powerful, fast and modern. Today, we’re going to recreate my popular Sublime plugin that sends CSS through the Nettuts+ Prefixr API for easy cross-browser CSS.

      Visit Article

    • 30 Days to Learn HTML and CSS: a Free Tuts+ Premium Course

      Days to Learn HTML and CSS: a Free Tuts+ Premium Course

      If you’ve ever wanted to learn how to build websites and web apps, HTML and CSS are the first skills you should learn. They are so fundamental that we believe everyone has the right to learn these skills for free.

      Visit Article

    • Dig into Dojo

      Dig into Dojo

      Maybe you saw that tweet: “jQuery is a gateway drug. It leads to full-on JavaScript usage.” Part of that addiction, I contend, is learning other JavaScript frameworks. And that’s what this four-part series on the incredible Dojo Toolkit is all about: taking you to the next level of your JavaScript addiction.

      Visit Article


    • Vectortuts+ — Illustrator Tutorials

    • How to Create a Vector Stamp Set in Illustrator

      How to Create a Vector Stamp Set in Illustrator

      In the following tutorial you will learn how to create a vintage, vector stamp set in Adobe Illustrator. Learn how to build a stamp illustration, shape by shape. We’ll construct the stamp border vector shape, highlight the edges, create the branding, and give the vector postage stamp a vintage texture, and final illustrator stamp effect. Let’s get started with making this vector stamp in Illustrator and then transform this into a vector stamp set.

      Visit Article

    • Create a Vector Bamboo Forest with Blends, Brushes and Profiles

      Create a Vector Bamboo Forest with Blends, Brushes and Profiles

      In today’s tutorial you’ll learn how to create a bamboo vector illustration with the help of custom art and pattern brushes, blends and profiles on strokes in Adobe Illustrator CS5. Vector bamboo is an excellent element to use in your work to give a classic Japanese fine art print feel, for use as bamboo forest art background in a larger illustration, and to make your vector pictures stand out with stylish bamboo art. So let’s jump straight into it!

      Visit Article

    • Massive Collection of Vintage Vector Graphics: Floral Borders, Corners, and Frames

      Massive Collection of Vintage Vector Graphics: Floral Borders, Corners, and Frames

      Welcome design rockstar, today you’re in for a real treat. We have a massive collection of vector graphics compiled for free download today. We’ve assembled vintage vector floral graphics that have antique floral borders, classic ornate corners, and decorative frames.

      Visit Article


    • Webdesigntuts+ — Web Design Tutorials

    • Bring Your Forms Up to Date With CSS3 and HTML5 Validation

      Bring Your Forms Up to Date With CSS3 and HTML5 Validation

      Let’s look at how to create a functional form which validates users’ data, client-side. With that done, we’ll cover prettying it up using CSS, including some CSS3!

      Visit Article

    • Design a Clean Launch Email for a Mobile App

      Design a Clean Launch Email for a Mobile App

      During this tutorial we’ll be using Adobe Photoshop to create a unique and clean email, announcing the launch of a new mobile app. We’ll look at using smart objects, clipping masks, warping text, and even examine the psychology of our users.

      Visit Article

    • Financial Best Practices for Web Design Freelancers

      Financial Best Practices for Web Design Freelancers

      A lot of web designers start their careers as employees for larger design firms. However, it seems inevitable that most designers will at least consider going out on their own as freelancers, either for side jobs or full time. One major key to any successful freelancing career, though, is to stay on top of your finances.

      Visit Article


    • Phototuts+ — Photography Tutorials

    • 50 Amazing Animal Photos

      Amazing Animal Photos

      Animals are, without a shadow of a doubt, a fascinating photography subject. They’re at their most intriguing when they’re unpredictable and wild, allowing you to capture something of their very nature. This collection is a look at some outstanding shots of animals, of every kind, in the hope that it inspires and encourages you in your endeavors to immortalize something of the creatures with which we share our existence.

      Visit Article

    • The Best Way To Learn Sports Photography

      The Best Way To Learn Sports Photography

      Whether you’re a sports fan or not, it’s hard to deny the huge popularity of sports in modern culture. In today’s tutorial, instead of giving you tips about directly shooting sports, we’re focusing on giving you tips on learning how to shoot it. We hope you enjoy this new approach.

      Visit Article

    • The Camera Swap Survival Guide

      The Camera Swap Survival Guide

      In photography circles, you run into two types of people. Those who love their gear and those who would just as soon forget about. I love making photographs, but I also love cameras and the other gear used in the process. Therefore, I love camera swaps and flea markets. The variety of tools available for our craft is astounding and frankly overwhelming. But I’m here to help. I’ve been going to swaps for 12 years. I’ve been ripped off more times than I care to admit, but after all this time, I’m finding more treasure than fool’s gold. So today, I’ll guide you through the jungle that is the camera swap.

      Visit Article


    • Cgtuts+ — Computer Graphics Tutorials

    • Facial Animation With Morph Targets In Cinema 4D, Part 1 – Cg Premium Content

      Facial Animation With Morph Targets In Cinema 4D, Part 1 – Cg Premium Content

      In this new two part Premium tutorial, Aleksey Voznesenski will give you an introduction to mesh animation in Cinema 4D, in this case a face with the use of the pose morph tag. We’ll also actually model the character, add materials, do some lighting, Faking GI is always fun, and then animate the little bugger.

      Visit Article

    • Making Of: The Abandoned Lobby in Maya and Mentalray, A Lighting & Rendering Overview

      Making Of: The Abandoned Lobby in Maya and Mentalray, A Lighting & Rendering Overview

      In this overview tutorial, author Pratik Gulati will give you valuable insight into Lighting and Rendering a scene in Maya using Mentalray. Using his “Abandoned Backyard Lobby” image as a basis, Pratik will discuss how he approached the Lighting setup and walk you through the render settings for achieving a very realistically lit interior scene with Mentalray.

      Visit Article

    • Quick Tip: Creating A Simple 3D Puzzle In Maya

      Quick Tip: Creating A Simple 3D Puzzle In Maya

      In this quick tip, author Abed Ibrahim will show you a great way to create a simple 3D puzzle in Maya. Although simple in approach, this valuable technique can be used in a variety of projects, ranging from very simple puzzles to extremely complex scenes, or even animations.

      Visit Article


    • Aetuts+ — After Effects Tutorials

    • Design A Fantastic Floating Card Logo Reveal – AE Premium

      Design A Fantastic Floating Card Logo Reveal – AE Premium

      In this tutorial we’ll break down a project I created called Motion Cards. We’ll create 3 scene’s in which we’ll animate some falling customizable placeholders that will be re purposed using Trapcode Particular for a dynamic logo reveal.

      Visit Article

    • Regenerate Like A “Time Lord” From Dr. Who

      Regenerate Like A “Time Lord” From Dr. Who

      In this tutorial, we’ll be creating a regeneration effect, inspired by the Doctor Who TV show. I say inspired by, because it’s not screen-accurate, but we’ll be using AE’s built-in tools, alongside some stock footage, VCP’s Optical Flares and Trapcode Particular to pull off a pretty convincing regeneration.

      Visit Article

    • An Apple Box At Its Core

      An Apple Box At Its Core

      In today’s video, I’ll talk about the Apple Box… a rectangular multi-purpose block used on production sets dating back to practically the beginning of film. This video is for exposure more than anything. A year ago, I didn’t even realize those boxes had a name, and now I end up pretty much using them at least once on every shoot I do. Hope you enjoy it. :)

      Visit Article


    • Audiotuts+ — Audio & Production Tutorials

    • Why You Should Use Metering Tools while Mixing and Mastering

      Why You Should Use Metering Tools while Mixing and Mastering

      Last AES convention I met a manufacturing rep for a very prestigious equipment company. He was demoing a piece of equipment for me, showing me all the great knobs and buttons that it had to offer. Then he said something along the lines of, ’We don’t include a screen for these things since you’re supposed to mix with your ears.” That’s when I took my exit stage left. I think imposing a viewpoint like that is just plain wrong.

      Obviously, you’re supposed to mix with your ears, but I don’t think looking at meters is going to destroy your mix.

      Visit Article

    • Adding Flavor to Chords -

      Adding Flavor to Chords -” Sixth Chords -” Basix

      Today we are going to cover how to add some flavor to your chords and compositions using sixths in both major and minor. Just like the 7ths chord tutorial, we will approach this chord concept from the ground up and look it from all possible angles. If you have heard of these types of chords but never knew exactly how they were constructed then this tutorial is for you. We will cover everything from basic structure to different voicings of the chords and try to apply them in a creative context. The sixth chords are waiting, you ready?

      Visit Article

    • 20 Podcasts that Musicians Should Subscribe To (And Why!)

      Podcasts that Musicians Should Subscribe To (And Why!)

      Rather than listening to music as I drive, shave and garden, I regularly listen to podcasts. That way Im not just being entertained, but educated as well. In this post we introduce you to the Top 20 podcasts musicians should subscribe to.

      A podcast is like a radio show, only distributed via RSS over the internet. Some are professionally produced, but many are done by amateurs. Most are about a particular interest or topic. And there are a ton of them on music and recording -” some featuring indie music, others exploring music technology, and many explaining techniques for playing and recording music. In this article we’ll focus on the podcasts that teach you about producing music, and not the ones that help you discover new music. Maybe we’ll cover those in a future post.

      Visit Article


    • Activetuts+ — Flash, Flex & ActionScript Tutorials

    • TimelineLite Ultimate Starter Guide: Introduction

      TimelineLite Ultimate Starter Guide: Introduction

      TimelineLite is the ultimate tool for creating elaborate and precise sequences of scripted animation. It is an integral part of the GreenSock Tweening Platform that allows you to make the most of TweenLite and TweenMax. This series of screencasts will walk you step by step through everything you need to know to take your AS3 tweening skills to the next level.

      Visit Article

    • Getting Started With Scoreoid

      Getting Started With Scoreoid

      Games are becoming ever more popular, especially casual games on mobile devices and tablets. In these games, the importance of leaderboards is multiplied – and game developers need a simple cross-platform solution for this. In this tutorial we will cover Scoreoid and how it can help you with game development.

      Visit Article

    • Effectively Organize Your Game’s Development With a Game Design Document

      Effectively Organize Your Game’s Development With a Game Design Document

      Have you ever dived right in to developing a game, but found yourself having to constantly change aspects of the design or the gameplay due to a lack of planning? You should consider using a game design document: a guiding vision of the game as a whole, pulling together ideas and plans for the design, development, and business sides of your game.

      Visit Article


    • Wptuts+ — WordPress Tutorials

    • 5 Cardinal Sins of WordPress Theme Development

      Cardinal Sins of WordPress Theme Development

      We talk alot on this site about tips and tricks for getting what you want out of WordPress… but today we’re going to take a step back from the technical stuff to look at some practices, bad habits, and coding faux pas that would be better left in our past. So, forgive the heavy-handed post title (haha!), we’re about talk bring up 5 surprisingly common practices that are blemishes on the platform.

      Visit Article

    • DIY WordPress Framework Part 4: Using the Framework as a Boiler Plate

      DIY WordPress Framework Part 4: Using the Framework as a Boiler Plate

      Last time we used our framework as a child theme, creating a totally new theme that depends on the framework. Today we’re going to use our framework as a boilerplate, copying the folder and making edits right to it.

      Visit Article

    • WordPress Monthly News: November 2011

      WordPress Monthly News: November 2011

      For some, WordPress is a livelihood whereas, for others, it’s just for fun. Nonetheless, anyone involved with WordPress needs to stay on track with the latest developments in the blogging world. This is our monthly article covering the latest developments in the WordPress world from news to the latest new kick-ass themes on our marketplaces.

      Visit Article


    • Mobiletuts+ — Mobile Development Tutorials

    • jQuery Mobile 1.0

      jQuery Mobile 1.0

      The official release of jQuery Mobile 1.0 was recently announced, and this tutorial will provide you with an overview of how this popular framework can assist you in your cross-platform and web based app development!

      Visit Article

    • Building a Caterpillar Game with Cocos2D

      Building a Caterpillar Game with Cocos2D

      In this series, we will be recreating the popular Atari game Centipede using the Cocos2D game engine for iOS. Centipede was originally developed for Atari and released on the Arcade in 1980. Since then, it has been ported to just about every platform imaginable. For our purposes, we will be calling the game Caterpillar.

      Visit Article

    • Android SDK: Using the Text to Speech Engine

      Android SDK: Using the Text to Speech Engine

      This tutorial will teach you to give your applications a voice with the Android SDK text to speech engine!

      Visit Article


    • FreelanceSwitch — Articles and Resources for Freelancers

    • 10 Free Apps for Working with Video

      10 Free Apps for Working with Video

      Video has become a must-have for every website or blog aiming to enhance its presence online. It’s a common practice that video-related orders are often assigned to freelancers, and these are not only simple video editing tasks, but the preparation of how-to’s, demos, screencasts, video embedding and distribution as well.

      Here is a roundup of the most popular video software and services recommended for freelancers’ everyday use.

      Visit Article

    • 30 Top Facebook Apps for Business

      30 Top Facebook Apps for Business

      Facebook is a good place to communicate with friends and get new job offers. Freelancers should not miss an employment opportunity on Facebook. The social network app section is a real treasure box with multiple handy applications.

      These are some of the best Facebook applications that help freelances boost their productivity, enhance their business pages, show off their portfolio and attract new contacts. Since many freelancers work with social media as experts, account managers and analysts, the list below has both apps for personal profiles and Facebook pages.

      Visit Article

    • The Latest Google Update is Fantastic News for Freelance Writers

      The Latest Google Update is Fantastic News for Freelance Writers

      On November 3, 2011 Google published a new article on their blog informing readers that fresh new content is now being seen as highly valuable on their blog or website. This “freshness update” is a new addition to Google’s “Caffeine web indexing system”.

      Now blog owners who update their sites regularly will be rewarded with a higher search engine ranking. Let’s look at how freelance writers can put this new update to use in their business.

      Visit Article


Create a Futuristic Bicycle Icon in Photoshop

$
0
0

It’s fun and challenging to create items from scratch in Photoshop. In this tutorial we will create a futuristic bicycle icon from scratch using some basic Photoshop tools. Let’s get started!


Step 1: New File

Open Photoshop and set up a new document (Command/Ctrl + N). Use the following settings;
Resolution: 72dpi, Color Mode RGB color, Dimensions: 500×310 px.


Step 2: Creating the background

Fill the document with the black color #000000, then make a selection using Rectangular Marquee Tool (M) like I did. Into a new layer (Command/Ctrl + Shift + N) using Brush Tool (B) with a big master diameter brush one time inside the selection.

Color Code: #546c79

Duplicate the layer created (Command/Ctrl + J) Flip it horizontal (Edit-Transform-Flip Horizontal) and place it like I did in the next image. After you did that, decrease the opacity of it to 50%.


Step 3: Start creating the bike

Using Pen Tool (P) create the Bike shape, fill it using a grey color (color code: #dbdcd6). After that, we are going to give a 3D look using selection tools and light/shadows tools.


Step 4: Working on details: Lights/Shadows

Continue to add lights and shadows by selecting different parts and use Burn Tool (O) to add shadows and Dodge Tool (O) to add light. In this step we are going to add just light.


Step 5: Creating Bike Elements

Delete the indicated part by selecting it and pressing "Delete" key then create a new selection using Pen Tool (P) and a Feather Radius ~ 0.3 pixels for better results.

In the selection created above use Burn Tool (O) and add some shadow there.


Step 6: Pedals

In this step we are going to create the pedal shape, so create this shape using Pen Tool (P) color code: #cdcec9. Select a part of it using Pen Tool (P) and go to Brightness/Contrast, here make the settings from the image below.

Use same techniques to create the pedal.


Step 7: Small Details

Now add some small details like reflections and some other things.


Step 8:
Rear Wheel

Now, we are going to create the wheels! First of all make a rounded shape using Ellipse Tool or Pen Tool (P) and delete the middle of it! Use Dodge & Burn Tool (O) to give the 3 look! After that start playing with stroke lines to add Light & Shadows


Step 9: Light over the rim

Select this part of the rear rim using Elliptical Marquee Tool (M) then, in the selection created add some light using Dodge Tool (O)


Step 10: Creating the rear tire

Start by creating another rounded shape around the Rim using a dark grey color. I used #121011. Again, start playing with light/shadow/stroke like I did in the next images to obtain 3d & real effect.

Here we are going to add some light reflection on our rim, so using Elliptical Marquee Tool (M) add a 1px black stroke, then another one over it but this one should be gray!


Step 11: Spokes

How we can creating the spokes? Really simple. Use Pen Tool and start creating 1 pixel gray lines like I did in the next image, then using Burn/Dodge Tool (O) add some shadow and light over the spokes to obtain a real effect. After you are done with the spokes from the top part of the wheel, duplicate the spoke layer, flip it horizontal and place it like I did down.


Step 12: Disk Brake

For creating the disk brake we are going to use the Ellipse tool and a light brown color (#9c9075). After you created an ellipse, delete the middle part using a selection tool and pressing "Delete" key.


Step 13: Effects on the disk brake

Go to Filter > Noise > Add noise and make the settings from the image below! For giving to our disk brake a real effect we need to use some light & shadow so, by watching the pictures down add some highlights and shdows over the disk using Dodge/Burn Tool (O).


Step 14: Seat support

Make a shape using Pen Tool (P) and a dark brown color (#161510) then go to Filter > Noise > Add noise and use a amount of 0.5% for a better effect. Again, add some shadow & light over our seat support.


Step 15: Seat

Create the seat shape using Pen Tool (P) and a dark (almost black) color, I used #010103! Then, over the shape created, add some light in the top part using Dodge Tool (O).


Step 16

Add more details on the seat support.


Step 17: Bike Horns

Create a path using Pen Tool (P) then fill it with a dark grey color #0f0f0d. Now playing with lights and shadows you should obtain something like in the image below


Step 19

Use Pen Tool (P) and stroke path technique add some light reflections on our bike horns.


Step 20: Fork

Create this path using Pen Tool (P) and fill it with a dark brown color, I used #201f1a.


Step 21: Effects on the fork

Again, add some noise and use dodge/burn tool to obtain a better effect.


Step 22: Front wheel

Duplicate the rear wheel layers group and place it under the fork. After that I created some pieces that will support the wheel.


Step 23: Caliper

We are going to create the caliper! Create a path using Pen Tool (P) then fill it with a red color, add some shadows and lights using Dodge & Burn Tool (O) and your bike it’s ready go.


Step 24: More Details

You can add more details on the bike like stickers and other things. You can also create a reflection of the bike like I did in the next image.


Final Image


Viewing all 6352 articles
Browse latest View live