Quantcast
Channel: Envato Tuts+ Design & Illustration
Viewing all 6352 articles
Browse latest View live

39 Best Sublimation T-Shirt Mockups (Using a T-Shirt Mockup Generator)

$
0
0

If you've created great designs that you want to use for sublimation transfers, and you're looking for just the right T-shirt mockup template to preview how your designs will look or showcase them to a client, then this article is perfect for you.

Today we'll share 39 of the best sublimation T-shirt mockup templates you can customise quickly and easily online using the T-shirt mockup generator from Placeit.

Mockup created with sublimation T-shirt mockup generator
Creating a sublimation T-shirt mockup is easy when you use the T-shirt mockup generator from Placeit

But first, let me show you how easy it is to use the Placeit sublimation T-shirt mockup generator.

How to Create a Sublimation T-Shirt Mockup

1. Go to Placeit.net> Mockups > Sublimated

Go to Placeitnet  Mockups  Sublimated

You will find a wide selection of clothing templates and other mockups that you can add your sublimation designs to, but for our purposes today, we're looking for T-shirt mockups. So go to the column on the left and select T-shirts. 

2. Peruse the Blank Sublimation Shirts > Choose a Mockup

 Choose a Mockup

3. Go to Left Menu > Upload Design > Choose Your Design

Choose Your Design

4. Go to Right Menu > Background > Choose a Background Colour

Choose a Background Colour

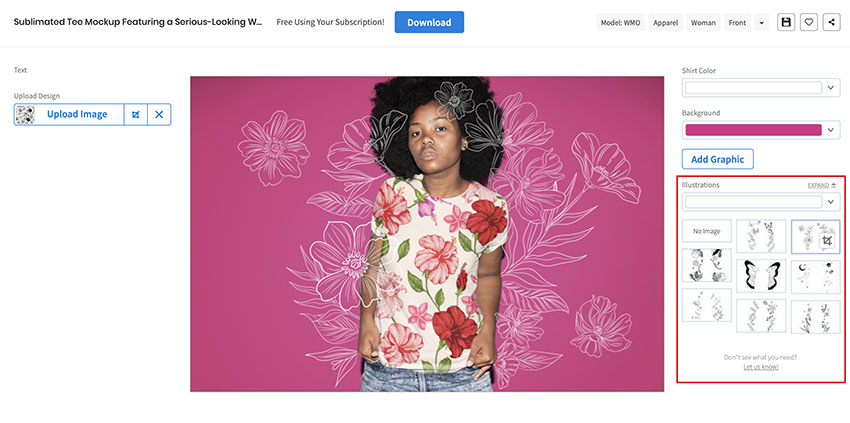
5. Select an Illustration

Select an Illustration

6. Download Your Customised Sublimation T-Shirt

Download Your Customised Sublimation T-Shirt

Now that you know how easy it is to create sublimation T-shirt mockups, let's look at the range of sublimation T-shirt mockup templates available at Placeit.

39 Best Sublimation T-Shirt Mockups 

T-Shirt Mockup of a Woman With a Hijab and Mug

Sublimation T-Shirt Mockup Template of a Woman with a Hijab and Mug

What better way to show off your designs for sublimation T-shirt printing than with this awesome T-shirt mockup template that features a young woman standing in her kitchen enjoying a cup of coffee? What's great about this template is that you can use it to test your design on both a T-shirt and a mug. 

Man With Sunglasses and a Customizable Long Sleeve T-Shirt Mockup

Man With Sunglasses and a Customizable Long Sleeve T-Shirt Mockup

This is an excellent long-sleeve T-shirt mockup for sublimation transfers. The template, which is shot in a studio, allows you to customise the background to suit your brand, or you can make the background transparent so it will blend the photo into the background of your choice. 

Long Sleeve Shirt Mockup of a Boy Lying Down on the Grass with His Mom

Long Sleeve Shirt Mockup of a Boy Lying Down on the Grass with His Mom

Are your designs primarily for kids? Then you will need this long-sleeve shirt mockup which features a boy reading on his mother's lap. A great summer-time mockup for your spring- and summer-themed sublimation examples. 

Activewear Mockup of a Female Athlete Wearing a Tee and Leggings

Activewear Mockup of a Female Athlete Wearing a Tee and Leggings

Need a T-shirt and leggings combo mockup to test your design for an upcoming sublimation T-shirt printing project? Check out this terrific mockup—a perfect palette for your casual or athletic-wear designs. 

Long Sleeve T-Shirt Mockup Featuring a Smiling Woman

Long Sleeve T-Shirt Mockup

Here's another great T-shirt mockup template for your sublimation transfer design. Just upload your design from your computer using the T-shirt mockup generator to see how your design will translate in a real-life context, and then add your mockup to your website or send it to a client. 

Boy in Sublimated Baseball Jersey About to Hit the Ball

Boy in Sublimation Shirt About to Hit the Ball

Designers of sublimated baseball jerseys will be happy with this terrific long-sleeve shirt mockup designed specifically for baseball uniforms. Try out several design sublimation examples to make sure your designs work and your client is happy with the outcome before investing in a whole print run. 

Sublimated T-Shirt Mockup of a Man in Studio

Sublimated T-Shirt Mockup of a Man in Studio

Sometimes you need a real-life context for your T-shirt mockup template, and sometimes you need a plain background that allows you to manipulate the background. This template allows you to create a background in whatever colour you need or leave it transparent to integrate into other backgrounds.

Long Sleeve Shirt Mockup of Girl Sitting in Bed

Long Sleeve Shirt Mockup of Girl Sitting in Bed

Here's a sweet long-sleeve shirt mockup of a little girl sitting in bed that's perfect for your child-centred sublimation transfer designs. Upload your design, and the generator will integrate it into the template for you in seconds. 

T-Shirt Mockup Featuring a Man on His Motorcycle

Clothing template Featuring a Man on His Motorcycle

Are you designing a sublimation transfer for motorcyclists or another target group? Well, Placeit mockups include a large demographic and range of interests and hobbies, so no matter how unique or specific your design, you can find a sublimation T-shirt mockup template to suit your needs.

Long-Sleeve Tee Mockup Featuring a Man Ready to Practice Yoga

Long-Sleeve Tee Mockup Featuring a Man Ready to Practice Yoga

This is another example of a speciality T-shirt mockup template for sublimation shirts. This one targets yoga practitioners. So if you've been tasked with creating a sublimation transfer for a yoga studio and you need a long-sleeve T-shirt mockup to test how your design will look in a real-life situation, this mockup is perfect.

Back of an Elderly Man Wearing a Long Sleeve Tee Mockup at a Park

Back of an Elderly Man Wearing a Long Sleeve Tee Mockup at a Park

There are loads of mockups of blank sublimation shirts at Placeit that feature front designs, but there are also mockups that show the back of your design as well, so if that's what you need, you will find several featuring models from across a wide range of our population demographic. 

Long Sleeve Tee Mockup Featuring a Young Woman Standing on a Sidewalk

Long Sleeve Tee Mockup Featuring a Young Woman Standing on a Sidewalk

Sometimes you just need a simple yet beautiful general-use T-shirt mockup template which shows your design clearly. This is the perfect mockup for such times, and what's more, you don't need any fussy software to customise it. Just use the online T-shirt mockup generator to upload your design, and your job is done. 

Long Sleeve Tee Mockup Featuring a Man in an Urban Look

Long Sleeve Tee Mockup Featuring a Man in an Urban Look

Here's the male equivalent of the simple, general-use long-sleeve T-shirt mockup template which shows your sublimation examples clearly. 

Long-Sleeve Tee Mockup Featuring a Man Walking on the Street

Long-Sleeve Tee Mockup Featuring a Man Walking on the Street

If you like the idea of a straightforward template but are looking for something with a cool weather vibe, then you'll like this beautiful mockup template for your sublimation T-shirt printing. It features a young man standing in a park against autumnal leaves. 

Happy Kid Posing Sublimated Baseball Jersey Mockup

Happy Kid Posing Sublimated Baseball Jersey Mockup

If you're making sublimated baseball jerseys for a kids' team, use this mockup to show then how their design will look in a real-life scenario. Customising your baseball jersey mockup is as easy as hitting the upload button on the mockup generator. 

Mockup of a Smiling Man with a T-Shirt Holding His Baby Girl in a Onesie

Mockup of a Smiling Man with a T-Shirt Holding His Baby Girl in a Onesie

How sweet is this father-daughter T-shirt mockup template? You can see how your sublimation transfers will look on two different sized shirts or use the mockup to show off complementary father-daughter sublimation examples.

T-Shirt and Shorts Mockup of a Woman Taking a Selfie

T-Shirt and Shorts Mockup of a Woman Taking a Selfie

Since it's such a ubiquitous sight in this day and age, we had to include a T-shirt mockup template featuring someone taking a selfie. This template is best suited to someone looking for a mockup that allows them to add sublimation transfer designs to both T-shirt and sports shorts.

Woman Wearing a Long-Sleeve Polo Shirt Mockup

Woman Wearing a Long-Sleeve Polo Shirt Mockup

Looking for a long-sleeve polo-shirt mockup for your sublimation transfer designs? Here's a terrific mockup for you. It features a young woman standing in front of a cafe on a city street, peering over her sunglasses. Use the upload image feature to add your design.

Long Sleeve T-Shirt Mockup Featuring Young Woman Against a Plain Background

Long Sleeve T-Shirt Mockup Featuring Young Woman Against a Plain Background

Need an edgy, fashion-forward long-sleeve shirt mockup for your sublimation transfer design? Then this is the template for you. It features a stylish young woman shot against a plain background. After you upload your design, change the background of the image to suit your taste.

Sublimated Baseball Jersey Mockup

Sublimated Baseball Jersey Mockup

How about this sublimated baseball jersey mockup for showcasing your team design ideas? Use the mockup to display several design options so your clients get a clear idea of how the design looks in a real-life scenario, and let them choose their favourite. 

Halloween Mockup of Kids With T-Shirts and Tote Bags Asking for Trick or Treat

Halloween Mockup of Kids with T-Shirts and Tote Bags Asking for Trick or Treat

It doesn't get any better than this sublimation T-shirt mockup template featuring kids trick-or-treating for Halloween. Not only can you use the template to showcase three different Holloween-themed designs, but you can also see how your design will look on a tote bag.

T-Shirt Mockup of a Man Standing on a Deck at the Marina

T-Shirt Mockup of a Man Standing on a Deck at the Marina

One of the great things about sublimation T-shirt mockup templates from Placeit is that they feature a wide demographic, so whether your target customers are the very young or old, LGBTQIA or heterosexual, from the Pacific, Arctic, Africa, Asia, Europe, or North America, short, tall, round, or straight, you can find a model that suits your needs. 

Sublimated Round Neck T-Shirt Mockup of a Woman in a Studio

Sublimated Round Neck T-Shirt Mockup of a Woman in a Studio

This is a great template for seeing how your sublimation shirt design will look on a real person. Just upload your design, change the background colour, and your T-shirt mockup template is ready to download.

Mockup of a Woman Wearing a T-Shirt Against a Wall Covered in Leaves

Mockup of a Woman Wearing a T-Shirt Against a Wall Covered in Leaves

This is a mug and T-shirt mockup template that is perfect when you want to test the versatility of your design. There are separate controls for the mug mockup and the T-shirt mockup, so you can test different sublimation transfers or try the same design. 

Mockup of a Man with a Sublimated V-Neck T-Shirt Standing by a Chain Link Fence Gate

Mockup of a Man with a Sublimated V-Neck T-Shirt Standing by a Chain Link Fence Gate

We've featured a ton of circle-necked sublimation T-shirt mockups here, so let's throw in a V-neck tee just to let you know that if that style's your preference, Placeit's got you covered. 

Woman Sitting Down in a Restaurant While Wearing a Sublimated T-shirt Mockup

Pretty Woman Sitting Down in a Restaurant While Wearing a Sublimated T-shirt Mockup

Looking for blank sublimation shirt mockups for your leisurewear line? Then this mockup is a good place to start. It features a young woman sitting casually in a restaurant and will show off your design clearly. 

T-Shirt Mockup Featuring a Happy Graduate with a Coffee Mug

T-Shirt Mockup Featuring a Happy Graduate with a Coffee Mug

Creating a special line of T-shirts and mugs for graduates? Then this is the mug and T-shirt mockup template for you. It features a proud and happy graduate holding her mug and wearing her gown so the T-shirt underneath shows clearly. 

Young Woman Sublimated T-Shirt Mockup

Young Woman Sublimated T-Shirt Mockup

Check out this awesome approach to sublimation T-shirt mockup templates that features the same model in different poses that are then combined to overlap each other. A cool and dynamic way to showcase your design.

Mockup Featuring a Woman with a T-Shirt and a Sublimated Tote Bag

Mockup Featuring a Woman with a T-Shirt and a Sublimated Tote Bag

Here's a cool tote and T-shirt mockup combination you need to try. Try one design on both templates or two different complementary designs. 

Sublimated Tee Mockup Featuring a Woman on a Stool

Sublimated Tee Mockup Featuring a Woman on a Stool

Here's another awesome template for your sublimation shirt mockup. This lovely clothing template is perfect for casual designs that pair well with jeans. 

Sublimation T-shirt Mockup Featuring a Stylish Man With Sunglasses

Sublimated T-shirt Mockup Featuring a Stylish Man With Sunglasses

Go bold with this blank sublimation shirt mockup of a young man posed in front of a blank wall. Another great clothing template for that urban casual look. 

T-Shirt Mockup of a Woman Wearing a Hijab with Mug

T-Shirt Mockup of a Woman Wearing a Hijab with Mug

How about this terrific sublimation mug and T-shirt printing mockup to display your amazing designs? You can add the same design to see how they would work at different scales or try complementary designs created specifically for each item.

Mockup of a Curly-Haired Woman Wearing a Sublimated Crop Top

Mockup of a Curly-Haired Woman Wearing a Sublimated Crop Top

Clothing templates often include a lot of other details in the image, but this one is simple and uncluttered: just a smiling woman wearing a T-shirt, giving you the perfect opportunity to show off your design.

Sublimated Tee Mockup Featuring Two Smiling Kids at a Playground

Sublimated Tee Mockup Featuring Two Smiling Kids at a Playground

How cute are these two? If you want to make a success of your sublimation T-shirt printing business, you'll need a good design, and then you'll need to choose the right mockup to sell it. If your target market is children's clothing, then this one is ideal.

T-Shirt Mockup of a Woman Wearing Leggings and Doing a Tree Pose

T-Shirt Mockup of a Woman Wearing Leggings and Doing a Tree Pose

This one is more than a sublimation T-shirt mockup: you also get to customise the model's leggings. You can choose different patterns for each, so this would be perfect if you want to show how two of your designs complement each other.

T-Shirt Mockup of a Woman Holding a Tote Bag at an Office

T-Shirt Mockup of a Woman Holding a Tote Bag at an Office

Or how about this mockup, which lets you show one design on the T-shirt and another on the tote bag? With the plain grey slacks and neutral background, your designs will really stand out!

Mockup of Three Folded Sublimated T-Shirts Lying on a Surface

Mockup of Three Folded Sublimated T-Shirts Lying on a Surface

Show three sublimation examples in one image with this simple but very useful mockup template. The outer two are on top, so your full design will be shown there, but the middle one also has plenty of space for the viewer to see what they'll be getting.

Mockup of a Man Showing His Sublimated Tee in Front of the Bars at a Gym

Mockup of a Man Showing His Sublimated Tee in Front of the Bars at a Gym

Looking for a T-shirt mockup template with a health or exercise theme? This one is a great choice, with its subtle gym imagery in the background. But notice how the background is still faded, putting all the emphasis on your sublimation T-shirt design.

T-Shirt Mockup of a Woman Sitting on a Chair Holding an 11 oz Coffee Mug

T-Shirt Mockup of a Woman Sitting on a Chair Holding an 11 oz Coffee Mug

And last but not least, here's another great mockup that lets you show off your design on a coffee mug as well as a T-shirt. It's a striking image that creates a mood of elegant sophistication, so use it for a design that fits that vibe.

Select a Sublimation T-Shirt Mockup to Promote Your Designs Today

These fabulous sublimation T-shirt mockup templates are just a few of the wide range of mockups available at Placeit. I hope our selection has made you excited about all the possible ways you can display your designs. Why not add your design to your favourite mockup and share it with us here? We’d love to see which you choose. 

And if you're interested in other cool mockups for face masks, sweatshirts, computers, iPads, and more, check out these handy roundups of the best mockups in different categories:


How to Create a Newsletter Template in Affinity Publisher (Free Newsletter Template)

$
0
0
Final product image
What You'll Be Creating

In this tutorial, you’ll learn how to create a newsletter template in Affinity Publisher. This simple newsletter template is easy to put together and quick to customise, and it also features an on-trend color palette and contemporary typography, making for one of the best newsletter templates you can find for corporate businesses.

This tutorial comes complete with free newsletter templates to download for both Adobe InDesign and Affinity Publisher, allowing you to quickly create your own business newsletter template and use it as a blank canvas for your own designs. 

Follow the steps below to learn how to create a printable newsletter template in Affinity Publisher, and put your newsletter design ideas into practice. 

final newsletter template

Looking for more business newsletter templates? Discover some great options over on Envato Elements

Follow along with us over on our Envato Tuts+ YouTube channel:

What You’ll Need to Create Your Affinity Publisher Newsletter Template

In this tutorial, we’ll be using Affinity Publisher to create our simple template newsletter. If you’re an InDesign user, you can download the InDesign newsletter template attached to this tutorial. In the enclosed ZIP file, you'll also find Publisher newsletter templates.

As well as access to Affinity Publisher, you’ll also need to download the following fonts and images from Envato Elements to recreate the newsletter format and Affinity Publisher newsletter template pictured here:

Images for newsletter design (pictured in tutorial):

1. How to Set Up Your Blank Newsletter Template in Affinity Publisher

Step 1

Open Publisher, and go to File > New. 

Select Print from the options along the top of the window. Set the Page width to 11 in and Page height to 8.5 in. Deselect Facing Pages.  

new document affinity

Step 2

From the Margins options, set a margin width of 0.5 in for all sides of the page. Add a Bleed width of 0.25 in. 

Then click Create

new document bleed

Step 3

Go to View > Guides Manager. 

guides manager

Increase the number of Columns to 3. Then click Close

guides columns

Step 4

Double-click on Page 1 in the Pages panel to make sure you’re on the main page of your document, not the master page.

Then go to the Layers panel (View > Studio > Layers) and click on the Add Layer button at the bottom-right of the panel. Name this layer Background

Repeat to create two more layers, naming them Color and Type

Select both the Color and Type layers and lock them by clicking the padlock icon at top-right. 

background layer

Step 5

Go to the Swatches panel (View > Studio > Swatches) and choose Add Global Colour from the drop-down menu at top-right. 

add global colour

Name the swatch Newspaper White and set the levels below to C=0 M=8 Y=9 K=0. Then click Add

swatches panel

Repeat to create four more swatches:

  • Coral: C=0 M=81 Y=78 K=0
  • Blue: C=79 M=47 Y=0 K=0
  • Yellow: C=4 M=26 Y=88 K=0
  • Green: C=73 M=0 Y=71 K=0
global color

2. How to Add Color and Images to Your Affinity Publisher Newsletter Template

Step 1

Working on the Background layer, select the Rectangle Tool (M) from the Tools panel and drag across the whole of Page 1, extending the edges up to the bleed. 

From the Swatches panel, set the Fill Color to Newspaper White. 

background color

Step 2

To divide up the newsletter layout further, we can add rows across the page. To do this, head back to View > Guides Manager. 

Increase the number of Rows to 5. Set the width of the Gutter to 0.01 in. Then click Close.

guides rows

Step 3

Working on the Color layer, use the Rectangle Tool to create a shape on the page, filling the top three rows of the right-hand column. 

Set the Fill to Blue

blue frame

Step 4

Create a second shape across the bottom-left corner of the page, meeting the bottom-right corner of the blue rectangle. Set the Fill of this shape to Yellow

yellow frame

Add a third shape in the bottom-right corner of the page, setting the Fill to Green.

fill green

Step 5

The newsletter design will look better with all the images set in black and white. You can use Affinity Photo to quickly adjust color images to black and white, and resave them for using on your newsletter. 

Open your color image in Affinity Photo and duplicate the Background layer, working on the copied layer. 

From the Adjustments drop-down menu at the bottom of the Layers panel, choose Black and White. 

black and white photo

In the Black & White window that opens, adjust the color sliders until you’re happy with the result. 

Exit the window, and File > Export the image as a JPG file.

black and white

Step 6

Back in Affinity Publisher, switch to the Picture Frame Rectangle Tool (F) and create a frame across the top-left corner of the page.

Go to File > Place, choose your edited image, and click Open

placed image

Double-click inside the picture frame to select the image directly, and scale it until you’re happy with the position. 

Here I’ve extended the height of the image by using the Colour Picker Tool (I) to pick up a grey color from the top of the image and applied this to the Fill of the image frame. 

eye dropper

I then use the Transparency Tool (Y) to fade the top of the photo by directly selecting the image inside the frame and clicking the tool from bottom to top. 

transparency tool

Step 7

Use the Rectangle Tool to create a tall shape over the top of two-thirds of the photo, setting the Fill to Red.

red shape

With the shape still selected, choose Multiply from the blending menu at the top of the Layers panel. 

multiply blending

Select all the other colored shapes and apply a Multiply effect to these too. 

multiply blending

Step 8

Use the Picture Frame Rectangle Tool (F) to create an image frame across the right half of the yellow rectangle. 

File > Place, dropping another black and white image into the frame. 

image frame

On the image frame, Right-Click > Arrange > Move to Back. 

move to back

Step 9

Create another image frame, this time over the green rectangle. 

placed image

If you need to hide the top or side of an image, use the Transparency Tool (Y) to create a subtle fade on any visible edges. 

faded image top

Then, as before, Right-Click > Arrange > Move to Back.

move to back

Step 10

Use the Picture Frame Ellipse Tool (F) to create a circular image frame over the bottom of the blue rectangle. 

ellipse image frame

File > Place an image, before Right-Click > Arrange > Move to Back.

image frame
layout so far

3. How to Format Type on Your Affinity Publisher Newsletter Template

Step 1

Lock the Color layer and unlock the top layer, Type

Use the Frame Text Tool (T) to create a text frame to the left side of the red shape, typing in ‘1’.

From the Character and Paragraph panels (View > Studio > Character) set the Font to Liber Grotesque Bold, and from the Swatches panel set the Font Colour to Red.

liber grotesque font

From the Layers panel, adjust the blending mode of the text frame to Multiply.

number in red

Repeat to create a second number text frame above the yellow shape. 

yellow number

Create a larger ‘3’ text frame to the left of the blue shape. 

number text frame blue

Finally, add a ‘4’ to the right side of the green rectangle. 

number text frame

Step 2

Create another text frame across the top-left corner of the page, typing in the title of the newsletter template. Set the Font to Okana Bold, All Caps, and reduce the Tracking (letter-spacing) to -40%. 

title in white

For color contrast, set the Font Color of the text over the colored shape to Newspaper White, and any outlying text to Red

title in red

Add the issue number and date to the top-right corner, setting the Font to Okana Bold, as before. 

issue number date

Step 3

Use the Frame Text Tool (T) to create a smaller text frame to the left side of the red rectangle. 

Type in the first article heading, setting the Font to Okana Black and the Font Size to around 14 pt. 

article title

Create a new frame for the start of the body text on your newsletter format, setting this to Ava Bold, Size 8 pt. Create more linked text frames for body text by clicking on the red arrow icon at the bottom-right corner of the text frame. 

body text

Click again to create a linked text frame. Arrange these into two columns, adjusting the Font Color of text in each to improve contrast. 

linked frame
body text threaded

Step 4

Copy and Paste the title and body text frames to populate other areas of your Publisher newsletter layout. 

body text frame

Step 5

Create a pull-quote set in Okana Black across the bottom of the red corner, setting the Font Size to around 21 pt, All Caps, and the Tracking to 40%. 

pull quote

Copy and Paste the quote text frame to create a second pull-quote above the yellow corner, adjusting the Font Color to match. 

pull quote yellow

Step 6

The final green square is a good place to list contact details, a web address, or social media handles. 

Set the Font to Okana Black and a Newspaper White Font Color. 

social handles

4. How to Export Your Simple Newsletter Template for Print

Step 1

When you’ve finished working on your Affinity Publisher newsletter template, it’s time to export your newsletter design as a PDF, ready for sending to print. 

File > Save your work, before going to File > Export. 

In the window that opens, choose PDF from the icon options at the top, and select PDF (press ready) from the Preset menu. 

Make sure the Raster DPI is set to 300, and that the Include Bleed box is checked.

Then click Export

raster dpi

Step 2

Name your file, select a folder to save it into, and then hit Save

export as pdf

You can send the exported PDF straight off to the printers—awesome work!

Conclusion: Your Finished Affinity Publisher Newsletter Template

Your Affinity Publisher newsletter template is finished—great job! Here you've learned how to create a newsletter template with a colorful, corporate style. 

newsletter mockup

In this tutorial, you’ve picked up a wide range of skills and techniques for how to create Affinity Publisher newsletter templates, from setting up a blank layout to creating color swatches, placing images, and formatting typography to create a stylish and contemporary business newsletter template. 

If you want to compare your newsletter design ideas with my own, make sure to download the completed Affinity Publisher newsletter template. It’s also available as an InDesign newsletter template.

final newsetter

It’s quick and easy to customise your end result by swapping in different color swatches, fonts, and images. 

Looking for more business newsletter templates and newsletter examples? Discover some of the best newsletter templates over on Envato Elements

Eager to develop your print design skills further? Don’t miss these Affinity Publisher tutorials for creating your own templates and discovering some awesome newsletter examples:


How to Create a Twitch OBS Stream Overlay in Photoshop

$
0
0
Final product image
What You'll Be Creating

Do you live-stream on Twitch? Ever wanted to make your own live-stream Twitch overlay graphics from scratch? In this tutorial, we'll walk through the basics of creating a stream overlay, for your custom Twitch live-stream, in Adobe Photoshop. We'll make a custom Twitch overlay from scratch, and then we'll put it to use in Streamlabs OBS. 

Streamlabs OBS is only available for PC, at this time. However, you can also use OBS Studio, with a tool like Muxy Alerts as an alternative, if you use a Mac. The premise behind using these tools is similar. 

In addition, if you're looking for a quick and customizable stream Twitch overlay—or even an OBS overlay maker—you might also want to take a look at Placeit! There's so much stream content and Twitch graphics here—from Twitch overlays to intro screens to Twitch panels! If you're looking for a Twitch overlay maker, this right here might fit the bill, as this content is customizable, too!

So, if you're looking for a super easy, OBS stream overlay maker, you might want to give Placeit a peek!

obs overlay maker

Now, let's dig in, talk about how overlays work, and make one of our own, from scratch!

Follow along with us over on our Envato Tuts+ YouTube channel:

What You'll Need: 

The followings assets are used within this custom Twitch overlay tutorial:

Take a moment to consider what imagery you might like to use in your Twitch overlay! I also like to work with screenshots, to help me get a feel for how things will look, while I'm designing in Photoshop. 

1. How OBS Stream Overlays Work

Step 1

First, let's talk about what an OBS Stream Overlay is and how it works.

When you watch your favorite live streamer, it's common to see graphics on top of the content that's being streamed. This could be anything from static graphics to animated elements, interactive text that's influenced by viewer interaction, and more. 

twitch overlay maker online
Twitch Stream Overlay Design from PlaceIt

Step 2

This might sound really complicated, but it's surprisingly simple! I want to note that I have not received any compensation for my recommendations here—these are my genuine thoughts and opinions, based on my experiences of streaming and how I make my own overlays. 

Generally speaking, when working with OBS, we typically have three things going on here: 

  • First, we have our graphics or media. This is the content that we can create using graphics software, like Adobe Photoshop or your software of choice. 
  • Second, we have a tool that generates content based on your stream. OBS Studio alone, for example, doesn't keep track of your new followers. One of my favorite free tools for stream alerts is Muxy Alerts, but there are a lot of choices out there! 
  • And third, we have broadcasting software, which brings all of your content together. Think of it like arranging everything from different sources into one, finalized presentation. An example of this would be OBS Studio.  

That said, in this tutorial, we'll be using Streamlabs OBS—the benefit here is we can largely "skip" the second criterion here. Streamlabs OBS handles the alerts and the broadcasting, all in one nice, neat place. 

how to setup stream overlay obs
Cute Pixel Stream Overlay from PlaceIt

2. How to Create a Stream Overlay

Step 1

Before we jump right into the design phase, we need to clearly define what we hope to create. There are lots of things we could do with our stream overlay—and the right choice is going to depend on what you'd like to do. Some streams have a lot of supplemental, visual content on them, and others prefer to keep things minimal. Again, there's no right answer—just what's best for you and your broadcast.

Retro Stream overlay maker
Retro Twitch Stream Overlay from PlaceIt

Step 2

Here's a list of some things you might want to consider, for your overlay:

Viewer Interaction—this would include things like the most recent follower, most recent subscriber, and most recent donor. 

Goals—you could display things like your donation goal, subscriber goal, or follower goal, for example.

Social Media—you may want to make your social media accounts visible on the overlay itself, so viewers are further encouraged to interact with you.

Web camera—many streamers have a web cam where viewers can watch both them and the subject of the stream at the same time. 

Chat window—you could also display your channel's chat on the stream itself. Personally, I'm not a huge fan of this, because it takes up a lot of real estate, but it can also be a fun way to capture the chat with the video. 

The stream focus itself—we have to, of course, allot space for the focus of the stream itself. This is often where the gameplay is shown, if it's a gaming live stream. 

Note, this list isn't exhaustive; there are plenty of other things you could do with your live stream and its overlay. For example, I have interactive lighting in my room, and I've used an animated carousel, on screen, to showcase a small selection of my artwork. Once you know the basics, you can expand on them in any way you like.

OBS Stream Overlay
Stream Overlay Design from PlaceIt

Step 3

So, how do you know what to include in your overlay? I'd recommend keeping the following in mind:

Where is your focal point? It's fun to have a lot of interactive things on screen, but make sure to keep the emphasis on the focus of your stream. So, for example, if you're streaming a game, it might be wise to keep it as your focal point.

Additions should supplement your stream. This means that content you add should enhance the experience and not distract from it. 

Make sure the content is legible. If things are difficult to read or understand, it might defeat the purpose. For example, decorative fonts are often best suited to titles and headers as opposed to things like body copy or smaller text.

Be cohesive. Consider a visually unified theme, especially if you're trying to build a professional brand. Have a logo, signature colors, and a consistent aesthetic—that's not to say you can't change it up, but consistency can make for a more cohesive, visual experience. For example, using six different fonts might look rather chaotic. 

Your decisions on these points should be influenced by your goals. For example, maybe you don't want a logo—maybe you'd prefer an avatar. Maybe you want to showcase artwork, so the visuals will change regularly. Consider your goals and you'll likely have a more successful outcome. 

Stream Overlay OBS
Customizable OBS Stream Overlay from PlaceIt

3. How to Design a Stream Overlay

Step 1

So, now that we have an idea of what we'd like to include, let's dig in and start designing. There are plenty of different ways to approach this—personally, I like to start in Adobe Photoshop and plan my design out there. 

Open up Adobe Photoshop and start a New Document.

Our New Document needs to be 1920 pixels wide by 1080 pixels tall—this is going to be the size of our total visible area.

Starting a New Document

Step 2

Before we create our document, let's change our Background Contents to Transparent.

Once you've done so, click Create to create your document.

Creating a New Document

Step 3

For this tutorial, I'm going to include the following in my layout:

  • on-screen viewer interactions
  • space for a web camera
  • social media content
  • space for a subscriber goal
  • my main stream footage 

I decided to start off with some content areas for my on-screen viewer interactions. I wanted the overlay to display the newest followers, the newest subscriber, and the latest donation—you can choose to include (or exclude!) whichever you prefer.

I began by creating a New Layer. You can do so in the Layers panel, as highlighted below. I like to name my layers, to keep things organized. You can name your layers by clicking on the name of the layer itself, in the Layers panel. 

Then, using the Polygonal Lasso Tool, highlighted below in the Tools panel, I drew a polygon with my mouse. Each click is a point in your selection. An extra tip—hold Shift while drawing your shape to create perfectly straight lines!

Finally, fill this selection with the Paint Bucket Tool—I chose to do this in black.

Creating a Shape

Step 4

Next, duplicate this layer. You can do so by right-clicking (on PC) or Control-clicking (on Mac). From the resulting menu, select Duplicate Layer

We want three copies of this layer in total—one for each of our planned interactions. 

Duplicating Layers

Step 5

Next, merge these three layers together. 

To do so, hold Shift to select multiple layers at once. Then, right-click (on PC) or Control-click (on Mac). From the resulting menu, select Merge Layers

Note, this combines the layers together. You may want to keep them independent. Keep in mind, however, that if you decide that you want to separate this content, it's as simple as cutting and pasting onto a new layer, once again. 

Merging Layers

Step 6

Now, Duplicate our merged layer, using the same process. 

This leaves us with two copies of the same three polygons. Use the Move Tool to adjust their alignment—if you're following along with me, we want it to look as if one is "on top of" the other, as shown below. 

Using the Move Tool

Step 7

Now, Lock Transparency on our bottom set of polygons. This will allow us to apply color without worrying about going "outside of the lines". You can Lock Transparency in the Layers panel, as shown below. 

Select a blue and a cyan color for your foreground and background colors—or select any colors you prefer! You can find your colors in the Tools—click on the colored squares to open up the color picker. 

Selecting colors

Step 8

Use the Gradient Tool to apply a gradient to our bottom polygons. Simply click and drag to apply your gradient. 

Again, the color will "stay" in this area, because we have Lock Transparency on in our Layers panel. 

Applying a Gradient

Step 9

Now, let's add some text with our Text Tool. It's hard to see, below, but I've typed out "new follower".

Since it's hard to see, let's add a Stroke to this text to help improve its visibility. 

To do so, select the text layer and then click on Add a Layer Style, in the Layers panel. That opens up the following menu, as shown below—select Stroke

Adding Layer Styles

Step 10

Here's what our Layer Style options look like—feel free to copy my values! I went with a 3 px Stroke.

Once you're happy with your settings, click OK

Stroke Options

Step 11

Repeat this process twice, so that we have text above all three polygons. 

Repeating the process

Step 12

When I'm working on an overlay, I often like to insert sample content, just so I can get a feel for how things look. In this case, I added some test names to each of my sections, in blue, so I could see what it looks like when there's content there. 

I did so using the Text Tool—and I put this content within a Folder. You can create folders at the bottom of the Layers panel. Folders (or groups) are a great way to keep your content organized. I'll be using them, in this tutorial, but they are optional. 

Adding sample text

Step 13

Now, let's create a space for some social media content. 

Similar to our original polygons, I created a New Layer, in a new folder (I want to keep the different parts of my layout organized). 

I started out by drawing a selection using the Polygonal Lasso Tool. Then, fill the space with the color of your choice, using the Paint Bucket Tool—I went with black, again. 

New Section

Step 14

Notice a pattern here? We're going to repeat the process that we did with our other black shapes:

  • Copy the layer.
  • Move the Layer, using the Move Tool, so one looks "in front of" the other.
  • Lock Transparent Pixels in the Layers panel, so we can't apply color "outside of the lines".
  • Then apply your gradient, using the Gradient Tool

Our goal is to create a similar look, so the content here matches. 

Adding a duplicate gradient

Step 15

Now, let's add some content here.

You could add anything you like here—social media icons, names, URLs, a notice, anything you like! In this case, I added two social media shout-outs here, so they remain on screen and easy to see.

I used the Text Tool to write the social media handles, and then I copied and pasted some social media icons into my layout. 

Here are the social media icons I used, if you'd like to use them too!

Adding social media content

Step 16

Next, I decided to add a space for a web camera. Again, I want to note that this all depends on what you want to include in your layout—you could, for example, leave this section out entirely! 

Repeat the same process from Step 14 and 15—only for our web camera's space.  

Note, you may want to take into consideration your web camera's dimensions. I chose to work with 640 pixels wide by 480 pixels high as my general basis (for example, create a new document at this size, paste it into your document, and then scale it using the Move Tool or Free Transform). 

Then, I scaled this down, so I knew the aspect ratio would remain the same. 

webcam overlay maker

Step 18

Again, I like to have sample content in my layout, so I can get a feel for how things are coming together. In this case, I chose to apply a test image to my web camera space.

If you'd like to do so, too, paste your image into your document. Make sure the layer containing this image is right above the black square we've designated for the web camera's space.

Then, select the image layer and right click (on PC) or hold control and click (on Mac), and select Create Clipping Mask from the resulting menu. Now, we'll see a sample image displayed within this space. 

Adding a test image

Step 19

Let's add a space for our subscriber goals, too! I want this to look like a progress bar, so I kept that in mind when creating these shapes.

Don't worry about the progress bar itself, just yet—just make sure there is a space for it, and that it visually matches the rest of our composition. Follow the same steps to create the blue gradient look behind our black content spaces. 

Adding a progress bar

Step 20

I decided I wanted to add some additional decorative elements to my layout. 

In this case, I created a New Layer. Then, I used the Rectangular Marquee Tool to draw a horizontal selection. I then used the Paint Bucket Tool to fill this space with black. Sound familiar?

Creating a long line

Step 21

As you might have guessed, I used the same process again to create a gradient blue line beneath this long black line! I'm trying to keep the visuals here consistent.

Follow the same steps with any colors you prefer!

Finalizing the lines

Step 22

We don't have to stick to straight lines—in fact, our layout uses some fun diagonals, so I thought it might be fun to create a bottom line that plays into this. Again, this is the same process as the previous line.

Experiment with different visual directions! 

Bottom lines

4. How to Prepare Graphics for a Stream Overlay

Step 1

At this point, I was pretty happy with my layout—so let's prepare it for OBS! 

First, make sure to remove or hide any test content, like names or pictures that you put into your layout, just for example purposes. 

Then, we need to selectively merge our layers. For example, I want the contents of my "Top Line" folder to be merged into one layer, so I can export it as one image. 

Hold Shift while selecting the layers you'd like to merge. Then right-click (on PC) or Control-click (on Mac) and select Merge Layers from the resulting menu to combine them. 

Don't merge everything together!Merge specific elements so they no longer have layered components. Think about what images you want to act as one unit, and which you'd like to keep independently.

Merging Layers

Step 2

Here's an example of my layers, after everything has been merged. No more folders, no more multiple parts to each component of my layout.

Below, only the top information bars are visible (you can toggle visibility on and off by clicking on the "eye" next to each layer). Notice, again, that this is all on one layer—the black polygons, the blue polygons behind them, and the text. 

Keep the layer you'd like to export selected. 

Merged Layers

Step 3

Now, we need to select this content. Go to Select > All to select your entire canvas. 

Selecting all

Step 4

Then, Copy (Edit > Copy) and Create a New Document

Now, Paste (Edit > Paste)—Photoshop should paste the content we copied from our layout, as shown in the example below. Notice, however, that it is exclusively the one, merged part of our layout that we had selected. 

Save this content as a PNG file—so the background stays transparent. 

Repeat this processfor each part of your layout. You could, in theory, export your entire layout as one transparent PNG, but I often prefer to keep different pieces separate. The choice is yours!

Isolated part of layout

5. How to Use a Stream Overlay 

Step 1

Now, let's take our work and discuss how to add a stream overlay to OBS. While we'll specifically be using Streamlabs OBS in this tutorial, the premise is similar in OBS Studio—adding in your sources, so you can broadcast with them. 

Make sure you have Streamlabs OBS installed. If you don't, or you have questions about installation, check out this tutorial from Streamlabs

Start off by creating a new Scene. Under the panel that says Scenes, click on the plus sign to create a new scene. When you do so, you'll be prompted to name your new scene. 

I decided to call my scene "My Overlay". Name yours whatever you would like!

Creating a new Scene

Step 2

But our scene doesn't have anything in it yet! That's because we haven't defined any Sources

Again, click on the plus sign, this time in the Sources panel. 

Adding a Source

Step 3

Doing so brings up a whole host of options! However, we're going to start off with Image, from the list of possible sources.

Select Image as the source, and then click Add Source

Adding an Image Source

Step 4

Here are the resulting popup options. We want to Add a new source instead—give it a name, and click Add Source

If we don't toggle "Add a new source instead" on, we can choose from old sources that we've already defined. Handy! 

Defining a source

Step 5

Now, select the image you'd like to import—this would be one of the images we exported from Photoshop.

In the example, below, I've selected the transparent PNG that contained our three black polygons. 

Once you've selected your image, click Done

Importing an Image

Step 6

Now, you'll see that Streamlabs OBS has imported the image into our visible area. 

Click and drag to position the image where you'd like it to display in your layout. 

Repeat this process, and continue to import your images. 

Positioning Images

Step 7

Let's take a look at an example. 

In this case, I've imported two images—I have the line that goes across my layout (which I've called "Top Line"), and my three polygons (which I've called "Top Notifications").

However, they're in the wrong order here—the line should not be on top of my notifications. 

Images in Order

Step 8

Luckily, rearranging sources is easy! 

Simply click and drag to rearrange your sources. Now, I've got my line behind my polygons, so they display together as I intended in my design. 

Rearranging Images

Step 8

Here's a look at my Streamlabs OBS, after I've imported all of my imagery. 

(I included a static background image, as well, just for visibility. This is where I'd have my gameplay or stream footage). If you're unsure of how to import images, please return to Step 2.

But, we're not done yet! What about our notifications? Click on the plus sign in your Sources, again, to add a new source. 

Imported Imagery

Step 9

However, this time we don't want to select Image—we want Stream Label

Select Stream Label from the list of Sources, and then click Add Source

Stream Labels

Step 10

Just like when we added an Image, we want to select Add a new source instead to create a new source. 

Give your new source a descriptive name, for your reference, and then click Add Source

Adding a New Source

Step 11

We have so many options when it comes to our Stream Labels! 

Most importantly, make sure to look at the Label Type. Below, I've selected Most Recent Follower, because that's the information I'd like displayed. Take a look through the list, however! There are so many different things you could choose here, like your top donor for the month, most recent cheer, and much more!

You can change the font, the color, the opacity—a whole bunch of options here! Change them to best suit your design. For example, I set my font family to Quinta Pro, the size to 36, and the color to #0000faff

Click Done when you are happy with your selections. 

Adjusting Stream Labels

Step 12

Now, just like when importing imagery, click and drag to align your text in your layout. I positioned mine on top of the corresponding black polygon—the one that says "new follower". 

Adjusting Stream Labels

Step 13

Repeat this process for any other dynamic text in your layout. 

Again, there are so many Stream Labels to choose from—I chose to work with my newest follower, my newest subscriber, and my latest donation. 

Adding Stream Labels to your Overlay

Step 14

Now, let's add in our subscription goal! Start by adding a new source. 

Looking at the Add Source options, again, we can choose Subscription Goal, instead of Image or Stream Labels. It's located under Widgets

Streamlabs Widgets

Step 15

Familiar yet? Add a new source instead of working with an existing one, and give your source a name, for your reference. Then, click Add Source.

Adding a New Source

Step 16

Here's a look at our Subscription Goal settings. 

Go ahead and put in the values that you prefer. For example, give your goal a title, set the amount of your goal, add a starting amount, if you like, and an end date. You can also edit the width and height in the upper left-hand portion of the settings. 

Click on Start Goal once you're happy with your properties. 

Stream Subscription Goals

Step 17

Once we've clicked Start Goal, we can see a preview of our subscription bar.

If you want to change the properties, click on End Goal and adjust them. 

If you're happy with your values, click Done

Previewing Stream Goal

Step 18

Now, as we did with previous sources, click and drag to adjust and align your subscription goal bar. You can also resize things from this preview—just use the resize handles. 

Adding a Subscription Goal to your Stream Overlay

Step 19

Let's take a look at some other common sources that you might want to use in your stream layout. 

First, check out the Display Capture. This captures your entire monitor. I like to use this if I'm using more than one program at a time—for example, if I want to share both Photoshop and AfterEffects (my entire screen). 

Stream Display Capture

Step 20

Then, we have Game Capture. This will capture a game that you're playing on your computer. Generally speaking, most of my computer games have worked properly with this source. Simply define the game, and voila!

Stream Game Capture

Step 21

Window Capture does what it sounds like—it captures a specific window on your computer. This is handy if I want to exclusively stream Photoshop and nothing else, for example. 

Stream Window Capture

Step 22

Video Capture Device is the source I typically use when I want to display my webcam. I can define it as my video source, and then preview my camera, within Streamlabs OBS. 

Video Capture Device Streamlabs

And This Is Just the Beginning!

As you may have guessed, there are so many things you could do with your stream overlay. I like to experiment with animated GIFs and MP4s, for example. You can add text right here in Streamlabs OBS, you can show your chat on screen, and more! You can even have a credits roll! 

Hopefully, this has given you a taste into some of the possibilities! Streamlabs has an awesome tutorial on how to get started, if you have questions about installation, stream settings, and more! 

This is just a taste of what you could create and how you could create it—good luck with your stream overlays!

how to setup stream overlay obs

I love experimenting with new stuff for my stream—videos, panels, lighting—it's all a lot of fun! If you're looking for extra help in customizing your stream and your channel, you might want to check out Placeit! It's a user-friendly stream overlay maker, "stream starting soon" overlay maker, and more!

There's so much content to customize, and it's super easy to use. Check it out!

stream starting soon overlay obs

If you enjoyed this tutorial, here are some others you might enjoy!

35 Twitch Panel Templates (Using a Twitch Panel Maker)

$
0
0

Want to create cool Twitch channel panels for your Twitch account?

35 Twitch Panel Templates using a Twitch Panel Maker
One of the stunning Twitch Panel Templates available at Placeit

If so, you need to check out the Twitch Panel Maker from Placeit. It offers terrific Twitch panel ideas and templates that will help you create your very own gorgeous custom Twitch panels quickly and easily. 

Follow along with us over on our Envato Tuts+ YouTube channel:

How to Make Twitch Panels Quickly and Easily

If you want to learn how to make Twitch panels, this short tutorial will teach you how to do so quickly and easily with a Twitch panel creator.

1. Navigate to the Twitch Panel Maker at Placeit.

How to Make Twitch Panels Quickly and Easily

2. Review the Twitch panel templates on offer and select the one you like the most.

For our example, I will teach you how to make a donation panel on Twitch.

3. To create Twitch panels, use the Twitch panel creator to customise the template provided.

  • Starting with the controls on the left, you can add your own text and change the font style and colour.

4. Move to the controls on the right

  • You can now change your background colour and the colour of the line dividing the image. 
  • Next, you can change the icon used in the panel by uploading your own or using one of those provided by the template. You can also change the colour of the icon here. 

5. When you're done, hit the Download button

Once you’re satisfied with your design, hit the download button at the top of the screen and download your custom Twitch panel for a small fee. 

If you regularly need to create banners, logos, flyers, posters, social media banners, etc., then the monthly plan may be the best deal for you. 

That’s how to make Twitch panels in five simple steps. Now let's take a look at the wonderful Twitch Panel Templates available at Placeit.

About Me Twitch Panel Templates

1. Twitch Panel Template for Cool Gamers

About Me Twitch Panel Templates

An About Me Twitch panel is a must for any Twitch channel. The Twitch panel creator has several About Me panels you can customise to suit your taste, like the Twitch Panel Template for Cool Gamers pictured here. Choose an icon to represent you or upload your own. Then personalise the text, add borders, and change your colours, and your 'About Me' Twitch panel is ready to download.

2. Twitch Panel Template for a Twitch About Me Panel

About Me Twitch Panel Templates

Amp up your Twitch channel with this cool About Me Twitch panel with funky colours and a fun skeleton wearing a beret. Of course, you can change every aspect of the design when you customise the template, so have some fun with it. 

3. Simple Twitch Panel Design Template

About Me Twitch Panel Templates

This split colour Twitch About Me panel is for those who like to keep things simple. It features bold text on one side and a simple gaming icon on the other. Choose your preferred colours, change the text and/or font, and then either upload your own icon, keep the one shown here, or choose another from those on offer. 

4. Girly Twitch Panel Maker

About Me Twitch Panel Templates

Hmmmmm! Not sure about the title of this Twitch About Me panel, but the panel itself would be a great choice for any gender. The beautiful gradient effect can be applied to any colour combo, and there are a plethora of gorgeous icons to choose from.

5. Twitch Panel Maker for an About Me Panel

About Me Twitch Panel Templates

Another variation on the panels above, this one offers a zig-zag dividing line that separates the two-colour panel. Use as is or modify the elements you don't like using the Twitch panel creator.

6. About Me Twitch Panel Template

About Me Twitch Panel Templates

This awesome Twitch About Me panel, with its transparent background, allows you to add a panel to your channel which gives the appearance of having a different shape from the usual rectangle. You can add a gradient to your background as well as a number of cool geometric shapes. 

7. Simple Twitch Panel Template for an About Me Button

About Me Twitch Panel Templates

This About Me Twitch panel template offers a number of options to jazz up your panel. Apart from being able to change the icon, the text and font, and the colours, you can also change the shape of the banner inside the rectangle in various ways to create a panel with a unique look and feel.

Follow Twitch Panel Templates

8. Twitch Panel Template for a Social Media Follow Button

Follow Twitch Panel Templates

Looking for Twitch Channel panels that encourage viewers to join your tribe? Then you'll need some awesome follow Twitch panels like the ones featured here, starting with this panel, which alerts Twitter users that you too have a Twitter account and encourages them to connect with you there.

9. Follow Twitch Panel Maker with Minimalist Design

Follow Twitch Panel Templates

Of course, you also need a follow Twitch panel that encourages visitors to follow your stream. Create Twitch panels that catch the eye and encourage people to click that follow panel with this template. All you need to do is upload your logo to the right side of the template, add the text you want, select your colour scheme, and your panel is ready to download. 

10. Twitch Panel Template with Social Media Icons

Follow Twitch Panel Templates

If you have loads of social media accounts, this is a great template you can customise to encourage visitors to follow each one. Just set up your colour scheme and text for each one, and then upload a different social media icon to the left. If you want to differentiate each panel a bit, you can vary the geometric overlays provided for each one. 

Twitch Donation Panel Template

11. Donations Twitch Panel Maker

Twitch Donation Panel Template

When you need to create Twitch panels to encourage donations to your channel, you can find tons of Twitch panel ideas on Placeit. This Twitch donation panel is a great example of a template you can use as is or customise by using your own logo or one of the icons provided. Then add your text and colour scheme, and your Twitch donation panel is ready to add to your channel. 

12. Twitch Panel Creator for a Donation Link

Twitch Donation Panel Template

This Twitch donation panel directs viewers to your Patreon account. It's a good idea not just to ask for donations but to indicate where you're sending viewers when they click on your donation button. 

13. Twitch Panel Maker for a Donate Button

Twitch Donation Panel Template

Using please when you're asking for anything is always a good idea. So when you're customising your Twitch donation panels, it's a good idea to remember to chuck a please in there when you can.

14. Twitch Panel Creator

Twitch Donation Panel Template

Of course, the other magic word is thank you, another great option to add to your text when asking for something. So maybe when you're customising this particular Twitch donation panel, all you need to do is change the colours and perhaps the font used if you like, and leave everything else as is. Just a thought!

15. Simple Twitch Panel Template for a Donations Panel

Twitch Donation Panel Template

What better way to encourage donations on your Twitch donation panel than with a money icon? Maybe you can also use the colour green, which is the colour of life and growth.

16. Twitch Panel Maker for PayPal Donations

Twitch Donation Panel Template

By now, you are familiar with this terrific Twitch channel panel with its transparent background and cool shape. I've included it here to show how you can use it repeatedly on your channel for different purposes by customising the colours, text and icons used. 

Discord Twitch Panel Templates

17. Twitch Panel Design Maker for Gamers

Discord Twitch Panel Templates

Need to create Twitch panels to invite visitors to chat with you via Discord? Well, Placeit has you covered with a collection of awesome Discord Twitch panels. And, of course, these panels are as easy to customise as all the other panels featured here. 

18. Customizable Twitch Panel Maker

Discord Twitch Panel Templates

As a Twitch user, you know that Discord has its own nifty little icon, so I wouldn't recommend replacing it if you want to catch the eye of visitors to your channel, but you can use the other settings in the Panel maker to change the frame, text and colours of your panel. 

19. Simple Twitch Panel Template with Gamer Icons

Discord Twitch Panel Templates

And, of course, you can customise this familiar template use for your Discord Twitch panel as well. The Panel maker colour palette is so extensive that the sky's the limit when it comes to creating unique colours to make your panel your own unique creation. 

20. Twitch Panel Creator for a Simple Chat Button

Discord Twitch Panel Templates

This very clean and simple design is a great idea for your Discord Twitch panel. It uses a simple circle around the Discord icon to help it stand out and uses a bold, clean sans serif font for the text. 

21. Modern Twitch Panel Template for a Chat Panel

Discord Twitch Panel Templates

Another Discord Twitch panel with a simple design. You can use as is, but remember everything here is customisable, so feel free to change things up to suit your taste.

Twitch Subscribe Panel Templates

22. Subscribe Twitch Panel Template with Badge

Twitch Subscribe Panel Templates

Every Twitch account needs a subscribe panel to encourage visitors to support the channel, so of course we have to include a set of Twitch subscribe panels here. Use as is, add your own icon, or select one from the wide selection on offer. 

23. Subscribe Twitch Panel Maker with Modern Icon

Twitch Subscribe Panel Templates

One of the cool features of this Twitch subscribe panel is the awesome background texture effects. There are so many fun choices here that you are going to have a hard time settling on just one. 

24. Subscription Twitch Channel Panel Template

Twitch Subscribe Panel Templates

Make your Twitch panels for subscriptions shine with this follow Twitch panel that offers a dizzying array of customisation features. Try them all out to see which combinations you like the most. 

25. Twitch Panel Creator for a Subscription Button

Twitch Subscribe Panel Templates

Your visitors will find it hard to resist following your channel with this altogether fabulous Twitch subscription panel. Of course, you can customise it in any way you like using the brilliant panel creator, but really why bother when it already is just perfect. 

26. Twitch Panel Design Template for Twitch Clans

Twitch Subscribe Panel Templates

And of course I had to slip in our old favourite one more time to show you another example of how customisation can give many different faces to one template. 

Twitch Schedule Panel Templates

27. Streaming Schedule Twitch Panel Creator

Twitch Schedule Panel Templates

If you're looking for a Twitch schedule panel to let your visitors know when you're going to be streaming, then this custom Twitch panel is the one for you. Featuring a calendar on one end and title on the other, it's simple and to the point, yet stylish and eye-catching. 

28. Twitch Panel Maker with Robot Clipart

Twitch Info Panels Templates

I can hear you saying, "Wait a minute here, that's not a Twitch schedule panel!" You're right, this template wasn't designed exactly as a Twitch schedule panel, but I included it to make the point that any panel that you like can be customised to your needs. All you need to do is change the icon, text and colours and you can easily change this into a Twitch schedule panel. Easy peasy. 

Twitch Contact Panel Templates

29. Twitch Panel Template for a Contact Button

Twitch Contact Panel Templates

Every channel needs a Twitch contact panel. If you're wondering how to make Twitch panels so visitors can contact you, we've got the perfect solution for you: use a Twitch contact panel template like this one. As is the case with the other templates featured here, customisation is easy.

30. Contact Twitch Panel Template

Twitch Contact Panel Templates

Here's another example of a Twitch contact panel available at Placeit. This one features the very familiar envelope and beautiful bold text next to it. The texture background and red accent frame are a nice touch. Of course, you may want to keep some of these design ideas and change others, and the beauty of using the Twitch panel creator is that you can do so quickly and easily. 

Twitch Info Panels Templates

31. Twitch Panel Creator for a Gaming Crew

Twitch Info Panels Templates

Let's face it, there are tons of different panels each individual Twitch user could make for their channel. We've tried to cover the most popular, but we cannot cover all of them. For the myriad other categories, we've bundled a few under the heading Twitch info panels. Let's start with this one. Bold and eye-catching, this could probably be included under "About", but we thought that it's distinct enough to warrant its own category. 

32. Twitch Panel Creator for a Chat Rules Panel

Twitch Info Panels Templates

Rules: we all need them, and so do you. Use this Twitch info panel to indicate to your visitors what they should know first before diving into your channel. 

33. Colorful Twitch Panel Design Template

Twitch Info Panels Templates

This cool Twitch info panel is just a great thing to have on your site because it acknowledges your supporters and lets them know you appreciate them. Customise as needed with your own font style, colours, and icon. 

34. Twitch Panel Creator for a Live Stream Gameplay

Twitch Info Panels Templates

Use this Twitch info panel to alert your supporters to your live-stream gameplays or to customise for whatever purpose you need. 

35. FAQ Twitch Panel Template

Twitch Info Panels Templates

Anyone who has any type of popular site on the internet is frequently asked the same questions over and over again. So it goes without saying that a Twitch info panel that's dedicated to frequently asked questions is a life saver. Use as is or customise it to your needs. 

Discover More Twitch Templates and Resources

If you're interested in learning more about creating Twitch resources or want to find some more premium Twitch channel templates, check out the following articles:

Choose Your Favourite Twitch Channel Panel Today

You can create Twitch channel panels quickly and easily with minimal cost when you use the Twitch panel creator.

These 35 Twitch panel ideas and template examples are just a few of the custom Twitch panels you can create with the Twitch panel maker at Placeit. I hope they have given you tons of inspiration, and you now feel confident that you know how to make a custom Twitch panel for your channel. Use your favourite template to make your own panel and share it with us here. We’d love to see what you come up with.

How to Make the Best Magazine Cover Design (& Learn the Anatomy of a Magazine Cover)

$
0
0

In this article, we'll show you the anatomy of a magazine cover so you can learn to make the best magazine cover designs by yourself.

Designing a magazine cover can be tricky as there are many different approaches. An effective cover includes many different elements, and the challenge lies in making all of them work like a fine-tuned orchestra. In this article, we’ll show you how to make the best magazine cover design possible. We’ll go through the different elements that exist on this important page—so you’ll learn some magazine front cover terminology—and their impact on your design and the reader. We’ll also talk about some famous cover designs throughout history.

Looking for stylish magazine cover templates? Envato Elements and GraphicRiver have awesome, high-quality libraries with magazine cover design inspiration for you to browse.

If you want to jump right into some of the best magazine cover tutorials, be sure to check out our tutorials on how to make a magazine cover:

What Are the Elements of a Magazine Cover?

The cover of a magazine is the most important opportunity to sell your publication to readers. The best magazine cover layout design grabs attention, is visually striking, and stands out from the rest. A magazine cover is an opportunity to invite your readers to explore the publication, acting as a midpoint. A good combination of elements will make the perfect magazine cover. So, what are the most essential elements you should have on your magazine cover design? Let’s take a look and use the image below as a magazine terminology glossary:

Anatomy of a Magazine Cover

As you can see, there are many elements that make up a magazine cover template. Let’s expand the elements shown above and learn about the impact they make:

Masthead

If you've ever wondered how to design your own magazine cover, it's best to start with the masthead. This element is one of the most important on the cover of a magazine. This is where branding also becomes important. The masthead is the title of the magazine and the most consistent element throughout the publication's issues, and it's how readers will recognize the magazine on stands.

The masthead is the largest font size that will exist in the magazine. While the size and placement are consistent, the colors of the masthead will change to match the theme or main image. Check out the cover of this InDesign magazine template.

HQ Letter Embraced InDesign Magazine Template (INDD)

This minimal magazine cover is clean and modern. The masthead is placed near the bottom of the page. The cyan details make it stand out against the subtle colored image and the white background. This magazine cover template also comes with 25 interior pages so you can complete your design.

HQ Letter Embraced InDesign Magazine Template

Magazine Deck

Not all magazines have a deck, but it can be useful to describe the magazine’s philosophy or the type of publication. The magazine deck is usually only a few words long—it should be concise and to the point.

Date Line

This is the month, year, and issue number of the publication. Sometimes the price will also be included in this group. Depending on the publishing frequency, some magazines may use the month and year (January 2020), while quarterly magazines may include the season and the year (Summer 2020).

Magazine Issue

Magazine issue numbers are usually displayed as Volume X, Issue X. Volume refers to the years the magazine has been in circulation, while issue refers to how many times it has been published during that year. For instance, for a monthly magazine that was published in March 2020 and has been in circulation for 20 years, the listing would be “Volume 20, Issue 3”. If you're looking for magazine cover ideas to get some inspiration, be sure to check out these articles:

Main Image

The main image of a magazine can be a photograph or an illustration. That’s decided depending on the main story of the magazine and the art direction. Low-quality images can really ruin a magazine cover. Many magazines set up special photoshoots or commission illustrators to create a unique cover and use conceptual images. Crisp, clean, and detailed images will attract readers' attention and just scream quality.

Use visually strong images with a clear focus; cropping is totally acceptable here. Avoid using busy backgrounds, and choose a focal point on your image. Choose an image that will create an instant emotional connection with your audience.

Pro tip: If using a portrait, make sure the subject is making eye contact with the camera and therefore, the audience—it’ll draw the readers in. Experiment by making your own cover for a magazine and using your own image with the very best magazine cover tutorials:

Lead Article Line

Every magazine has a main theme for the issue, and that makes the lead article line on a cover. Try to emphasize the lead article line by using a slightly different font that goes with the theme. You can also use different colors that complement the imagery and adjust the size to have more prominence on the cover. This will create a dynamic cover and will be sure to draw your reader’s eyes to the lead article line element first.

Cover Lines

When it comes to the placement of the cover lines, aim for balance. Cover lines are set at a smaller point size compared to the lead article. Every magazine has one, depending on the topic or the person being interviewed. The cover line topics can revolve around the main theme of the magazine, but not necessarily. Cover lines should have no more than ten words and must be concise. Use words that will draw your readers in. Below, we're featuring a font from Envato Elements that's suitable for magazine cover designs:

Loverica Regular

This classic and modern sans serif is the perfect font for a magazine cover design. It's elegant and suitable for a fashion magazine. The set comes with seven styles and supports multiple languages.

Loverica Regular
Loverica Regular

Website Link

The rise of digital devices gave room for magazines to extend their contact on their websites. Remind your customers where they can find you online, be it your website or any other social media channels.

Price and Bar Code 

Bar codes are taken care of by the printing house, but you do have to make sure to leave room for them. Their placement is at the bottom-left corner of the cover, and this space can also include the price of the magazine. Another option is to put the price next to the date and issue number of the magazine.

Iconic Magazine Covers

Print may be almost dead, but magazine covers are still very relevant. Cover designs are one of the most talked-about parts of a magazine as they can impact and influence society. Covers can be a catalyst to start conversations that can make significant social change. To give you some magazine cover ideas, here are a few of the covers we've seen throughout history that have made an impact:

The New Yorker, 9/11/2001 magazine cover from their September 24th, 2001 issue represented the attacks of September 11 a few weeks before. The illustration by Françoise Mouly and Art Spiegelman shows the black silhouette of the Twin Towers against a dark background. The attacks shut down the world, and the image of a dark NYC was a representation of the somber memory. This striking cover works because it's rare to see magazine covers entirely dark, and this was a powerful one that represented the emotion of the Western world.

The New Yorker 9112001 September 24th 2001
The New Yorker, 9/11/2001, September 24th, 2001

Esquire's cover design from October 1966 featured only type with the sentence "Oh my God—we hit a little girl" followed by "The true story of M Company. From Fort Dix to Vietnam" over a black background. Needless to say, the cover had a dark connotation. The story was about soldiers from M Company, from their time training in the U.S. to their deployment in South Vietnam. This cover made a big impact on society that led people to think differently about the Vietnam War and ultimately contribute to its ending.

Esquire October 1966
Esquire, October 1966

Ellen Degeneres graced the cover of Time Magazine on April 14, 1997, with the cover line "Yep, I'm Gay" which was risky at the time. With this cover, she became a pioneer in the fight for LGBTQ rights and now stands as one of the most well-known activists. Degeneres's Time magazine cover is simple and clean, and the colors mimic the American flag as this was one giant step for society as a whole. 

Time Magazine April 14 1997
Time Magazine, April 14, 1997

The most famous cover in the world comes from National Geographic's June 1985issue. It features a striking photograph of Sharbat Gula, an Afghan refugee living in a camp at the border of Pakistan. Her gaze is haunting, and she had been hiking for weeks before arriving at the camp. Eye contact is important in any cover that features a person as the audience can make an easier and deeper connection with the subject.

National Geographic June 1985
National Geographic, June 1985

Get Started on Your Magazine Cover Design

Now that you've learned the anatomy of a magazine cover, here are some striking assets that can help you get started with your design:

Magazine Cover Design (PSD)

If you don't know where to start when it comes to how to make a magazine cover, worry not! Templates are here to the rescue. This magazine cover design template in Adobe Photoshop is ready to print—simply add a picture and new cover lines, and you're good to go!

Magazine Cover Design

Creative Magazine Cover Template (PSD, INDD)

The cover of a magazine is the most essential way to sell it to readers. This minimal cover is sure to stand out from other covers that are visually noisy. Change the magazine cover with your own picture—you can do that in either Photoshop or InDesign. Easy peasy.

Creative Magazine Cover Template

InDesign Magazine Template (INDD)

This professional magazine template includes 25 pages for you to showcase all of your amazing content. The layout is grid-based, so it'll always be visually perfect. This is one of the best magazine cover layout designs as it'll surely stand out from the crowd.

InDesign Magazine Template

Apsari Beauty InDesign Magazine Cover Template (INDD)

Less is more couldn't be more true—especially when you have beautiful, high-quality pictures to display on a cover. Take this image as magazine cover design inspiration. It's strikingly beautiful, and the color of the photograph and the layout can grab lots of eyes. Sometimes, something simple is just enough. 

Apsari Beauty InDesign Magazine Cover Template

3 Magazine Cover Templates (INDD)

Are you an avid magazine designer? This magazine cover template set is perfect if you're in a rush. With three magazine cover options, you can rest easy, and all you have to do is input your own content. The files are set in InDesign and organized with Character Styles—you already know this will save you lots of time.

3 Magazine Cover Templates

When you've got your magazine cover ready, place it on a mockup to see how it looks. We've got some awesome options that work for pitching your design to your clients:

Magazine Cover Mockup (PSD)

Pitching a magazine to your peers? Magazine cover mockups will help you take everything to the next level and make your design as realistic as possible. This file is based on a real photo—all you need to do is load up Adobe Photoshop and place your file, and voilá.

Magazine Cover Mockup

A4 Magazine Cover Mockup and Spread (PSD)

Present your magazine cover design in the most professional way with this magazine cover mockup. You can also add the rest of your magazine, perfect for a portfolio piece. The layers allow you to customize the shadows, other effects, and even the background to match your magazine design.

A4 Magazine Cover Mockup and Spread

Conclusion

The anatomy of a magazine cover is essential, not only to drive sales up but also to be able to make an impact within our society. This article showed you how to design your own magazine cover by understanding every element you need. Nowadays, a successful magazine cover has to work on social media, bring awareness to important topics, and start conversations in our society. We've shown you plenty of magazine cover design inspiration to keep in mind for your next project.

We know that creating magazine covers can turn into a real challenge, especially if you don't have much experience. Magazine cover makers like Placeit can help you make your magazine cover by providing a number of magazine cover templates. So if you are facing time or budget limits, give this magazine cover maker a go!

Envato Elements and GraphicRiver have an ever-growing library of assets containing everything from InDesign magazine templates to the best magazine cover layout designs. Be sure to check it out!

We also have some great tutorials on creating your own magazine cover that can help you get started:

100 Great Photoshop Tutorials for Clever Beginners

$
0
0
Final product image
What You'll Be Creating

Before you can create Photoshop masterworks, you need to learn the basics. Even the most complex digital artworks are built on a foundation of simple actions. These 100 tutorials are aimed at the clever beginner who wants to master Photoshop from the roots.

Pro Photoshop Resources

There are a number of ways to make a living with your Photoshop skills. We have a series of articles that explore careers in design and illustration, which is a great starting point to explore after you work more in Photoshop.

Also, as your design skills improve, you can sell graphic components yourself and earn a solid income. We have plenty of professional resources available on Envato Elements, with unlimited downloads for a low monthly price. 

Take a look at our awesome range of Photoshop actions and Photoshop brushes, for example. You can use these to bring the "wow" factor to your projects and start building a freelance clientele.

Photoshop addons on Envato Elements
Photoshop add-ons on Envato Elements

Or watch a free course on how to use Photoshop from the ground up. Certified Adobe instructor Daniel Scott teaches you all the essential features in more than three hours of easy-to-watch video.


Now let's get into these free Photoshop lessons!

Text Effect Photoshop Tutorials

These tutorials are a great entry point into Layer Styles in Photoshop.  

  • Dramatic Text on Fire Effect in Photoshop

    Dramatic Text on Fire Effect in Photoshop

    Flames are particularly hard to render in Photoshop, but in this tutorial Collis Ta'eed will show you how to use a photograph of fire to set text to the match. You'll render the look on a nice dark background with a gorgeous text effect to complete the image.

    Visit Tutorial

  • How to Create a 3D Text Effect Action in Photoshop

    How to Create a 3D Text Effect Action in Photoshop

    In this tutorial, Melody Nieves will teach you how to make a 3D effect Photoshop action to create a simple 3D text effect.

    Visit Tutorial

  • How to Create a Disney Frozen Inspired Text Effect in Photoshop

    How to Create a Disney Frozen Inspired Text Effect in Photoshop

    Create a text effect inspired by the Frozen Disney movies with Enrique Eliçabe. The main concept is to show you how to create an ice texture effect with a variety of textures and text style attributes with Adobe Photoshop.

    Visit Tutorial

  • How to Create a Realistic Chrome Text Effect in Adobe Photoshop

    How to Create a Realistic Chrome Text Effect in Adobe Photoshop

    This super easy and quick tutorial by Rose will show you how to use a couple of textures and layer styles to create a shiny, reflective chrome text effect.

    Visit Tutorial

  • How to Create a Stranger Things Inspired Text Effect in Adobe Photoshop

    How to Create a 'Stranger Things' Inspired Text Effect in Adobe Photoshop

    Rose shows you an easy way to create a text effect inspired by the 'Stranger Things' series, using only layer styles and some simple adjustments.

    Visit Tutorial

  • How to Create an Underwater Text Effect in Photoshop

    How to Create an Underwater Text Effect in Photoshop

    Water can make for such beautiful, inspiring visuals! In this tutorial, Daisy Ein will take some text and visually "place it" underwater—creating a wavy text effect, looking down and into the water, with the text beneath.

    Visit Tutorial

  • How to Create a Cloud Effect in Photoshop

    How to Create a Cloud Effect in Photoshop

    Want to know how to make cloud shapes, cloud text, and cloud brushes, really quickly and easily? With John Negoita, you can make realistic cloud shapes using your own images.

    Visit Tutorial

  • How to Create a Realistic Embroidery Text Effect in Adobe Photoshop

    How to Create a Realistic Embroidery Text Effect in Adobe Photoshop

    In this tutorial, John Negoita will show you how to create a realistic embroidery text effect in Photoshop using stitch brushes and layer styles. The end result will be a font that looks like embroidery!

    Visit Tutorial

  • How to Create a Japanese Brush Font Text Effect in Photoshop

    How to Create a Japanese Brush Font Text Effect in Photoshop

    Create a completely custom font effect from scratch easily and quickly. In Abbey Esparza's tutorial, you'll find step-by-step video instruction.

    Visit Tutorial

  • How to Make a Graffiti Text Effect With Photoshop Layer Styles

    How to Make a Graffiti Text Effect With Photoshop Layer Styles

    In this tutorial, Jan Stverak will show you how to create a graffiti text effect in Photoshop. You will use layer styles and the "Blend If" function from the blending options.

    Visit Tutorial

  • How to Create a Realistic Neon Light Text Effect in Adobe Photoshop

    How to Create a Realistic Neon Light Text Effect in Adobe Photoshop

    Layering glow and gloss effects can help create nice, shiny objects. Learn with Rose how to modify a brick texture for the background, and then use layer styles with the Pen Tool to add some bright, glowing neon text and a simple cable over it.

    Visit Tutorial

  • How to Create a Clean Glossy Plastic Text Effect in Adobe Photoshop

    How to Create a Clean, Glossy Plastic Text Effect in Adobe Photoshop

    Using multiple layer styles can help achieve a more detailed and 3D-looking effect. Rose will show you how to use layer styles, filters, textures, brushes, and adjustment layers to create a shiny, clean plastic text effect in Adobe Photoshop.

    Visit Tutorial

  • How to Create a Cartoon Rainbow Text Effect in Photoshop

    How to Create a Cartoon Rainbow Text Effect in Photoshop

    Text effects and Photoshop text styles can be a lot of fun—they can be expressive, dynamic, and communicative! In this tutorial by Daisy Ein, you'll create a rainbow text effect in Adobe Photoshop using text effects, layer styles, and some other tricks too.

    Visit Tutorial

  • How to Create a Quick Broken Glass Text Effect in Adobe Photoshop

    How to Create a Quick Broken Glass Text Effect in Adobe Photoshop

    Rose will show you how to use a couple of layer styles to create a glass text effect. Then, you'll learn how to use the Selection Tool and masks to turn it into broken glass.

    Visit Tutorial

  • How to Create a Medieval Metallic Text Effect in Adobe Photoshop

    How to Create a Medieval Metallic Text Effect in Adobe Photoshop

    Wondering how to make stylish medieval lettering? Jan Stverak will show you how to create a metallic medieval text effect, using a pattern and layer styles.

    Visit Tutorial

  • How to Create a Cool 3D Comic Text Effect in Photoshop

    How to Create a Cool 3D Comic Text Effect in Photoshop

    In this tutorial, you will learn with Jan Stverak how to make a 3D text effect in Adobe Photoshop easily and quickly. You will use layer styles and a filter to add a comic book look to it.

    Visit Tutorial

  • How to Create a Leaf-Covered Text Effect Action in Adobe Photoshop

    How to Create a Leaf-Covered Text Effect Action in Adobe Photoshop

    Create your very own natural-looking text effect using layer styles with the power of patterns. Follow Anderson Luiz and you'll learn the ins and outs in no time.

    Visit Tutorial

  • How to Create a 3D Jewel Text Effect Action in Photoshop

    How to Create a 3D Jewel Text Effect Action in Photoshop

    Anderson Luiz will show you how to create fake 3D Photoshop actions. This text effect looks as if it's made of a faceted ruby.

    Visit Tutorial

  • How to Create a Cartoon Text Effect in Adobe Photoshop

    How to Create a Cartoon Text Effect in Adobe Photoshop

    Create an easy cartoon text effect using a pattern and a layer style with Jan Stverak. In this easy tutorial, you'll learn how to use different layer styles to make a bold, colorful effect.

    Visit Tutorial

  • How to Create a Fun Felt Photoshop Text Effect

    How to Create a Fun Felt Photoshop Text Effect

    Learn how to create a stitched felt Photoshop text effect in just a few easy steps. This effect by John Negoita is great for the winter holidays.

    Visit Tutorial

  • How to Create a Layered Floral Typography Text Effect in Adobe Photoshop

    How to Create a Layered Floral Typography Text Effect in Adobe Photoshop

    Floral typography is a design trend that combines nice floral elements with bold typography to create some elegant designs. Learn how to create flower text art in Photoshop with Rose. This tutorial will show you how to use a flower stock image, with simple text and a couple of layer styles, filters, textures, and adjustments, to create your own floral typography design.

    Visit Tutorial

  • Quick Tip Create a Candy Flavored Text Effect in Photoshop

    Create a Candy Flavored Text Effect in Photoshop

    Want to know how to create a sweet and tasty text design? In this quick tip tutorial, Enrique Eliçabe will explain how to create a "Caramelo" glossy candy cane style text effect in Adobe Photoshop.

    Visit Tutorial

Photo Manipulation Photoshop Tutorials

Want to make really impressive pictures? These tutorials will help you to achieve your goals.  

  • Mix Cool Retro Curves Into Your Photographs

    Mix Cool Retro Curves Into Your Photographs

    Inspired by James White's designs, Fabio Sasso decided to figure out his own way of creating that type of effect in Photoshop. In this tutorial, he shows you how to mix cool retro geometric shapes into your photo.

    Visit Tutorial

  • Create a Basic Vexel Image

    Create a Basic Vexel Image

    Alvaro Guzman will show you how to make a stylish comic-look image from a regular photo portrait. You'll learn a basic way to create a vexel image predominantly using Photoshop's vector-based tools.

    Visit Tutorial

  • How to Create VHS Glitch Art in Adobe Photoshop

    How to Create VHS Glitch Art in Adobe Photoshop

    Do you like that grunge, glitched look on old VHS tapes? There are different ways to add such effects to your images and even create an animation from a static photo. Ivan Gromov shows how to convert your image to a VHS frame in simple steps, using only standard Photoshop tools.

    Visit Tutorial

  • How to Create a Dripping Paint Photoshop Effect Action

    How to Create a Dripping Paint Photoshop Effect Action

    In this tutorial, you will learn how to create an amazing, artistic paint-drip effect Photoshop action. Marko Kožokar will explain everything in so much detail that everyone can create it, even those who have just opened Photoshop for the first time.

    Visit Tutorial

  • How to Create an Awesome Dispersion Action in Adobe Photoshop

    How to Create an Awesome Dispersion Action in Adobe Photoshop

    In this tutorial, Marko Kožokar will show you how to create an amazing dispersion effect.

    Visit Tutorial

  • How to Add Realistic Falling Snow to a Photo in Photoshop

    How to Add Realistic Falling Snow to a Photo in Photoshop

    Falling snowflakes are a great way to make your winter photography much more interesting. Sometimes the weather doesn't cooperate, however, and you have to turn to Photoshop to get the job done. Tony Aube will explain how to create a realistic falling snow effect in Photoshop and show you how to apply it to your images.

    Visit Tutorial

  • How to Create a Colorful Collage in Adobe Photoshop  Lightroom

    How to Create a Colorful Collage in Adobe Photoshop & Lightroom

    In this tutorial, you will learn how to use Adobe Photoshop to create a colorful, futuristic collage featuring a beautiful woman. Kaylan Michael will also teach you how to retouch the artwork in Adobe Lightroom.

    Visit Tutorial

  • How to Make a Cool Photo Effect Album Cover Design in Photoshop

    How to Make a Cool Photo Effect Album Cover Design in Photoshop

    This tutorial by Abbey Esparza includes how to create a surrealistic body paint Photoshop portrait effect that you can use in your everyday art, not just on an album cover!

    Visit Tutorial

  • How to Turn a Landscape Photograph Into an Isometric Icon in Adobe Photoshop

    How to Turn a Landscape Photograph Into an Isometric Icon in Adobe Photoshop

    Wondering how to create an isometric icon? Mohammad Jeprie will teach you how to create an isometric perspective grid in Adobe Photoshop. To make a nice isometric view illustration, you also will add some photo textures.

    Visit Tutorial

  • How to Make a Photo Collage in Photoshop

    How to Make a Photo Collage in Photoshop

    Create a cool and original photo portrait together with Marko Kožokar. In this very detailed and easy tutorial, you will learn how to make a photo collage in Adobe Photoshop.

    Visit Tutorial

  • How to Create a Living Galaxy Photo Effect in Adobe Photoshop

    How to Create a Living Galaxy Photo Effect in Adobe Photoshop

    Do you like space and the planets? Make your own ethereal portrait with Abbey Esparza.

    Visit Tutorial

  • How to Create a Dramatic Angel Photo Manipulation in Photoshop

    How to Create a Dramatic Angel Photo Manipulation in Photoshop

    Abbey Esparza will show you how to make dramatic and cinematic angel photo effects using only a handful of images. This photo effect looks really breathtaking!

    Visit Tutorial

  • How to Create a Fun Giant Dog Photo Manipulation in Photoshop

    How to Create a Fun Giant Dog Photo Manipulation in Photoshop

    What if dogs were as big as houses? You don't need to wonder any longer, because we can bring this vision to life with the magic of Photoshop! Let's take our Godzilla-dog for a walk in the city and see what happens with Monika Zagrobelna.

    Visit Tutorial

  • How to Create a Glowing Winter Night Photo Manipulation in Adobe Photoshopp

    How to Create a Glowing Winter Night Photo Manipulation in Adobe Photoshop

    Warm lights in a winter forest. Make your night photos look cozy and intimate. This tutorial by Jenny Le will help you with it.

    Visit Tutorial

  • Make a Trendy Double Exposure Effect in Adobe Photoshop

    Make a Trendy Double Exposure Effect in Adobe Photoshop

    You’ve probably seen this interesting effect of two or more overlapping photos on the covers of music albums, in modern magazines, and in advertisements. In this tutorial by Yulia Sokolova, you’ll create a trendy double exposure effect in Adobe Photoshop.

    Visit Tutorial

  • How to Create a Wintry Deer Portrait Photo Manipulation in Photoshop

    How to Create a Wintry Deer Portrait Photo Manipulation in Photoshop

    Add some winter magic to your portraits! Melody Nieves will show you how to make a magical creature in Adobe Photoshop using simple tools, Adjustment Layers, and high-quality stocks.

    Visit Tutorial

  • How to Create a Neon Rainbow Photoshop Portrait Effect

    How to Create a Neon Rainbow Photoshop Portrait Effect

    Make a cool punk-rock portrait with Abbey Esparza. You will learn a little-known trick for getting the perfect neon glow, as well as how to bring an all-over vibrancy and brightness to a portrait.

    Visit Tutorial

  • How to Remove a Person From a Photo in Adobe Photoshop

    How to Remove a Person From a Photo in Adobe Photoshop

    One of the most important and helpful tricks in Photoshop. Melody Nieves will teach you how to make it quickly and easily. Also, this tutorial contains a short video explanation.

    Visit Tutorial

  • How to Create a Human Cyborg Photo Manipulation in Adobe Photoshop

    How to Create a Human Cyborg Photo Manipulation in Adobe Photoshop

    Let's add some cyber-punk to your portrait! Melody Nieves shows how to make a stylish cyborg portrait using color adjustments and regular brushes.

    Visit Tutorial

  • How to Create an Abstract Portrait With Rocks and Lava in Adobe Photoshop

    How to Create an Abstract Portrait With Rocks and Lava in Adobe Photoshop

    In this detailed tutorial by Jenny Le, you'll learn how to build the base background using several texture images, retouch the model, and import an abstract texture and rock effect.

    Visit Tutorial

  •    How to Create a Futuristic Fashion Portrait in Adobe Photoshop

    How to Create a Futuristic Fashion Portrait in Adobe Photoshop

    Design an impressive modern portrait with Abbey Esparza. You'll explore the concept of hand-painting smaller details as opposed to using filters, pre-mades, or presets.

    Visit Tutorial

  •    How to Create a Wonderland Photo Manipulation With Adobe Photoshop

    How to Create a Wonderland Photo Manipulation With Adobe Photoshop

    Do you like Alice in Wonderland? Jenny Le will explain how to make a photo manipulation scene based on this story.

    Visit Tutorial

  •    How to Create a Surreal Giraffe Photo Manipulation With Adobe Photoshop

    How to Create a Surreal Giraffe Photo Manipulation With Adobe Photoshop

    Create a surreal giraffe using a variety of photo manipulation techniques. Jenny Le explains all the steps in this tutorial.

    Visit Tutorial

  • How to Create a Vintage Portrait Photo Manipulation in Adobe Photoshop

    How to Create a Vintage Portrait Photo Manipulation in Adobe Photoshop

    Some of our greatest inspiration can come from learning about the past. Melody Nieves explains how to turn a modern photo into an old-looking vintage one.

    Visit Tutorial

  • How to Create a Black History Month Collage in Adobe Photoshop  Lightroom

    How to Create a Black History Month Collage in Adobe Photoshop & Lightroom

    In this tutorial, Kaylan Michael will show you how to use Adobe Photoshop to create an intense, powerful collage for Black History Month featuring a beautiful woman, and how to retouch the artwork in Adobe Lightroom.

    Visit Tutorial

  • How to Create a Colorful Wavy Tribal Photo Manipulation in Adobe Photoshop  Lightroom

    How to Create a Colorful, Wavy, Tribal Photo Manipulation in Adobe Photoshop & Lightroom

    Kaylan Michael has always been a fan of Japanese art, so she decided to merge two styles together: Afrofuturistic and Japanese. In this tutorial, you'll learn how to use Adobe Photoshop to create a colorful, wavy, tribal collage featuring a beautiful woman.

    Visit Tutorial

  • How to Create a Black Panther Movie-Inspired Photo Manipulation in Photoshop

    How to Create a Black Panther Movie-Inspired Photo Manipulation in Photoshop

    Do you like superheroes? With this brilliant tutorial by Melody Nieves, you could turn yourself into one of them!

    Visit Tutorial

Print Design in Adobe Photoshop

These step-by-step tutorials will help you to make top-quality designs. You'll learn the basics of composition, digital collages, and typography. 

  •  Make a Turn of the Century Vaudeville Poster

    Make a Turn of the Century Vaudeville Poster

    In this tutorial, you'll learn how to create a turn-of-the-century Vaudeville poster. This uniquely appealing style of advertisement was popular in the late 1800s and early 1900s. You sir! You madam! Step right up and prepare to be amazed as we transport an image of two friends back in time to create a poster advertisement without compare!

    Visit Tutorial

  • Wicked Worn Vintage Poster

    Wicked Worn Vintage Poster

    Follow Alvaro Guzman and expand your poster design skills as he teaches you how to create a vintage poster using the power of Photoshop's blending modes.

    Visit Tutorial

  • How to Make a Movie Poster in Photoshop

    How to Make a Movie Poster in Photoshop

    Want to be a movie star? Abbey Esparza shows you how to create a stylish movie poster with stock pictures, the same technique you can apply to your own photos. You will be focusing on creating a gritty post-apocalyptic color grade using adjustment layers and will learn pro Photoshop tips.

    Visit Tutorial

  • How to Make a Star Wars Inspired Movie Poster in Photoshop

    How to Make a Star Wars Inspired Movie Poster in Photoshop

    Become a hero of your own saga! In this tutorial, Monika Zagrobelna, will show you how to create a movie poster in Adobe Photoshop, inspired by Star Wars: The Last Jedi.

    Visit Tutorial

  • How to Use Grids in Photoshop to Create a Typographic Poster

    How to Use Grids in Photoshop to Create a Typographic Poster

    Grids are the base of every composition. With Laura Keung, you will create a powerful typographic poster by using grids. Also, you'll learn how to use layer masks and adjustment layers to edit images. Are you ready to get started?

    Visit Tutorial

  • How to Create a Light Streak Effect for a Contemporary Ballet Poster in Adobe Photoshop

    How to Create a Light Streak Effect for a Contemporary Ballet Poster in Adobe Photoshop

    Do you like ballet? In this tutorial, Laura Keung will explain how to combine three different Photoshop filters to create a contemporary poster. You will be mixing two styles, a modern light effect and a classical dancer.

    Visit Tutorial

  • How to Create a Music Poster Using Bitmap Mode in Photoshop

    How to Create a Music Poster Using Bitmap Mode in Photoshop

    There are a lot of interesting effects you can achieve with Bitmap mode in Photoshop, and Laura Keung will show you how to use it. Together you will look at a couple of different patterns you can use on a photo to create a screen-printed effect.

    Visit Tutorial

  • How to Create a 90s Abstract Rave Poster in Adobe Photoshop

    How to Create a 90s Abstract Rave Poster in Adobe Photoshop

    Do you like the rave aesthetic? Laura Keung explains how to create an abstract but impactful poster in Adobe Photoshop by using compelling imagery and typography.

    Visit Tutorial

  • How to Make a Halftone Roy Lichtenstein Style Poster in Adobe Photoshop

    How to Make a Halftone Roy Lichtenstein Style Poster in Adobe Photoshop

    The pop art style of Roy Lichtenstein still looks modern and fresh. Laura Keung shows how to design a typographic poster using the Color Halftone filter to achieve a Roy Lichtenstein art style look.

    Visit Tutorial

  • How to Create a Poster Using Layer Masks in Adobe Photoshop

    How to Create a Poster Using Layer Masks in Adobe Photoshop

    Want to make a stylish and elegant poster? Join Laura Keung as she shows you how to make an empowering poster using typography interwoven into flowers using the Layer Mask tool in Adobe Photoshop.

    Visit Tutorial

  • How to Create a Poster Using the Liquify Tool in Photoshop

    How to Create a Poster Using the Liquify Tool in Photoshop

    In this tutorial, together with Laura Keung, you will design a poster using the Liquify Tool on a traditional object in Adobe Photoshop to give it a digital feel.

    Visit Tutorial

  • How to Make a Business Flyer Template in Photoshop

    How to Make a Business Flyer Template in Photoshop

    Need a new flyer for your business? Melody Nieves can show you how to make your very own professional flyers using Adobe Photoshop.

    Visit Tutorial

Digital Drawing in Adobe Photoshop

Create your own universe by following these awesome tutorials. Warning, some of them may need a graphics tablet. 

  • 3D Transform a Colorful Cube Design

    3D Transform a Colorful Cube Design

    Constantin Potorac carefully examined the work of a great artist named Guilherme Marconi. In this tutorial, you'll learn one way to create a design using repeating elements in a style inspired by him.

    Visit Tutorial

  • Design        a Glossy Download Icon

    Design a Glossy Download Icon

    Ever wondered what it takes to create your very own glossy icon? Well if that's the case, follow Arik in this in-depth tutorial, where he gradually shows you how to build a download icon using basic geometric shapes combined with the power of Lauer styles.

    Visit Tutorial

  • Craft a Vintage Fifties Letter

    Craft a Vintage Fifties Letters

    In this tutorial, Rafik Massoud goes over how to create a fifties love letter with stamps, a bent corner, and a retro border using the brush engine, rectangle tool, layer styles, blend modes, and several intermediate techniques that are sure to propel your skills to the next level.

    Visit Tutorial

  • Draw a Pirate Character in Photoshop

    Draw a Pirate Character in Photoshop

    Character design might be one of the most fun things that you can do in Photoshop. Here, Eric Galand will demonstrate how to draw a pirate character in Photoshop.

    Visit Tutorial

  • Quick Tip Turn a Side View Into a 3D View in Photoshop

    Quick Tip: Turn a Side View Into a 3D View in Photoshop

    Drawing a side view of something seems to be the most intuitive—without "perspective" it's simple and fun. However, because of this simplicity, side-view drawings are also boring, and they make it very hard to present all the features of a character. In this short tutorial, Monika Zagrobelna will show you how to turn them into an interesting, 3D view with a simple Photoshop trick.

    Visit Tutorial

  • Learn to Paint Beautiful Realistic Lips in Adobe Photoshop

    Learn to Paint Beautiful Realistic Lips in Adobe Photoshop

    Lips in humans are instruments of emotion. Not because we speak with them, but also because of the infinite amount of feelings they can convey. Together with Alice Catrinel Ciobotaru, you'll go over a technique (among many others—everyone has their own way of painting) for painting realistic lips.

    Visit Tutorial

  • How to Paint a Dapper Victorian Cat in Adobe Photoshop

    How to Paint a Dapper Victorian Cat in Adobe Photoshop

    Digital artists have the unique ability to travel back in time by tapping into the styles and techniques of other periods. In this tutorial, Melody Nieves will show you how to create a fun, dapper cat, inspired by the beautiful portrait paintings of the Victorian era.

    Visit Tutorial

  • How to Create a Textured Hand-Lettered Card in Adobe Photoshop

    How to Create a Textured, Hand-Lettered Card in Adobe Photoshop

    In this tutorial by Elizaveta Akimova, you will draw a Valentine's card with a Mexican flavor, including text reading "Te Quiero Mucho" ("I love you so much") and a lot of ornaments and decoration.

    Visit Tutorial

  • How to Draw Hermione Granger in Adobe Photoshop

    How to Draw Hermione Granger in Adobe Photoshop

    Do you like the Harry Potter series? Yulia Sokolova shows the full process of drawing a piece of Hermione Granger fan art from scratch, coloring it in greyscale and then enlivening the illustration with bright colors.

    Visit Tutorial

  • How to Create a Sign Language Digital Painting in Adobe Photoshop

    How to Create a Sign Language Digital Painting in Adobe Photoshop

    Love is... universal. Learn how to create a digital painting inspired by the American Sign Language (ASL) alphabet in this Photoshop tutorial. Melody Nieves will cover how to draw each hand from scratch before tackling the digital painting with Layer Blend Modes and more.

    Visit Tutorial

  • How to Create a Hand-Lettered Housewarming Poster in Adobe Photoshop

    How to Create a Hand-Lettered Housewarming Poster in Adobe Photoshop

    Yulia Sokolova shows how to create a hand-drawn lettering poster that will make your home cozy and add a warmer atmosphere to any interior.

    Visit Tutorial

  • How to Create a Set of Zodiac Icons in Adobe Photoshop

    How to Create a Set of Zodiac Icons in Adobe Photoshop

    In this tutorial, Yulia Sokolova explains the inspiring process of creating a set of funny cartoon zodiac icons. You’ll be using basic shapes as well as simple freehand drawing.

    Visit Tutorial

  • How to Create a Furry Purple Spirit Day Mascot in Adobe Photoshop

    How to Create a Furry, Purple Spirit Day Mascot in Adobe Photoshop

    Draw a cute purple mascot for Spirit Day with Monika Zagrobelna! Also, she will show you how to shade colorful fur without having to switch colors all the time.

    Visit Tutorial

  • How to Paint Fluffy Stormy and Wispy Clouds in Photoshop

    How to Paint Fluffy, Stormy, and Wispy Clouds in Photoshop

    Love to stare up at the sky? Recreate beautiful, realistic clouds with this Photoshop tutorial by Melody Nieves.

    Visit Tutorial

Other Interesting and Useful Tutorials

Learn more Photoshop secrets with our instructors. 

  • How to Make Gradients in Photoshop and More

    How to Make Gradients in Photoshop (and More!)

    Do you want to become a pro with Photoshop Gradients? Jonathan Lam shows how to create a gradient in Photoshop, as well as how to load and save preset gradients in Photoshop.

    Visit Tutorial

  • How to Create a Light Particles Photoshop Brush

    How to Create a Light Particles Photoshop Brush

    In this tutorial, Jonathan Lam shows the step-by-step process of how to create a particle effect using Photoshop brushes.

    Visit Tutorial

  • How to Create a Layer Mask in Photoshop

    How to Create a Layer Mask in Photoshop

    In this quick tip tutorial by Abbey Esparza, you will learn what a layer mask is, what it does, and how to create a mask in Photoshop!

    Visit Tutorial

  • How to Create a Rubber Stamp Effect in Adobe Photoshop

    How to Create a Rubber Stamp Effect in Adobe Photoshop

    Turn any photo into a rubber stamp in just a few quick steps. John Negoita will show you how to create a realistic rubber stamp effect in Photoshop.

    Visit Tutorial

  • How to Insert a Photo Into a Product Mock-Up in Adobe Photoshop

    How to Insert a Photo Into a Product Mock-Up in Adobe Photoshop

    In this Quick Tip, Kirk Nelson explains how to use Adobe Photoshop to add your own custom imagery to a product mock-up purchased from Envato Market.

    Visit Tutorial

  • Photoshop in 60 Seconds How to Apply a 3D Anaglyph Effect

    Photoshop in 60 Seconds: How to Apply a 3D Anaglyph Effect

    A 3D anaglyph image is one that contains two different colored images, one for each eye, using filters of typically red and cyan. Melody Nieves explains how to do make it in Photoshop.

    Visit Tutorial

  • Use a Tattoo Font to Add a Realistic Tattoo to a Photo in Photoshop

    Use a Tattoo Font to Add a Realistic Tattoo to a Photo in Photoshop

    A tattoo font is the easiest way to create a stylish tattoo in no time. In this tutorial, Monika Zagrobelna will show you how to add a realistic tattoo in Photoshop using a tattoo font.

    Visit Tutorial

  • How to Create a Photoshop Painting Effect

    How to Create a Photoshop Painting Effect

    With Ivan Gromov, you will create a vintage painting Photoshop action using smart filters, mask layers, vintage textures, and dynamic brushes.

    Visit Tutorial

  • How to Create an Instagram Post Template in Photoshop

    How to Create an Instagram Post Template in Photoshop

    In this tutorial, Abbey Esparza will take a quick look at how to create an Instagram post template in Adobe Photoshop!

    Visit Tutorial

  • Design a Vista Styled Wallpaper

    Design a Vista Styled Wallpaper

    Join Vaclav Krejci as he shares his process of creating a gradient background in Adobe Photoshop. Learn how to draw curved shapes and make them glow using the Layer Style panel.

    Visit Tutorial

  • Create a Wavy Blackberry Style Wallpaper Design

    Create a Wavy Blackberry Style Wallpaper Design

    Fabio Sasso will show you how to create an abstract background image using Photoshop only. The design has a cool wavy pattern with interesting lighting effects, like the Blackberry 9000 wallpaper. This is a tutorial you can sit down and complete in less than an hour.

    Visit Tutorial


Clever Photoshop Ideas: Video Tutorials

I've shown you an awesome selection of free Photoshop tutorials from Tuts+, which I'm sure you've found useful. But, if you prefer to watch Photoshop tutorials for beginners in video, I'm here to help you.

The next videos are from our playlist Learn Adobe Photoshop, where you can watch more than 150 cool things to do in Photoshop. And don't forget to check our Envato Tuts+ YouTube channel, where you'll find more fun Photoshop projects.

1. Create a Magical Mermaid Illustration in Photoshop

Have you ever wondered how to draw a mermaid from scratch? For sure, this could make a very fun Photoshop project! Well, this free Photoshop tutorial will teach you how to draw a mermaid tail using the Pen Tool and some photo manipulation.

2. How to Make a 3D Text Effect in Photoshop

Text effects are really cool things to do in Photoshop. Why don't you take a look at these Photoshop tutorials for beginners and learn how to make a 3D text effect.

3. Create a Living Galaxy Photo Manipulation Effect in Photoshop

Looking for awesome Photoshop projects? What about creating a live galaxy? That's a cool Photoshop idea. Learn how to create stars, galaxies, and nebulas in this free Photoshop tutorial.

4. Create an Instagram Story Template with Adobe Photoshop

Instagram stories can be great Photoshop projects, believe it or not. In these Photoshop tutorials for beginners, you'll learn to quickly create Instagram story templates for your accounts. 

5. How to Create a Cool Glitch Photo Effect in Adobe Photoshop

Speaking about cool things to do in Photoshop, a glitch effect is a pretty nice thing to Photoshop. Check this free Photoshop tutorial and recreate a glitch like the ones you see in television or video games.

6. How to Make a Halftone Pattern in Photoshop

Halftone patterns can become fun Photoshop projects if you follow our Photoshop tutorials for beginners. Learn how to create a halftone effect in Adobe Photoshop in different ways to achieve the exact look you want.

7. How to Use Layer Masks in Photoshop

If you've got plenty of things to Photoshop, then you need to master the use of masks. Photoshop masks add tons of advantages to your workflow that will help you achieve some of the best photo effects.

8. How to Make a Stop Motion Video in Adobe Photoshop

Looking for Photoshop ideas for your pictures? Learn a simple and useful animation tip with our Photoshop tutorials for beginners.

9. How to Create an Instagram Filter Adobe Photoshop Action

If you'd like to start Instagram filters Photoshop projects, then this free Photoshop tutorial is for you. With a few simple adjustments, you can achieve a cool photo effect like your favorite app in Adobe Photoshop.

10. How to Remove a Person from a Photo

Who hasn't taken a cool picture, only to realize a person is ruining the view? Well, cropping out objects and removing unwanted tourists from pics are some really cool things to do in Photoshop. Just follow our free tutorial and start this fun Photoshop project!

11. How to Make a Glowing Photo Effect to a Portrait in Photoshop

Tribal makeup styles are nice Photoshop ideas to recreate, don't you think? Learn to create this glowing photo effect inspired by African tribal makeup following this free Photoshop tutorial.

12. Create an Abstract Diamond Lens Effect in Adobe Photoshop

There are plenty of cool things to do in Photoshop. What about creating a trippy diamond lens effect? Follow this tutorial and get yourself some cool Photoshop projects!

13. How to Create a Vintage Photo Filter With Adobe Photoshop

You'll find these Photoshop tutorials for beginners pretty easy to follow! In 60 seconds, learn to create your own Photoshop Action for a cool vintage photo effect.

14. How to Decorate Photos with Drawings in Adobe Photoshop

Looking for more things to Photoshop? Then check this fun Photoshop project and learn to decorate pictures with drawings in less than 60 seconds!

15. Blur a Photo's Background with a Custom Photoshop Action

We've got this handy tutorial from our selection of cool things to do in Photoshop. A blurred background is a great way to bring attention to the objects in the foreground. 

16. Create a Haunted Portrait Effect in Photoshop

I've got some pretty unique Photoshop ideas for you. Have you ever wished to create a haunted image? Then this free Photoshop tutorial will give you tons of cool Photoshop projects.

17. How to Create a Kaleidoscope Effect in Adobe Photoshop

We haven't run out of Photoshop ideas for you. This Photoshop tutorial for beginners will teach you how to create a kaleidoscope effect to use in your Photoshop projects.

18. Use a Tattoo Font to Add a Realistic Tattoo to a Photo in Photoshop

Tattoos are interesting things to Photoshop. If you're wondering how a tattoo would look on you or a friend, then follow this useful free tutorial.

19. How to Make a Movie Poster in Photoshop

For cinematography lovers, movie posters are awesome things to Photoshop. This free Photoshop tutorial focuses on creating a gritty post-apocalyptic color grade using adjustment layers.

20. How to Create an Orton Effect Photoshop Action

If you're short on Photoshop ideas, why don't you take a look at this?

The Orton effect is a dreamy glow often added to landscape images to make them look magical. This free Photoshop tutorial will show you how to create an action to recreate the popular Orton effect.

10 Creative Photoshop Effects From Envato Elements

We've covered a great range of free Photoshop tutorials and effects you can learn with some practice. 

However, if you're short on time, you can always use our premium Photoshop actions and brushes from Envato Elements to give your pictures some cool effects in a few clicks. Let's see them!

1. Double Exposure Photoshop Action (ATN)

Double Exposure Photoshop Action

Double exposure pictures are cool things to Photoshop. Use this Photoshop action to create a double exposure effect in a few clicks. You can add any tone or gradient to your composition to make it stunning!

2. Photoshop Ink Brushes (ABR)

Photoshop Ink Brushes

Looking for Photoshop ideas? Check this complete set of Photoshop brushes, which includes a total of 36 brushes, divided into 3 different categories: regular brushes (for ink sketches and illustrations), ink washes, and ink stain stamps.

3. Sand Dust / Powder Explosion Photoshop Action (ATN, ABR)

Sand Dust  Powder Explosion Photoshop Action

Get this creative Photoshop action and give your pictures a dramatic sand effect! This best-selling action also includes a video tutorial link, so you'll learn in detail how to complete this fun Photoshop project.

4. Watercolor Brushes for Photoshop (ABR, PNG)

Watercolor Brushes for Photoshop

This is one of our favorite set of Photoshop brushes because it's very complete and easy to use. This Photoshop project includes: 

  • 15 watercolor hand-drawn brushes 
  • 15 flora and fauna elements on transparent background 
  • 2 backgrounds with floral elements 

5. Retro Photo Kit (ATN, PNG)

Retro Photo Kit

Give your pictures a retro look! This kit gives you 15 cool film Photoshop actions, 10 beautiful light leaks, an easy date stamp generator, and a retro font.

6. Plastic Photoshop Stamp Brushes (ABR)

Plastic Photoshop Stamp Brushes

Use these Photoshop brushes to give your image a realistic look. This set comes with 30 Brushes inside, 2500 pixels size, and works with any Photoshop version!

7. Dissolve Photoshop Action (ATN)

Dissolve Photoshop Action

We've got more Photoshop ideas! What about this cool dispersion effect? Dissolve and disperse parts of your photo! Simply brush over the areas that you want to dissolve, choose the direction of liquid dispersion, and just play the action.

8. 50 Vintage Woodblock Brushes (ABR)

50 Vintage Woodblock Brushes

This fun Photoshop project of 50 brushes allows you to add moody, atmospheric, grungy effects to your imagery without having to break out the ink. With the simple click of a button, you can apply these brushes over your images to create some simply stunning effects!

9. Vintage Painter Photoshop Action (ABR, ATN, PAT)

Vintage Painter Photoshop Action

Use this Photoshop action to create a professional painting effect of watercolor and vintage looks. The final result will include fully editable layers, colors, and elements.

10. Splatter Stamp Photoshop Brushes (ABR)

Splatter Stamp Photoshop Brushes

This set of 15 splatter stamp brushes will come in very handy when you're looking for cool things to do in Photoshop. Don't hesitate to add it to your collection.

Conclusion

Still craving more inspiration and Photoshop ideas? Then check our incredible collection of Photoshop effects and Photoshop add-ons to transform your photos through GraphicRiver and Envato Elements.

15 Design Tips to Make Professional Business Flyers in 2020 (With Great Designs)

$
0
0

Whether you’re setting up shop or looking to reach new customers, you’re going to need an eye-catching and stylish business flyer.

In this article, we’ll give you ten pro flyer design tips for designing flyers that are the ultimate multi-taskers—functional, direct...and much more creative than you think! 

Business Professional Flyer
Choose from a huge collection of professional flyer design templates, like this one, on Envato Elements.

Let's talk about how to make a flyer to promote your business. A flyer’s primary purpose is to attract attention. The secondary purpose is to convert sales—through information about unmissable offers or the details of an event, for example. 

Sure, this means it’s not going to be a treasured work of art, but you can still make a flyer that looks incredible while fulfilling both purposes. These are important things to consider when thinking about how to make a business flyer.

Read on to discover ten professional tips to design a flyer that makes the most of small print space and how best to attract attention from your target market. 

The Best Business Flyer Templates on Envato Elements (With Unlimited Use)

There are thousands of the best ideas for business flyers on Envato Elements. It's a great offer. Download as many as you want for one low price. 

Each of these awesome flyer template designs from Envato Elements has tons of professional and creative marketing options. They're stacked with pro design features and great visuals to choose from. They're also quick and easy to work with. 

Choose between thousands of creative example of business flyers on Envato Elements
Choose between thousands of creative example of business flyers on Envato Elements.

Grab one of these professional corporate information flyer templates or product flyer templates. Quickly create a memorable sales impression.

Inspiration: Top 10 Business Flyer Template Designs From Envato Elements (Video)

See some of these great business flyer templates in action. We also include some extra top examples for inspiration. 

Check out some of our best creative business flyer templates from Envato Elements in this quick video:

If you're looking for design inspiration, check out these awesome collections of flyer designs. From business to charity, parties to announcements, there's plenty to see and plenty to download.

Designing a Flyer: Top Tips for Professional Flyers

Design inspiration can be exciting to look at. But what should a flyer include? How do we make it look great? Let's dig into some flyer design tips, perfect for your next professional project:

1. Function Before Form

OK, so before we get distracted with the fun design stuff, let’s get a reality check first. You may want to make your flyer into a Michelangelo masterpiece, but realistically most people won't see it in that light at all.

Whether you’re advertising a computer sale or a club night, you need to remember that your flyer has to be striking enough to be picked up and looked at. This is a key part of how to make professional flyers. The information on it also has to be clear and concise enough to convince that person to check out your shop or attend your event. 

You'll also need to consider questions like: 

  • What should a flyer include? 
  • What makes a good flyer? 
  • What does a flyer look like, in your experience? 
  • What makes a flyer stand out? 

The answers are all a part of how to design a flyer.

Flyer Design Template
What software will you use for your flyer design? Templates like this one work in many software environments.

Prioritising function over form before you start out designing will help to get your brain in the right place. Of course, design plays a significant role in converting sales. But it isn’t necessarily the most tastefully designed flyer that'll push the right buttons. 

Take note of this functional checklist and review your business flyer at the start and end of the design process to make sure it conforms to some or all of these. They're all part of how to make an effective flyer:

  • Keep the information concise. Edit the text content down to the essential information only and don’t be tempted to waffle. A flyer reader’s attention span is super-short, so make what they read in that split-second count. 
  • Make information easy to read. Make sure your font sizes are large and your leading generous. And don’t be afraid to let a big, bold header dominate a large part of the flyer. This is one of the most important tips for making a flyer.
  • Make contact details and other essential information instantly accessible. Pull out a website address in a bold color, or make sure the date and time of an event or sale is blown up to large-scale.
  • Apply a WYSIWYG (What You See Is What You Get) attitude. If you’re selling a product, make sure to feature an image of it. It might seem like simple common sense but giving the reader a visual aspect to go with a text item will help your flyer to convert sales much more easily. Take inspiration from this stylish sale flyer. Each item of text is accompanied by a simple image of the product being sold. Treat your business flyer like a shop front. Shops put their products on display as they know that people ultimately buy with their eyes. When considering how to make a promotional flyer, it makes good sense. We need strong visual associations with the objective.
Business Flyer Template Design
A strong business flyer design is both visually engaging and functionally strong. Download this one today.

2. Short on Space? Gridify!

One of the biggest challenges faced by graphic designers is how to make the most of a small amount of print space. With most flyers restricted to a standard A5 (148 mm x 210 mm) or A6 (105 mm x 148 mm) page size you’re going to need to think a bit more creatively about how to lay out your design. 

Whereas with an invitation or more formal brochure you might look to arrange text content into one column on the page, with a flyer you can and should be more experimental with your grid. Newspaper-style same-size columns might look a bit rigid, so try dividing your flyer up into irregular sections. 

Flyer Design Layout
Use a grid based flyer layout to break up your layer in all kinds of interesting ways, like in this design.

The designer has created a four-part grid, with the top third devoted to the header and image, two irregular-width columns below, and a narrow full-width row at the base of the design. The flyer packs in a lot of content, but still retains a minimal, clean look thanks to the balanced proportions of the grid.

creative flyer design
Use a grid based layout for a myriad of creative flyer design solutions. Download this design today.

Or why not move away from lateral thinking when it comes to how to make flyers and try experimenting with diagonal sections on your grid? The modern flyer template shown below, breaks the normal rules with a diagonal slash across the top-right section of the flyer. It’s the perfect place for a slogan and background image, without intruding across the main layout. 

Modern Corporate Flyer
This flyer design uses a grid based layout and employs some interesting geometry too, to complement it.

If you spend a bit of time at the start of the design process mapping out your grid and planning which content goes where you’ll be amazed at how much you can actually fit onto a small page size.

3. Play it Cool...

Sometimes an understated flyer can be a perfectly pitched design move. If you’re aiming at the more intelligent or corporate consumer it might not be the wisest idea to throw a rainbow of brights or a shouty novelty font into the mix.

Aim for an aesthetic that's minimal, subtle and calm. If you’re advertising corporate services or a business convention an understated, flat design style will attract your target market with very little effort.

Minimal Flyer Design
Choose a clean, minimal flyer design, like this one, for your next flyer project.

Stick to a black, white and grey palette. Restrict yourself to just one splash of bold (but appropriate) color. Teals, mustards, pale greys and mint greens are corporate at their core and prevent the flyer from drifting into bland territory. 

Flat Flyer Design
This flat flyer design comes in three different color options, all employing the same idea.

Bringing in infographic-style icons and simple graphics will add a visual element without dominating the design. If you’re on the hunt for stylish icons, you can spend hours browsing the huge selection of free-to-download vector graphics at flaticon.com.

Minimal Flyer Design for Business
A strong flyer design doesn't necessarily imagery. Keep things simple, like in this stylish design.

4. ...But Don’t Be Dull!

Whether you’re making an understatement or a full-blown statement, you want to avoid the curse of dullness at all costs. Transform understated designs from bland to brilliant with a deft application of color. 

If you’re looking to advertise something more informal and attention-seeking, like a club night, exhibition or festival, you simply can’t afford to be dull at all! 

You want to inject your flyer with the spirit of the event itself. Looking at your flyer should transport the viewer to the event and allow themselves to imagine what it would be like to experience the event. If your flyer is a little on the boring side, they certainly aren’t going to get into the party spirit.

Follow these tips for making your flyers more exciting and never be in fear of producing a dull design again:

  • Color is your new best friend­. A palette of complementary bold tones, like the hot pink, sunny yellows and sea blues used in this eye-catching photo flyer, can conjure up summer days (perfect for festivals and BBQ events). While a pop of neon can add a masculine, sporty edge to black-and-white designs. 
Colorful Flyer Design
Check out this colorful flyer design. It's playful, engaging, and memorable. Download it now.
  • Balance a trio of bold elements. Create a balanced team of one striking photo, one attention-grabbing header (in a legible but bold slab typeface) and one colored element (such as the triangle pattern used on this photo flyer template). Avoid overcrowding by sticking to this three-element rule. It’s pleasing to the eye and will be eye-catching without becoming an eyesore.
colorful business flyer
Color can make for a playful, energetic aesthetic. Check out this fun, colorful business flyer design.
  • Make your design optimistic and fun. Don’t allow the flyer to be overly serious. Even if you want to bring in a corporate element you’ve still got scope to make something look witty or even a bit childish. You want people to pick up your flyer and hang onto it. They’ll be more likely to do this if the design makes them feel good.

5. Bring Tech Appeal to Your Design

Even though you’re probably designing your flyer for print, you may well be advertising services or products that can be accessed or bought online. More and more companies are moving their businesses solely online. As a result, most consumers interact with brands via websites or apps. 

It's got to be pointed out that flyers and apps have many things in common, even though a print flyer lacks the element of interactivity. Both flyers and apps are optimised for small spaces. As a result, they both need to make the way they present their information as efficient and easy-to-read as possible. They also are tasked with holding the attention of someone who may easily have many other distractions to be drawn to, whether that’s other apps on their phone or different flyers on a display stand. 

Ultimately, apps are a great example of efficient, eye-catching design. Lift these lessons from the digital world and apply them to your print flyer designs.

business flyer template design
Take inspiration from tech in your next business flyer design.

Look at some of the apps you most frequently use. What elements do they feature that would lend well to print design? Whether that’s a strong, simple color palette, chunky buttons or clean sans serif type, they’ll bring desirable and very modern app-inspired charm to your business flyer.

corporate business flyer
Note the tech inspiration in the icons—a design like this flyer template could be the perfect design solution.

6. Be Approachable

Nobody likes a grumpy face...You shouldn’t under-estimate the simple power of a smiling human face when it comes to designing your flyers. 

flyer design template
Consider working with a smile—like we see in this flyer design template. Download it now.

For many people a flyer is going to be their first point of contact with your business, so it’s vital to make a good impression. If you’re advertising services, it’s important to give the viewer a friendly face. When they do further research, even if that’s online or over the phone, they'll keep that person’s face in mind. 

The otherwise minimal, restrained style of the flyer compliments the image. It makes it look like this man both knows what he’s doing and will be friendly and approachable in the process.

Business Flyer Design
Greet your customers with a smile—consider custom photos for your next business flyer design.

A word of caution on using stock images—many stock photos of ‘smiling business people’ can look overly staged and soulless. Hiring a professional photographer to take high-quality, casual, authentic-looking photos of your business’ staff will be worth the money. Plus, the images can be reused for advertising, websites or social media. 

If your budget won’t stretch to that and you must use stock, aim for photos that feel casual, informal and friendly. Browse a range of high-quality stock images over at Envato Market.

7. Don’t Compromise on Your Visuals 

It can seem a shame to restrict your photos or illustrations to just a small part of your flyer. But there’s no need to compromise! 

You can turn striking photos into the main attraction by sitting them behind other items of content, like text and color. Gradients and transparency effects are fantastic for allowing you to step outside of the usual boxy grid layout and create a layered effect on your design.

These professional flyers let graphics and color take center-stage. But by reducing the opacity of the colored element and adding subtle gradients the designer can make the text appear legible and stylish to boot.

colorful photo flyer design
Color opacity can bring visual interest to your photos and your design, like in this business flyer design.

When working with small page sizes don’t feel limited to a basic grid layout. Layered designs can look particularly striking and are a surprisingly simple way of making flyers that look professionally designed.

layered business flyer template design
Layer colors and shapes to create different visual effects in your business flyer layout design.

8. Use Shape to Create a Cool Modular Design

If you've got more than one image and can’t decide which one to choose, try experimenting with shape to create a modular style. A shape-based layout is perfect for creating a modern photo collage on your flyer, which is ideal for almost every kind of purpose where you’d like to showcase a range of products or images, from stock sites to retail brands.

colorful flyer design template
This stylish flyer design template uses shapes to create interest. Add it to your collection today.

Shapes can add a lot of character and interest to your flyer design. This can go in a number of ways and suit many different aesthetics.

business flyer design circles
Playful use of shape can be a welcome addition to many business flyer design projects.

You can design a flyer that takes advantage of a variety of shapes. This promotional flyer uses layered squares and rectangles, bordered by minimal white strokes, to showcase a range of product and fashion shots. 

promo flyer
This Promotional Flyer Template utilizes a variety of shapes in its layout design

Most software programmes will have a range of default shape tools, including circles, squares and polygons, which you can use to create a unique design.

abstract shape flyer design
Combine, create, and use unique shapes in your business flyer design to create visual interest.

9. Tweak the Mood of Your Flyer with Color

We’ve already touched on how vital a role color plays in making your flyer appear bolder. But where to begin with selecting an effective color palette for your flyer design?

Color, arguably more so than typography or images, is the key player in defining the mood and personality of your flyer design. Color will play a significant part in enticing a reader to pick your flyer up. So, you need to consider color as playing a strong psychological role in your design. 

Citrus tones, like oranges and yellows, can appear zingy and optimistic, which is great for more informal flyer designs. Cooler tones like icy blues and pale greys can seem more intellectual and tech-forward, which is perfect if you’re looking to create something more corporate. Choosing an ill-judged color combination can alienate potential customers. But the right color palette can help your flyer to translate to sales. 

If you’re looking for a failsafe color combination that looks timeless and effortlessly elegant, I love the combination of black-and-white photography with a contrasting trio of complementary colors.

photo flyer
This beautifully designed business flyer template features skillful use of color.

Using black-and-white photography instead of full-color images keeps flyer designs restrained and makes a great backdrop for your brand colors. For added impact, choose bright neons or fresh pastels­­—teamed with monochrome photography they’ll always look stylish, not garish. 

creative flyer template
Try color and overlays with monochrome photography, like in this creative flyer design. Download it now.

10. Try to Make Your Flyer a Keeper

Flyers are cheap to produce, often printed on low-weight paper with unfashionable gloss finishes. As a result, they're rarely seen as items to be treasured. They're the workhorse of promotional print items, but many often end up in the trash. This makes it even more important to consider what makes a good flyer.

A beautifully designed flyer is much more likely to be kept by a potential customer. It may even be pinned up on display at home or at the office if it’s particularly attractive.

At the start of this article we talked about the dual purpose of flyers—to attract enough attention to be picked up and to convert to sales quickly by presenting information in a clear, concise manner. But there’s another purpose to be added—that of the long sell.

In a similar way to follow-up e-newsletters or online ads that follow you when you haven’t quite committed to purchase, print flyers can be used as a long-term reminder to a consumer. This will only be a realistic aim if you’ve created a flyer that’s attractive enough to be kept around in view for a longer period of time. 

If you treat your flyer like a mini poster design, using striking images, beautiful colors, and stylish typography, it’s less likely to be thrown away as soon as it’s been picked up. 

business design flyer
The perfect business flyer design will depend on our professional brand. 

Don’t just think of the short-term role your flyer will have. Play the long game and you’ll reap the rewards in the long-term too with your professional flyer. Imagine this flyer design being pinned to a noticeboard or placed in a scrapbook for future reference. 

flyer design for business
There's so many ways you could take your business flyer design. Which will you choose?

Don’t just think of the short-term role your flyer will have. Play the long game and you’ll reap the rewards in the long-term too with your professional flyer.

Get more business flyer inspiration to help you find the perfect template: 

5 Professional Business Flyer Design Trends for 2020

Let's look at some flyer design trends. As you research and explore how to make flyers, it's a great idea to observe what works, what's timeless, and what's on trend. Designing a flyer is more than copying trends, of course. But visual research can prove to be valuable when developing the right solution for your professional flyer. 

Consider these trends as flyer design tips: observe, understand, and adapt to suit your professional brand.

1. Typography with Emphasis

There's a reason why it's trendy to use scale and color to bring emphasis to your type. It looks good and it works well. 

Where do your eyes go in the design below? Chances are, the red "Dream" really stands out. Why? The red really commands our attention against the rest of the design elements. 

Typographic Business Flyer
Add emphasis and interest to your typography with scale and color, like in this business flyer design template.

Try this design trend with a sans serif type family. They tend to come with variants that make an aesthetic like this simple to achieve.

2. Abstract Shapes as Design Elements

Abstract shapes can be a versatile way to add interest to your composition. They can also divide and organize your composition. In the example below, notice how the use of shapes serves many purposes. They highlight sections and influence the flow of the composition too.

Abstract Business Flyer
This professional flyer design from Envato Elements utilizes abstract shapes.

Here's a second example. Abstract shapes don't necessarily have to only be angular. Here we see curved shapes use with a different color scheme. 

Professional Flyer Design
Curved abstract shapes can be a smooth, organic addition to your professional flyer design.

The nice things about relying on shape as a design element is the versatility. Change colors, add imagery, and this approach can work for a wide variety of projects and subjects.

3. Consistent Key Colors

Color is very communicative. Consistent key colors are a trend you'll notice in many professional flyer design concepts. You'll see this in many flyer designs in 2020, as app inspired aesthetics are often quite stylish. That sleek, tech inspired look often benefits from consistent but limited colors.

Remember to make your color choices based on your professional branding. Color is communicative, too. These color choices should support your professional brand and its goals.

This business flyer design template uses a single color, both for accents and for emphasis.

4. Clean, Organized, Open Space

Some design choices are timeless. Look at the examples, below. Notice how there's generous "breathing" room. 

The parts of the design visually relate to one another, but also leave a lot of open space—often called negative space in design theory. It can make a very classy and adaptable design. 

Minimalist Business Flyer Design
Try out a stylish, minimalist business flyer design, like this one from Envato Elements.

For example, imagine the possibilities if you changed up the color choices and/or imagery. There's a reason why this aesthetic is still popular. It's because the versatility and professionalism can't be understated.

5. Attention Grabbing High Contrast

So, what makes a good flyer? We want to create something attention grabbing—and contrast is a great way to command attention. Contrast makes things stand out while similarities in value make things more supplemental and complementary. You'll likely see this technique used in regularly in 2020.

Use this approach in a wide variety of ways. The concept below is a professional flyer that makes great use of this design concept.  Notice how the dark portions of the composition really stand out against the light portions of the composition.

High Contrast Flyer Design
Command attention and creative emphasis with high contrast, like in this professional flyer design.

Your Checklist to Make Awesome Business Flyers in 2020

In this article we’ve looked at some top tips for how to make a good flyer—making your business flyers the best they can be. Keep this checklist to hand when you’re tackling a new flyer design project:

  • Consider function before form. Think about the practical purpose your flyer will play before you dive into the aesthetics.
  • Apply an irregular grid to make the most of small print space.
  • Consider an understated, restrained design for more corporate or formal businesses...
  • ...or make a bold statement with an attention-grabbing trio of bright color, strong photo and bold typography.
  • Introduce some tech appeal to your flyer with app-inspired design elements.
  • Make your flyer appear friendly and approachable with personable, informal photography of employees.
  • Make use of transparencies and gradients to create a layered effect without compromising on the impact of your chosen photography.
  • Use shape tools to create a modular effect on your flyer—great for showcasing many images.
  • Adjust the mood of your flyer in a flash by switching your color palette.
  • Try to make your flyer a keeper. Convert more long-term sales by making your flyer into a beautiful keepsake.

More Business Flyer Template Resources

Looking for even more flyer design inspiration and design tips? Check out these flyer design collections for design inspiration or add a design to your collection, today.

Go Forth and Create Fantastic Business Flyers in 2020

If you're still looking for the perfect business flyer, check out Envato Elements. It's a perfect choice if you're looking to download many different flyer design templates at one, low cost. Or, if you prefer single downloads, a la carte, consider checking out GraphicRiver.

And if you want to learn how to make a flyer in Photoshop, take our free course with designer Melody Nieves.

Have any more top tips for designing awesome business flyers? We'd love to hear about them in the comments below! 

Editorial Note: This tutorial was originally published in March of 2016. It's been updated to include new information—with special assistance from Daisy Ein.

Gaming Templates for Twitch & YouTube Gamers (Streaming Overlays, Banners, and More!)

$
0
0

Are you a live streamer looking for an OBS stream overlay, Twitch panel creator, YouTube banner maker, or other streaming assets? You can create your own with no software required—no design experience required either! 

Whether you're looking for an animated logo maker or a galaxy YouTube banner, Placeit has you covered. It's much more than an online banner maker—create custom logos, videos, intros, and so much more.

PlaceIt
Placeit is an easy-to-use, browser-based design maker. Create and customize your design today.

Placeit is an easy-to-use online tool—customize and design content right from the comfort of your browser. There's no need for special software or installation here, and it's free to jump right in and start designing.

Choose from a huge library of professionally designed templates, like these.

PlaceIt Twitch Overlay Template
There's a huge library of gaming templates on Placeit—and they're all customizable too.

But don't worry—you don't have to stick with any of these templates, right out the box. They're just a starting point. Change colors, move assets around, add text, change fonts—you can do it all with Placeit, and come up with something unique for your channel. 

Design and save drafts of your work, all from your browser. When you're ready to download, it's one low fee—or, with a low monthly fee, download as much as you want! It's an awesome deal.

It's never been easier to make a banner, panel, or overlay. It's a Minecraft YouTube banner maker, YouTube channel banner maker, an animated logo maker... and more!

Free Twitch Overlay Maker
Test out this Free Twitch Overlay Design—customize it right in your browser and download it now, for free.

Sounds fun, right? Well, it is—fun, easy, and simple to get started. Check out this selection of awesome, customizable content, especially designed with gaming in mind.

How to Make Custom Gaming Logos, Video Intros, and More Online

Let's take a look at some of the designs on Placeit that you can start customizing right now. These are perfect for streamers—there's even free content to check out!

1. Futuristic OBS Stream Overlay Maker

Futuristic OBS Stream Overlay Maker

Looking for something simple and stylish? Check out this overlay. Maybe you'd prefer it in a different color—that's an easy change with Placeit.

2. Cute OBS Stream Overlay Design Template

Cute OBS Stream Overlay Design Template

Neon colors can make for a really fun aesthetic, as you can see in this design. Again, keep in mind that these designs are a starting point, if you want them to be. They're yours to mix, match, and change up.

3. Pixel Art OBS Stream Overlay Maker

Pixel Art OBS Stream Overlay Maker

Pixel art can be a perfect look for retro gamers—which side of the bit wars were you on, SNES or Genesis? The war might be over, but that generation is hardly forgotten. Would you consider pixel art for your channel's aesthetic?

4. OBS Stream Overlay Maker Online Designer

OBS Stream Overlay Maker Online Designer

Where do you want your focus to be in your live stream? Will there be a large video portion, like in this customizable design? Or would you prefer a smaller window for your webcam? 

5. OBS Webcam Frame with Custom Frame

OBS Webcam Frame with Custom Frame

Or maybe you stream video game covers or your artwork. We didn't forget about you, creative streamers! Maybe something clean and minimalist, like this design, is more up your alley.

6. Gaming Animated Logo Reveal Anime Inspired

Gaming Animated Logo Reveal Anime Inspired

Show off your logo or avatar with this awesome, animated introduction—this one is 2D animated, and perfect for channels that fancy an anime vibe. I don't know about you, but I got major Dragonball FighterZ vibes here. 

7. Animated Logo Video Opening Template Maker

Animated Logo Video Opening Template Maker

This stylish, animated logo maker can be a great fit for a whole host of genres. Change the colors, add your logo or imagery, and you'll have a professional video opening in a flash.

8. Glitch Animated Logo Maker Template

Glitch Animated Logo Maker Template

If you like the glitch look and feel, check out this animated logo creator. Making an intro for your gaming footage, live stream, or other content has never been easier.

9. Wall Break Video Intro Animated Logo Stinger

Wall Break Video Intro Animated Logo Stinger

This custom video is a great fit for slogans, logos, and more. Introduce your gaming team or list of competitors in your gaming tournament with a dynamic smash through this digital wall.

10. Fantasy RPG Gaming Animated Logo Introduction

Fantasy RPG Gaming Animated Logo Introduction

Is your content all about the fantasy genre? Maybe you play a lot of RPGs or MMOs on your channel or livestream—maybe even DnD! Check out this customizable opening—add your text, your names, and more.

11. Animated Gaming Logo for Fighting Games

Animated Gaming Logo for Fighting Games

Having a fighting game tournament coming up? Or maybe you and your friends are a bunch of Smash Bros enthusiasts. Check out this animated logo—it's fully customizable, and you can also use it for static projects (like T-shirts, posters, and more)!

12. Animated Logo Maker for Gaming Clans and Guilds

Animated Logo Maker for Gaming Clans and Guilds

Placeit's animated logo maker is really dynamic—check out this design. Prefer different colors? Change it up! The character's hood moves in the animated version. Click to check out the animated preview.

13. Animated 8 bit Logo Maker Featuring a Cute Character

Animated 8 bit Logo Maker Featuring a Cute Character

Love pixel art and an 8-bit look? Whether you're a retro gamer or a speed runner practicing for your best time on stream, an animated logo like this one could make a perfect intro. Remember, these are all customizable too.

14. Animated Gaming Logo Maker for an RPG Guild

Animated Gaming Logo Maker for an RPG Guild

Here's another fun, pixel-inspired design. If you'd prefer to see this knight in blue, green, or yellow, that's all doable—and from the comfort of your browser, too. 

15. Fortnite-Inspired Animated Gaming Logo Maker

Fortnite-Inspired Animated Gaming Logo Maker

This Fortnite-inspired design could work for a whole host of projects—whether you're playing live for your audience or sharing footage on YouTube. If blue isn't your thing, try out some other colors, other fonts, and more.

Want to Learn About Streaming, OBS, and More? 

Eager to stream but not sure where to start? Check out these free tutorials from Envato Tuts+ to help get you started:

How to Create Custom Twitch Overlays, Panels, and More

Next, let's take a look at some content specifically for Twitch. Create your own custom banner online—your own Twitch panels, your own overlays, and more. Take a look at all of the Twitch-centric content Placeit has to offer.

1. Custom Twitch Panel Maker

Custom Twitch Panel Maker

A good channel has Twitch panels that easily explain all of the who, what, and when for their audience. Whether you're looking for something cute, something minimal, or something eye-catching, Placeit is the perfect Twitch panel maker. 

These are just a sample of the many designs you could customize.

2. Abstract Gaming Controller Free Twitch Banner Maker

Abstract Gaming Controller Twitch Banner Maker

If you're looking for an online banner maker, give this one a try. It's simple, clean, and a perfect addition for your Twitch Banner. In fact, you could remix it for your Twitch offline banner too. 

3. Twitch Banner Maker Featuring a Liquid Background

Twitch Banner Maker Featuring a Liquid Background

Here's another abstract design with a lot of possibility. Keep in mind that these designs can be remixed to meet all of your professional branding needs—from banners to title screens to YouTube banner artwork.

4. Pixel-Art Background Free Twitch Banner Maker

Pixel-Art Background Twitch Banner Maker

It's a great idea to have your social media platforms clearly and easily visible for your viewers—get them to follow you on as many platforms as possible, to extend your reach. Consider a Twitch banner, like this one, that puts all your info out there. 

5. Free Twitch Banner Template with a Minimalist Target Graphic

Free Twitch Banner Maker with a Minimalist Target Graphic

Less is often more—check out this classy Twitch banner. Use it for your main banner, your offline imagery, and more. Keep it as is, or swap out the logo, change the colors, and move design elements around. It's up to you.

6. Free Twitch Banner Generator with Emblem

Free Twitch Banner Generator with Emblem

There are a number of abstract backgrounds you can test out on Placeit, like this one. It's more than just choosing images, though—all of these design elements can also be moved around to match your taste.

7. Twitch Offline Banner Maker with Tech Images

Twitch Offline Banner Maker with Tech Images

Having an image display when you're offline helps relay important info to your viewers, when they tune in but you're not around. If you're looking for an easy Twitch offline banner maker, give this one a shot.

8. Offline Twitch Banner Template with Space Background

Offline Twitch Banner Generator with Space Background

Isn't this imagery striking? You can work with this one or import your own on Placeit—keep it simple or add extras. It really is a browser-based design tool.

9. Abstract Twitch Offline Banner Maker with Neon Lines

Abstract Twitch Offline Banner Maker with Neon Lines

Have you thought about which colors best represent your live stream? What's your professional brand? If you're not feeling the purple in this layout, change it up and give some other colors a try. It's easy and free to test out some design options, right now.

10. Twitch Online Banner Generator with Diagonal Lines

Twitch Offline Banner Generator with Diagonal Lines

Isn't this color scheme trendy? This one could work beautifully for those looking for a YouTube background maker too. How would you customize this layout for your Twitch stream?

11. Free Twitch Offline Banner Creator with a Futuristic Layout

Free Twitch Offline Banner Creator with a Futuristic Layout

Whether you're looking for a space-themed Twitch background or a galaxy YouTube banner, this one has a lot of potential. Imagine it in neon green, or maybe even a dark blue. What would you try?

12. OBS Twitch Stream Overlay Generator

OBS Twitch Stream Overlay Generator

Placeit also has a large selection of Twitch overlays that you can customize for your stream, like this one. Again, you can click and drag to move elements around and make the perfect overlay.

13. Twitch Overlay Maker Template for Gaming Streamers

Twitch Overlay Maker Template for Gaming Streamers

Here's an overlay with space for your webcam and a lot of focus on gameplay footage. Remember, this is just a starting point—you can move elements, remove elements, and more.

14. Twitch OBS Webcam Frame with Modern Border

Twitch OBS Webcam Frame with Modern Border

Maybe your stream is more about hanging out—playing music or chatting with your audience. Keep it simple but professional with a clean, minimalist Twitch overlay like this one.

15. Twitch Stream Overlay for OBS with Sharp Lines

Twitch Stream Overlay for OBS with Sharp Lines

If you're looking for a Twitch overlay maker, there are so many options here, like this one. Not only that, it saves a lot of time—jump in, easily try different options out, and boom—you're done.

16. OBS Twitch Overlay Stream Design Template

OBS Twitch Overlay Stream Design Template

Isn't this stream overlay template cute? Add images, move content, try out different color schemes—there are so many ways you could jump in and make this template your own. Why not give it a shot, right now?

Want to Learn More About Twitch Streaming?

Streaming on Twitch is a lot of fun—and it's easier than you might think too! Check out these free Twitch tutorials from Envato Tuts+ for even more Twitch tips and info.

Want to Create YouTube Channel Banners, Thumbnails, Backgrounds, and More?

Now, let's take a look at some content especially for the YouTube content creators out there. From thumbnails to banners, there's plenty you can create on Placeit—and easily too, with no software and no design experience required.

1. YouTube Thumbnail Maker for a Gaming Review Channel

YouTube Thumbnail Maker for a Gaming Review Channel

Placeit is an awesome YouTube thumbnail maker—whether you're reviewing a game or sharing your gaming knowledge, a template like this can prove to be the perfect starting point.

2. YouTube Banner Art Maker Thumbnail for a Gaming Channel

YouTube Thumbnail Designer for a Gaming Channel

Reviewing hardware? Maybe a template like this one is the perfect starting point for you. You can replace this imagery with any custom image—and you can save your work on Placeit for future thumbnails too!

3. Gaming YouTube Banner Maker for Gaming Hardware

Youtube Thumbnail Generator for Gaming Hardware

A strong template can be mixed and remixed, just like this one. Replace the imagery with any custom image of your choice, or choose from the ready-made images on Placeit. 

4. YouTube Banner Art Maker Thumbnail for Gaming Channels

YouTube Thumbnail Maker for a Gaming YouTube Channel

Love Nintendo Switch? Me too—and this template is a perfect fit for your Nintendo commentary, game reviews, and more! There's plenty of other minimal gaming illustrative work to choose from too.

5. YouTube Thumbnail Maker for a Gaming YouTube Channel

Youtube Thumbnail Maker for a Gaming YouTube Channel

Imagine this one with a different controller. This could be the perfect gaming YouTube banner maker for so many different projects—from announcements to reactions, from gameplay footage to commentary.

6. YouTube End Card Design Template

YouTube End Card Design Template

You can make and customize a YouTube end card on Placeit too—check out this fun, energetic design. This content could double for those looking for a YouTube background maker too. 

7. Multicolored YouTube Banner Maker Gaming End Card Maker

Multicolored YouTube End Card Maker

Looking for something colorful and fun to match the energetic tone of your YouTube content? Check out this design. You could completely mix it up with new colors, move content around, and more.

8. YouTube Banner Maker Gaming Screen Template

YouTube End Screen Template with Social Media Icons

Looking for the perfect Minecraft YouTube banner maker? Templates like this one could be the perfect fit for your next Minecraft let's play. Prefer another background or want to feature your avatar? You can import your own images into Placeit, too!

9. Simple YouTube End Screen Template Maker

Simple YouTube End Screen Template Maker

There are so many options when creating content with Placeit—you could also remix this YouTube end screen to work as your Twitch offline banner! Elements can be easily added, removed, and moved around.

10. Free YouTube End Screen With Abstract Frame Textures

Free Youtube End Screen with Abstract Frame Textures

Here's another design to check out—imagine this one with a yellow background and green elements. It would totally change the look up, right? Jump right in and give customization a try for free, right now.

11. YouTube Banner Template for a Gaming Channel

YouTube Banner Template for a Gaming Channel

Love a retro 80s aesthetic? This is just one of many options, over on Placeit, that you can check out and customize. It can be an awesome fit for those of us who are into retro gaming.

12. Free YouTube Banner Maker Design

Free YouTube Banner Maker Design

There's a lot of beautifully designed and illustrated imagery to choose from on Placeit too, like this YouTube banner maker design. If the logo isn't your style, move it, customize it, or drop it completely. 

13. YouTube Banner Creator Template Maker

YouTube Banner Creator Template Maker

Here's a different take on a retro aesthetic. There's a collection of backgrounds that you can swap out for this one too, if you're digging the look but you'd like to mix it up. Give it a shot.

14. YouTube Banner Creator Template For Gaming Channels

YouTube Banner Template For Gaming Channels

Dig a space look and feel? This galaxy YouTube banner has some abstract elements worked in too. What colors and fonts would you try with this one? Remember, this template is just a starting point, and not necessarily your final design.

15. YouTube Banner Maker Template Designer

YouTube Banner Maker Template Designer

Isn't this design artistic? There's so much interesting abstraction here—it could make for a really visually engaging YouTube banner. Mix up the background colors here, and you can create something really colorful and fun.

Want to Learn More About Making YouTube Content?

Are you a YouTube content creator looking to improve your content? Or maybe you're just getting started, and you could use some extra help. Check out these free tutorials on Envato Tuts+ for even more YouTube content:

Take Your Professional Gaming Further With Placeit!

Gaming is a lot of fun—and it's never been a better time to jump in and share your passion for gaming with the world. With live streaming, video sharing, competitive gaming, and so much more out there, starting your professional gaming venture can be overwhelming. 

A tool like Placeit can help take some of the complication out and get you back to doing what you love—gaming and sharing with your audience. Easily make a banner, an overlay, or a logo in a snap!

Why not consider giving Placeit a look? It's free to get started and begin designing, right now, from the comfort of your browser. If you create something you love, it's easy and simple to download your creation. Not only that, but you won't have to worry about licensing, usage, or other complicated matters that can come with commercial use. It's all covered.

Good luck, and happy gaming!


25+ Free SVG Fonts (Font Files to Download Now)

$
0
0

SVG fonts are a cool addition to the world of fonts that can add new life to a tired design.

Estoria Script - SVG Font
When you need premium SVG fonts, Envato Elements should be your first stop. 

Today we're featuring over 25 of the best free SVG fonts around, as well as a selection of premium SVG fonts from Envato Elements.

Unlimited SVG Font Downloads at Envato Elements

Free fonts are a great option when you're on a tight budget, but unfortunately they often impose licensing restrictions and attribution commitments, and also expose you to the risk of downloading hidden malware from unverified online sites. 

For all these reasons, we're introducing you to Envato Elements, a terrific resource that allows you to access hundreds of premium SVG fonts without destroying your finances. 

Premium SVG fonts

In fact, you can download as many SVG fonts as you want, as often as you want, for one flat monthly fee. What's more, that monthly fee also gives you unlimited access to thousands of quality digital assets like graphic templates, photos, business card templates, and much more. Let's dive into some of the best SVG fonts you can find at Elements.

12+ Premium SVG Fonts From Envato Elements 

Futuristico SVG Color Font

Futuristico SVG Color Font

Looking for cool SVG monogram fonts? How about Futuristico SVG Color Font. This awesome display font offers complex and stylish geometric shapes that include gradients and multiple colours in a single SVG font glyph. Guaranteed to catch the eye, this is definitely one for your SVG font library. 

Ciera Watercolor SVG Calligraphy Font

Ciera Watercolor SVG Calligraphy Font

Ciera Watercolor SVG Calligraphy Font is a dreamy collection of four SVG fonts, 23 floral illustrations, and six pre-made logos. There are two versions of this gorgeous font: one with watercolour texture included and the other a solid version. This is a great collection for creating monograms, wedding invitations, titles, etc.  

Morriles - SVG Font

Morriles - SVG Font

Morriles is a beautiful handmade font with a brush style that's also offered in TTF and OTF. Add it to your SVG font library and pull it out when you need realistic handwriting with an artistic feel.

3D SVG Color Font

Color Paper 3D SVG Color Font

Here's another SVG font example that you need for your library. This 3D SVG color font is all sorts of awesome. Use it when you need SVG monogram fonts or a display font for your next project. 

Hey Insomnia SVG Font

Hey Insomnia SVG Font

When you need a font that won't put your audience to sleep, try Insomnia. It's made with transparent textures and includes ligatures and alternates, so that you can create your own custom font in SVG. So open up Photoshop or Illustrator and get to work.

Corn Fruit Loops SVG Color Font

Corn Fruit Loops SVG Color Font

How about this fruit loopy SVG color font? It's guaranteed to put a smile on everyone's face, and you can use Photoshop to create a veritable custom font in SVG that will suit your specific needs. This is also a great option if you're looking for an SVG monogram font with a bit of a twist. 

Pastelle SVG Font

Pastelle SVG Font

When you need a painterly font for greeting cards, invitations, and the like, choose Pastelle SVG Font, with its natural textured feel that'll bring an authentic artistic touch to your projects. The font includes upper and lowercase characters, punctuation, symbols, and numerals. It also includes stylistic alternates and ligatures to make this SVG font uniquely yours. 

Acrylic SVG Font Collection

Acrylic SVG Font Collection

Bring a hand-painted feel to your signage, labels, and titles with this wonderful bold SVG font collection. It includes four font styles, each featuring realistic and high-quality textures that give them a terrific, authentic feel. 

Hackney Hand-Painted SVG Font

Hackney Hand-Painted SVG Font

Speaking of authentic texture, this is another SVG font example that's perfect for those who want to create text with a painterly quality. You can see the brush strokes in each letter in this font, which offers uppercase characters with two alternatives for each letter.

Stencil Autobahn SVG Font Bold

Stencil Autobahn SVG Font Bold

What could be cooler than a font that really captures the essence of spraypaint stencil? Well, that's exactly that Stencil Autobahn SVG Font Bold delivers. This bold display typeface is full of street attitude, and with the included bonus spray-paint drips, you can recreate that attitude in your own projects. The font offers uppercase characters with at least two alternatives for each letter, so you can really make this SVG font your own.  

Estoria Script - SVG Font

Estoria Script - SVG Font

Here's another gorgeous SVG calligraphic font that's an excellent choice when you need an authentic-looking signature for your projects. The font contains both uppercase and lowercase characters, numbers, and punctuation. This elegant font would make a great addition to your SVG font library.

Bluesky SVG Font

Bluesky SVG Font

Check out this awesome premium font for your SVG font library. This one offers a wonderful 3D look created by shadows included in each SVG font glyph. The font includes upper and lowercase characters, numbers, punctuation, alternative characters, and multilingual characters. Use this bold SVG font for logos, title, packaging, posters, and more. 

Karelle SVG - An Organic Serif

BKarelle SVG - An Organic Serif

Karelle SVG is a beautiful font that uses a painterly technique to create an SVG font that is at once strong and delicate. The font includes upper and lowercase characters, numbers, symbols, and punctuation, as well as several alternates that will help you make this SVG font your own. 

Maryatha SVG Calligraphy Font

Maryatha SVG Calligraphy Font

We round up our list of premium SVG fonts with this fabulous script font. Using a creamy crayon texture to form flowing letters, Maryatha SVG Calligraphy Font offers upper and lowercase letters, numbers, and punctuation, as well as alternate characters. Add this handwritten font to your SVG font library, and pull it out for special projects like greeting cards, invitations, signatures, and the like. 

25+ Best Free SVG Fonts

Now that we've covered some of the awesome SVG fonts available at Envato Elements, let's take a look at those free SVG fonts that we promised to share with you.

Bafora - Brush SVG Font

Bafora - Brush SVG Font

This elegant brush font would make a great choice for stationery, invitations, and the like. Or how about using it on social media for posting creative quotes? It has a contemporary design, while also boasting a down-to-earth, hand-drawn vibe.

Multicolored SVG OpenType Font

Multicolored SVG OpenType Font

SVG fonts often make great use of color, and this one is no exception. It works in Adobe CC 2018 and above; older versions show it in monochrome. Changing the color of the segments is easy: just head to the Swatches panel and double-click to start changing them around!

ResotE Dream Font

ResotE Dream Font

Look at this creative SVG color font, with the different segments overlapping each other. It would be a great choice for a high-impact display font. Note, however, that this font is only free for personal use; you'll need to buy a license if you want to use it in commercial projects. When downloading free fonts online, it's always important to check exactly what's free and what isn't.

BROCHA - Free Typeface

BROCHA - Free Typeface

This free SVG font may have pencils in the preview image, but as you can see, it's really a brush font. You can feel the texture of paint and the creative flourishes of the brushstrokes in those letters.

Use Your Imagination Font

Use Your Imagination Font

Here's a perfect SVG font example. You can see how it uses the different colours to distinguish the letters from each other, even as they are so close that they overlap. Without the multi-colour feature offered by SVG fonts, this would be really tough to read. Instead, it's a great display font for a variety of creative projects.

Free SVG Alphabet

Free SVG Alphabet

The main font here is quite a plain sans serif, but it's the little mini-illustrations around each letter that really make it special. Check out the full alphabet to see how it works.

ROSE BLUSH SVG - FREE HAND DRAWN SCRIPT FONT

ROSE BLUSH SVG - FREE HAND DRAWN SCRIPT FONT

Although this one is described as a "feminine SVG font", it could work for any gender. What it does offer is a beautiful hand-drawn style, with a set of ligatures to make it look even more like natural handwriting. Try it out!

BroshK-Fruits Font

BroshK-Fruits Font

If you're looking for an SVG font that's bold and eye-catching, this is a great option. Look at how the segments of each letter seem to intersect with a subtle 3D effect. BroshK would make a great addition to your SVG font library.

YORKVILLE SVG - FREE SIGNATURE BRUSH FONT

YORKVILLE SVG - FREE SIGNATURE BRUSH FONT

Now let's look at another hand-drawn brush font. Yorkville SVG is a wonderfully creative option for signatures, headlines, logos, and more. If you want to get creative with your typography, try this one out.

BigParty O2 Black Font

BigParty O2 Black Font

Get the party started with this intriguing OpenType SVG font. It's got a retro party vibe, reminiscent of seventies party flyers and posters. Like some of the other fonts in this list, BigParty 02 is free for personal use only.

Brewery SVG FREE FONT

Brewery SVG FREE FONT

Again, let's switch things up and look at another font with a hand-painted brush style. If you're looking for a creative brush font or an SVG calligraphy font, this would be a good option. Just look at those realistic brush textures and paint spatters!

Agreloyc Font

Agreloyc Font

Or why not add Agreloyc to your SVG font library? With its bold type and decorative flourishes, it has a strong vintage appeal. You can see it on an old sign or a fantasy book cover, can't you?

THRONE - SVG & Regular OTF font

THRONE - SVG  Regular OTF font

Why make an SVG font when there are so many available to download? Throne is free for personal and commercial use, and it will help you create a realistic, textured, hand-painted look in no time at all.

Sortefax No2 Font

Sortefax No2 Font

Sortefax is an intriguing mix of vintage and contemporary styling. Check out the use of strong shadows to create a 3D effect. This font just lifts right off the page (or screen!).

SURGING SVG - FREE HAND DRAWN SCRIPT FONT

SURGING SVG - FREE HAND DRAWN SCRIPT FONT

Surging comes in both regular OTF and semi-transparent SVG versions. It's a vivacious, handmade brush font that would truly elevate any of your greeting cards, invites, advertisements, etc. Why not take it for a spin!

Namskow Font

Namskow Font

If you're looking for an SVG font example that is big, bold, and attention-grabbing, why not try Namskow? It's a great multi-colour vector font with clever use of outlining and transparency to create a high-impact display font.

Sinistral | Hand-Written SVG Font - FREE Vector Version

Sinistral  Hand-Written SVG Font - FREE Vector Version

You can see the horror-movie inspiration behind this one, can't you? But think laterally, and you'll be able to use Sinistral for all kinds of different projects. It's available in both SVG and OTF forms.

Mistletoe Font

Mistletoe Font

Wait, is it Christmas again already? No, not yet, but it's never too early to start preparing your holiday cards, flyers, website banners, and more. Mistletoe is the perfect SVG color font to help you spread some of that seasonal good cheer. 

Ivory Heart • Free SVG Font

Ivory Heart  Free SVG Font

The maker of Ivory Heart used real, hand-painted watercolour lettering to create this custom font in SVG format. It looks so realistic that it might smudge at any moment!

Sudegnak No4 Font

Sudegnak No4 Font

Fun fact: Sudegnak means "suddenly" in the Basque language. So says Google Translate anyway, and who are we to argue? This SVG color font comes in blue, orange, red, and green versions, and we recommend downloading it—either suddenly or in your own time.

Macbeth Free SVG Font

Macbeth Free SVG Font

We're not sure what Shakespeare would make of this one, but it certainly works in a contemporary context. Get that rough, hand-drawn style in an OpenType SVG font that comes with uppercase and lowercase characters as well as numbers, punctuation, etc.

The Free SVG Bundle Volume II

The Free SVG Bundle Volume II

More holiday designs! This free SVG bundle comes with ten different options, each one perfect for Christmas good cheer. Your greeting cards and holiday invites will look extra special this year if you download this awesome collection.

Anaglyph Isometric Font

Anaglyph Isometric Font

Here's a great SVG font example. The combination of red and blue to make a trippy 3D anaglyph effect is a great way of using the new creative options that SVG fonts open up for font makers. You probably only want to use this one in small doses, but in the right context it could really wow your audience.

Display Signature

Display Signature

Free SVG fonts don't get much better than this. See how the lettering fades in the middle, just as if it had been hand-painted on a shop or cafe window? That's what SVG fonts can do. There's also a "clean" version without the transparency effects if you prefer.

BigPartyO2-Green Font

BigPartyO2-Green Font

We saw the black version of this font earlier, and now the party continues in bright green! The closer you look at this font, the more subtlety you can see in the design. From the shades of green and the natural leaf-like dots on the letters to the 3D effect, this is definitely one to add to your SVG font library.

DigitaltS-Fruits Font

DigitaltS-Fruits Font

Rounding out this list of free SVG fonts, here's one that uses cool gradient colours and comes with a full range of diacritics for multiple languages. This SVG font is bold and full of impact!

Choose Your Favourite SVG Font Today

Well, that's it for the best free SVG fonts available today. There are many terrific free fonts available on the internet, but if you're looking for the very best SVG fonts, we highly recommend Envato Elements. 

Elements is a professional and reliable resource for premium fonts, and if you regularly need logos, icons, mockups and other design resources, Elements offers unlimited downloads for one low monthly fee. 

Bonus: If you want more information on other great fonts, check out these really helpful articles below: 

100 Insanely Awesome Fonts From Envato Elements

$
0
0

Are you a font lover with an appetite for serifs and sans-serifs? Sink your teeth into this amazing collection of 100 stunning cool fonts from Envato Elements!

Get Unlimited Cool Fonts With Envato Elements

The right font can transform your creative designs from drab and dreary to sophisticated and marvellous. And with Envato Elements, you can satisfy your love for fonts with unlimited downloads all for one monthly price!

Download thousands of fonts from Envato Elements
Envato Elements has thousands of awesome fonts you can download with unlimited use 

In this collection packed with 100 assets, we present you with a plethora of amazing resources curated from the font section of Envato Elements.

Use these fonts in your next designs, or enlist the help of a design professional by contacting the good folks at Envato Studio.

Most Popular Fonts Last Month on Envato Elements

Before we jump into that, I'd like to share with you the five most popular fonts we had in May. 

From script and handwritten fonts to sans-serif typefaces, check them out and discover why these awesome fonts were the most downloaded from Envato Elements.

1. Flanders Script (OTF)

Flanders Script

The most popular font in May was Flanders Script, a script and handwritten font. This bold and modern typeface is perfect for baseball and sport logos. Flanders Script font has OpenType features and supports many languages. 

2. Transyl - Elegant Display Headline Typeface (OTF, TTF, WOFF)

Transyl - Elegant Display Headline Typeface

Or try the elegant Transyl font, a popular choice recently for headlines and other scenarios where you need a bold display font. Note: this is an all-caps font, so it's best used for small amounts of text where you want a big impact.

3. Ray Signature Font (OTF, TTF, WOFF)

Ray Signature Font

Third place is for Ray Signature, a script and handwritten font. This nice typeface is very versatile, and you can use it for many projects, such as invitations, logos, T-shirts, posters, or any other project you've got in mind.

4. Rockys Handbrush Font (OTF, TTF, WOFF)

Rockys Handbrush Font

Next up is Rockys, a script and handwritten typeface that can also be a decorative font. This hand brush font features a bold and natural style that makes it perfect for branding projects, advertisements, product design, stationery, or any other idea you've got.

5. Art Plot Bold Hand Drawn Font (OTF)

Art Plot Bold Hand Drawn Font

To close the selection of the five most popular fonts, we've got Art Plot, a script and handwritten font. Use this font to give your designs a unique look with a hand-drawn finish.

25 Stunning Serif Fonts

Love the classic vintage allure of a serif font? What makes a great serif font are those extra finishing details, usually in the form of a small line attached to the end of a stroke in a letter.

Perfect for a variety of applications, this first list of 25 cool fonts will have you ready to dive into your next design project. Enjoy!

Herbert Lemuel Font

Let's kick off this list with the Herbert Lemuel font, a vintage-style font that comes with six different versions for that old school look. This serif family comes sectioned in three different sets and is the perfect font for your vintage wedding invitations or designs.

Herbert Lemuel Font

New York Font

If you love that old New York look, then this font is the one for you! The New York font comes packed with eight font files, featuring everything from regular styles to grunge and so much more!

New York Font

Flexiletto Font

Perfect for the hipster designer, this serif font has a cool vintage vibe with elegant details. It's suitable for many design applications, so enjoy the classic feel of this retro font.

Flexiletto Font

Hagen Font

Update your font collection with this avant-garde-inspired font. Hagen comes with two different weights and is the perfect addition to your collection as a font for electronic festivals or other fashion-forward posters.

Hagen Font

Haste - 3 Handmade Fonts

Included in this font pack are three handmade fonts with a classic vintage vibe. You can access the alternative characters for this font using Adobe Illustrator, making this the perfect font for your next lettering project.

Haste - 3 Handmade Fonts

Megeon Font

If you're looking for something bold with a dash of retro design, then consider this unique serif font. Megeon is a vintage-style font with wonderful grunge qualities and is perfect for logos, advertising, and so much more!

Megeon Font

LUNA Font

Suitable for many design applications, Luna is a slab serif typeface that comes available in two different versions. Also included is a stencil version for additional style.

LUNA Font

Western Grit Font

Love the look of old westerns? Then you're sure to love the Western Grit Font. This distressed typeface is a little beat up, but oozes with incredible character and style. Enjoy this 100% handmade design with characters, numbers, symbols, and punctuation included.

Western Grit Font

Troupe Font

Inspired by retro hand-drawn lettering, the Troupe Font comes with six different weights and four different styles. It's the perfect font family ready to be used for your next flyer or poster design.

Troupe Font

Parlour Font

There's nothing quite like the style of an old Brooklyn barber shop, and you can enjoy the great urban aesthetic with this Parlour Font. A display typeface inspired by Movember, this versatile font comes complete with the entire alphabet, numbers, and punctuation.

Parlour Font

Bartolomew Font

With both a regular and printed style to choose from, the Bartolomew Font is a classy alternative to the fonts you're most familiar with. Add that extra personal touch to your wedding invites and more with this elegant hand lettering typeface.

Bartolomew Font

Marema Typeface

Inspired by modern vintage posters, this Marema Typeface features stylistic alternatives, contextual alternatives, and ligatures. Show off this font and use it for headlines and more for that beautiful vintage look.

Marema Typeface

The Salvador Font

Inspired by the lettering artist who created this unique style, The Salvador Font is a trio combination that includes serif, script, and condensed variations. Additional options allow you to choose different colors on every layer of the font without needing special effects.

The Salvador Font

Esther Handmade Font

The ultimate version of the serif font, this classy design is not constructed out of modules but instead drawn by hand and optimized for the best legibility. It's ideal for cookbooks, menus, and more, so enjoy the beautiful style of this handmade serif font.

Esther Handmade Font

Burford Rustic Font

A rustic alternative to the Burford Font Family, this font includes new style variations and layering options. Enjoy even more from the ornamental package to cover the basic keyboard characters and more.

Burford Rustic Font

Lunchbox Slab Regular Font

A part of the Lunchbox Font Family, this hand-drawn typeface features a unique style with numerous customization options available. Included in this package is a custom set of small caps, contextual alternatives, and access to over 1,500 different characters.

Lunchbox Slab Regular Font

Zelda - ArtDeco Font

Enjoy this amazing font full of style and flair that is originally inspired by that wonderful age of Art Deco design. Great for modern and vintage projects alike, this font includes four font styles with regular, bold, and grunge alternatives.

Zelda - ArtDeco Font

Star Typeface

Shine bright like a star with this unique typeface. This retro font features a vintage Art Deco aesthetic perfect for a variety of design projects. Download this font to get access to its eight incredible font files.

Star Typeface

Bureno Font

A display font with incredible style, this Bureno Font features a vintage design with four creative fonts included. Enjoy both the regular and grunge styles for more design alternatives, and ultimately upgrade the look of your print materials.

Bureno Font

Lawless Font

Resurrected from a once scrapped file, this Lawless Font has been re-birthed to fulfill the needs of the design masses. Included in this complete package are four different styles, the entire alphabet, and letters and punctuation.

Lawless font

Euphoria Font Family

Introducing the illustrious Euphoria Font Family. This vintage typography set is beautifully crafted and makes for an instant vintage design. Included in this download is access to several alternative styles as well as a few fun extras.

Euphoria Font Family

Stiquez Font

Achieve that classic retro look with this elegant typeface. Perfect for logos, advertising, and so much more, this unique font is suitable for a variety of software applications.

Stiquez Font

Brixton Line Font

Sometimes there's nothing better than a font with that simplistic elegance. This handcrafted beauty is quite uniquely creative, with over 80 different stylistic alternatives to choose from. Enjoy this super pretty typeface to beautify your next print designs.

Brixton Line Font

806 Typography Font

Inspired by that retro design of old signs, this font works with Illustrator, Photoshop, and even more software applications. Download this file to get complete access to this wonderful vintage font.

806 Typography Font

Magnifika Font

The age-old appeal of vintage lettering will never go out of style. And with the Magnifika Font, you can create that old Victorian look in a matter of seconds. Enjoy a variety of elements included in this complete font file.

Magnifika Font

25 Elegant Sans-Serif Fonts

Sans-serif, or fonts without those extra little stroke details, feature clean, modern designs that transform any graphic design into a sophisticated dream. Their sleek style allows for the utmost of versatility in almost any design application.

Enjoy this next collection of fonts, for we already know there will definitely be a handful you'll want to download!

CornerOne Typeface

Make this simple, round font a staple in your next font collection. The CornerOne Typeface package includes all the letters, numbers, and glyphs you could ask for in one simple download.

CornerOne Typeface

Reiju - Typeface Duo

Divinely unique with its own modern flair, this clean, feminine typeface will make any graphic design truly stand out. Incorporate this type into a variety of design projects, from branding to fashion and even stationery.

Reiju - Typeface Duo

Frank Font

Inspired by the classic DIN, Eurostile, and Futura fonts, Frank is the perfect font for that clean, bold look. Included in this file are five different weights, Latin support, and even 300+ glyphs.

Frank Font

The Great Outdoors Font

Take a great big gulp of fresh air with The Great Outdoors. Available in two different styles, clean and rough, this versatile typeface brings the warm nature of the wild to you. It's a great addition to your growing collection, and you can incorporate this font into almost any art project.

The Great Outdoors Font

Hitchcut Font

Inspired by the classic Hitchcock movies, Hitchcut is a fun play on words and an even greater play on font styles. Included with this unique sans-serif are contextual alternatives for the full alphabet and all the normal characters you desire.

Hitchcut Font

Graun Font

Need a little grunge in your life? Then feast your eyes on Graun, a unique handmade typeface with bonus elements included. Dress up your album covers or t-shirts with this grungy look.

Graun Font

Cormier Font

The beauty of Art Deco design is that it instantly elevates your work. So next up we have Cormier, an Art Deco themed typeface that comes in three different styles. Incorporate this sleek font into your corporate or business designs for more drama and flair.

Cormier Font

Sovereign Typeface

Every great designer needs a slew of clean, modern fonts in their design arsenal. So we present you with Sovereign, a bold and modern typeface that is perfect for branding, advertising, and so much more!

Sovereign Typeface

Laguna7 Font

The simple elegance of the Laguna7 Font means that you can incorporate this typeface into a variety of designs. Complete with letters, numbers, and glyphs, this font is created in the OpenType format.

Laguna7 Font

Lunchbox Bold Font

Got lunch? This unique sans-serif design features a font with lots of character and additional elements to boot! Enjoy the four different font styles per letter and the wide range of alternatives for this creative hand-drawn type.

Lunchbox Bold Font

Maxwell Sans Font

Bold and condensed for that sexy solid look, the Maxwell font is the perfect addition to your font collection. Inspired by the retro font aesthetic of the 1950s, Maxwell comes complete with all the necessary characters and elements you desire.

Maxwell Sans Font

Blocklyn Font Family

A fun play on words, this font is big, bold, and bad ass. Intimidate or simply impress your viewers and inspire a strong masculine design with this bold typeface. Included are four font styles, numbers and symbols, and standard Latin characters.

Blocklyn Font Family

Fast Track Font

Next up is Fast Track, a speedy display font inspired by vintage racing. This unique type features a design with lots of character, as it shows the letters moving in a fast motion. Included in this font file are example mockups for added inspiration.

Fast Track Font

Friday's Font

Thank god it's Friday, and thankfully you'll have this font to celebrate. The Friday's Font is a lazy but clean font style that is ideal for any standard marketing material. Incorporate this font into your business cards, blog photos, or scrapbooks for added style.

Fridays Font

Bob Font

A huge typeface, Bob is going to need a little space to fit into your growing collection. Complete with a bold, solid, and angular look, this one lets you show off your love for huge fonts.

Bob Font

Abeja - Font Duo

Perfect for the design professional with minimalist tendencies, Abeja is a uniquely modern typeface that features letters with a slightly pixelized appeal. Enjoy this font alone or incorporate it into your designs to amplify their style.

Abeja - Font Duo

Ichiji - Typeface Duo

Introducing Ichiji, a modern sans-serif typeface that is sure to impress all your viewers. This strong yet elegant font features a unique design that distorts the average letter. Highlight this eclectic font with a variety of fun design projects.

Ichiji - Typeface Duo

Fantai Font

Fantai is a simple, hand-painted font. Its classic style makes it very versatile to use for web or print materials. Included in this package are two font formats that are simple and easy to use.

Fantai Font

Wilder Font

Get lost in the wild with this natural handwritten font. Wilder is a condensed, sans-serif typeface inspired by an old wooden sign outside a crazy man's log cabin. Enjoy the simple nature of this font and take advantage of a lifetime of free updates!

Wilder Font

Gutenberg - Font Family

A tribute to Johannes Gutenberg, the man who introduced printing to Europe, this sans-serif font presents sketchy edges with irregular imperfections. Its grungy vibe is the result of simulating the look of transferred ink, and we think the creator has succeeded greatly in his inventive design.

Gutenberg - Font Family

Sailors Font

Last but not least in this collection of sans-serif fonts is Sailors, a clean typeface available in two different styles. Perfect for branding, labeling, and more, this classic vintage font is a great way to showcase your love for boats. 

Sailors Font

25 Gorgeous Script & Handwritten Fonts

Nothing can beat the charm of freehand writing. Long gone are the days when we were taught script in school, but luckily we still have amazing Script and Handwritten Fonts to turn to.

In this next collection, enjoy an array of styles, from the dainty and pleasant to the abstract and messy.

Cherie Bomb Font

Let's begin this collection with an explosion. Cherie Bomb is a fun handmade font with a punk rock feeling to it. It's screaming with personality and heart and allows you to create stunning hand-lettering quickly and easily.

Cherie Bomb Font

Midnight Rider Font

Written with a dry marker, Midnight Rider is a unique handwritten font. It's perfect for branding projects and is a great addition to your growing collection of hand-drawn typefaces.

Midnight Rider Font

Little Wonder Font

You'll wonder why you didn't have this font sooner with Little Wonder. Created with a single watercolor brush and painstakingly digitized for your convenience, this typeface is a mix of chaotically brushed lettering with elegant script.

Little Wonder font

Briella Font

There's no hiding the beauty behind this feminine, cursive typeface. Briella is a font based on a unique hand-lettering style. Use this for wedding invites and every design that could use an extra pinch of pretty.

Briella Font

Rainy Days Typeface

Make sure you have an umbrella before going out with this type. Rainy Days is a fun typeface that was made by hand with black Indian ink. Add it to your collection to add splashes of personality to your next design project.

Rainy Days Typeface

Heiger Font

Carefully crafted with you in mind, Heiger is a gorgeous script font with bonus elements included. Enjoy the additional vector swirls to classy up your next fashion or bridal invitation.

Heiger Font

Fjord Brush Font

Made by the hands of the painter Krisjanis Mezulis, Fjord was inspired by the beautiful landscapes of the fjords in Norway. Incorporate this natural, yet unique brushwork into your designs for that messy look.

Fjord Brush Font

Mallow Typeface

Recently updated with 15 mockups for your inspiration, Mallow is an imperfect hand-painted typeface with an irregular baseline. Featured in this complete package are letters, numbers, punctuation, and more.

Mallow Typeface

Amorie Modella Font Family

Tall and skinny with the charm of vintage style, the Amorie Modella Font Family comes in various weights and styles. Built to look completely handcrafted, this is an OpenType font that includes a great set of design extras as a bonus.

Amorie Modella Font Family

Drustic Dialy Script Font

Drustic Dialy is the birthchild of its creator Adamfathony. In collaboration with another designer, they created this unique script font with rustic charm and incredible detail. Download this font to gain access to several font styles and more.

DrusticDialy Font

Asphalts Typeface

A mixture of heavy and rough brush strokes makes for an incredible typeface. Asphalts is inspired by a rolling downhill passion and is sure to uplift your brand name, identity, or presentation.

Asphalts Typeface

The Painter Font

Created with the look of traditional sign and brush lettering in mind, the Painter Font is a font family that includes two styles along with several OpenType features. Perfect for logos, flyers, and more, this unique typeface lets you get the most out of your designs.

The Painter Font

Every Summer Font

If you're looking for a dynamic font to fulfill your spontaneous design projects then look no further. The Every Summer Font is a great way to add personality to your brand with its unique brush look and charming marker imperfections.

Every Summer Font

Banaue Handwritten Brush Font

A handwritten font for that homemade look, Banaue features 104 characters and all the basic glyphs you need. You'll definitely want to add this one to your collection to get started on your next project right away!

Banaue Handwritten Brush Font

Himalaya Set Type

We never get tired of that beautiful vintage look. The Himalaya Set Type is a vintage inspired font duo that includes one script and one sans-serif font. Both are hand-drawn with rough edges, and we know you'll find a great way to incorporate this font into your designs.

Himalaya Set Type

Shallom Font

A cute typeface that is both modern and unique, Shallom is a handcrafted font created with a brush and ink. Its calligraphic style will win over any design client, and it even includes a bonus graphic pack with fun fashion elements.

Shallom Font

Ornette Font

Casual yet cursive, this sans-serif font is ideal for branding and graphic design work. Created with a love of hand lettering, this font includes all the characters you need, with several different styles to choose from.

Ornette Font

Harmonie Script Font

With a combination of copperplate and contemporary typeface design, the Harmonie Script Font is absolutely stunning in its simplicity. Use this font for your wedding invitations, or any design that would work well with calligraphy.

Harmonie Script Font

My Dear Script Font

Though the art of writing letters by hand is dying out, the beautiful script style remains with the My Dear Script Font. This classic style has a touch of elegance inspired by the lettering on vintage postcards. Download this font to gain access to this stunning typeface and its features.

My Dear Script Font

Brandine Font

Made with a thin brush and watercolors, the Brandine Font is handcrafted with a beautiful feminine appeal in mind. Use this font for your invitations or celebrate its uniqueness across the board in your next design projects.

Brandine Font

Emellie Script Font

A unique calligraphic typeface with feminine touches, Emellie is the perfect font for any designer. Use this font to make your designs instantly pretty or even elevate your home projects.

Emellie Script Font

Maloishe Brush Script Font

Handmade and oozing with character, you'll definitely want to add Maloishe to your collection. This font stands out from the rest and includes all your basic characters with additional elements for even more style. No need for customization or editing—this font is instantly ready to use.

Maloishe Brush Script Font

Cosmodrome Monoline Script Font

Love the cosmos? Explore the wonder of space with this fun Cosmodrome Monoline Script Font. This type features a cool aesthetic that is sure to upgrade all your web and print designs.

Cosmodrome Monoline Script Font

Novitha Script Font

Developed by hand using a brush pen, the Novitha Script Font is everything you want in a script font. Scanned in at a very high resolution, it's designed with a strong personality for any typography lover.

Novitha Script Font

Eiffell Brush Script Font

Busting with a unique, French charm, the Eiffel Brush Script Font is stunning with its decorative capitals and elegant curves. Incorporate this font into your designs for that old-world look.

Eiffell Brush Script Font

25 Modern Decorative Fonts

Last but certainly not least, if you fancy the ornate, then dive into this next collection of Decorative Fonts. With both serif and sans-serif fonts included, you can fulfill a special theme for your upcoming designs.

Spacethink Typeface

Space out with this insanely creative font from Envato Elements. Spacethink features five different types of style options that can make it easy to convey that space look you desire. Download this font for your posters or flyers or include it on your next album cover.

Spacethink Typeface

Mighty Typeface

Need to showcase your mighty attitude? The Mighty Typeface is perfect for your adventurous message and comes complete with free vector badges.

Mighty Typeface

Baddest Typeface

Introducing the baddest typeface around. This decorative font has a killer design that features strong, bold letters. Enjoy the full package, complete with letters, numbers, punctuation, and symbols.

Baddest typeface

TOXINE Typeface

Imagine the old medicinal bottles from yesteryear. The Toxine typeface is inspired by their decorative vintage design. This font is suitable for labels, posters, and all your vintage projects, while also including all the necessary elements to complete that entire look.

TOXINE Typeface

Alpha Rough Font

Adapted from the philosophical Greek language, Alpha presents itself with a nice handwritten element that will work perfectly in your next designs. Download this font file to gain access to the full list of characters and additional stylistic alternates.

Alpha Rough Font

Stooges Races Font

Drawing inspiration from the old retro posters found at races, Stooges is a fun font bursting with character and speed. Enjoy its unique grunge style complete with .OTF font files and an additional vector pack.

Stooges Races Font

Auther Typeface

Looking for something vintage with a modern flair? Consider this retro monoline display typeface, Auther. With its gorgeous curvy lines and rustic texture, there's no way you can resist adding this awesome font to your collection.

Auther Typeface

CA Rusty Nail Font

Looking for a rusty nail? A design by Stefan Claudius, this font is carefully hand crafted and comes complete with a full Central European set in two distinct styles. It's perfect for labeling and more, so download the file to take advantage of that homemade look.

CA Rusty Nail Font

Haext Regular Font

This rustic Neo-Goth font is sure to make you conjure the spirits with its linear uniqueness and abstract style. Make your designs stand out from the crowd and download this font to inspire something different in each project.

Haext Regular Font

Madeline Handsketched Font

Here's a cute, hand-sketched font created with care. Madeline features a friendly, charismatic design that is super lovable with each letter. The overall feel is meant to be carefree, so be sure to design with a free spirit in mind.

Madeline Handsketched Font

Ginusto Font Family

Made carefully by hand, the Ginusto Font Family is a bold typeface that will inspire you to design with optimal creativity. What you'll get in this package is four family fonts, an ornamental pack, and even access to a comprehensive video tutorial for additional help.

Ginusto Font Family

Baker Street Rough Font

Inspired by the creator's trip to London, the Baker Street Rough Font encompasses all the great elements of beautiful, vintage typography. This font family delivers a multitude of OpenType features and includes additional ornament sets to work specifically with the Baker Street style.

Baker Street Rough Font

La Forest Typeface

If you're looking for a dramatic font perfect for that Count Dracula look, consider the La Forest typeface to inspire some gorgeous Gothic style. Add this unique font to your designs and transform the theme easily with these four creative fonts.

La Forest Typeface

Mars Attack Typeface

We are not alone, and you won't be either once you feast your eyes on this Mars Attack. This eclectic typeface features a bold, spacey design that will easily convey the message you desire for design that is out of this world.

Mars Attack Typeface

Catalina Clemente Font

After visiting a bakery in Newport Beach, California, the creator of the Catalina Clemente Font was inspired to create a typeface with all the organic design and stunning typography of that very special place. Download this file to gain access to four font families and more, including additional graphic ornaments for even more style.

Catalina Clemente Font

Morning Glory

Take a trip back to the Victorian age with this beautiful decorative font designed by Inumocca Type. It comes with just the right amount of creative features, while still being clear and easy to read. Try out this eye-catching font for your next project!

Morning Glory Font

Atebellum Font Family

This vintage inspired typeface comes in two distinct styles, allowing you more room for versatility in your designs. Download this special package to use for awesome displays, labeling, and more.

Atebellum Font Family

Casual Brush Font

Or you could always just keep things casual. The Casual Brush Font is a lovely handwritten typeface created with fluid brush strokes that are sure to inspire serenity. Download this file to gain access to 600+ ligature pairs and two stylistic alternatives.

Casual Brush Font

Sweetiest Font

The sweetest font around, this adorable typeface comes complete with bubbly thick curves and a lovable romantic style. Combine this font with your favorite hand-brushed look for a design that looks very natural and sweet.

Sweetiest Font

The Thron Typeface

An elegant font family that comes in three different font formats, The Thron Typeface is a static font, which means that it'll look great on almost anything. Inspire elegance in your designs with this unique look.

The Thron Typeface

River Side Font

If you're looking for even more handwritten fonts to add to your design arsenal, then consider the River Side Font for your next designs. Great for inspirational posters and fierce brand identities, you're sure to impress with this rustic hand-painted font.

River Side Font

The Rupture Font

The Rupture Font features an original, rustic look that is handmade with you in mind. Elevate your designs with this creative typeface that is ideal for any poster or graphic design.

The Rupture Font

Story Brush Font

Tell me a story! The Story Brush Font is a surefire way to add a creative story element into your designs. Equipped with OpenType features and over 240 glyphs, this font can make a huge impact for your next Halloween or horror-themed project.

Story Brush Font

Phillnesia Typeface

Featuring an incredibly gorgeous Victorian design, the Phillnesia Typeface is a great vintage font that will instantly age your print materials for that fun retro look. Download this creative design and incorporate it in your favorite labels, posters, and so much more.

Phillnesia Typeface

Sea Horse Typeface

Last but not least, let's dive into this elegant water theme with this lovely Sea Horse Typeface. Inspired by old Victorian typography and vintage sign printing, this file includes the original .OTF format and a poster sample for inspiration.

Sea Horse Typeface

Conclusion

This list is jam-packed with amazing resources for the avid collector of serif and sans-serif fonts. If you need a more hands-on approach to your work, however, consider enlisting the help of a design professional from Envato Studio for custom lettering, branding, and so much more.

And with hundreds of fonts available at your fingertips, chances are we've missed a few to add to your personal collection. Be sure to browse Envato Elements for more resources, and let us know your favorites in the comments below!

If you still want more fonts, you can find dozens more fantastic examples in the following article:


20 Best Free Printable Flyer Design Templates to Download Now in 2020

$
0
0

When someone views your flyer design, it's often their first time coming in contact with your business. 

Opinions are immediately formed when viewing a flyer. This makes it necessary for you to put your business's best foot forward through the design on the flyer. 

MEDUSA Fashion Flyer From Envato Elements
MEDUSA fashion flyer is one of the many high-quality premium printable flyer templates available on Envato Elements

By starting the flyer creation process with premium and free printable flyer templates, you start with a high-quality and professional-looking template that's sure to impress.

With free printable designs or premium flyer design templates in 2020, you can spend your time focusing on content rather than on the flyer design. Let’s explore five of the best premium printable design templates available for 2020.

Best Premium Printable Flyer Design Templates on Envato Elements (With Unlimited Use)

Premium templates offer the highest quality designs and give you a greater level of control when editing. As mentioned, it necessary for you to have an excellent flyer design to make a great first impression. Premium printable flyer design templates help you do just that. 

Although you could try one of the online flyer templates available for free download, you'll find that those aren't as professional. Also, free flyer designs may not take advantage of current flyer design ideas. Your best bet for making a good impression is a premium template.

Premium Printable Flyer Design Templates on Envato Elements
Professional best-selling printable flyer design templates on Envato Elements - with unlimited access.

Before we delve into the best free printable flyer design templates available, let's look at premium templates from Envato.

For a low monthly cost, Envato Elements gives you access to over 15,000 templates and designs to help you create professional-looking flyers. Not only can you access all these printable flyer design templates, but you get access to photos, videos, fonts, and many other resources that could be helpful to you in your projects.

All the flyer design templates in the Envato Elements library are fully customizable and feature the trendiest designs for 2020.

The level of control that you've got over these professional designs allows you to craft the perfect flyer for your business. You won't find this level of customization or as many high-quality designs with any free printable flyer design templates.

If you need to buy printable design templates one at a time, you can find plenty of professional-looking flyer design templates on GraphicRiver. Start your search for premium flyer templates on GraphicRiver by checking out the best-selling templates available. 

Don't miss out on this opportunity to get access to the best flyer design templates available on the web. Create next-level designs that convey your business in an elegant way with the Envato Elements and GraphicRiver templates. 

Next, we'll go over five of the best-selling premium printable flyer design templates available on Envato Elements.

5 Best Printable Flyer Templates (From Envato Elements - For (2020)

Now let’s look at a few of the top premium printable flyer templates from Envato. We’ll first explore five of the best cool flyer designs from Envato Elements in this section:

1. Corporate Flyer

Corporate Flyer

This minimal template gives your flyer the perfect design for any corporate flyer. If you need to resize any of the objects in the flyer, you can do so without any loss in quality. All the text in the flyer is editable so you can present your specific project with all the necessary text. 

2. Hostel Flyer

Hostel Flyer

This double-sided flyer is ideal for promotions and advertisements. This versatile template is layered, fully editable, and visually appealing. Here are few of this printable flyer design templates notable features:

  • US letter and EU A4 flyer formats
  • includes a customized layered Photoshop template 
  • comes with Microsoft Word and iWork Pages template

3. Property Flyer

Property Flyer

Photos are an integral part of any flyer. The layout of this cool flyer design template helps highlight your photos and catch the attention of your audience. Whether you're looking to showcase real estate, a fitness class, or any type of promotion, the Property Flyer allows you to show your business in an attractive way.

4. Interior Flyer

Interior Flyer

Use this clean and modern design for any product or service your company wants to advertise. This cool flyer design template features four photo slots with layered text and titles as well as a bottom text and icon area to describe your promotion. The size of the letter is 8.5 X 11. Use this stylish design for your next flyer project now!

5. Real Estate Flyer

Real Estate Flyer

Real Estate Flyer lets you describe your promotion or advertisement in detail as there are many text fields available that cover two-thirds of the flyer. The simple but elegant font gives the flyer a sense of professionalism and helps build trust. If you're in need of a minimal and high-quality template, then this is the one for you!

Now that we've covered some of the best cool flyer design templates from Envato Elements, let's look at five of the top designs from GraphicRiver. 

Top 5 Printable Flyer Design Templates From GraphicRiver for (2020)

To buy individual designs rather a subscription, look to GraphicRiver. There are a ton of premium professional printable flyer design templates available on GraphicRiver for individual sale. 

GraphicRiver Corporate Flyers
Here are just a few of the many corporate creative flyer designs on GraphicRiver.

Here are five unique flyer design templates that'll help you kick start the flyer creating process:

1. Corporate Flyer

Corporate Flyer

With this printable flyer template, create a stunning leaflet in no time. Use this easy to edit design to create traditional print advertising such as magazine advert, newspaper ads, promotional posters, and much more. The template comes with five color variations to ensure it fits the color scheme of your business. 

2. Conference Flyer

Conference Flyer

At first glance, this may seem like a simple modern flyer design. But it's quite detailed. This multi-layered template gives the flyer a sense of depth and sophistication. The spacious design lets you showcase important images for your business and display text in an interactive manner. 

3. Multipurpose Price Flyer

Multipurpose Price Flyer

This is the ideal flyer for an advertisement. Promote more than one product or service as well as different price structures for each product and service. The top of the flyer gives you enough room to display an eye-catching image. The section below showcases your product or services pricing. Three PSD files are included with this simple flyer design template. 

4. Product Sale Flyer Bundle

Product Sale Flyer Bundle

Product Sale Flyer Bundle is a fully editable template that allows you to download a mockup of the template. This mockup will allow you to add your business's content to a watermarked flyer. So, you can preview what your flyer will look like. The template also features free fonts and two color variants.

5. Product Promotion Flyer Bundle

Product Promotion Flyer Bundle

Product Promotion Flyer Bundle is like the last design template, except it only has two of the designs from the previous design instead of four. If you're looking for a modern-looking design for a cheap price, then this is a must-have. This printable flyer design template features a free mockup download as well. 

Now that we've covered the best premium templates available, here are the best free flyer design templates that you can download.

20 Free Printable Flyer Design Templates for Download in (2020)

The premium printable flyer design templates let you use the best designs available for your flyer. This ensures that the user experience is the best it can be. 

Before looking for a free flyer template on the web, check Envato's free offerings first. Try out various premium template files (not always flyer templates) at no cost to you.

Here's the deal: 

But, if you're on a tight budget and can't afford premium designs but still need to create a professional-looking flyer, there are free templates you can download.

I've collected a list of twenty of the best free printable flyer design templates for free download below: 

1. For Sale by Owner Modern Design

For Sale by Owner Modern Design

This free flyer design template allows your images to be focal point of the flyer. Whether you're selling a house or a specific product or service, this can be a great flyer design template free to download.

2. Call Owner Design

Free flyer templates like this make use of different circle shapes to create a symmetrical and visually pleasing flyer. This design has a modern feel to it that'll work for a wide range of flyers. 

3. Summer Clearance Clothing Sale

While this clothing sale flyer is targeted at women's clothing, you can easily change it to promote a sale of any product. Change the image and colors to address your audience with this free flyer design template.

4. Discount Sale

Free Printable Flyer Design Template Discount Sale

This free printable flyer template gives you a basic template to advertise sales or special offers. There's plenty of room on this flyer to describe your promotion and add your contact details. 

5. Orange Business Services 

This free printable flyer template is designed for mid and small sized businesses, startups, and marketing agencies. This flyer templates free download contains an editable PSD file.

6. Blue-violet Creative Design Agency Flyer

Free printable designs like this one features a creative and modern design to fit any business. This free flyer template is sure to catch the attention of your target audience. 

7. Promotional Business 

This promotional free flyer template is best used for promotions, branding, brochures, and marketing. Download this free printable design and get to designing it today!

8. Modern Business Promotional 

Free Printable Flyer Design Template Modern Business Promotional

This professional looking free flyer template has the design you need to engage your target audience. The color scheme, icon selection, and font make this a visually appealing free printable design.

9. Business Solutions Consultant 

The bright orange colors will grab anyone's attention in this flyer design template free to download. Use this free printable flyer template to promote your business's best products or services.

10. Startup Business Advertising 

Whether you're a creative professional, running a consultancy agency, or need to promote a personal project of yours, this free advertising flyer design gives you the ideal template to start from. 

11. Professional Business Promotion 

This flyer is your typical corporate flyer. It's got all you need to inform your audience what it is you're promoting or selling. 

12. Delicious Moment Restaurant

Free Printable Flyer Design Template Delicious moment Restaurant

This free flyer design is fully customizable. It's best suited for fast-food restaurants, hotels, Coffees shops, menus and brochure designs. 

13. Future Design School Admission 

Use this flyer design for various ads including but not limited to, fitness, coaching, and school and academics. The download includes an editable PSD file.

14. Free Professional Business

Clean, modern, and simple describes this flyer template free download. Give yourself a leg up on the competition with this design template. 

15. Travel and Tour Services Agency 

This is a multi-theme travel and tour services agency free download flyer template. Use this for travel agency ads, travel and tour guides, and hotel booking services. 

16. Fitness Center Promotional 

Free Printable Flyer Design Template Fitness center promotional

This is a free printable professional fitness flyer. Use this flyer to promote your fitness centers, gyms, sports clubs, and health care centers.

17. Restaurant Business Promotion 

Give your restaurant the promotion that it deserves with this eye-catching design template. Use it for restaurants as well as any food or drink service business.  

18. Property Promotion Real Estate 

This is a completely free flyer template that's fully customizable. Generate new business with this stylish looking flyer. 

19. Natural Beauty Spa

Use this printable free flyer design for beauty parlor, salon, and wellness and spa business ads. There are five different image slots on this flyer to showcase your business.

20. Creative School Admission 

Free Printable Flyer Design Template Creative School Admission

This is a school flyer design template free to download template. It's best suited for educational institute ads, training, and coaching businesses. 

Now that we've gone over the best premium and free flyer design templates available, we'll discuss how you can get the most out of these free printable designs. 

5 Quick Design Ideas to Make a Great Flyer

Even if you're using a premium or free flyer design template, you'll still need to design the flyer to convey your message in a visually appealing way.

Don't forget to browse through the Envato Elements marketplace to find the exact premium template needed to start your project and use the simple flyer design tips. 

Now, here are a few flyer design ideas on how to get the most out of your flyer design templates:

1. Use Colors That Support Your Message 

Certain colors will evoke different emotions from people. The psychology of color is a very powerful tool. It'll enhance the message of your specific flyer. Use colors that match what you're trying to convey in your flyer. 

2. Limit Your Font Choices 

Having many different fonts in your flyer can easily clutter up your design. Limit your font choices to two or three to ensure an easy to read flyer. 

Creative Flyer
The two different fonts used in this premium creative flyer make it easy and enjoyable to read.

3. Design for Trimming 

When you're designing your flyer, avoid putting any important elements, such as text on the edges of the flyer. The reason for this is trimming. When cutting out flyers from a batch of printings, the cutting of each flyer won't be 100% accurate. If you've got important items on the edge of your design, they might be cut off during the trimming process.

4. Use Contrast  

A flyer needs to have this attention-grabbing effect for it to be successful. Using visuals that are contrasting helps your flyer pop out. Create this contrast from the colors, images, and fonts that you use. The idea is to pick design elements that help you convey your message, but also are different enough from each other to garner attention.

Color Themed Party Flyer Template
The contrasting colors in this premium Envato Elements flyer template help the design stand out.

5. Include a Call to Action 

The whole purpose of your flyer is to inform the viewer and to get them to act! When you're designing this call to action consider the last tip of using contrast. Have the call to action contrast the other elements on your flyer to draw in the attention of the viewer.

5 Top Flyer Design Trends for More Impact in 2020

Now that I've shared with you some useful ideas to apply to your next flyer, why don't you check these awesome 2020 printable designs trends? Give your next flyer an unforgettable design! Here are the trends:

1. Vintage Vibe

The vintage look is trending this season in printable designs. The retro text-over-background look is back with a refreshed look. This trend for printable flyers works better with maxi typography and monochrome tones, like in this cool vintage flyer template.

Vintage Burger Flyer
A vintage look will make your printable flyers stand out as in this premium template.

2. Only Typography 

Speaking of typography and fonts, another big flyer trend for 2020 is to go for a design that features only fonts. Designers play with unique typography to come up with striking results! Check this trend in this printable flyer template.

Typography Flyer Vol12
Play with fonts in your premium printable designs to get this unique look

3. Geometric Look

Printable flyers will feature geometrical shapes this year. This trend incorporates triangular, circular and rectangular shapes to catch the audience's attention!

AWR Creative Geometric Flyer
Geometric shapes are a great printable flyers trend, especially in the world of Art. This premium template is a great example.

4. Minimalist Feeling

Minimalism has been on trend for a while now, and it's here to stay. Take advantage of this cool design trend to create polished and clean flyers. Keep this well-known adage in mind: less is more.

Minimalist Flyer Design08
A minimalist look (like in this premium template) will give your printable designs a very professional feeling. 

5. Free & Open Composition

If you really want to think out of the box, then get rid of the grids and frames and go for a free composition in your printable flyers. This trend follows no rules. Let your creativity go free!

Free Falling Flyer  Poster
Forget composition rules and create truly unique, eye-catching printable designs (premium template).

Discover More Great Flyer Templates for 2020

Each flyer design template gives you the opportunity to deliver your message in a unique way. Envato Elements offers a ton of exclusive printable flyer template designs for one low monthly payment. 

By taking advantage of the unlimited subscription, you'll have complete access to a massive library of professional flyer design templates. You can also find a design template that meets your needs by browsing the articles below:

5 Benefits of Using Premium Printable Flyer Templates

We know flyer design templates free to download are useful when you're on a limited budget. But, using premium printable flyers can have many benefits for you and your business or project.

Let me tell you some of the benefits of professional printable flyer templates:

  1. Make a great first impression. As we've said, your flyer is the first impression a customer will get of your business or brand. Why choose free flyer templates that anyone can download, when you can get a unique flyer template? With our premium printable flyer templates, you can be sure you’re making the best first impression.
  2. Save hours of work. Premium printable designs mean you won't have to invest time in designing your flyer from scratch. You won't have to think about the right colors or composition. Just download it and fill in the event or project details!
  3. Customization is infinite. A professional printable flyer also gives you unlimited customization options: color, fonts, size, etc. You can edit any detail of our high-quality flyer templates from Envato. 
  4. Show your brand. Our printable flyer templates will let you add your own branding colors and logos. Don't miss on a chance to professionally present and share your brand!
  5. Inspiration is included. If you don’t have a clue about how to start designing your next flyer, browsing our collection of printable flyer templates is the place for you. We've got templates for every occasion!

Envato Elements: Design Without Limits

Now that you know the benefits of using premium flyer templates, Envato Elements has a fantastic (all inclusive) offer for you:

Envato Elements - Unlimited creative template downloads for one low price

Sign up for Envato Elements and get access to thousands of creative digital assets with unlimited use. Download as many flyers, brochures, presentations and resume templates as you need. All for one low monthly price.

Learn More About Printable Flyers Design

If you're new to flyer design, or you're looking for useful resources about this subject, let me share our carefully crafted guide, Flyer Design & Templates.

There you'll find useful articles about which software to use, tips on how to design a fantastic flyer for every occasion, and some video tutorials about flyer design. Check these out:

Unlock the Power of Professional Printable Flyer Design Templates

As you can see, there are many high-quality premium and free printable flyer design templates available. Use templates and the five simple flyer design tips listed above to create a stunning flyer for your business that's sure to be successful.

Check out Envato Elements and GraphicRiver to gain access to exclusive premium flyer design templates. The premium professional templates found on these marketplaces offer higher quality designs compared to the free alternatives. Whichever design you decide to use, it's time to act. Get started on your flyer design today! 

Editorial Note: Our staff updates this post regularly—adding new professional printable flyer designs. That way, you can find just the design you need to make high-impact flyers.

How to Create an Easy Ice Text Effect in Adobe Photoshop

$
0
0
Final product image
What You'll Be Creating

This tutorial will show you how to use layer styles, with simple shapes and textures, to create an easy ice effect in Photoshop. 

This text effect was inspired by the many Layer Styles available on GraphicRiver, like this 3D Ice Cool, Freeze and Snow Effects Styles pack.

3D Ice Cool Freeze and Snow Effects Styles

What you will learn in this Adobe Photoshop text effect tutorial:

  • How to create a cool ice effect in Adobe Photoshop
  • How to use different combinations of layer styles to achieve the 3D ice effect
  • How to adjust gradient effects
  • How to create a snowy environment effect

Let's get started!

Follow along with us over on our Envato Tuts+ YouTube channel:

Tutorial Assets

The following assets were used during the production of this tutorial:

1. Create the Background Shape

Step 1

Create a new 1000 x 650 px document.

Create a New Document

Step 2

Pick the Rectangle Tool, and create a rectangle that covers the bottom part of the document. Rename the rectangle layer to Ground.

Create the Ground Rectangle

Step 3

Create another rectangle that covers the upper part, and rename its layer to Back.

Create the Back Rectangle

2. How to Style a Ground Shape

Double-click the Ground layer to apply the following layer style:

Step 1

Add an Inner Shadow with these settings:

  • Blend Mode: Linear Burn
  • Color: #9cb0be
  • Opacity: 15%
  • Distance: 0
  • Size: 250
Inner Shadow

Step 2

Add a Gradient Overlay with these settings:

  • Check the Dither box
  • Blend Mode: Linear Burn
  • Opacity: 20%
  • Style: Radial
  • Scale: 150%
  • Create a Transparent to Fill Color gradient fill using Black on both sides.
Gradient Overlay

Step 3

Click the + icon next to the Gradient Overlay tab to add another Gradient Overlay effect with these settings:

  • Check the Dither box.
  • Check the Reverse box.
  • Use the shown Gradient fill from the CSP True Sky Gradients file.
Gradient Overlay - 2

Step 4

Click the first Gradient Overlay tab again, and then click-drag inside the document to move the gradient so that the light is near the upper part of the rectangle.

Move the Gradient

This is how the first rectangle should look.

Styled Ground

3. How to Copy and Paste Layer Styles

Step 1

Right-click the Ground layer, choose Copy Layer Style, and then right-click the Back layer and choose Paste Layer Style.

Double-click the Back layer to uncheck the Reverse box in the second Gradient Overlay effect.

Copy and Paste the Layer Style

Step 2

This will style the back rectangle. If needed, move any gradient fills as you did before.

Move the Gradient

4. How to Adjust a Background

Step 1

Click the Create new fill or adjustment layer icon at the bottom of the Layers panel and choose Hue/Saturation.

Add a HueSaturation Adjustment Layer

Step 2

Change the Hue to -3, the Saturation to -25, and the Lightness to -20.

HueSaturation Settings

Step 3

Add a Gradient fill layer. Create a Transparent to Fill Color gradient fill using a Black color on both sides.

Then, change the Style to Radial and the Scale to 200, and check the Dither box.

The Gradient Fill Settings

Step 4

Change the Gradient layer's Blend Mode to Soft Light.

Change the Blend Mode

Step 5

Place the Textures - Golds, Whites, And Greys image on top of all layers, rename its layer to BG Texture, and resize it as needed.

Add the Background Texture

Step 6

Go to Image > Adjustments > Desaturate, and then change the BG Texture layer's Blend Mode to Soft Light.

BG Texture Layer Settings

5. How to Create Text Layers

Step 1

Create the text in All Caps using the font Kornik.

Then, set the Color to #367497, the Size to 250 pt, and the Tracking value to 25.

Create the Text

Step 2

Duplicate the text layer, change the copy's Fill value to 0, and then duplicate the copy layer.

Duplicate the Text Layers

6. How to Style the Original Text Layer

Double-click the original text layer to apply the following layer style:

Step 1

Add a Bevel and Emboss with these settings:

  • Style: Emboss
  • Technique: Chisel Soft
  • Depth: 200
  • Size: 10
  • Uncheck the Use Global Light box
  • Angle: 60
  • Altitude: 50
  • Gloss Contour: Sawtooth 1
  • Check the Anti-aliased box
  • Highlight Mode:
    • Opacity: 20%
  • Shadow Mode: Screen
    • Color: #ffffff
    • Opacity: 80%
Bevel and Emboss

Step 2

Add a Contour with these settings:

  • Contour: Rolling Slope - Ascending
  • Check the Anti-aliased box.
  • Range: 100%
Contour

Step 3

Add an Inner Glow with these settings:

  • Blend Mode: Linear Light
  • Opacity: 50%
  • Color: #edf1f4
  • Technique: Precise
  • Source: Center
  • Size: 90
  • Contour: Gaussian
  • Check the Anti-aliased box
Inner Glow

Step 4

Add a Satin with these settings:

  • Blend Mode: Screen
  • Color: #afcbea
  • Opacity: 50%
  • Angle: 30
  • Distance: 38
  • Size: 50
  • Contour: Cone - Inverted
  • Check the Anti-aliased box
  • Check the Invert box
Satin

Step 5

Add a Gradient Overlay with these settings:

  • Blend Mode: Multiply
  • Opacity: 70%
  • Create a Fill Color to Transparent gradient fill using the colors #275c8d to the left and #274a71 to the right.
Gradient Overlay

Step 6

Add an Outer Glow with these settings:

  • Blend Mode: Soft Light
  • Opacity: 50%
  • Color: #b9dfff
  • Spread: 20
  • Size: 10
  • Contour: Cove - Deep
  • Check the Anti-aliased box
  • Range: 80%
Outer Glow

Step 7

Change the text layer's Fill value to 20%.

Change the Fill Value

7. How to Style the First Copy Text Layer

Double-click the first copy text layer to apply the following layer style:

Step 1

Add a Bevel and Emboss with these settings:

  • Technique: Chisel Hard
  • Size: 50
  • Gloss Contour: Ring
  • Check the Anti-aliased box
  • Highlight Mode: Soft Light
    • Opacity: 50%
  • Shadow Mode: Soft Light
    • Color: #f4ffff
    • Opacity: 70%
Bevel and Emboss

Step 2

Add a Contour with these settings:

  • Contour: Cove - Deep
  • Check the Anti-aliased box.
Contour

Step 3

Add an Inner Shadow with these settings:

  • Blend Mode: Linear Burn
  • Color: #8699a6
  • Opacity: 100%
  • Distance: 0
  • Size: 35

This will style the second text layer.

Styled Text Layer 2

8. How to Style the Second Copy Text Layer

Double-click the second copy text layer to apply the following layer style:

Step 1

Add a Bevel and Emboss with these settings:

  • Technique: Chisel Hard
  • Size: 50
  • Uncheck the Use Global Light box
  • Angle: -158
  • Altitude: 64
  • Check the Anti-aliased box
  • Highlight Mode: Linear Light
    • Opacity: 50%
  • Shadow Mode: Linear Burn
    • Color: #90abc8
    • Opacity: 100%
Bevel and Emboss

Step 2

Add a Contour with these settings:

  • Contour: Cove - Deep
  • Check the Anti-aliased box.
Contour

Step 3

Add a Texture with these settings:

  • Pattern: Molecular
  • Depth: 5%
Texture

Step 4

Add a Pattern Overlay with these settings:

  • Blend Mode: Soft Light
  • Pattern: Satin
Pattern Overlay

Step 5

Add an Outer Glow with these settings:

  • Opacity: 35%
  • Color: #7ab6ef
  • Spread: 20
  • Size: 30
Outer Glow

This will finish off the ice effect.

Styled Text Layer 3

9. How to Create a Reflection

Step 1

Duplicate all three text layers you have, go to Layer > Merge Layers, and rename the merged layer to Reflection.

Create the Reflection Layer

Step 2

Press Command-T to enter the Free Transform Mode, and then right-click the bounding box and choose Flip Vertical.

Flip Vertical

Step 3

Move the reflection text right below the original text, and hit the Return key to accept the changes.

Move the Reflection

Step 4

Right-click the Reflection layer, choose Convert to Smart Object, and then change its Blend Mode to Soft Light and place it below the original text layer.

Convert to Smart Object

Step 5

Go to Filter > Blur > Motion Blur, and change the Angle to 90 and the Distance to 10.

Motion Blur

Step 6

Click the Add layer mask icon at the bottom of the Layers panel to add a mask.

Add a Layer Mask

Step 7

Pick the Gradient Tool, set the Foreground and Background Colors back to Black and White, and select the Reflection layer mask's thumbnail.

Choose the Foreground to Transparent fill in the Options bar, and make sure that the Linear Gradient icon is active.

Now hold the Shift key and drag from about over the top of the original text to right outside the document's bottom, in order to fill the mask and hide the lower part of the reflection.

You might need to retry or repeat this step a couple of times in order to get a result you like.

Mask the Reflection

10. How to Create a Simple Shadow

Step 1

Duplicate the original text layer, drag the copy below it, and rename it to Shadow.

Create the Shadow Layer

Step 2

Right-click the Shadow layer and choose Rasterize Type.

Press Command-T, and scale the text down vertically to get the basic shadow shape.

Rasterize Type

Step 3

Use the Move Tool to reposition the Shadow below the text.

Reposition the Shadow

Step 4

Go to Filter > Blur > Gaussian Blur, and set the Radius to 10.

Gaussian Blur

Step 5

Change the Shadow layer's Blend Mode to Multiply and its Opacity to 70%.

Shadow Layer Settings

11. How to Add a Snow Texture Overlay

Step 1

Place the Heavy Snow Texture image on top of all layers, rename its layer to Snow Texture, change its Blend Mode to Screen, and resize the texture as needed.

Add the Snow Texture

Step 2

Pick the Spot Healing Brush Tool, and make sure that the Sample All Layers box in the Options bar is unchecked.

Use a soft round tip to paint over unwanted spots and get rid of them.

Remove Unwanted Areas

Congratulations! You're Done

In this tutorial, we created a simple background using shapes, layer styles, and adjustment layers. Then, we created three text layers, and styled all of them to achieve the ice effect.

After that, we created a reflection and a shadow for the ice text. Finally, we added a snow texture overlay to finish the effect off.

Please feel free to leave your comments, suggestions, and outcomes below.

Final Result

5 Ways to Add Ice Effects in Photoshop

Need more inspiration? Check out and download some of these professionally made assets from Envato Elements! These are great especially if you are looking to save some time.

Snow Lettering - Photoshop Action (ATN, ABR, PAT, PDF, PSD)

Snow Lettering - Photoshop Action

Make your text or logo written on snow! The realistic effect of writing on the snow in just a couple of seconds. Get winter lettering for your winter projects!

Ice Chrome Photoshop Layer Styles (ASL, HTML, PSD, PAT)

Ice Chrome Photoshop Layer Styles

These Layer styles look perfect with every font and shape, you can quickly apply them to give a feeling of freezing and icy environment, and to give a cool look to a winter scenery. They are a must have when it comes to give a Christmas and Winter feeling to your work. The textures are real ice photos.

Ice Frozen Texture Mockup (PSD)

Ice Frozen Texture Mockup

This Ice Frozen Texture Mockup includes 1x high res (4500x3000 pixel size, 300dpi)  psd with 3 different styles. Easy and fast editing via smart objects, organized layers and folders and a changeable background color.

Digital Snow Photoshop Brushes (ABR)

Digital Snow Photoshop Brushes

Digital snow effects for your Christmas and winter designs! You will receive 2 .ABR files, one for Photoshop CS2-CS5, second for CS6 - CC and above. 5000x5000 res., 40 Different snow designs.

Blizzard Photoshop Action CS3+ (ABR, ATN, TXT)

Blizzard Photoshop Action CS3

Just brush the area over your object and play the action! You will get the effect of strong snowstorm in few minutes and clicks. Different result every time! 

Learn How to Create More Ice Effects!

If you liked this and are looking to learn how to create some more ice effects, check out the tutorials below! Expand your expertise by going through these in-depth guides. Happy designing!


42 Best Logo Mockups (3D, Vector, and PSD)

$
0
0

Logo mockups are a great way for designers to showcase logo design for clients in a realistic and creative way. They're also a great way to test how designs translate in the real world when applied in various sizes to various surface textures. 

Logo Mockups
One of the many awesome Logo Mockups to be found at Placeit, Envato Elements, and GraphicRiver

Today we'll take a look at 42 of the best logo mockups to be found at PlaceitEnvato Elements, and GraphicRiver.

Unlimited Logo Mockups at Envato Elements

Unlimited Logo Mockups at Envato Elements

First up is Envato Elements. Elements offers an incredible range of high-quality logo mockups from the best designers across the globe, and you can download as many as you want, as often as you want, for one flat monthly fee. What's more, that monthly fee also allows you to access thousands of premium digital assets like fonts, graphic templates, mockups, photos, business card templates, and much more. 

Take a look at this collection of the best logo mockups found at Elements.

18 Best Logo Mockups From Envato Elements

Shop Window Logo Mockup (PSD)

Shop Window Logo Mockup

Test how your logo will look on the window of your new restaurant when you use this 3D glass window logo mockup. There are eight mockup customisation options available with this template, and everything is organised in layers and folders to make editing easy. 

3D Logo and Sign Mockup (PSD)

3D Logo Mockup

This 3D logo mockup for Photoshop helps you see exactly how your design will look when mounted on a wall. This high-res file can be edited using the smart object feature. There's a help file included in case you get stuck.  

Logo Mockup Pack. Craft and Cardboard Edition (Vector)

Logo Mockup Pack

Merchandisers will be happy that this mockup has been included. It contains 12 high-quality stylish mockups in a cardboard label, craft paper parcel, paper roll, etc. The template is well organised in layers, and editing is quick and easy with smart objects. 

3D Logo Mockup (PSD)

Logo Mockups

Use this 3D logo mockup for Photoshop to discover how effective your logo design really is. The smart-object feature helps you replace the current placeholder design with your own with little time and effort.

Paper Logo Mockup Vol. 2 (PSD)

Paper Logo Mockup

Looking to create a gold logo mockup? Well, we've got a few here that might interest you, like this paper logo mockup PSD file. It allows you to add a beautiful gold effect to whatever text you upload to the template.

Logo Mockup Pack, Paper Edition (PSD)

Paper Logo Mockup

We've given you gold, so let's do silver now. This paper logo mockup offer 12 different PSD logo mockups, with an option for using dark paper or light paper, each with a different set of effects that complement the paper. 

Stylish 3D Logo Mock-Up (PSD)

Stylish 3D Logo Mock-Up

This stylish 3D steel logo mockup gives you the chance to see how your design would look in a real-life setting. There are six different styles to experiment with. Use the smart object to add your text to each style to see which one you like the best. 

Salon Glass Logo Mockup (PSD)

Salon Glass Logo Mockup

You don't have to use your imagination to see how your logo would look on the glass window of a business. That's because with this 3D glass window logo mockup, all you need to do is place your designs in the smart object artwork layer and save the image to see with your own eyes how well your design works in a real-life setting. 

Gold Logo Mockups (PSD)

Gold  Logo Mockups

Another gorgeous gold logo mockup just for you. This one includes three different styles to showcase your logo designs, like adjustable gold foil and letterpress effects with customisable shadows. To use the template, simply open the PSD file and double-click on the smart object layer. Drag and drop your design in the opened layer, adjust the design, close the layer, and save the file. 

Logo Mockup on White Paper (PSD)

Paper Logo Mockups

This beautiful paper logo mockup is a Photoshop file with smart-object features to help you replace design by double-clicking, dragging and dropping your design inside, and then saving the file. It's easy peasy, but there's a help file included in case you get stuck.

Faded Glass Logo Mockup (PSD)

Faded Glass Logo Mockup

Here's another 3D glass window logo mockup for you to create a photo-realistic template of what your logo will look like when mounted on a glass window. Once you've added your artwork, you can customise your background to create the context relevant to your design. 

Gold Foil Logo Mockup (PSD)

Gold Logo Mockups

This is a gold logo mockup with a formal touch for those projects that are all about simple elegance. The template includes three paper textures in a white and grey palette, and the metal foils are offered in gold, silver, and copper. 

Leather Keychain Logo Mockup (PSD)

Leather Keychain Logo Mockup

How about this leather keychain logo mockup as an item for showcasing your next logo design? Use the smart-object feature to replace the current designs with your own. If you get stuck, there's a help file available to assist you in getting back on track. 

3D Logo Mockup (PSD)

3D Logo Mockup

How do you like this 3D steel logo mockup? Why not upload your text to the template using the smart object and take this mockup for a test run. 

Paper Logo Mockup (PSD)

Paper Logo Mockup

If you're a fan of vintage, you'll love this paper logo mockup. Inside the well-organised PSD file, you'll find everything you need to customise the template. Place your own design in the smart object, change the background colour, objects, etc., and your mockup is ready to use. 

Photorealistic Paper Logo Mockups (PSD)

Paper Logo Mockups

If you're creating a logo for a luxury brand, you have to use a mockup to match. That's where this logo presentation mockup comes in. It offers three different lux backgrounds with unique paper surfaces. To customise it, click on the smart object layer, and then drag and drop your logo design into the open layer. Adjust the design, close the layer, and save the file. 

Logo Mockup Corporate Interior (PSD)

Logo Mock Up Corporate Interior

How exciting it is to see your work up on a wall? This logo presentation mockup allows you to do just that by giving you five corporate interiors you can use to test out the effectiveness of your logo. The template is easy to edit, but there is a help tutorial included in case you get stuck.

Gold Logo Mockup (PSD)

Logo Mockups

One more elegant gold logo mockup for the road. This one offers eight different fully layered Photoshop files that you can experiment with to find the look that's a match. The high-resolution files are well organised in layers and easy to customise using smart objects. 

16 Best Logo Mockups From Placeit

Logo Mockups from Placeit

Placeit is a one-stop shop for the internet's widest selection of mockups, and one of the things that makes Placeit so fabulous is that you can customise any mockup online in a matter of seconds, without the need for complicated software. 

Furthermore, if you're on a budget, you can buy one mockup at a time for a low individual fee. Alternatively, if you have a bit more money, you can purchase a monthly or yearly service for one flat fee, which gives you unlimited access to thousands of other resources as well. 

Let's take a look at some of the incredible logo mockups available at Placeit. 

Mug Mockup of a Beautiful Woman Drinking a Hot Beverage

Mug Logo Mockup of a Beautiful Woman Drinking a Hot Beverage

Coffee mugs are a great vehicle for showcasing logos, and this logo mockup is the perfect way to keep your design front and centre. This mockup features a young woman holding the viewer’s gaze while taking a sip from her cup. 

Drawstring Bag Mockup with Customizable Strings

Drawstring Bag Logo Mockup with Customizable Strings

Can you see your design on this logo mockup of a fabric draw-string bag? What a way to call attention to your work! Using the Placeit logo mockup generator, you can add your logo to this template in a matter of seconds. 

T-Shirt Packaging Mockup Featuring a Wooden Table

T-Shirt Packaging Logo Mockup Featuring a Wooden Table

If apparel or merchandising is your business, then it really helps to see how your logo will translate on certain kinds of packaging. These two paper logo mockups offer a photo-realistic paper surface, so you can see how your design will look when applied to paper. 

Mockup of a Hand Sanitizer Lying on a Colored Surface

Logo Mockup of a Hand Sanitizer Lying on a Colored Surface

You've got the product, you've commissioned the logo design, but how will the two look together? One way of finding out is to use a logo mockup like this one. Just upload your design using the Placeit Logo Mockup Generator, and then change the background colour to suit your brand or taste.

Mockup of Two Food Boxes

Logo Mockup of Two Food Boxes

Food trucks, health stores, bakeries and the like will find these logo mockups extremely useful because they are ideal for testing out your logo design to see whether the design is legible and eye-catching. 

Phone Grip Mockup Featuring a Smiling Woman Looking at Her iPhone

Phone Grip Mockup Featuring a Smiling Woman Looking at Her iPhone

These little phone grips are such a great vehicle for promoting your business, so it makes sense to use this logo mockup to see whether the design works before you go ahead and order up a batch.

Front View Mockup of a Snapback Hat

Logo Mockups of a Snapback Hat

The ubiquitous snapback hat is the perfect walking billboard. Use the logo mockup generator to upload your logo design and try different hat colours to figure out the combinations that work best together.

Coffee Cup Mockup Featuring Side Lighting

Coffee Cup Mockup Featuring Side Lighting

Coffee is as indelible a part of modern life in our business centres as rush-hour traffic, so the recyclable coffee cup is an excellent vehicle for your logo. This beautiful logo mockup is all you need to test your design to see how it translates in the real world.

Mockup of an Open Jar for Cosmetics

Logo Mockup of an Open Jar for Cosmetics

The lid of a jar is a prized place for logo design, so it makes sense that this particular logo mockup gives a clear view of the jar's lid. Upload your image to see how well it works, and then change the background using brand colours or your own preferences. 

Mockup of a Cardboard Label Tag at the Edge of a Textured Surface

Logo Mockup of a Cardboard Label Tag

Cardboard labels are a great branding and marketing tool for some companies. If they make sense for yours, why not use this logo mockup to test how well your design will work in real life. 

Silicone Wristband Mockup of a Man Holding a Book

Logo Mockup - Silicone Wristband Mockup of a Man Holding a Book

Your logo will sit exactly where the words "upload your image" are. This is one of the things that's so great about the logo mockups from Placeit. Controlling where your designs go and how they look is completely in your own hands. 

Mockup of a Folded Polo Shirt Placed on a Solid Surface

Logo Mockup - Silicone Wristband Mockup of a Man Holding a Book

Restaurants and other hospitality businesses that require staff to wear uniforms or branded apparel will appreciate this logo mockup of a polo shirt. To see how your design looks on it, just upload your logo design from the computer using the logo mockup generator.

Mockup of a Metallic Color Pen Surrounded by Office Supplies

Logo Mockup - Silicone Wristband Mockup of a Man Holding a Book

Pens are a wonderful branding tool because—in spite of the incursion of computers into our daily lives—they're still an indelible part of our existence. That's why it makes sense to use them in your marketing efforts. The important thing, though, is to use a pen logo mockup like this one to figure out how well your design holds up once it is reduced in size.

Mockup of a Glass Water Bottle Placed on a Clear Surface

Logo Mockup - Silicone Wristband Mockup of a Man Holding a Book

Not every logo design will show clearly on a transparent water bottle, so take the guessing game out of the equation when you use this logo mockup of a water bottle to test your designs. 

Mockup of a Clothing Label on the Sleeve of a Heathered T-Shirt

Logo Mockup - Silicone Wristband Mockup of a Man Holding a Book

How would your logo design look on a clothing label? Find out when you use this logo mockup fabric example. Just upload your design from your computer using the logo mockup generator, and your job is done. 

8 More Premium Logo Mockups From GraphicRiver

Premium Logo Mockups From GraphicRiver

GraphicRiver is another service that offers tons of premium logo mockups. But it works differently from Elements. 

While Elements is the best source when you want to buy many logo mockups and other resources, GraphicRiver—like Placeit—is better for those who are on a budget and only want to buy one font set at a time. 

So if you're interested in purchasing just one mockup instead of experimenting with several, then GraphicRiver may be a better choice for you.

Photorealistic Paper Box & Logo Mock-Up (PSD)

Photorealistic Paper Box  Logo Mock-Up

This template contains eight photorealistic paper logo mockups with realistic light effects to enhance the sense of authenticity. Insert your logo using smart objects, and compare the different templates to see which work the best for you. 

Leather Gold Printed Logo Mockup (PSD)

Leather Gold Printed Logo Mockup

Looking for a beautiful gold logo mockup? How about this one, with gold letters printed against textured leather. The template is organised in layers, which allow you to do your editing using smart objects. 

3D Logo Mockups (PSD)

3D Logo Mockups

This 3D logo mockup for Photoshop consists of four different mockups that will give your logo a 3D photo-realistic look. This is achieved by using a smart object in Photoshop. This is a great mockup when you want to see how well your design will read for signage, etc.

Glasses Logo Mockup (PSD)

Glasses Logo Mockup

How will your logo hold up against a glass background? Find out with this translucent glass. Use Photoshop to add your image using smart objects.

Logo Mockup (PSD)

Logo Mockups

Here's another paper logo mockup with an organically textured surface. The file offers four high-resolution PSD files that can be customised and scaled as much as necessary.

12 Corporate Logo Mockup (PSD)

Corporate Logo Mockup

Check out this 3D steel logo mockup. It works so well against the concrete wall. Use this mockup to test your own logo creation. The files are organised in layers and offer 12 logo styles that are easily changed using smart objects. You can customise the files as much or as little as you want to get the exact look you're after. 

3D Logo Mockup (PSD)

3D Logo Mockup

How awesome is this 3D logo mockup? Can you imagine your own logo like this? The package contains five fully layered, high-quality PSD files, all of which are editable using smart objects.

10 Logo Mockups (PSD)

Logo Mockups

This is not a 3D steel logo mockup, but because of the silver surface colour and the movement of light and shadow, the logo creates a visual 3D effect. There are ten individual mockups in this template, all with different styles, and all are easy to edit using smart objects.

Choose Your Favourite Logo Mockup Today 

Envato Elements, Placeit, and GraphicRiver are excellent resources for terrific logo mockups that are versatile and easy to use. If you also regularly need fonts, icons, and other design resources, both Elements and Placeit offer unlimited downloads for one low monthly fee. 

Alternatively, if you just want to buy a single logo mockup, both GraphicRiver and Placeit allow you to buy just one mockup from their sites. 

Head over to any of these sites today to choose your favourite logo mockup.

And finally, if you want more information on other amazing mockups, check out these really helpful articles below: 

Vintage Trend: Best Mid-Century Fonts

$
0
0
Mid-Century Modern design style

In this tutorial, we'll look at the famous Mid-Century Modern design style. We'll look at some of the characteristics, typography, and a few Mid-Century Modern font suggestions.

Follow along with us over on our Envato Tuts+ YouTube channel:

What Is Mid-Century Design?

We've all seen the flat design comeback that happened a few years ago. This particular style stems from the design period starting from the 1930s all through to the mid-1960s. This was enhanced by the opening of the New Bauhaus School of Design in Chicago in the early 1940s and the popular Swiss International Typographic Style in the 1950s.  

Multiple historical and social events led to the Mid-Century movement. A new era of advertising arose due to the evolution of printing technology and the mass production of posters and billboards. The style was also a rejection of the characteristics of the previous Victorian style: a highly ornate and overdecorated aesthetic. Mid-Century graphic design is well known for distilling complicated concepts into simple and highly visual forms.

Some of the most well-known designers of this period are Paul Rand, Saul Bass, Josef Müller-Brockmann, and Wolfgang Weingart.

Saul Bass was an American graphic designer, best known for his award-winning title sequences. He created innovative title sequences by mixing graphic design and moving images. This collaboration resulted in a new way of displaying information while giving each movie its own identity. The movie titles introduced the theme of the movie even before the actual movie started. 

Anatomy of a Murder movie poster by Saul Bass 1959
Anatomy of a Murder movie poster by Saul Bass, 1959

Characteristics of Mid-Century Design

Like many art forms, Mid-Century design was a response to the previous style. There was an urge to make design simpler and straight to the point. It all started with Art Deco—the style in this era was influenced by technology and geometric styles. The Mid-Century Modern style kept some of the touches from Art Deco but opted to follow a more minimalistic approach. This affected not only graphic design but also architecture, interior design, and furniture design. The style had some of these characteristics:

  • Geometric shapes were the main choice of designers. Mixing basic forms to create a full composition led to a minimalistic style. Saul Bass created multiple posters using minimalistic but freeform shapes in his famous movie posters.
  • Color palettes vary from decade to decade. It started as desaturated and monochromatic with the work of Piet Mondrian. It later evolved to saturated and playful with the works of Josef Albers. Towards the 1950s and 1960s, the colors became even more vibrant. 
  • Space was a key component in Mid-Century design. Designers provoked the spatial relationship between positive and negative spaces. Many of the Swiss International Typographic Style posters include this playful feature. The Swiss grid was born during this time to create order and emphasis. Josef Müller-Brockmann's work was well known for its simple design and strong use of a grid system. In the poster below for Musica Viva, Brockmann also used diagonal grids to add dynamism to the poster.
musica viva by Josef Mller-Brockmann 1958
Musica Viva by Josef Müller-Brockmann, 1958

Mid-Century Modern Font Styles

The Bauhaus and the Swiss International Typographic Style were the two most influential schools in this era. The Bauhaus characteristics included playful typographic posters designs, while Swiss designers kept type very clean and traditional, with flush left paragraphs or center-aligned headlines. 

When it came to graphic design work, the Mid-Century fonts were generally geometric sans serif. A few of the most popular Mid-Century fonts were Futura, especially at the beginning, and later Univers, Frutiger, and Helvetica.

The bold Mid-Century sans serif font style communicated messages clearly with no fuss, which was a big selling point when it came to advertising. You’ll see some of the main Mid-Century Modern font characteristics in the famous ad for Volkswagen Beetle by the Doyle Dane Bernbach agency. The advertisement features a single car with a simple word "Lemon" in bold sans serif. There were a few relaxed and less sterile Mid-Century sans serif fonts used during this period, like Akzidenz Grotesk and Franklin Gothic.

The Mid-Century Modern font style also included serifs. Their anatomy was usually expanded, and slab serifs conveyed a warmer mood compared to the cold sans. The anatomy of the slab serifs during this period included big and bold terminals, with extreme curves and contrasts. Serifs like Century Expanded, Craw Modern, Hellenic Wide, Clarendon, and Pistilli Roman were used for a friendlier take on layouts. 

Volkswagen ad Lemon by DDB 1960
Volkswagen ad "Lemon" by DDB, 1960

Mid-Century Modern Font Examples

San Marino 

San Marino is an elegant and geometric sans serif. You can use this font for any of your fashion-inspired or thematic events. This Mid-Century font comes in four styles, including regular, outline, and italic versions. Most geometric Mid-Century Modern font numbers have the same characteristics, but San Marino has a different anatomy. The numbers are more contemporary and slightly less geometric. The low belt and pointed corners make San Marino a true Mid-Century Modern sans serif inspired font. 

San Marino
San Marino

Cartograph 

Cartograph is a fixed-width font that is the opposite of regular monospaced fonts. This typeface is friendly and has an easygoing character. Cartograph has a typewriter feel with a spin. The package also includes proportional characters so you can choose between the two. Cartograph is a tribute to utilitarian beauty, which was seen very much at the start of the Mid-Century era. This Mid-Century font comes in eight weights, including italics—that's a total of 32 fonts for you to have fun with! 

Cartograph
Cartograph

Undeka Regular Font 

Undeka Regular is a contemporary sans serif that combines geometric forms and strong type foundations. It's inspired by the grotesk typefaces from the early 20th century, like Futura. Undeka is a great dupe for the geometric Mid-Century Modern sans serif fonts developed at the beginning of the era. 

Undeka Typeface
Undeka Typeface

Let’s Jazz 

If you are designing a thematic design piece, Let's Jazz is a fun Mid-Century font inspired by the advertising and lettering of that era. This jazzy typeface is condensed and comes in a regular and a stamp version. The Mid-Century Modern font numbers in Let's Jazz convey fun and dance-like features. This extensive Mid-Century font contains 450 glyphs and supports multiple languages and thoughtful ligatures. The font was inspired by the works of Saul Bass, who was a pioneer in movie posters during the Mid-Century era. 

Lets Jazz
Let's Jazz

Schmalfette

Schmalfette is inspired by the Mid-Century sans serif fonts of the 1950s. It is a revival of the original Schmalfette Grotesk, with small changes to accommodate today's digital needs. Designer Jason Walcott did an amazing job with this Mid-Century font that strongly exemplifies the style of advertising during that time period. 

Schmalfette
Schmalfette

Classy Marisa 

Classy Marisa is the right mix of minimalism, modernity, and vintage style. This versatile font is a friendlier and warmer version of the Mid-Century sans serif fonts used in the 1950s. The font has a classic feel by maintaining a low contrast between the thick and thin strokes. The low belt on the capital A is very similar to the Mid-Century sans serif fonts seen in the 1930s. The Mid-Century Modern font numbers are elegant, which makes it perfect for wedding invitations. The font comes in four weights and supports multiple languages. It also includes some beautiful glyphs that can help you add personality to your designs.

Classy Marisa
Classy Marisa

Roger

Roger is another elegant and minimalist font that resembles the Mid-Century sans serif fonts from the beginning of the period. The similar width and height values make each character look square, giving it the right mix of classic and modern. This Mid-Century font is highly geometric and includes some interesting glyphs for some characters. The font comes in regular, bold, and italic versions. 

Roger
Roger

Hellenic Wide 

Mid-Century design saw a few slab serifs in use on advertising and billboards. This wide font is full of fun and personality. This type of Mid-Century font was especially popular in America as it was released in the 1800s as wood type. Hellenic Wide has strong horizontal letterforms that make it great for a period piece. 

Hellenic Wide
Hellenic Wide

Herald

Many of the invitations and TV shows of the Mid-Century era featured fun serif fonts. Herald is a font that's very close to the originals being used back then. It is not your typical serif font; it has a handmade quality to it, but it still has clean edges. The baseline is different in each character, so it makes it look as if the letters are moving. This is a great Mid-Century font style to use for invitations because it just says fun all over it!

Herald
Herald

Carosello 

This vintage-inspired font was created with a real Sharpie marker to display the imperfections. Mid-Century script fonts were very big in the 1950s—you can see this especially in classic car logos released around that time. Carosello is a great, gritty font to use for quotes or any vintage design layouts. 

Carosello
Carosello

Retylle Solyta Monoline 

This awesome Mid-Century script font has a great handmade quality to it. The letters are highly legible and uncomplicated, making it perfect for any type of medium you might need. While this Mid-Century script font is legible, it still has a specific personality to it. The package includes many glyphs and useful ligatures that can help avoid character repeats in the same word. 

Retylle Solyta Monoline

Pipetton Font Duo 

This font duo consists of two fonts: a Mid-Century sans serif font and a script. If you are still getting used to pairing fonts, this is a great duo to get. The Mid-Century sans serif font is slightly geometric but still has a handmade quality to it. The script font is dynamic and lends movement to the sans serif. The combination of these two fonts is great if you are designing inspirational quotes and branding. 

Pipetton Font Duo
Pipetton Font Duo

Arkland Monoline 

This script font is retro and modern at the same time. It is inspired by badges, signs, and pins. The Mid-Century font style contains multiple stylistic alternates that can help you enhance certain words. This Mid-Century script font style feels very natural and organic, making it perfect for brands that have handmade products.

Arkland Monoline
Arkland Monoline

Belymon Script 

Belymon is another script font that has a brush and ink feel to it. Vintage, highly legible, and fun, this font mimics many of the custom ink designs of the Mid-Century era. The font includes ligatures, stylistic alternates, swashes, and end alternates. All these options are great to have in a Mid-Century script font if you want it to look natural. 

Belymon Script
Belymon Script

Making a Comeback

The Mid-Century design trend evolved over the course of roughly 30 years, and the styles it saw varied slightly. Art and design trends are usually a response to the previous style, and this was the case for Mid-Century design. Some of the best advertising campaigns were made during this era (hello Mad Men!). The Mid-Century style made a comeback just a few years ago and is still lingering with the flat design digital icons—not only in the graphic design field but also in those dreamy Scandi-inspired interiors. 

In this article, we gave you a quick history of Mid-Century graphic design. Take a look at the designers who inspired it and created some of the greatest design pieces of that era. The typographic style was important in the design pieces, so why not try to recreate your own or design your take on the Mid-Century style. Don't forget to show us your designs! 

If you are looking for other styles of fonts, be sure to check out Envato Elements—they've got an extensive library that can help you complete your next project.

If you liked this article, you might like these:

How to Make a Restaurant Menu Template in Affinity Publisher

$
0
0
Final product image
What You'll Be Creating

In this tutorial, you’ll learn how to create a menu template for a restaurant menu using Affinity Publisher. Complete with a colorful design and on-trend typography, this take-out menu template is easy to adapt with your own photos and branding.

In the process of learning how to make a menu of a restaurant, you’ll pick up key print design skills and a simple formula for creating a stylish and effective restaurant menu sample, which can be extended depending on the number of dishes you wish to present. 

final menu template

Designed with contactless food delivery services in mind, this take-out menu template can be printed as a one-sheet or multi-page delivery flyer, for mailing, or exported as an online menu template for websites or marketing emails. 

Discover more menu design templates, take-out menu templates, and dinner menu templates for restaurants, events and more over on Envato Elements.

Ready to create your restaurant menu design? Read on to get started!

Follow along over on our Envato Tuts+ YouTube channel:

What You’ll Learn in This Affinity Publisher Menu Template Tutorial

Over the course of this beginner-friendly tutorial, you’ll learn:

  • How to set up a dinner menu template in Affinity Publisher, complete with layers and color swatches.
  • How to enhance your menu design with gradient color and contemporary fonts and photo styles.
  • How to export your take-out menu template as a printable PDF, ready for mailing out or using in-restaurant.

Included with this tutorial is a free download of the menu template for both Affinity Publisher and Adobe InDesign, allowing you to get started quickly with creating your own stylish restaurant menu design. 

menu design menu of a restaurant
Create your own menu mockup using templates available on Envato Elements.

What You’ll Need to Create Your Menu Template

We’ll be using Affinity Publisher to create our menu design, and you’ll also need to download some fonts to use on the menu of your restaurant:

You’ll also need to have overhead shots of your dishes, ready to incorporate into your restaurant menu. Here are a few examples:

Once you've installed the fonts on your computer and have your photos ready, you’re ready to begin the process of learning how to create a dinner menu template. Let’s dive in!

1. How to Set Up Your Menu Template in Affinity Publisher

Step 1

Open Affinity Publisher and go to File > New. 

Choose Print from the options along the top of the window. Set the Page width to 5.8 in and Page height to 8.3 in, with a DPI of 300

Increase the Number of pages to 2, and make sure Facing pages is deselected. 

Include a Margin width of 0.25 in and a Bleed of 0.125 in, before clicking Create

new document
new document

Step 2

Go to the Swatches panel and choose Add Global Colour from the panel’s dropdown menu.

add global color

Name the swatch Lime, and set the mode to CMYK Sliders. Set the levels to C=36 M=0 Y=98 K=0, and click Add

lime swatch

Repeat to create a second swatch, Off-White, with the levels C=8 M=6 Y=4 K=0.

off white swatch

Step 3

Working on Page 1 of your document (not the Master page), go to the Layers panel and click on the Add Layer icon at the bottom-right of the panel. Rename the layer Background

background layer

Create five more layers: Type Behind, Photo Behind, Color, Type in Front, and Photo in Front. 

photo in front

Then lock all the layers except the bottom layer, Background

locked layers

2. How to Add a Gradient Background to Your Take-Out Menu

Step 1

Working on Page 1, which will be the front side of your restaurant menu, and on the Background layer, select the Rectangle Tool (M) from the Tools panel at the left side of the workspace, and drag across the whole page, up to the bleed edge. 

rectangle tool

Step 2

Switch to the Fill Tool (G) and click and drag across the rectangle to apply a gradient fill. You can click to select one of the circular color handles, and from the Colour panel (View > Studio > Colour), you can adjust the color of the handle to a CMYK swatch. Set the left-hand handle to C=0 M=87 Y=50 K=0, a hot pink. 

gradient fill tool

Click on the right-hand handle and set the color of this to C=0 M=73 Y=90 K=0 for a vivid orange. 

Arrange the handles so that the gradient moves across horizontally from hot pink on the left to orange on the right side. 

adjust gradient

Step 3

Right-Click on the rectangle shape and choose Add to Swatches > From Fill, to save the gradient as a color swatch. 

from fill

3. How to Add a Title and Focal Image to Your Restaurant Menu

Step 1

Lock the Background layer and unlock the Type Behind layer. 

Use the Frame Text Tool (T) to create a large text frame across the left side of the page, just below the halfway point. Type in the title of your menu, and from the Character panel set the Font to Pioggia, around a 67 pt Font Size, and a LimeFont Color. 

new summer menu title

Step 2

Lock the Type Behind layer and unlock the Photo Behind layer above. Switch to the Picture Frame Ellipse Tool (F) and, holding Shift, drag to create a perfect circle across the page, allowing it to sit a little off-center and slightly overlapping the menu title, as shown below. 

ellipse tool

Go to File > Place, navigate to the image you want to use, and Open it. 

placed image

Double-click inside the picture frame to select the image directly, and scale it so that the plate fits snugly into the circular frame. 

image resized

Step 3

With the picture frame selected, go to the Effects panel (View > Studio > Effects) and check the Outer Shadow box. Increase the Opacity to around 22%, Radius to 43.4 px, and Offset to 13.4 px, with an Angle of 225 degrees.

effects shadow

Step 4

Working on the Type Behind layer, use the Picture Frame Ellipse Tool (F), as before, to draw a circle just slightly larger than the original, centering it over the plate picture.

ellipse tool

Select the Artistic Text Tool (T) and click anywhere on the edge of the ellipse to transform it into a text path. Type in the order number, name of the dish, and a price, setting the Font to Karoll. Highlight some items of text in Lime, setting the rest in Off-White. 

You can drag the triangle icons around the edge of the circle to switch the position and orientation of the text. You want to aim for it to sit on the top-left side.

artistic text

Step 5

Working on the Color layer, use the Rectangle Tool (M) to create a shape over the far-right of the page, extending the edge up to the top, bottom, and right bleed. 

Set the Fill to the gradient swatch. 

placed rectangle

From the Effects panel, add a subtle Outer Shadow to the rectangle, with a -180 degree angle. 

effects shadow

4. How to Populate Your Menu Design Template With Dishes

Step 1

Working on the Photo in Front layer, use the Picture Frame Ellipse Tool (F), as before, to create a circular frame over the top of the new rectangle shape. 

photo in front

File > Place, dropping another overhead photo into the frame, and scaling the image to fit the dish snugly in the frame. As before, add a drop shadow to the picture frame from the Effects panel to add realism. 

effects panel

Step 2

Copy and Paste the circular picture frame repeatedly to create a vertical sequence of plates down the length of the rectangle shape. You can swap in different images now or later on, whichever you prefer.

pasted images

Step 3

As we did before, but this time working on the Type in Front layer, use the Picture Frame Ellipse Tool (F) to draw a circle shape around the edge of the top plate image, making the circle slightly larger than the image. 

type in front

Use the Artistic Text Tool (T) to add a description and price to the circle, setting the Font in smaller-size Karoll

artistic text

Then Copy and Paste the circle with the text path, placing each copy around a plate image. 

copy and paste

Step 4

Add a heading, e.g. ‘Main Dishes’, on the Type in Front layer, at the top of the sequence of dishes. 

Set the Font to Pioggia, Size 23 pt, Center Align, and a Lime Font Color. 

sub heading text

Step 5

Add a text frame below the menu title with further details about how the menu is available, set in Karoll, All Caps, and an Off-White font color. 

text in karoll

You can also add a phone number and web address below this, also set in Karoll. Highlight key contact details in a larger font and a Lime color. 

contact details

At the top-left of the page, you can File > Place a PNG version of the restaurant’s logo, or create a logo using the fonts available to you, such as Pioggia.

business logo

Step 6

You can use the reverse side of your menu to feature a wider number of dishes. This will be Page 2 of your layout. 

We’ll use some of the elements we’ve created on Page 1 to populate the second page. First, unlock the Background layer and select and Copy the gradient rectangle on this layer.

background color

Scroll down to Page 2 and Edit > Paste the shape onto the page. 

pasted shape

Step 7

Select the narrower rectangle on Page 1 sitting on the Color layer and Edit > Paste this onto Page 2. Position it at the far-left side, and expand the width to just over half the width of the page. 

Adjust the Angle of the Outer Shadow to 0 degrees. 

angle outer shadow

Step 8

Copy and Paste the ‘Main Dishes’ header from Page 1 onto Page 2, moving it to the top of the rectangle on the left side. 

main dishes header

Paste again, moving this header over to the top of the right-hand column, adjusting the text to read ‘Sides’ and adjusting the Font Color to Off-White. 

sides header

You can add further headers, such as ‘Desserts’ and ‘Drinks’, by pasting and editing the text. 

drinks header

Step 9

On Page 1, select one of the plate images and the surrounding text path (you’ll need to unlock layers to do this), and Edit > Copy them. 

copy text

Paste them onto Page 2, positioning it at the top left corner of the page, under the header. You might need to scale the size of both elements down slightly, in order to fit two columns of plate images on the left-hand section. If you have fewer dishes, you can keep the sizing the same. 

paste image

Copy and Paste the resized dish and its text path repeatedly, creating two columns of dishes. You can File > Place new images into each picture frame, and adjust the text content accordingly. 

placed images

Step 10

Once you’ve added more dishes to the right-hand section, you can add written menu items for things like drinks and extras towards the bottom of the right-hand section. 

dishes placed

Set these in Karoll, All Caps, and vary the Font Color between Lime and Off-White.

prices of drinks

Step 11

Don’t forget to add a contact number and/or website to the bottom of this reverse page as well. 

If you want to add more pages to your menu template to include more menu items and create a multi-page brochure, you can Right-Click on Page 2 in the Pages panel and choose Duplicate. This will create a third page, based on the design of Page 2, on which you can swap in dish images and header text.

contact details

5. How to Export Your Restaurant Menu Sample as a Printable PDF

Once you’ve finished working on your take-out menu template, go to File > Export. 

Choose PDF from the options along the top, and choose PDF (press ready)* from the Preset menu. 

pdf press ready

Ensure the Raster DPI is set to 300 and Include bleed is checked, before clicking Export

export pdf

Name and Save your file, and you’re done! This PDF is ready to send to print as a mailable restaurant menu. Great job! 

* If you want to create a version of your menu design for sharing on email or uploading to a website, choose PDF (digital). 

Conclusion: Your Finished Menu Design

Your restaurant menu template is finished and exported, ready to be printed and mailed out to customers. Great job!

Once you’ve created the menu of the restaurant, give your menu layout the professional treatment by using a menu design mockup. Discover 25 free menu mockups here: 

final menu template

In this tutorial, you’ve picked up a range of techniques and skills you can apply to print projects and other flyer design work using Affinity Publisher. You now know how to make a simple menu template in Affinity Publisher, allowing you to create documents for both print and online. 

Remember that a free download of the menu template for both Affinity Publisher and Adobe InDesign are included with this tutorial, allowing you to get started quickly with creating your own awesome menu design.

Looking for different Affinity Publisher templates and InDesign templates for creating your own take-out menu templates? You can find a wide range of easy-to-edit menu templates and Affinity Publisher templates on Envato Elements.

Discover more tutorials and recommended templates for creating fantastic menu designs for take-out menus, restaurant menus, cafe menus, and more:


25+ Best Free Affinity Designer Brushes (& Affinity Designer Tutorials!)

$
0
0

Affinity Designer burst onto the design scene in 2014 and has been going from strength to strength ever since, with pro designers and amateurs alike creating a range of resources like Affinity Designer brushes and more to complement the software.

Paint Brush Strokes for Affinity Designer
Paint Brush Strokes, one of many Affinity Designer brush sets on Envato Elements

Today we're featuring over 25 of the best free Affinity Designer brushes around, as well as a selection of premium Affinity Designer brushes from Envato Elements. And we'll finish off with some awesome Affinity Designer tutorials to help you learn more.

Unlimited Affinity Designer Brush Downloads at Envato Elements

Scoring free Affinity Designer brushes is great when you're on a tight budget and trying to expand the tools at your disposal, but free resources often come with licensing and use restrictions, cumbersome attribution commitments, and the ever-present risk of downloading hidden malware from unverified online sites.

That's why we're starting out this article by introducing you to Envato Elements, a terrific resource that allows you to access hundreds of premium Affinity Designer brushes without breaking the bank.

Affinity designer brushes on Envato Elements

In fact, you can download as many Affinity Designer brushes as you want, as often as you want, for one flat monthly fee. What's more, that monthly fee also gives you unlimited access to thousands of quality digital assets like graphic templates, photos, business card templates, and much more. Let's take a look at some of the best Affinity Designer brushes you can find at Elements.

12+ Premium Affinity Designer Brushes From Envato Elements

10 Artsy Affinity Designer Brushes

10 Artsy Affinity Designer Brushes

Use these ten artsy Affinity Designer brushes to create bold and eye-catching projects. The acrylic brush strokes were made on thick paper to give them more visual texture and tactility. An excellent collection for your Affinity Designer brush library.

Affinity Designer Watercolor

Affinity Designer Watercolor Brushes

This Affinity Designer watercolor set offers 145 watercolor textures and 50 free brushes. No need to imagine what you can create with this incredible collection—just download it and get to work.

32 Affinity Designer Assets

32 Affinity Designer Assets

With these Affinity Designer assets, you can create beautiful shapes and textures. Painted with ink on paper, these shapes are high-res and would be a great addition to any project, from cards to banners to posters to web design. 

Grunge Stain Brushes for Affinity Designer

Grunge Stains Brushes for Affinity Designer

Looking for brushes for Affinity Designer to create grunge effects? Then check out the 20 spraypaint and ink effects in this Grunge Stain Brushes for Affinity Designer pack. Download this terrific pack and add it to your next design project.

Affinity Brushes With Drip Textures

Affinity Brushes With Drip Textures

Affinity Brushes With Drip Textures presents you with a set of brushes which will help you create the drips and drops associated with using paints and inks. The set is easy to download and add to your software.

101 Blob & Spot Spray Shapes

101 Blob  Spot Spray Shapes

Blobs, spot spray, and drip shapes are all possible when you use this set of Affinity Designer assets. In fact, you get a whopping 101 different effects when you download this set, which is more than enough to start having some fun creating a wide range of projects.

Black Ink Texture Brushes for Affinity Designer

Black Ink Texture Brushes for Affinity Designer

This collection of black abstract ink on paper brushes for Affinity Designer is just what you need to create stunning projects. The pack contains 30 handmade ink paper textures that can be used in a variety of ways for greeting cards, posters, signage, and more.

20 Paint Splatter Textures and Brushes

20 Paint Splatter Textures and Brushes

These high-res textures and brushes for Affinity Designers give graphic designers endless possibilities for experimentation to create memorable designs. This pack contains 20 isolated handmade ink splatters—use them to create realistic splatter effects and save hours of otherwise painstaking work.

Affinity Photo Oil Painting Brushes

Affinity Photo Oil Painting Brushes

These Affinity Photo Oil Painting Brushes were created to give you the tools to make bold eye-catching projects that stand out. The set contains 80 high-res brushes created on thick paper to give a tactile effect.

Paint Splashes Brushes for Affinity Designer

Paint Splashes Brushes for Affinity Designer

Splitter splatter! Create your own Jackson Pollock mess with these terrific brushes for Affinity Designer. These wild marks are wonderfully expressive and perfect for creating the effect of a controlled mess or urban grunge.

Chaotic Affinity Brushes

Chaotic Affinity Brushes

Chaotic Affinity Brushes offers handmade ink paint brush textures with wonderful movement and fluidity. The pack contains 30 ink paint brushes that can be used in a variety of ways to create backgrounds, surface texture etc.

Tropical Foliage Affinity Designer Assets Pack

Tropical Foliage Affinity Designer Assets Pack

Get this artsy pack of Affinity Designer assets, which contains tropical leaves and sprigs, ink splatters, brush textures, and outlines. This is a great collection for branding projects, wedding invitations, posters, and more.

Hand-Drawn Arrow Brushes for Affinity Designer and More 

Hand Drawn Arrows Brushes for Affinity Designer and More

Get this awesome collection of hand-drawn arrow brushes for Affinity Designer and various Adobe software. Use this collection of 63 hand-drawn arrow brushes to add to gift tags, invitations cards, greeting cards, stickers, posters, packages, etc.

Chaotic Brush Affinity Designer Brushes

Chaotic Brush Affinity Designer Brushes

Check out this collection of chaotic Affinity Designer brushes. The set includes 30 handmade ink paint textures. The shapes are high-res and would be a great way to add texture and visual interest to your projects.

25+ Best Free Affinity Designer Brushes

Prefer to get your Affinity assets free of charge? Here are 25+ Affinity Designer brushes, free to download. Keep in mind, of course, that the premium brushes you've seen above have been quality checked and are properly licensed for you to use with confidence. But if you are on a budget and need to download Affinity Designer brushes free of charge, browse the list below to find one that works for you.

InkBrush - Vector Paint Sample Set

InkBrush - Vector Paint Sample Set

Mimic the look of elegant ink brushes with this beautiful set of Affinity assets, free for you to download and use. There's plenty of variety in these vector brushes for Affinity Designer, so you can create the exact look and feel you want for your project.

FREE Crayon Brushes

FREE Crayon Brushes for Affinity Designer

Or if you prefer the waxy look of crayons, check out this set of 40 highly realistic crayon brushes, fully compatible with both Affinity Designer and Adobe Illustrator. Note that, as is sometimes the case with free files, you have to provide your email address and sign up to a newsletter to access these Affinity Designer free brushes.

Affinity Photo – Free Grunge Brushes

Affinity Photo  Free Grunge Brushes

If you're looking for brushes for Affinity Photo, try these free grunge brushes. They'll give your artwork an instant urban vibe, reminiscent of scratched paint on an old concrete wall. If you want to take your work to the next level, download these Affinity Photo brushes today!

Vintage Lines - Vector Brushes (Free)

Vintage Lines - Vector Brushes Free

These Affinity Designer free brushes come from a dedicated user on the Affinity website. Try out the vintage line brushes for Affinity Designer, and don't forget to scroll down for more offerings in the forum thread, all free to download and use.

Texture Brush Dots

Texture Brush Dots

Wow, you can really see the possibilities with this set of free Affinity Designer assets. Not only do you get 120 texture brushes, but you can also download helpful sample sheets like the one above, so that you can quickly browse through the brush selection and pick exactly the right one for your needs.

Affinity Designer Free Brushes

Affinity Designer Free Brushes

These Affinity assets, free to download and use even for commercial purposes, are beautifully designed and extremely useful. Whether you want to create the look of rope, ink, leaves, or other patterns, this set of vector brushes for Affinity Designer is a great option.

7 FREE Affinity Brushes

7 FREE Affinity Brushes

Create stars, hearts, bubbles, glitch effects, and more with this set of Affinity Designer brushes for free download. If you like what you see, you can click the link on the site to support the artist on Patreon.

Monet Style Textured Brushes

Monet Style Textured Brushes

Vector illustration and traditional "Monet"-like painting might not have seemed like two things that could go hand in hand, but thanks to these free brushes you can now fuse these previously separate worlds of art.

DAUB Comics Basic Brushes

DAUB Comics Basic Brushes

Cartoonists and line artists will be delighted with these free comic brushes. You'll get four brushes that simulate pencils and four inking brushes. No more undoing and redoing to get the perfect stroke—just put your line down once, and then adjust it as required. On top of that, the brushes are pressure and rotation sensitive, not to mention completely free of charge.

Ink Sketch Brushes

Ink Sketch Brushes

More ink brushes! It's hard to see the difference between them all in this image, but when you zoom in, you can see the detailed work that's gone into creating each one. You get 35 Affinity Designer brushes, free to download of course.

Paint Brushes Set

Paint Brushes Set

Or try this pack of 30 Affinity assets for free. These small paint brushes are ideal for highly detailed texture work, and the pack includes a PDF sample file to help you choose the right one for the job.

FLOWER POWER Brushes

FLOWER POWER Brushes

Groovy! The world could use a bit of sixties flower power right now, and you can channel it into your artwork with this collection of flower brushes. You get a zipped .afbrushes file that you can easily install in Affinity Designer and start using right away.

Project Brush Assets Ammonite

Project Brush Assets Ammonite

Artist StuartRc created these Affinity Designer brushes for an illustration of a highly textured ammonite fossil sitting on the seabed. These awesome Affinity assets are free to download, so you can create that rough, hazy look in works of your own. Beautiful!

THE ARTIFEX FORGE

THE ARTIFEX FORGE

Don't you just love that ornate sugar skull in the preview image? If these 60 free Affinity Designer brushes can help you create something like that, they're well worth the investment—especially because the investment is zero!

Smoke Brushes for Affinity Photo and Affinity Designer

Smoke Brushes for Affinity Photo and Affinity Designer

Smoke effects like these ones are so hard to create from scratch, so these free Affinity Designer and Affinity Photo brushes are a massive time-saver. Download 20 high-quality smoke brushes, compatible with both applications. They're free to use, with no credit required.

AFFINITY DESIGNER BRUSHES FREE

AFFINITY DESIGNER BRUSHES FREE

Create patterns, swirls, textures and more with this gorgeous set of Affinity Designer brushes for free download. With so much variety to choose from, this is an awesome set of Affinity Designer assets.

Star Rain - Brush

Star Rain - Brush

Add a touch of magic to your artwork with this Affinity Designer free brush. It creates a stream of glittery stars at different sizes and angles. It's easy to use too: just download the brush file, install it, and start painting away!

Hearts Brush

Hearts Brush

The artist, Volker Krenz, made this brush "because the world needs a lot of love." If you agree with that sentiment, then why not download this brush and start using it to spread some love around, vector by vector?

15 Distressed Affinity Designer Halftone Brushes

15 Distressed Affinity Designer Halftone Brushes

You want Affinity Designer halftone brushes? Well, how about 15 Affinity Designer halftone brushes, completely free to download and use? These vector brushes are perfect for giving your work that rough, distressed look.

Brush Factory 2

Brush Factory 2

This massive set of 118 vector brushes for Affinity Designer will help you create repeating patterns with as little distortion as possible. Download these textured intensity brushes and see what they can do!

17 Zip Brushes for Affinity Designer

17 Zip Brushes for Affinity Designer

OK, many of these free brush files come in zipped format to take up less space, but that's not what we're talking about here. This set is devoted to real-life zips (a.k.a. zippers in North America). And you don't just get 17 zip brushes; you can also download 15 stitch brushes, 133 fabric creases, and a whole set of vector images to help you show the sliders and stoppers: those bits of the zip that you hold onto when doing it up. Amazing!

Stamp Texture Brushes

Stamp Texture Brushes

Try out these Affinity Designer free stamp brushes to create that hand-stamped texture of a bygone era. If you're too young to have seen someone pressing a rubber stamp into an ink pad, just take our word for it: the slightly rough textures, with little blank areas where the ink didn't quite come through, are highly realistic. Check them out!

15 Stitch Brushes for Affinity Designer

15 Stitch Brushes for Affinity Designer

You know that old saying, "A stitch in time saves nine"? Well, here you get 15 stitch brushes, so just imagine how much saving you can do. Or you could just use them to create cool portraits of people wearing clothes with beautifully detailed seams and stitches.

Realistic Vector Skin Texture Brush

Realistic vector skin texture brush

Yes, that's right: a free brush to help you create the texture of human skin! When you're making vector portraits, it's the little details that can elevate your work and give it added realism. Many artists show the skin as perfectly smooth, but by using this free Affinity Designer brush to give it a subtle texture, you can make your work super-realistic!

Pattern Brush Packs

Pattern Brush Packs

Do you want patterns? How about a free set of vector brushes for Affinity Designer, with 120 mixed patterns? As you can see, there's so much variety here, from abstract lines and geometric shapes to retro space invaders. And this sample sheet is just the tip of the iceberg!

Texture Brushes 04 [Hatching]

Texture Brushes 04 Hatching

Recreate the look of a traditional pencil sketch with these beautiful hatching brushes. You get ten different Affinity Designer brushes, free to download and use. Just look at the detail in those hatching patterns!

Learn More With These Free Affinity Designer Tutorials

Ready-made assets are great, but sometimes you also want to customise them, or even start creating from scratch. Check out these 20 amazing Affinity Designer tutorials from Envato Tuts+ to learn the program from start to finish—and, like the brushes, they're free!

Choose Your Favourite Affinity Designer Brushes Today

Hope you've found this article on the best free Affinity Designer brushes helpful. As you can see, there are many wonderful Affinity assets free on the internet, but if you're looking for the very best Affinity Designer brushes for an important project, we highly recommend Envato Elements.

Elements is an excellent resource for premium brushes, and if you regularly need mockups, icons, and other design resources, it offers unlimited downloads for one low monthly fee. Sign up today!

How to Create Halftone Effects in Adobe Illustrator

$
0
0
Final product image
What You'll Be Creating

Halftones are dots of varying sizes and spacing, put together to simulate a tone or gradient. Though it is a method connected to print, the aesthetics of it have made it popular to use even for digital content.

Having read a lot of comics where halftones are used, I have a special love for it that I hope to share with you in this tutorial. You will find that it is not so hard to create this effect in Adobe Illustrator, and by using halftones instead of regular black and white or grayscale gradients, you can give your comics and artwork a certain unique appeal.

Follow along with us over on our Envato Tuts+ YouTube channel:

Looking for halftone resources for Adobe Illustrator? Check out this Halftone Brushes & Patterns pack over on Envato Elements, where you can download unlimited Adobe Illustrator resources (and much more!) for one monthly price

Halftone Brushes and Patterns for Illustrator

1. How to Create the Line Art

Step 1

We first need to create the artwork which the halftones will be applied to. I've made a sketch of a shocked woman, as a reference to pop art, which many associate halftones with.

I open a new document in Adobe Illustrator and import the sketch by going to File > Place...

From there I double-click the current layer the sketch is placed on, check the Template box and press OK. I won't be working with many of them for this one, but naming your layers is always a good practice.

Template layer for sketch

Step 2

Now I start inking the loose sketch with the Brush Tool. As usual, I like to use my comic style custom brush from a previous tutorial, but go with your own preference on what brush you use. You can find tips and tricks on creating various brush types here at Envato Tuts+, or you can check out some of the vector brush packs available on Envato Market.

Ink on top of sketch

Step 3

I like to make pretty loose sketches and do the real defining during the inking process. I find that a lot of the energy from the sketch can get lost when inking it, so my method is to not put too much effort into the sketch, and use it as more of a rough guide than a precise map to follow.

I have differed from the sketch in a lot of places, but now I feel it has the energy behind the expression just right, and it is ready for the next step.

Finished line art

2. Adding Shades of Gray

Use the Pen Tool to create the shapes of the hair. Make two shapes, one for each of the sides the hair is parted into. To get a gradient in black and white, simply press the Period key on your keyboard.

Start filling in the lineart with grays

Once the hair is done, I add the shapes for the lips and irises as well. Since her hair is covering part of her face, I add a large shadow underneath the big lock of hair.

Gradient tool used for hair lips and eyes

When shading the skin, I try to keep in mind where the light source is coming from in the picture—from the left in this case—and try to break the shapes down that way. To add to the shock of the expression, I add extra shadow underneath the eyes, which can have a scary effect.

When shading the tongue, I make a dark to medium gray object with the Pen Tool, and then I add points of lighter gray with the Mesh Tool.

Mesh tool used for tongue

A good way to keep control over the overall look of your image is to make a grayscale palette from which you pick your colors. By limiting yourself to just a few shades, you minimize the risk of having it look chaotic and overworked.

Grayscale pallette

3. Time to Make Halftones!

Now we have a pretty decent grayscale image, but we want to have it in halftones. This part is easy, but a little demanding as well. While turning an object into grayscale is simply a push of a button, getting the desired look requires the right settings.

Which settings are best to use depends on what type of image you're after and what size and resolution you are working in. In other words, it requires some trial and error.

Skin

I start by selecting all the objects making up the skin shading. Having these selected, I go to the Effect menu and choose Pixelate, then Color Halftone. Even though it says "Color Halftone" I recommend starting out creating these in black and white, simply because it's easier to just keep track of how those two colors behave. Making halftones in color involves several colors blending, and the results can be trickier to manipulate.

Halftone settings

My image is not very big, so the settings I decide to use have pretty low values, which creates a nice dense pattern for the skin.

Halftone result

Hair

For the hair I want something a bit bolder, and I turn the values up a bit.


Halftone settings

Here you can really see how the dots work, becoming smaller the lighter the gradient becomes.

Halftone result

Mouth

Finally, for the mouth, I decide to experiment a bit more with the values of the mesh before applying the halftone.

Halftone settings
Halftone result

4. Use Dot Swatches for the Background

Besides creating the halftone effect yourself, Illustrator also offers some ready swatches to use. You can find them by going to Windows > Open Swatch Library > Patterns > Basic Graphics > Basic Graphics_Dots.

This will provide you with a selection of plain grays and gradients in halftone. While they may not be as flexible as making your own, they are quick and easy to use, and will make a good background for our image.

Dot pattern swatches

Awesome Work, You're Done!

Creating halftones is not very hard in Illustrator, but they can be a bit fickle still. For example, you might notice their appearance can change unsatisfactorily when scaling. The best approach is to apply halftones to an image that is already in its final size. That way you won't have unpleasant surprises when you export the image.

You might spend some extra time tweaking the settings to get the perfect density of dots, but adding halftones can be a good way to shake up your grayscale artwork. Especially with all the resources available, there are several ways to approach this type of style as well. For example, you might feel more comfortable creating halftones with brushes. If so, then this Halftone Brush pack from Envato Market might be of interest to you.

Finished result
Or find more comic-book Photoshop effects in this wonderful roundup:

Looking for more Illustrator tutorials? Learn how to use Adobe Illustrator in our free three-hour video masterclass, or check out these tutorials!

Retro Design Trend: Create the 80s Style With Fonts, Text Effects, and More!

$
0
0

Do you want to know what was the style in the 80s design? Ready to go down memory lane? Let's explore the cool 80s style with neon lights, pastel colors, and cyberpunk! 

Follow along with us over on our Envato Tuts+ YouTube channel:

One of the most iconic eras in the last 100 years is the 80s. Everyone references it, talks about it, and reminiscences about it. What was so cool about the 80s, besides the cool toys and the albums? The 80s gave us some really bold fonts, futuristic styles, neon colors, and anything that screamed ‘bolder is better’. It’s safe to say that the 70s were a direct reaction to the 60s, and the 80s just took it a step further.

The introduction of more sophisticated computers radically changed graphic design during this decade. All this new technology and the development of graphic software paved the way for a plethora of new and radical styles. Software allowed designers to create 3D images and handle elements a lot more easily than before. PageMaker was introduced in the mid-80s, making it Adobe’s very first desktop publishing software. This was a whole new way for designers to experiment with layouts, move images, and set type. 

We saw a resurgence of the 80s styles around 2010 with the movie Drive and Tron: Legacy. It brought back all the cool visuals like the neon colors and 80s script. Most recently we’ve seen it in Stranger Things, with the classic neon red title sequence. 

If you are looking for 80s-inspired graphics, be sure to check out Envato Elements and GraphicRiver. There are plenty of premium resources such as 80s powerpoint theme templates, 80s graphic design templates, and much more for your next project and you can even create your own Miami vice logo maker using these amazing products! 

What was the style in the 80s?

There were multiple trends happening in the 80s simultaneously, with visuals ranging from neon lights to tropical settings to childish rainbows. We've narrowed down the key characteristics:

  • In the 80s, we saw a variety of pastel colors inspired by 50s kitsch, like light pinks, turquoise, and light blue. Neon colors were inspired by technological advances during the decade. There were electric blues, neon greens, and magenta, creating a strong contrast against dark backgrounds. 
  • New graphic technology influenced many of the design styles we saw in the 80s. Grids in space were featured in many movie posters, and monospaced fonts that mimicked those of computer screens were featured in many movie title sequences. 
  • The 80s didn't have only one specific graphic style. There were many designs that took inspiration from previous years' styles and others that had built up over the years. The 80s Deco style drew many characteristics from the 20s Art Deco scene, while Cyberpunk had been building up for a few years with new technological advances. The Memphis style was a mix of 50s kitsch and pop art, which made it the most playful and cheeky style of the 80s. 

What is 80s Deco?

Art Deco originated back in the 1920s, but just like all styles, it comes back every few years. The 80s retro design Deco style had an impact on multiple design disciplines. In graphic design, it was the use of soft pastel palettes and sans serif fonts.

Similarly to the 20s Art Deco, the 80s graphic design used sharp and pointy angles in typography. This resulted in a combination of thick/thin strokes typefaces with a stencil look like the Miami Vice show logo. Geometric sans serifs that neared perfectly rounded.

Visby CF

If you want to create 80s text elements for your project, check Visby! Visby is a geometric font with hard lines and sharp corners. Geometric sans serif fonts were commonly used during the 20s and the Art Deco era. They always stayed around, but we saw a resurgence in the 80s that mimicked much of the original Art Deco. 

Visby CF
Visby CF

Fiver

Fiver is another style of font that was big during the Art Deco era in the 20s. Inline fonts are characterized by hairline strokes, making it stand out from the rest of its environment. This type of font can give you a three-dimensional effect, perfect for large display sizes. 

Fiver
Fiver

80s Retro Design: Neon Style

To everyone’s surprise, the neon style wasn’t created in the 1980s. It originated way back in 1898 when two English chemists by the name of Sir William Ramsay and Morris W. Travers discovered the gases that gave off the vibrant neon colors. It wasn’t until 1910 when neon tubes made a public appearance at the Paris Motor Show. The neon tubes were used beside a building to light up the perimeter.  

Neon design made quite a few appearances in history, just like in the 80s, thanks to channel lettering. By then, the neon design had been used in Las Vegas because it was a prominent holiday destination. Channel lettering allowed for custom-made lettering for public signs. The show Miami Vice heavily used neon colors, making this key characteristic part of pop culture in the 80s. 

This neon style with its 80's lighting effects had many qualities that made it perfect when designs needed to stand out. Due to the qualities of the gases in the lettering tubes, the neon colors were bright and vivid. The colors also created a strong light and dark contrast, especially during the night-time. 

Let's take a look at 80's lighting effects for your text layers and 80s retro PowerPoint template I found for you!

Outrunner 80s Retro Script

Part of the 80s graphic design was about bright and vibrant colors due to discos and sci-fi movies. Scripts were mainly used for movie posters as big headlines to make them stand out from the rest of the design. A recent movie that uses this style is Drive, which uses a classic neon pink color for the script title. 

Outrunner 80s Retro Script

Neon Layer Styles

The 80s wouldn't be the 80s without neon lights. We saw them everywhere because the colors created a strong contrast against the night. If you happen to be set on a font, this Neon Layer Style add-on is perfect to apply that 80s graphic design effect. Choose from multiple colors and light intensity and add a classic 80s text effect.

Neon Layer Styles
Neon Layer Styles

Neon Sign Photoshop Effect

This Photoshop 80s text effect is awesome if you are looking to customize colors and background textures to display your cool 80s graphics. If you are looking for realism, you can add the braces that were commonly seen holding the signs on the wall. There's no shortage of neon effects at Envato Elements, so make sure to check them all out! 

Neon Sign Photoshop Effect

IGNITO - Neon Colour Powerpoint Template

This 80s PowerPoint theme could be a handy tool if you want to present some of your 80s-inspired products. Bold colors, neon lights, and cool 80s elements in one awesome atmospheric 80s retro PowerPoint template.

IGNITO - Neon Colour Powerpoint Template

Looking to get into neon effects? Check out these tutorials that can help you learn more:

80s Graphic Design: Cyberpunk Style

We can’t talk about the 80s without mentioning technology. Cyberpunk originated in the 60s, but it made a stronger impact in the 80s mainly through scenes of the movie Blade Runner. Cyberpunk focused on futuristic high-tech, lawless societies, and big corporations. Many films, comic books, and designs originated from cyberpunk. 

Some of the characteristics of this style were the use of grids and computer-based fonts that gave the design a “digital” look. The album for the Tron soundtrack and the opening credits for The Terminator are a few examples of cyberpunk. 

Bergen Mono

Technology-inspired fonts were another staple of the 80s graphics. With the introduction of new computers and software, monospaced font designs made a big appearance. This sans serif font is a contemporary take on the 80s tech-inspired font. While it isn't as pixelated and includes curves on some characters, it is a great addition to your library. 

Bergen Mono
Bergen Mono

Arcade Machine 80s Retro Font

Arcade Machine is inspired by everything 80s, from shows like Miami Vice to video games and a combination of cyberpunk. This type of font features pointy lines on every character, making it look edgy and aggressive. This highly stylized font is perfect for display copy, and it features uppercase, lowercase, and ligatures.

Arcade Machine 80s Retro Font

Gnome Retro Wave Typeface

Gnome is slightly italic and very geometric, which gives us that computerized feel from the 80s. There were big technological and graphic advances, but not as much as the present time. Fonts were constructed through bitmaps, and that's how the geometric and pixel style came into place. This font is suitable for display type—are you ready to take it back to the 80s?

Gnome Retro Wave Typeface

80s Music Flyer

Throwing a retro party anytime soon? Everyone loves one, and this flyer is perfect for that. It's set on a black background to get that neon-at-night effect. It features a grid within a bold geometric shape on the background and a script font that completes the design. With a flyer like this, no one will want to miss the party. 

80s Music Flyer
80s Music Flyer

These awesome tutorials can help you create 80s design effects and photo manipulations: 

Postmodernism: Memphis Style

In the early 1980s, Ettore Sottsass founded a group of designers that came to be known as the Memphis Group. During their first meeting, the song Stuck Inside of Mobile with the Memphis Blues Again by Bob Dylanwas playing in the background, leading the group to call themselves the Memphis Group. 

Inspired by previous art movements like Art Deco, Pop Art, and 1950s kitsch, the group created a very flashy aesthetic. The group was ready to rebel against the modernist ethos of the 1970s by creating something completely radical.

Memphis Name Card Design Vector

This Memphis Style business card design includes all the characteristics that you need. This bold card design template is perfect for you if you want something fun and vibrant. The geometric shapes and pastel colors are easy to edit. You can simply input the information and the cards are ready for print! 

Memphis Name Card Design Vector

Memphis Seamless Pattern Collection

Seamless patterns can be tricky to make, so Envato Elements has got you covered. This colorful and geometric pattern is made up of basic graphical elements that have been tastefully arranged. Perfect for the summertime, this stylish set is perfect for social media banners, backdrops, and even clothes! 

Memphis Seamless Pattern Collection

Memphis Style Text Effect

Stylish three-dimensional styles are tricky to put together unless you put in the work. Luckily for you, we have this Memphis Style text effect that can help you create depth in your design in just minutes. There are eight different styles you can choose from and easily edit. Are you ready to make your design pop?

Memphis Style Text Effect

Geometricity Font

The Memphis Style was all about simple geometric shapes, and if this font existed back then, it would have been the perfect fit! Geometricity is a display font that was carefully designed to make it highly legible. You can add multiple colors to it or use it as a layered font—so much fun! This is a really great tool for creating 80s graphics!

Geometricity Font
Geometricity Font

If you are looking to learn more about the Memphis Style, check out these tutorials:

Show Us Your 80s Designs!

This retro trend was one to remember, and it keeps coming back in one way or another. There have been many movies and shows in the last ten years that featured characteristics of the 80s. If you're as fond of this 80s trend as we are, then show us your work! Let us know about your favorite style from this era. 

For more trendy retro 80s designs or if you want to find Miami vice logo maker, check out high-quality assets over at GraphicRiver and Envato Elements. Happy designing!

So now, when you know what was the style in the 80s, you might like these tutorials:

Use a Tattoo Font to Add a Realistic Tattoo to a Photo in Photoshop

$
0
0
Final product image
What You'll Be Creating

A tattoo font is the easiest way to create a stylish tattoo in no time. In this tutorial, I'll show you how to add a realistic tattoo in Photoshop using a tattoo font. We're going to add some text effects to the font, warp it, and apply photo effects of texture and shine. The process is fast and can be used for all skin colors.

You can also follow us over on our Envato Tuts+ YouTube Channel, where you'll find useful tutorials like this:

Use a Tattoo Font to Add a Realistic Tattoo to a Photo in Photoshop

Step 1

Open your photo (I used this one). Use the Type Tool (T) to add the text of the tattoo. Change the font to a tattoo font (for example RockSands), center the text, and resize it. The text should be wider than the area you're putting it on.

tattoo font text

Step 2

With text selected, click Create Warped Text. Pick the style that fits the shape and perspective of the body part you're working on.

warp text

Step 3

Let's accentuate the perspective some more. When the letters turn away from us, they get tighter. Select the text and open the Character panel. Select the first three letters and reduce their width to 75%. Lower the distance between them by 10.

change letters distance

Select the first two letters and make the effect even stronger.

make text tighter

Finally, select the first letter and add an even more dramatic change to it.

warp text realistically

Adjust the other side the same way, keeping in mind that here the angle isn't that sharp.

how to warp text without rasterizing

Step 4

Reposition and rescale the text if necessary with the Free Transform Tool (Control-T). Right-click and select Rasterize Type.

scale the text

Step 5

Duplicate (Control-J) the background layer and drag it to the top. Go to Filter > Sharpen > Smart Sharpen and strengthen the texture with it. Go to Image > Adjustments > Desaturate, then Image > Adjustments > Levels. Deepen the contrast by dragging the left and white markers towards the center.  Don't go too far—we need the texture of the skin.

sharpen skin texture
increase contrast

Step 6

Copy this image and save it as a separate file. Name it Map.

create displace map

Step 7

Hide this layer and go back to the text layer. Go to Filter > Distort > Displace. Click OK and select the Map file. After the distortion is applied, decide if it's too strong or too weak. If needed, undo and repeat, this time adjusting the values accordingly.

use displace filter
displacement texture

Step 8

Group the text (Control-G). Add a Layer Mask to the group. Paint with black to remove the parts that go outside of the body.

add layer mask
clean up the edge

Step 9

Duplicate the background layer and drag it over the group. Sharpen it with the Smart Sharpen filter. Hold Alt and click the line between the layers to clip it to the group below.

add skin texture
clip the layer

Step 10

Add a Hue/Saturation adjustment to make the tattoo dark blue. Change its Blend Mode to Darken.

add hue saturation adjustment
colorize the skin

Step 11

Show the upper layer and clip it as well. Change its Blend Mode to Screen. Double-click this layer. In the Blend If section, hold Alt and drag the upper black marker to the right. This way, you'll remove the effect from the shadowed part of the skin. Hold Alt to split the marker for a more gradual effect. Lower the Opacity for a more realistic shine.

remove dark effect
add shine to skin
create relistic shine tattoo

Step 12

Double-click the text (not the group!) to access its Layer Style panel. Add a Drop Shadow to simulate some gentle blowout.

add blowout to tattoo
tattoo blowout effect

Step 13

If you want to make this effect more visible, you can also add an Outer Glow. Adjust its intensity with Opacity, Size, and Noise.

add glow to text
photoshop text effects

Step 14

If you want to add this photo effect to darker skin, apply the same process. In most cases it will look all right, but sometimes you'll have to adjust the color of the tattoo or the opacity of the blowout.

dark skin tattoo

Discover More Awesome Tattoo Lettering Fonts

Good job! Now you know how to use a cursive tattoo font to add a realistic tattoo to a photo in Photoshop. If you want to check out more different fonts for tattoos, like tattoo fonts cursive and elegant, or learn more about tattoo design, try these tutorials:

10 Best Tattoo Fonts From Envato Elements

Now that you've learned how to add a realistic tattoo in Photoshop using a tattoo font, let me share with you a selection of some of the best tattoo fonts from Envato Elements.

This is our subscription-based marketplace where you can download as many cool tattoo ink fonts as you need, and many more creative graphic assets, for a low monthly fee.

Get the best tattoo fonts in Envato Elements
You can get more than 8,000 tattoo fonts in Envato Elements for a low monthly subscription!

Our libraries feature various different fonts for tattoos, such as typewriter fonts for tattoos and Arabic tattoo fonts. We've got the classics covered as well: hundreds of tattoo script fonts and cursive tattoo font alphabets. Check out these propositions:

1. Brooklyn Tattoo Script Font (OTF, TTF, WOFF)

Brooklyn Tattoo Script Font

If you're looking for classic tattoo lettering fonts, this one is for you. Brooklyn is a cursive tattoo font inspired by tattoo parlors. It features bold curves and fat-to-thin brush strokes. The cursive tattoo font alphabet also includes more than 75 bonus glyphs! 

2. Strong West Retro Tattoo Script Font (OTF, TTF)

Strong West Retro Tattoo Script Font

Interested in different fonts for tattoos? Strong West is one of the coolest tattoo lettering fonts because it features a retro style. You can also use it as a tattoo number font.

3. Samir Arabic Tattoo Font (OTF, TTF, WOFF)

Samir Arabic Tattoo Font

Arabic tattoo fonts are so eye-catching. Just take a look at cursive and elegant tattoo fonts like this one. This Arabic tattoo font can be used for any of your projects and includes the basic Latin A-Z characters and numbers, which makes it another great option for tattoo number fonts.

4. Black Angela Tattoo Script Font (OTF, TTF)

Black Angela Tattoo Script Font

Black Angela is a classic, cursive tattoo font inspired by tattoo lettering fonts. It comes with OpenType features and can be used for logotypes, badges, tattoo artists, tattoo ink font merchandise, and more. Overall, a tattoo font that's cursive and elegant.

5. Perfect Thoughts Typewriter Font Tattoo (OTF, TTF)

Perfect Thoughts Typewriter Font Tattoo

Different fonts for tattoos are a great alternative, like this typewriter font tattoo pack that includes not one, but three fonts! One is a real tattoo ink font with stamp marks. The second is a straighter and more serious typewriter font tattoo, and the third features a funky, irregular baseline font.

6. Didone Room Tattoo Number Font (OTF, TTF)

Didone Room Tattoo Number Font

The artist was inspired by a hand-painted hotel room number plate from Vienna to create fantastic tattoo number fonts. This non-alphabetic serif font focuses on numerical and currency symbols. No doubt, this makes it a unique tattoo ink font.

7. Incognito Tattoo Lettering Font (TTF, OTF)

Incognito Tattoo Font

This blackletter tattoo script font is best if you're working on Gothic or tribal tattoo themed designs. Definitely a classic tattoo ink font.

8. Milestone Tattoo Script Font (TTF, OTF)

Milestone Script

This cursive tattoo font is perfect for lovers of classic tattoo lettering fonts. This cursive tattoo font alphabet also has many OpenType features: contextual alternates, swashes, ligatures, stylistic alternates, ordinals, and fractions.

9. American Traditional Tattoo Lettering Font (TTF, OTF)

American Traditional Tattoo Font

Looking for the best tattoo fonts with traditional designs? Look no further than this traditional tattoo ink font: a hand-drawn font in two weights, inspired by the traditional tattoo style of America.

10. Flathead Typeface Tattoo Lettering Vintage Font (TTF, OTF)

Flathead Typeface

One of the best tattoo fonts with vintage style. The tattoo font is inspired by American Western culture and tattoos, and is perfect to use in vintage-themed designs.

Conclusion

I hope you've enjoyed my tutorial on how to create a realistic tattoo using a tattoo font in Adobe Photoshop, and the selection of the best tattoo ink fonts from Envato Elements. Remember to explore our Envato Tuts+ YouTube channel, where you'll find many cool Photoshop projects.

90s Graphic Design Trends: From Aesthetic Fonts to Grunge Patterns and Rave Flyers

$
0
0

The 90s trends in graphic design were full of fashion statements, bold colors, and many music genres. Let's take a look at some famous 90s art styles that made this decade so popular. 

Many of the 90s graphics were heavily influenced by pop culture and the underground music scene. Also, many 90s trends happened simultaneously, influencing each other, with overlapping design elements. One thing was for sure: experimenting with design and throwing the 'classic' rules out the door were constant. 

We started the decade with the grunge style influence from skateboarding, graffiti, and punk cultures. Seventies new wave music led to the rave culture. The 90s rave flyers broke the rules of design just as the grunge aesthetic did. TV shows like Rugrats, Saved by the Bell and Full House influenced the use of sans serif and casual handwritten style fonts. Comic Sans was released in 1995, and it was used anywhere from children's invitations to newsletters. The overuse of the font caused its controversial status.

If you're pressed for time and looking for 90s logo design templates, make sure to check out Envato Elements and GraphicRiver for amazing assets.

90s Aesthetic Characteristics

There were a few key characteristics seen throughout famous 90s art style designs. The decade saw different trends, each with their own attributes that we'll expand on in the "Assets" portion of this article. Generally, however, these were some of the key qualities of the 90s aesthetic:

  • Vibrant colors: bright yellow, pink, purple, fluorescent green, cerulean blue, neon lasers. All these colors were applied to patterns for a bold and eye-catching effect in 90s graphics. 
  • Abstract shapes: bold, abstract, geometric shapes were standard in the 90s aesthetic. Patterns like polka dots were applied everywhere from clothing to famous 90s art. 
  • Fun Patterns: from 90s rave posters and their trippy background grids to geometric shapes applied to wallpapers and carpets, patterns were just everywhere. 
  • Gradients: the underground 90s rave posters included vibrant gradients.
  • Font choices: Comic Sans style fonts were used mainly for pop 90s style graphic design. Handwritten fonts were seen on the shows Rugrats and Full House. For more impact, condensed sans serifs were applied to grunge style and 90s rave posters. 

90s Trends: Pop Style Assets

Graphic design in the 90s included many graphic elements influenced by fashion and the colorful 80s. The 90s aesthetic was full of abstract graphic elements used as patterns or supporting bigger elements in the background.

The main typographic style was casual handwritten fonts, most of them with rounded edges like Comic Sans. TV show titles and main headlines used condensed sans serif fonts with drop shadows to separate them from busy backgrounds. Patterns were enhanced by bright colors and applied everywhere from clothing to carpets and graphic design. 

1. The Moonlight 90s Style Retro Font

The Moonlight 90s Style Retro Font

This unique ball pen handwritten font has an easy and relaxed flow. The signature style makes it perfect to use in editorial design, logos, and even apparel design. The casual style font comes with stylistic alternates and extra goodies to complete your designs. 

2. Thunderstorm 90s Aesthetic Font

Thunderstorm 90s Aesthetic Font

This 90s style font was developed from a handmade brush. Inspired by the retro vibe of the late 80s and early 90s aesthetic, it embodies so much of the disco and pop culture of the time. The pack comes with alternates and swashes that finish off any logo nicely. The extras are full of 90s digital art illustrations. 

3. Studly 90s Retro Font

Studly 90s Retro Font

Comic Sans was released in 1994, making it one of the most popular fonts in the 90s. The font was used everywhere, making it the number one choice in pop culture when it came to school projects. Studly maintains the friendly and round shapes of Comic Sans, while upgrading the legibility by keeping it clean. This 90s style font includes layered families so you can create that 3D 90s aesthetic. 

4. Back to 90s Flyer (AI, PSD)

Back to 90s Flyer

Thickly lined drawings and vibrant colors were a big part of the 90s trends. This poster has a modern take on the 90s aesthetic if you're planning a throwback party to celebrate some of the best music of the decade. Everyone needs a fun night out once in a while! 

5. Back to 90s Instagram Pack

Back to 90s Instagram Pack

If you're a fan of the recent 90s graphic design comeback, this colorful social media pack is going to have you trending in no time. The download comes with 24 Instagram posts, including some of the best 90s style graphic design. They didn't forget about Instagram stories—those are also taken care of and ready to post!

90s Trends: Grunge Style

We entered the decade bringing a few things from the 80s, like flannel shirts and the start of alternative rock. The grunge aesthetic originated from punk music, graffiti, and skateboarding culture, paving the way to experimental typography and grunge style posters. 

David Carson famously designed Ray Gun magazine, the ultimate grunge style magazine. The style was widely adopted on posters and album covers. There were lots of handmade posters, handwritten fonts, and grunge textures applied to posters. These elements conveyed underground rock culture.

1. Exit Brush & SVG Font

Exit Brush  SVG Font

The 90s grunge aesthetic took over the decade as the alternative rock culture was rising. This grunge-style 90s font represents so much of what music was at the time. The font also comes as SVG files if you want to change the colors. Bonus points for the grunge patterns that come with the pack to complete your design. Now you have all the 90s style graphic design elements to get started on your project!

2. Supreme Spirit Brush Font

Supreme Spirit Brush Font

This 90s retro font has a more polished look. It's inspired by brush-style handmade characters. If you're looking to add some grunge aesthetic to your 90s logo design, this font is legible and clean. Aside from the regular font files, the pack comes with SVG, vector, and PSD versions. 

3. Black Space SVG Font

Black Space SVG Font

Most vintage 90s fonts were based on handwritten brush and marker characters. Black Space is a cool SVG font with awesome texture, so you can get that true natural transparent effect on your 90s graphics.

4. 90s Grunge Style Music Flyer (PSD)

Grunge Music Flyer

Music venues were filled with staple 90s grunge style music flyers, and the alternative rock scene was booming. If there's one iconic 90s design style, it was grungy underground posters, and this flyer is a perfect example of that. The download comes neatly organized with layers, and it's ready to print. 

5. Vector Grunge PatternTextures (PNG, AI)

Vector Grunge Pattern Textures

Heavy grunge pattern textures were dominant in any 90s graphics. These textures were sourced from photos of real surfaces to have an authentic feel. Use these to add distress to your 90s graphics and take them to another level. The pack includes 29 different textures in PNG and AI formats. 

90s Trends: Rave Style Assets

The 90s rave posters were powerful and evocative when it came to breaking the rules of design. The end of the 80s in Chicago brought acid house, a music genre that quickly expanded around the world. The word rave was used to describe the subculture that revolved around the acid house music genre. 

The only way to promote events was their famous 90s art style inspired by surrealism, cyberpunk, and psychedelia elements. Typography was bold and mostly legible as it sat on a bed of experimentation. The backgrounds were sometimes dark, with heavy patterns. Time-saving hacks sometimes led to a complete black and white design printed over colored neon paper.

1. Zuume Font Family

Sans serif fonts were some of the most popular fonts in the 90s. Clean cut and precise, they supported many of the 90s digital art designs. This striking font is condensed and eye-catching due to the multiple weights it includes. The pack includes an alternate Cut family with sliced details that will make your 90s rave posters look dynamic and unique. 

2. BW Stretch 90s Font

BW Stretch 90s Font

High impact characters were some of the most popular fonts in the 90s. They needed to stand up against busy 90s digital art and grunge aesthetic. This compressed grotesque comes in a wide variety of weights to fit any range of impact you're looking for. The disruptive alternates considerably expand the width of the characters and can give a very modern look to your 90s rave flyers.

3. Morton 90s Retro Font

Morton 90s Retro Font

Lots of 90s rave posters had busy backgrounds and needed a good font to keep the content legible. Morton is a 90s aesthetic font, grotesque and condensed, creating a strong effect on 90s style graphic design. The pack comes with nine weights, so you'll be covered with such wide variety. 

4. 90s Style Rave Poster (PSD)

90s rave flyers were electronic music's most iconic medium. Artists blended psychedelic styles with cyberpunk, resulting in trippy 90s digital art. This design pack even includes the original photo, which is free for commercial use. It's also easily editable and comes in a variety of sizes, so you can make it as big as you want. Pair your design with an awesome vintage 90s font, and you're ready to party!

5. 90s Rave Flyer (PSD)

90s Rave Flyer

The 90s rave posters showed an interesting unique style that very accurately translated the sounds of electronic dance music. This 90s rave poster style features colorful and vibrant elements that capture the passion of the music scene. The design is ready to print and is easily editable because of the highly organized layers. Ready to party?

It's Your Turn!

In the last couple of years, we've seen a resurgence of 90s nostalgia. The decade was full of experimental design choices that made graphic design grow in ways that hadn't been seen before. What's your favorite 90s design trend? Let us know in the comments section!

If you're looking for more premium 90s style font assets, make sure to check out Envato Elements and GraphicRiver. Let's get designing! 

If you like this article, you might like these:

Viewing all 6352 articles
Browse latest View live