In this tutorial I'll show you how to create a sci-fi artwork with planets, spaceships and nebulae. You'll learn how to create a space background from scratch, make a planet in a simple way, and combine space elements using blending techniques. You'll also learn how to adjust the contrast and color, create lighting effects, and enhance the depth of field.
Tutorial Assets
The following assets were used during the production of this tutorial:
Make a new 3000 x 2000 px document in Photoshop with the settings below:
The background color must be black.
Step 2
Press Control-Shift-N to make a new layer. Activate the Brush Tool (B)
with a soft round one, and set the foreground to #8c92ae. Paint around
the middle section of the black background:
Change this layer mode to Hard Light 100%:
Step 3
Create a new layer and use a soft round brush with different colors to make spots on the canvas. You can use colors of your taste, but don't forget that we're
creating a colorful background, so pick vibrant colors. Here is my
choice of colors: #378c6c, #c20707, #cf53c8.
Remember not to fill the whole canvas with colors—we need some space for the dark shade and depth.
Step 4
On a new layer, change the foreground to #44595b and use a soft brush to paint on the edges and corners of the canvas.
Change this layer mode to Hard Light 100%:
Step 5
Create a new layer and press D to set the foreground/background to
default (black and white). Use the Lasso Tool (L) to make a selection on
the canvas and set the feather Radius to 60px:
Go to Filter > Render > Clouds:
Change this layer mode to Color Dodge 100%:
Step 6
Use an adjustment layer and set it as Clipping Mask to make the effect
more subtle. Go to Layer > New Adjustment Layer > Levels:
On this layer mask, use a soft round brush with black color (soft black
brush) to reveal the vibrance on some areas as shown below:
Step 7
Duplicate the clouds layer and move the duplicated one above the first
and the Levels adjustment layer. Go to Filter > Render > Different
Clouds:
Select Filter > Blur > Gaussian Blur and change the Radius to 35px:
Step 8
Make a Color Balance adjustment layer to change the resulting color a little.
Step 9
Time to make some stars. Create a new layer and change the foreground to#72c6fd. Use a hard brush to paint random stars over the canvas,
remembering to vary the brush size:
Double click this layer, choose Outer Glow and set the color of glow to white:
Step 10
Create a Curves adjustment layer on top of the layers to change the color of the effect:
Step 11
Open the nebula image. Drag this image into our main canvas using the Move Tool (V) and enlarge it using the Free Transform Tool (Control-T):
Change the mode of this layer to Linear Dodge 100%:
Step 12
Add a mask to this layer and use a soft black brush to reduce the effect and make it appear subtle on the existing background:
Step 13
Use a Color Balance adjustment layer (set as Clipping Mask) to alter the nebula effect color a bit:
Save the result as a JPG file for your future use.
2. Add the Space Background
Step 1
Create a new 2200 x 1600 px document and set the background color to
black. Open the space background created in the first stage and drag
it into this new canvas using the Move Tool.
Add a mask to this layer and use a soft black brush to reduce the image
opacity, making the middle section more visible than the rest:
Step 2
To make the middle more visible, create a new layer and use a soft white
brush to paint on this area. Change this layer mode to Soft Light 100%:
3. Add the Planets
Step 1
Open the planet texture. Create a new layer and use the Clone Tool (S) to remove the four black lines on the image.
Step 2
Press Control-Shift-Alt-E to merge the background and the clone layers into a
new one. On the merged planet layer, use the Elliptical Marquee Tool to
grab a circle. Go to Filter > Distort > Spherize:
Step 3
Click this selection and choose Layer via Copy. We have the base of planet on a new transparent layer (I turned off the background, clone and merged layers to help you see the result more clearly).
Step 4
Drag the planet into our main document and scale it down using Control-T. Place it in the center of the image.
Step 5
Make a Hue/Saturation adjustment layer (set as Clipping Mask) and bring the Saturation value down to -87:
Step 6
Use a Curves adjustment layer and decrease the lightness.
On this layer mask, use a soft black brush to erase the outside section
of the planet to bring some light to this, and also leave the shadow in the
middle.
Step 7
Make a Color Balance adjustment layer and change the Midtones settings:
Step 8
Create a new layer (set as Clipping Mask) and use a soft brush with the
color #b68fa4 to paint on some areas around the planet to color it
(we've put it on a colorful background). Change this layer mode to Soft
Light 100%.
Step 9
Make a new layer and change the brush color to #b6eadd. Paint on some
other areas of planet with the same purpose, and set the mode to Soft
Light.
Step 10
Add two other planets to the sides of the big one, making them much smaller.
Step 11
Select these small planet layers and press Control-G to make a group for
them. Change this group mode from Pass Through to Normal 100%. Make a
new layer above these planet layers and use a soft black brush with the Opacity about 70–80% to paint shadow in the lower part of the planets.
Step 12
Create a Hue/Saturation adjustment layer and bring the Saturation value down to -86.
Step 13
Use a Color Balance adjustment layer to change the planet's color.
4. The Basic Color and Light
Step 1
We'll be coloring the planets and adding more light to the space. Create
a new layer above the planets group and use a soft brush with the color#b6eadd to paint on the top center of the scene. Change this layer mode
to Soft Light 100%.
Step 2
Use a new layer with the brush color changed to #b68fa4. Paint on the
top area of the big planet and alter the mode to Soft Light 100%.
Step 3
Make a new Curves adjustment layer on top of the layers, and increase the highlight.
On this layer mask, use a soft black brush to reduce the brightness at
the bottom of the planets and space as they're hidden from the light.
5. Add the Spaceships
Step 1
Open the spaceships image. Select three spaceships which have similar
poses and add them to the space. Duplicate them and rotate them towards the
big planet. The nearer the foreground, the bigger the spaceship.
Step 2
Make a group for the spaceship layers and change this group mode to Normal 100%. Use a Hue/Saturation adjustment layer within this group to
desaturate the spaceships.
Step 3
Create a Color Balance adjustment layer to add some cyan/blue to the spaceships.
Step 4
Use a Curves adjustment layer to darken the spaceships.
On this layer mask, use a soft black brush to reveal the light on the
top of the spaceships because they should be brighter than the bottom:
Step 5
Create another Curves adjustment layer to give more light to the top of the spaceships.
Select a soft black brush and paint on the Curves layer mask to maintain the shade of their bottom.
Step 6
Use a new layer with a soft white brush to paint more highlight for
some of the spaceships. Change this layer mode to Overlay 100%.
6. Add the Asteroids
Step 1
Open
the asteroids images. Select different asteroids to put around the big
planet, duplicating and transforming them if needed, and make them very much
smaller than the planets. Rotate the bright parts of the asteroids
towards the light.
Step 2
Add some asteroids to the bottom left and right corner of the space
scene, and make them bigger than the existing ones. Blur them to bring
some depth to the scene by applying a Gaussian Blur of 8 px to each of
these layers.
Step 3
Make a group for all the asteroids layers. Use a Color Balance adjustment layer to match the asteroids' color with the other elements:
Step 4
Create a Curves adjustment layer and reduce the lightness:
On this layer mask, use a soft black brush to reveal the luminosity on the asteroids:
Step 5
Make another Curves adjustment layer to bring more light to the asteroids.
Use this layer mask to maintain the shade of the asteroids, especially the parts which are hidden from the light.
7. Add the Lights and Light Trails
Step 1
Make a
new layer and take a hard brush with the color #eebde2. Add small
dots in order to create the lights on the spaceships. The bigger the spaceship,
the bigger the dots.
Step 2
To make a glowing trail we often see in space art, make a new layer and
use a soft colored brush (#7b3e51) to create a spot on the canvas. Resize the
brush size down and choose a lighter color (#d69e96) to put a spot in the
center of the existing one.
Convert this layer to a Smart Object and use Control-T to change its
perspective and make it look like a trail. Place it at the bottom of a spaceship:
Step 3
Duplicate it several times and add the trails to other spaceships.
Step 4
Make a new layer and set its mode to Color Dodge 100%. Use a soft brush
with the color #eebde2 to paint the lightest part of the trails at the
bottom of the spaceships.
8. The Final Adjustment
Make a Curves adjustment layer to brighten the whole scene, especially the top center:
Use a soft black brush to erase the sides and the shade on the big planet to create a nice contrast of the final effect.
Congratulations, You're Done!
Thanks for following this tutorial, and I hope you've learned something new from it. Feel free to leave your comments in the box below—I'd love to see them. Enjoy Photoshopping!
For the past couple of years, we've published a large amount of spooky themed content in time for the pinnacle of the creative calendar, Halloween. We've even invited the community to join in with our community projects. However, this year we're doing things a little bit differently.
We're Off to See the Wizard
You may be expecting the next two weeks to log on to see content with a eerie feel, but in an effort to not duplicate themes, we've prepared for you two weeks of content and themes based on the popular culture classic movie, The Wizard of Oz.
Spoiler Alert!
Each weekday, for the next two weeks, you'll be treated to at least two new pieces of content. Each has a different theme, and they are posted in the order of appearance when they're most important to the story line.
Still Want Spooky Halloween Content?
If you're new to Envato Tuts+ and want to see more spooky themed content, you can always view our many tutorials which cover Halloween themes from our archives.
The best-know movie adaptation of The Wizard of Oz is the beloved Judy Garland classic from 1939. In this tutorial we’ll be designing a tribute to the film and to the Golden Age of Hollywood with a movie poster that has a distinctively vintage vibe.
Using both Adobe InDesign and Adobe Illustrator, you’ll learn how to develop a vintage style in your poster designs, using graphics, textures, colors and typography. Suitable for beginner-to-intermediate users of the software, this is a great introduction to some of the key principles of poster design.
Let’s get going and ‘Follow the Yellow Brick Road’!
1. Prepare Your Poster Document
We’ll design the poster layout in Adobe InDesign, and use Illustrator to create graphics that can be used in the design. So, first up, get InDesign opened up.
Step 1
Go to File > New > Document and, in the New Document window that opens, keep the Intent of the document set to Print.
Step 2
Moving down the window, select A3 from the Page Size drop-down menu (297 mm by 420 mm) and keep the Landscape Orientation.
Keep the Margins set to their default 12.7 mm value on all sides except the Bottom Margin—increase this to 26 mm.
Set the Bleed on all sides to 3 mm and click OK to create your new poster page.
2. Build Up the Layers of Your Poster
Vintage posters look ‘vintage’ because they have a layered appearance, built up with textures, effects and colors. Anything too flat and one-dimensional will look too polished.
Let’s build up the layers of our poster design using InDesign’s Layers panel...
Step 1
Expand the Layers panel, which will probably be docked at the right-side of the workspace. If you can’t spot it, head up to Window > Layers.
Double-click on the default Layer 1 name in the panel to open up the Layer Options window. Rename the layer Background and click OK.
Step 2
From the Layers panel’s drop-down menu, select New Layer (or click the Create new layer button at the bottom-right of the panel).
Rename the new layer Border and click OK.
Step 3
Create a further three layers in this order:
Yellow Brick Road
Ruby Slippers
Typography
Now you will have a sequence of five layers, with Typography at the top of the pile.
Step 4
Lock all of the layers except Background and click on the layer to activate it.
3. Create a Vintage Color Palette
Before you start designing your poster, it’s a great idea to create a selection of swatches—a vintage color palette that you can apply to elements on your design.
Step 1
Expand or open the Swatches panel (Window > Color > Swatches).
Click on [Black] to select the swatch, and then go to the Swatch panel’s drop-down menu and choose New Color Swatch. Keep the Color Type as Process and Mode as CMYK, and set the value to the following: C=2 M=8 Y=22 K (Black)=0.
Uncheck the box next to Name with Color Value and rename the Swatch as Cream.
Click Add, and then OK.
Step 2
Using the same process as in the step above, create a further four new CMYK swatches (until you have five swatches in total), with the following values and names:
Emerald: C=83 M=17 Y=68 K=2
Vintage Yellow: C=7 M=22 Y=87 K=0
Ruby: C=2 M=100 Y=85 K=6
Vintage Black: C=62 M=59 Y=68 K=72
Step 3
From the Tools panel, docked to the left of the workspace, select the Rectangle Tool (M) and drag across the whole page, up to the edges of the bleed on all sides.
Set the Stroke Color to [None] and Fill Color to Cream.
4. Create a Vintage-Style Border
You’ll notice that most vintage-style posters have imperfections, such as wobbly lines and patchy textures. It all adds up to that perfectly imperfect vintage look.
Step 1
Return to the Layers panel and Lock the Background layer. Unlock the next layer up, Border.
Select the Pen Tool (P) from the Tools panel, and start to click around the margins of the page (indicated by a colored line running around inside the edges of the page) with a slightly imperfect aim.
Stick roughly to the margin, but allow your pen to drop anchor points either side, here and there, to create an imperfect rectangle shape.
Click on the first anchor point to join up the points into a solid shape.
Set the Fill Color of the shape to Emerald, and Stroke Color to [None].
Step 2
With the emerald shape selected, head up to the main menu at the top of the workspace and select Object > Effects > Transparency.
Set the Mode to Multiply and reduce the Opacity to 90%.
From the Effects window’s left-hand menu, click on Gradient Feather to apply a default gradient and open up the options for adjusting the gradient.
Swing the Angle round to -60 Degrees, and pull the Gradient Stops reasonably close together, in the right-hand half of the scale.
Click OK to exit the Effects window. You now have a perfectly imperfect border on your poster layout, which is looking really great. Good work!
5. Follow the Yellow Brick Road...
The focal point of our poster is going to be an abstract graphic of the famous yellow brick road from the movie. To create this, we’ll need to head over to Adobe Illustrator.
Step 1
First up, remain in InDesign and go to the Swatches panel. Click to select the Vintage Yellow swatch, and choose Save Swatches from the panel’s drop-down menu.
Name the Adobe Swatch Exchange (ASE) file as ‘Vintage Yellow’ and click Save.
Step 2
Now you can open up Illustrator and go to File > New to create a New Document. Keep all the default options as they are and click OK.
Open up the Swatches panel (Window > Swatches) and open up the panel’s drop-down menu. Go to Open Swatch Library > Other Library.
Navigate to your ASE file on your computer and click Open. The Vintage Yellow swatch will load in its own window.
Step 3
Now we’re going to create our yellow brick road! From the Tools panel, choose the Spiral Tool (find it under the pop-out menu for the Line Segment Tool).
Hold down Shift and drag onto the artboard to create a uniform spiral, as shown. Set the Stroke Color of the spiral to Vintage Yellow.
Step 4
Open up the Brushes panel (Window > Brushes) and click on the Brush Libraries Menu button at the bottom-left corner of the panel. Choose Artistic > Artsitic_ChalkCharcoalPencil.
With the range of brushes loaded, select the brush called Chalk - Blunt and apply the brush to the spiral’s stroke. Increase the weight of the Stroke to 4 pt, from the options at the top of the workspace.
Step 5
Take the Scissors Tool (C) from the Tools menu (under the Eraser Tool’s pop-out menu). To create the ‘bricks’ of the road, snip the spiral along its length at varying intervals. Create a larger section followed by a smaller section, and delete the smaller sections to create a sequence of large ‘bricks’.
Continue along the whole length of the spiral.
To create a paved road effect, drag your mouse across parts of the spiral and Edit > Copy, Edit > Paste. Reduce the pasted sections in size a little if you need to (holding Shift to maintain the proportions), and position inside the first spiral.
Repeat the process, copying and pasting sections of the spiral and positioning them outside the edge of the original spiral, along its base, until you have a spiralling road that gradually expands in size towards the outside of the spiral.
Step 6
Drag your mouse over the whole graphic, so you have selected all the ‘bricks’, and then go to Edit > Copy.
Return to your InDesign poster layout, and Lock the Border layer. Unlock the next layer up, Yellow Brick Road. Go to Edit > Paste to drop the spiral graphic onto the page.
You can rotate the graphic a little—try to make it look a little imperfect and off-center—and position it up towards the top-right of the page, as shown.
Once you’re happy with the arrangement, return to the Layers panel and Lock the Yellow Brick Road layer. Unlock the Ruby Slippers layer above it.
6. Create Ruby Footprints
Dorothy wouldn’t be seen dead without her gorgeous ruby slippers, and we can insert a little reference to her choice of footwear on our poster design.
You can either draw your own simple footprint shapes (remember to include a heel and a pointed sole for heeled shoes) in Illustrator, or download this ready-made EPS file from GraphicRiver.
Step 1
Open up the graphic in Illustrator, and isolate just the pair of heeled shoes to work with.
Apply a thin Charcoal Brush to the Stroke of the footprints to give them a slightly rougher edge. Then drag your mouse across one of the footprints, and Edit > Copy.
Step 2
Return to InDesign, and Edit > Paste the footprint onto the Ruby Slippers layer. Adjust the Stroke and Fill Color of the graphic to Ruby.
Return to Illustrator and Edit > Copy the other footprint (this is done separately so you can edit them separately in InDesign), and Paste into InDesign. Set the Stroke and Fill of this to Ruby as well.
Now you can resize the footprints (while holding Shift) and adjust their angle and position. Place them somewhere on the yellow brick road, as demonstrated below.
Step 3
As a final touch, drag your mouse across the page to select both footprints and go to Object > Effects > Transparency. Set the Mode to Multiply and click OK.
7. Finish Your Poster With Vintage Typography
There is a difference between authentic ‘vintage’ designs and designs that borrow from vintage styles. This poster falls into the latter group. We want to make the poster look like a contemporary tribute to vintage styles, and typography is a great way of introducing both modern and retro elements to a poster design.
Step 1
The first thing to do is to select your typefaces. There is a huge range out there of fonts that claim to be ‘vintage’ in style, some look better than others, and it’s really up to you to choose a font that’s going to reflect the sort of period and feel you want for your poster design.
These are the fonts I’ve chosen to use on this poster design. But feel free to experiment with different options!
Minotaur is a strong slab font with a nod to 1930s type styles, and Fontleroy Brown is a more traditional, 1940s-style serif.
Download the fonts above (or choose your own), install and return to InDesign.
Step 2
Back in the Layers panel, Lock the Ruby Slippers layer and Unlock your top layer, Typography.
From the ruler at the top of the screen (if you can’t see your rulers, go to View > Show Rulers) click and drag down a guide to Y Position 374 mm, towards the bottom of the page.
Take the Type Tool (T) and create a large, square text frame. Position in the lower right corner of the page. Type ‘Oz’ and set the Font to Minotaur, Size 260 pt. Adjust the Font Color to Ruby.
Adjust the position of the text frame so that the baseline of the text matches the 374 mm guide position.
Step 3
Pull down a second guide onto the page, to 329 mm. Use the Type Tool (T) to create another text frame, this time a bit longer, and type ‘Wizard’ into it.
Set the Font to Fontleroy Brown, Size 241 pt, and set the Font Color to Cream.
Position the text frame to the left of the page, resting the text baseline on the 329 mm guide.
Step 4
Create another, much smaller, text frame and position it above ‘Wizard’ to the left of the page. Type ‘the’ and set the Font to Minotaur, Size 70 pt, and Font Color to Cream.
Select the text frame and Copy and Paste, adjusting the text to read ‘of’ and increasing the Font Size to 100 pt. Position to the left of ‘Oz’.
Step 5
Now you have your movie title put together, you can introduce other smaller sub‑headings, such as straplines, review quotes or the names of the cast.
Here, I’ve set ‘Judy Garland’ in Size 37 pt Minotaur, Font Color Vintage Black and chosen Align Right from the Character Formatting Controls panel at the top of the screen. I’ve positioned her name above ‘Oz’.
I’ve also added the names of other prominent cast members underneath ‘Wizard’, setting them in Minotaur, Size 23 pt, and Vintage Black. I’ve aligned them randomly to give the typography a more authentically vintage feel. I’ve also added connecting words like ‘starring’ in Fontleroy Brown, for a bit of contrast.
8. A Final Vintage Touch...
Your poster’s looking great, but we can give it an even more authentically vintage look by bringing in a bit of texture in the background of the layout.
Step 1
Lock the Typography layer and Unlock the Border layer further down. With the layer activated, select the emerald shape, and go to Edit > Copy.
Step 2
Without pasting your shape, let’s first edit the existing emerald shape we have here on the page.
Remove any effects applied to the shape by selecting it and going to Object > Effects. Deselect Gradient Feather from the Effects window’s left-hand menu, and reset the Transparency to Normal and Opacity to 100%. Click OK to exit the window.
Remove the emerald color fill by choosing [None] from the Swatches panel.
Step 3
Now head up to File > Place. Choose a paper background image with a vintage feel. Try this paper texture from PhotoDune.
Select Open and resize the paper image so that it fills the shape (choose Fill Frame Proportionally from the options that appear at the top of the workspace).
Step 4
Finally, go to Edit > Paste in Place to paste a copy of your original emerald shape over the top of the paper image. The paper texture will subtly peek through the emerald shape, and give the whole poster a much more authentic vintage look.
Conclusion
Great work! Your poster is finished, and it’s looking fantastic!
All you need to do now is export it (File > Export, choosing Adobe PDF (Print) or (Interactive) from the Format drop-down menu) and share it with friends and family.
In this tutorial you’ve picked up some really useful, transferrable skills for recreating vintage-style designs digitally. Now you can feel confident:
Creating avintage-style background and ‘perfectly imperfect’ border for your poster layouts
Creating custom swatch color palettes in InDesign, and sharing them with Illustrator as ASE files
Creating simple vector graphics in Illustrator, ready for pasting directly into your InDesign documents
Choosing suitable typefaces and creating typography with a retro twist
Integrating papery textures into your designs to recreate that authentic vintage look
Awesome work. Feel free to share your poster designs in the comments below!
The Wizard of Oz is an iconic movie which covers many themes. One of my favourites is that of colour. With this in mind, I've decided to create my own colouring book style illustration of its protagonist, Dorothy Gale. In this tutorial, I'm going to show you many different ways to create line art in the process of creating this tribute.
You can download the line art yourself in high resolution to the right of this article, should you wish to print it off and colour it in yourself... I've tried it out myself, and it's a lot of fun!
So let's get Adobe Illustrator open and get vectoring!
1. Create Chunky Line Art
Step 1
Before I start, I like to put together a sketch of what my idea of the composition will look like. This helps me visualise the final product. Where needed, I include stock images to assist me in the drawing process, for example the model for Dorothy herself and a stock image for the bow (for some reason, I've always had problems with drawing bows!).
I then Place the sketch in Adobe Illustrator to work from, with a white filled Rectangle (M) on top set to Opacity 50% to dim the image.
Step 2
The initial line art that I'm drawing for the illustration will be created with the Pen Tool (P). These are more chunky lines which have a non-uniform width. They create a more organic look to the lines, and I think it helps give it a bit more style.
Below is an example of how I put together the collar on her dress. I first draw the overall shape of the collar, and then use Pathfinder > Minus Front to remove the two inner shapes.
Step 3
I continue using this style for several areas on the portrait. Notice how some parts aren't complete—this is due to future shapes overlapping the area and therefore hiding where certain parts meet.
2. Use the Grid Tool for the Rainbow
Step 1
Throughout the composition I want several icons from the movie to be present. One of the big ones would be the rainbow, and it would make sense to have her above the rainbow ("Somewhere over the rainbow").
To create the rainbow shape, I'm going to use the Rectangular Grid Tool. First I double-click on the icon so I can modify the number of horizontal and vertical dividers. The number you want is one less than the bars and columns you need. So seven colours in the rainbow means 6 Horizontal Dividers. I'm just wanting one column, so it would be 0 Vertical Dividers.
When I click-drag the tool, I end up getting the following seven-row grid.
Step 2
To create the rainbow arc, I'm going to keep the grid selected and go to Object > Warp > Arc and set the Bend to 100% Horizontal.
Step 3
I then Object > Expand Appearance to remove the editable effect so I can ensure all of the lines are a uniform 2 pt Stroke Weight. I want the large area outlines to be at 2 pt and the smaller details to be between 0.25 pt and 1 pt.
3. Section the Hair and Add Line Art
Step 1
For the hair, I've divided it up into sections first, using the Pen Tool (P). So I create the initial shape and then add on the next section. I do this with half of the head first and then copy and paste the shapes and reflect them for the other side, since the portrait is symmetrical. I then use the Free Transform Tool (E) to move the sections into place.
Step 2
To add the detailing for the hair, I first create a tapered Art Brush.
Step 3
Then I create a series of strokes in the following pattern: a large stroke around the outside, with a smaller in the middle and then an independent stroke in the very centre. These are created with the Pen Tool (P) for maximum control of the curves.
Step 4
I then carry on this style throughout the top of the hair and add additional strokes where required.
Step 5
To work on the flowing hair behind her head, I'm going to create a new brush. I draw a line with the Line Segment Tool (\) and give it a 40 pt Stroke Weight and apply the tapered art brush. I then Object > Expand it to get the shape of the brush. I set the fill to white and the stroke to black.
Step 6
Now to add strokes using this brush from the back of her hair to over the rainbow and along her shoulder. Notice how half of the brush covers her face... this is so the tapered end of the brush is hidden.
Step 7
I'm going to need to start cleaning up my line art, so it's time to get creative with Clipping Masks (Control-7). As this line art is staying empty, ready to be coloured in by hand, you can use white filled shapes and Clipping Masks to hide unsightly edges.
The first thing I do is work out the shape to cover the face, to hide the overlapping edges of the hair.
Then I continue to use Clipping Masks to hide overlapping edges.
Step 8
Now continue using the same style for creating the line art within the sections of the hair, for the hair overlapping the rainbow and shoulders.
4. Detail the Eyes and Eyebrows
Step 1
For the eyes, I'm going to use another Clipping Mask. I use the Pen Tool (P) to create the inside of the eye and create the impression of a waterline.
Then with this shape, I use it to create a Clipping Mask for Ellipses (L) for the iris and pupil.
Step 2
Using the first tapered brush, I create strands around the eyebrow to mark out the shape and direction of the eyebrows. I do this using the Paintbrush Tool (B).
Step 3
Using the Blob Brush Tool (Shift-B), I fill in the centres of the eyebrows to complete the shape.
Step 4
Then use the tapered brush to add eyelashes to the top and bottom eyelids. The bottom eyelashes have a smaller Stroke Weight.
5. Add Detail to the Clothing
When adding detailing to the clothing, you can use the tapered brush to create the folds. I've also used the tapered brush and a dashed stroke to create a stitching effect on the sides of the strap.
6. Create the Yellow Brick Road
Step 1
For the Yellow Brick Road, I've created a tapered line using the triangle Width Profile with the point of the triangle at the Emerald City.
Step 2
Then I've Object > Expanded it, removed the point of the path, and applied our tapered brush to create perspective with the line art.
Step 3
I've added additional lines to the portrait and the horizon using the tapered brush, the Pen Tool (P) and the Line Segment Tool (\).
7. The Emerald City
Step 1
I've used the Rounded Rectangle Tool to create the Emerald City. I've created the spires using the Line Segment Tool (\) and the triangle tapered Width Profile.
Step 2
I want to make the city sparkle. I do this by creating a Rectangle (M) and rotating it 45 degrees. Then, while selected, I apply Object > Distort & Transform > Pucker & Bloat with the below settings.
I then place them around the city.
8. Create Icons to Do With the Characters
Step 1
For the Wizard (spoiler alert!), I'm creating a hot-air balloon leaving the city, as he does at the end. The base of the hot-air balloon is formed of basic shapes, which include a Rounded Rectangle and two Ellipses (L).
Step 2
I then add additional lines to form the rest of the balloon and basket. I place the balloon in the top left-hand corner to fill in the space.
Step 3
For Dorothy's companions, I've created an earring with icons representing them. So a brain for the scarecrow, heart for the tin man and a medal for the lion.
9. Create the Ruby Slippers
Step 1
After drawing the base of the shoe, I'm going to add sequins to make them sparkle. I do this by creating a Scatter Brush.
Step 2
Then using the Pen Tool (P) I draw strokes around the shoe to add the sequins.
Step 3
After Object > Expanding the brush, I've used the Free Transform Tool (E) to squash the sequins on the edge of the shoes to create the impression they are curving around the shoe.
Step 4
I create the bow in a similar way, but to get the sequins at an angle, I use Object > 3D > Rotate to angle them all.
I then finish off by adding sparkles to the shoes.
There's No Place Like Home!
I hope you've picked up some tips and tricks on creating your own line art illustrations. If you're creating one specifically for colouring in, remember to vary the sizes and shapes you're drawing, and make it interesting by not creating massive amounts of blank spaces.
Colour in Dorothy yourself by clicking download on the right of this article to get the high quality copy of the final illustration. Post your finished, coloured-in pieces in the comments—I'd love to see them!
As you've seen already, we are starting a huge project: creating Wizard of
Oz characters. It is a children's story written by L. Frank Baum, and the original name of this story is "The Wonderful Wizard of Oz". It is a
story about a little girl named Dorothy and her puppy Toto's adventures
after their house was swept away from Kansas to the Land of
Oz by a cyclone.
In this tutorial, we will create our cute puppy character, Toto. We will
use basic shapes and add new fills to existing ones. You will also learn
one of the many ways to create fur. At the end of this tutorial, you
will get a puppy in a basket against a floral background, and a little
gratification from a job well done!
1. Make the Basket
Step 1
After creating a New document (600 x 600 px Width and Height), we will start by forming the shape of the
basket. Hit the Rectangle Tool (M) and draw a rectangle similar to the
shape shown below. While keeping it selected, go to Effect > Warp > Arc. In the new dialogue window, adjust the options as you see
here:
Step 2
Now look at the Appearance panel. Click on the tiny triangle in the top
right corner and in the pop-up menu, select Add New Fill. Then look at
the Swatches panel. Go to Swatches > Patterns > Basic Graphics > Basic Graphics_Lines and select the 6 lpi 50% pattern for this new
fill. Set the Opacity to Soft Light.
We don’t want to stop here just yet. Let’s add one more fill. Press Add
New Fill again, and go to Swatches > Patterns > Basic Graphics > Basic Graphics_Lines. Select the Scotch Rule 4 pattern and set the Opacity to Soft Light.
Step 3
Take the Rounded Rectangle Tool—draw two rounded rectangles and place them at the top and bottom of the basket shape.
Step 4
While keeping the same fill color, use the Ellipse Tool (L) to create
two circles (to create an even circle, hold down the Shift button while
drawing). Draw the small circle over the bigger circle. Then go to the Pathfinder panel and press the Exclude button. This will be the handle
of the basket.
Step 5
Put the handle on top of the basket, but behind the basket (Control-X, Control-B).
2. Draw Toto's Head
Step 1
With the help of the Ellipse Tool (L), create two ellipses which are
overlapping each other. Go to the Pathfinder panel and press the Unite
button.
Step 2
Double-click on the Warp Tool (Shift-R) and let's adjust the options. We will use this tool to draw the fur.
Once the Warp Tool Options appear, enter the settings you see below, and then
press OK.
Now we will start creating the fur. Draw each strand of hair spanning from the head outwards. Try not make the fur too long.
Step 3
Create another copy of this furry head in front (copy-paste), making it smaller and lighter.
Step 4
Let's add the eyes. Using the Ellipse Tool (L), first create two
ellipses: a large, dark blue one, and a small, white one for the highlight. Then copy-paste to complete the set of eyes, and place those two eyes on
the head.
Step 5
Now let's create the nose. Keep the same fill color as we had for the
eyes and create an ellipse. Then you will need to make a sharp corner
with the help of the Convert Anchor Point Tool (Shift-C). Click on the
bottom anchor point to make it sharp. Add a white ellipse to create a
highlight.
Place the nose under the eyes of the dog.
Step 6
To create the mouth of Toto, we will draw an ellipse (R=92 G=115 B=130)
and rotate it slightly to the right. Using the Reflect Tool (O), let’s
create another copy of this ellipse. Here’s the trick, though: once you
have selected this tool, hold down the Alt key and click on the right
side of the ellipse. A new dialogue window will appear where you need to
enter Vertical, Angle 90 degrees and press Copy.
Use the Warp Tool (Shift-R) again as you did for the head to add furry effect around the mouth.
Now, place the mouth under the nose.
Step 7
Set the fill color to R=85 G=108 B=123, and once more draw an ellipse.
Take the Direct Selection Tool (A) and move the handles of the anchor
points of the ellipse to create the shape as in the second image below.
Then, using the Warp Tool (Shift-R), add the furs.
Copy-paste this shape in the front and make it smaller and darker (R=49 G=68 B=79).
Step 8
We just created the left ear! But we still need the right one. Hit the Reflect Tool (O) and make a reflection of the whole ear as you did for
the mouth. Place the right ear on the right side of the head.
We can now also align everything if you didn't do this before. So,
select the two ears and group them together (right-click > Group), and then group the two eyes, the nose (along with the white highlights), and the
mouth. After that select, the whole head and on the Align panel, press
Horizontal Align Center.
3. Create Toto's Body
Step 1
Make the fill color darker than the face (R=55 G=78 B=91), and draw an
ellipse. After that take the Direct Selection Tool (A) and move the
three handles to create the shape as shown in the image below.
Step 2
Using the Warp Tool (Shift-R), create some fur on the body as you did
before. You don't need to add the fur on the bottom of the body, because
it won't be visible later.
Place the body behind the head (Control-X, Control-B).
4. Place Toto in the Basket
Select your dog and set it inside the basket.
5. Create the Paws and the Tail
Step 1
Now we can create the paws. Their position in the basket depends on how deep the dog is sitting in the basket.
Hit the Ellipse Tool (L) and draw a small, narrow ellipse. Keep the same
fill color as we had for the body. Move the handles to create the shape
shown below.
Step 2
Copy-paste the paw you just created and make it darker (R=42 G=64 B=73). Place the darker paw behind the whole body of the dog.
Step 3
Let’s add some furs to the paws. Remember to select the object before using the Warp Tool (Shift-R).
Step 4
Using the same method as you did with the paws, create a tail and then add the fur.
6. Create the Background
Step 1
Let’s make a light blue oval for our background—place it behind
everything (Control-X, Control-B) and set the fill color to R=232 G=239
B=239.
Step 2
Take the Polygon Tool and click on your work space. In the new dialogue
window, enter 6 Sides and for the Radius, it doesn't matter, just not
too big. Set the fill color at R=202 G=219 B=221. To make a flower from
it, go to Effect > Distort & Transform > Pucker & Bloat
and set the slider to 55%. The flower is ready.
Step 3
Spread the blue flowers on the left side of the background by copying-pasting the flowers. Then add a few more very light blue flowers
(fill color R=249 G=252 B=251).
Step 4
Now for a slightly tricky step: select all the objects which are overlapping the
oval background as well as the oval background itself. Keep them selected
and press Control-C, Control-B on your keyboard. On the Pathfinder
panel, press the Unite button to create one shape from all these
objects. Delete the fill color and set the stroke color to R=216 G=226
B=227. Make this stroke very thick on the Stroke panel. We are done!
I Don't Think We're in Kansas Anymore, Toto
Our illustration is ready, and you’ve done a great job! You’ve just
mastered creating different shapes by moving the handles of the anchor
points on an ellipse, adding multiple fills to an existing one, and one
of the many ways to create animal fur. I hope you've enjoyed the
tutorial.
Let's create one more building for our isometric pixel art collection, this time under the Wizard of Oz theme. We'll make a farmhouse based on Dorothy's.
We'll finish it in a sepia tone to match the film, but we'll make it in regular color so that the building is an easily recyclable element to be used if the need arises.
1. Define the Size
We should use our pixel art character to find a size we like for our building.
Step 1
We'll start with a square and a simple demarcation of a door to get a better idea of proportions.
The square doesn't need to be big at all, as we'll add more of a footprint next.
Step 2
Let's add another square, smaller, attached to one side of the original one.
Step 3
And finally this longer section that will go on the back of the house.
If you really want to be faithful to the movie's house, check for reference images of Dorothy's farmhouse. It's not completely clear which side is the front, but I'm quite confident Ms. Gulch enters through this door.
Step 4
Now let's give the house some height. Take the original square, and Alt-nudge or copy/paste it a good height above the footprint. The character should be useful for this.
Step 5
The other two sections of the house have lower roofs, so repeat the above but without reaching the same height.
Looks a little confusing. Let's clean it up.
Step 6
Remove the lines that make it seem as if the larger cube is see-through. Let's just make it a solid box, with vertical lines connecting the corners.
Step 7
And repeat the above with the other sections of the farmhouse.
I kept the line separating these two sections for future reference.
The volumes should be pretty clear now.
2. Create the Roof
Let's do the outlines of the roof. The geometry here can get tricky, especially if we want to avoid jagged lines, but there are a few shortcuts and foolproof lines we can use.
Step 1
In a New Layer, let's make a copy of these top squares, in the same place as they are but in a contrasting color for easier editing.
Remember that you can draw lines very easily by clicking on one point while using the Pencil Tool, and then clicking on another point while holding down Shift.
Step 2
Now let's give the bigger, taller roof a slightly wider footprint than the walls below. Roofs will usually cover a larger area than the walls.
Do the same to the smaller square, with the difference that it should grow only on the three sides that aren't connected to the larger section of the house.
Step 3
Now to start projecting the roof upwards we can simply take one of the sides of a square, starting with the largest one, from corner to corner, copy it and then rotate it (Edit > Transform > Rotate 90˚),and then connect this new line with a corner of the square.
Step 4
To finish the first side of the roof's wireframe, you simply need a 1:1 diagonal line. You can draw it with the Pencil Tool or with the Line Tool, making sure its weight is 1 px and that anti-alias is turned off.
Step 5
To finish the wireframe for this section of the roof, we just need to replicate this new triangle we made and add one line connecting the two tips.
Step 6
Let's get that shape clean, removing the rear lines. We also won't need most of the right-facing bottom line.
Step 7
Now repeat pretty much the same process for the smaller square.
Make the triangle.
Step 8
Copy the triangle and add the roof ridge.
Step 9
And clean up the lines.
Step 10
For the longer section we'll add a roof with a different inclination. It should simply be a horizontal line that shoots right out of the corner.
You'll want to add a bit of volume to it so the roofs don't look paper thin. That's why I put two horizontal lines here. We'll also do it to the other roofs a bit later.
Step 11
These new horizontal lines should extend a bit past their corner of the farmhouse. And from their corner there should go a 2:1 line, covering the whole side until it meets the big roof.
Notice the two small green lines added here. They'll be used to find the point where this new roof surface will intersect with the big roof. Right now they're simply marking the correct width.
Step 12
Now if we move the two green lines up (simultaneously) to where the right one meets the horizontal roof line, that would mean the left green line has to be at the point where this new surface meets the wall and the big roof.
Then you simply have to add another horizontal line from the intersection point.
And then clean up the green lines at the corner of the big roof that we won't need anymore.
Step 13
Now we add the width to the rest of the roofs; they're a few parallel lines, separated from the original lines by just one pixel.
Step 14
To finish the most important volumes of the house, we'll need to add a small porch.
We can start with its footprint.
Step 15
If you copy the footprint up to the level of the base of the big roof then you'd almost have the roof for the porch—you just need to give it an inclination.
It'll be a gentler inclination than the one from the big roof. It's done simply as a 1:1 diagonal.
This inclination actually corresponds to the inclination of the last roof we added. Basically, these are the only lines that can make symmetrical vertical triangles in isometric pixel art, without any jaggedness.
Step 16
Now make the whole roof of the porch align to this new inclination.
Step 17
Add a pair of posts, holding up the roof.
And you're done with the roof and most of the volumes of the farmhouse. Moving on…
3. Add Colors and Textures
Enough with the wireframes! Let's get some color in.
The farmhouse is black and white, even after it lands in Oz, but we don't need to stick to that. We'll give it some nice colors to keep it as a possibly recyclable asset in our library of isometric pixel art… which should be growing if you're following this series of tutorials.
Step 1
Lo-sat blue for the roof seemed a nice choice. Use slightly different shades for the different inclinations.
Also, add a bit of light (almost white) grey to the edges of the roofs.
Step 2
I thought I'd give a light grey to the walls, with just a tiny bit of saturation (5%) of a greenish hue.
Add different shades; for some reason it seems logical to me to shade the left side lighter than the right one. At any rate, it's ideal to keep this constant so that the lighting looks consistent throughout your pixel art.
Step 3
Let's make the walls reach the roofs—it looks much cleaner.
If you like, you could merge the roof and walls into one layer at this point.
Step 4
Add some wood color to the floor of the porch. And fill in the posts with the wall color.
Step 5
Now let's soften the dark lines in surface intersections, wherever you get "valley" corners. I like black outlines to exclusively denote freestanding volumes.
So these "valley" lines should be similar to their neighboring surface colors, darker than both of them, but not black.
Not all pixel artists do this, but I think it's a nice touch.
Step 6
Now the opposite of the "valley" corners would be the "peak" corners. And we'll want these to be highlights; lighter than the neighboring surface colors.
This is more universally applied in isometric pixel art.
Step 7
Now that we're done with coloring, let's add some texture. It's pretty easy for the walls, because they're just wood boards—parallel lines.
In a New Layer, you can start by drawing lines over the visible house footprint lines. You might want to use a contrasting color for now.
Step 8
Then Alt-nudge so that you get a whole bunch of these lines, going up on the walls, all regularly spaced.
Step 9
You won't successfully cover all your walls this way, so add the extra lines you may need.
Step 10
Now color the lines black, using the Paint Bucket Tool with contiguous checked off.
And then remove any part of them that's not over walls. You can do this by going into the walls layer and with the Magic Wand, selecting all of the wall colors (excluding outlines) and then going back to the texture layer, inversing the selection (Select > Inverse) and hitting Delete.
Step 11
Then lower the layer opacity to 10% or less. You can do this via a shortcut: while the Move Tool is active, press the number 1 (for 10%) or rapidly press 08 (for 8%), or try multiple opacities and see what you prefer.
Step 12
To finish the wall texture we may remove all parallel lines from the very corners of the walls and add some vertical lines, like corner frames.
Step 13
On to the roof. Let's make a roof tile pattern.
You could make tiny L shapes, repeating along a 2:1 line. And then copy that down, aligning them like bricks on a wall.
Then replicate and replicate till you get a large patch.
Step 14
Use this to cover the roofs.
Step 15
And then repeat the process we did with the wall, leaving only texture on the surfaces we want to cover.
But let's exclude the back piece of roof because the angle is very different for that.
Then lower the opacity and merge down, if you like.
Step 16
For the back piece of roof we'll do this very simple parallel 2:1 lines texture.
Applied in low opacity.
Step 17
The porch floor should have a wooden boards texture. Start with parallel lines along the length of the floor.
And then some extra pixels to make the separate boards.
Step 18
Lower the opacity and apply.
The farmhouse textures are complete.
4. Add Finishing Details to the House
Let's add some nice windows and other details to the building. They'll be based on the ones from the farmhouse in the Wizard of Oz, but should still be reusable and very nice looking.
Step 1
The frontmost walls will have double windows. We can start those with a rectangle, centered on the wall, and in a New Layer.
It would be ideal to align this rectangle with the lines of the wall texture!
Step 2
Now let's make a frame for the windows. It can be 2 px in width all around. Looks nice and chunky.
Let's also add a break, splitting the windows in half.
Step 3
Finally let's split the windows vertically as well, with more of the chunky window frame, and clean up the rest of the lines.
Step 4
Add some color. I'm giving the window frame a slightly lighter shade of the wall color.
Remember you can modify colors with Hue/Saturation/Brightness(Image > Adjustments > Hue/Saturation…). Try it if you haven't—it's easy and fun.
Step 5
Now let's soften those harsh black lines.
And add an extra bit of dimension with some subtle highlights, a bit of shading on the window frame, and the glass effect of your choice.
Step 6
For the window on the other wall we can just Alt-nudge the first one, place it centered on the wall, and for the lighting to more appropriately match, lower its brightness by about 10% with Hue/Saturation/Brightness(Image > Adjustments > Hue/Saturation…).
Step 7
We'll want more windows, but no longer double. So you can copy the existing ones and bring the ends together, getting rid of the break in-between. I made the window on the right a little bit shorter vertically, as suggested by the reference images I found.
Step 8
Finish placing the windows by removing the parts that should be obscured by the structures.
Step 9
Now let's get to that door. Those vertical lines were starting to get annoying.
Start with a frame, very much like the window ones, except there shouldn't be any frame at the bottom, parallel to the floor. Instead you may want to bring some of the porch floor up on that section just a little bit, to give the door a deeper look, a bit of extra dimension.
Step 10
Add some color and soften the corner lines.
Step 11
And now add some detail to the door, which is actually a screen door with some semi-circles decorating the inner frame corners.
Right now it's all done with one color.
Step 12
But it becomes a more understandable and more 3D-looking with some softer shading in some areas and a bit of highlighting.
Here I added a tan color to the parts that would be the actual screen door.
Screen doors are see-through, but I think we might risk making the door too convoluted if we tried adding some see-through detail.
Step 13
Here I added a small square to help find a spot for the chimney.
Step 14
Here are the extra lines to define the chimney shape.
Step 15
Add some color.
Step 16
Highlight and clean lines.
Step 17
And now let's add a brick texture, starting with parallel lines.
Step 18
And finishing with the individual bricks, give some of the bricks slightly different shades for that extra bit of detail.
And the farmhouse is done! Now we just have to land it somewhere. Witches beware!
5. Add an Environment
We're going to make a little scene around the farmhouse. So, um… why not a farm?
Step 1
Let's start with a background color. I landed on this because I thought it looked enough like soil and looked nice enough with the house colors.
Step 2
Let's give it a subtle dotted texture. It's pretty much a grid, so it shouldn't be too distracting if you keep the contrast low.
Step 3
Let's make one more edit to the house before it's finally grounded. We'll add a base to it, which should look pretty much as if the porch is a step above the ground.
To get it started I drew a line along the footprint of the house, in a New Layer (underneath the house).
Step 4
Clone that line down a few pixels, and give it a wood-like color and some outlines.
Step 5
And as usual: shade, highlight…
Step 6
… and soften the line colors where the surfaces meet.
Step 7
The house has landed, so let's bring a tree into the scene.
It's not much of a farm if it doesn't have any crops. And to plant the crops we should first ready the soil.
Here's a simple way to make a tilled soil pattern.
Alt-nudge that into longer and longer lines and then into multiple lines, like this:
Step 9
And then place it against the corner of the scene. Crop whatever's out of the frame.
Step 10
As for the crops, let's make them carrots—or basically some generic, leafy, vegetable thing.
You can start making a bunch of small and slightly different leaves. Then color them green, flip them horizontally (Edit > Transform > Flip Horizontal) and add shading.
And then put a group of leaves together and touch up the shading and dark lines to have one crop.
Ideally do a few slightly different crops, combining the multiple leaves, so you don't have the same one thing repeating over and over.
Step 11
Crops placed! Looks like a good year for carrot-thing.
Let's just hope the weather doesn't turn.
Step 12
We'll add a fence between the crops and the house. Here's a pretty simple way to make one. This gets repetitive but: outline > coloring > highlighting > softening dark lines.
Oh! and also, make it easy to tile.
Step 13
Around the rest of the house we'll have a picket fence. It can become overwhelmingly dark if we make each board of the fence freestanding, so instead we can just make them thin and bunch them close.
Then to go around the house, make a flipped (and shaded a bit darker) version, plus a smaller, more ornate piece that will become the entrance.
Step 14
We are so close, but let's add one more bit of unnecessary detail: a path to the house (in a contrasting color at first).
Step 15
The path will simply have the same ground color but no texture.
Place the fences.
When placing the picket fence, make sure the gate lines up with the newly made path.
And that marks the end of the pixel work.
6. Add the Sepia Tone
Finally to give it that Wizard of Oz "back-in-Kansas" look, we'll add a couple of effects.
Step 1
Over the drawing, in a New Layer, fill in with a dark, low-sat, tan color, covering the entirety of the illustration.
Step 2
Change the layer Blend Mode to Color.
Step 3
And your graphic should look like this:
You can easily modify your sepia with Hue/Saturation/Brightness(Image > Adjustments > Hue/Saturation…).
Step 4
And why stop there?
You can add an iris effect with a black radial gradient and rounded corners to make it really presentable and a bit more old-timey.
Gradients are usually a no-no in pixel art, but as part of presentation it should be cool.
For a smoother look I enlarged the illustration 2x before applying the radial gradient and the rounded corner crop.
There's No Place Like Home!
It took a bit of heart, brains and courage, but we did it! It's a pretty nice postcard type of pixel art illustration, commemorating a really great piece of cinema.
Create a blend using the colors of the spectrum, then turn that blend into an Art Brush. You can then apply that brush to any stroke and experiment with effects for interesting, colorful designs.
This tutorial was originally published in April 2010. Although this tutorial does not use the latest version of Adobe Photoshop, its techniques and process are still relevant.
If you're looking to create a really nice photo manipulation, often you will have to combine several photos and apply a few effects to get your desired look. In today's tutorial I decided to combine a few photos that I took while I was traveling to create a devastating tornado consuming everything in its path. Okay, let's get started!
1. Prepare Your Canvas and Gather Resources
To create images like this, I recommend that you gain a bit of knowledge of perspective, focal point, vanishing point, etc. It helps a lot while bringing together various images into one final composition.
Step 1
First, create a new document in Photoshop and name it tornado. Create a layer and fill it with some color, and come up with a rough sketch of your composition.
Step 2
Download the following images, and open them up in Photoshop. Use the upper image for the sky and the lower one for the land.
2. Construct the Twister From Clouds
Step 1
With the help of the Lasso Tool and a 20 px feather, cut out the sky and paste it into your tornado document.
Step 2
Now that the sky is ready, our next job is to make the sky look cloudy.
Step 3
Make some adjustments the image's Brightness/Contrast and Hue/Saturation.
Step 4
Use the Clone Stamp Tool to help spread out the sky.
Step 5
Use the Clone Stamp Tool to change the shade of the clouds.
Step 6
Open the second image and select some portions of the grass and vegetation using the Lasso Tool (5 px feather). I used multiple selections of the ground for my image.
Step 7
Now paste the vegetation fragments of my image, and then bring them together. Use the Lasso Tool to spread the vegetation across your canvas.
Step 8
Start selecting portions of the sky, and play around with the brightness and contrast just to give it some variation.
Step 9
Use the same technique with other parts of the image as per my sketch and change the shade of the clouds in those areas.
Step 10
At this point it's time to start laying out the tornado.
Step 11
Use the Clone Stamp Tool to spread the tornado out in the selected area of the drawing.
Step 12
Repeat the same process for the other selected areas.
Step 13
The dust can be created by cloning portions of the sky and by changing its shade.
Step 14
Use the Clone Stamp Tool to create a smooth transition between the various elements in the composition.
3. Add the Finishing Touches
Step 1
To enhance our image, we now need to create a new adjustment layer with a black to transparent gradient. Set the Blend Mode of this layer to Soft Light.
The purpose of this step is to enhance our image so that the upper edges look darker and that the viewer's focus is directed to the center. Repeat this step in one more layer if you want more variation in shading.
Step 2
Now it is time to shade the outer areas of the composition. Do this by drawing a rectangle with the Rectangular Marquee Tool (with 0 px feather) in a new layer and fill it with black color. Use the Lasso Tool to cut the layer as shown.
After this, set the layer's Blend Mode to Soft Light. The purpose of this step is to darken some areas of the image to shift the focus towards the center.
Step 3
Now let's play around with some color variations. Make sure that you do it in adjustment layers, so that if you don't like it you can just delete the layer.
Time to Go to Oz!
That's it. I hope that this tutorial helped you learn a little about photo manipulation techniques. Good luck!
One of the most iconic themes in the Wizard of Oz is the transition from sepia to colour. In this tutorial, I'll show you how to colourise a sepia photo to create a coloured image.
Colourising a sepia or black-and-white image can seem like a
real challenge, but although it takes time and patience, it’s probably easier
than you think. Here I'll take you through colourising a photograph in Adobe Photoshop.
This is the image I'm going to use to take you through the colourising process:
I find black and white easier to work with than sepia, so
the first thing I did was convert this. This is just my personal preference, and you don’t have to; work on the sepia if
you prefer.
1. Make Sure the Image Mode Is Set Correctly
Once your image is loaded in, you need to make sure the Image Mode is RGBand not Grayscale, even if your image is monochrome or black
and white. Click Image >Mode and see that RGB Colour is ticked.
Make sure your image is RGB
2. Start With Large
Blocks of Colour
Step 1
Use the Quick Select tool to select the sky or what would be the largest
single block of colour in the photo.
Use Quick Select to select an area that would be the same colour, like the sky
Step 2
Hit Refine Edge.
Use Refine Edge to tidy up your selection
Step 3
Below you can see I’ve checked Smart Radius and changed the amount
to 5 px—you can adjust it to whatever looks best for your image. I’ve also increased Smooth to 3 px to take off the hard edges. You can use the Refine/Erase Refinements tools here to tidy up your selection, and when you’re happy hit OK.
Adjust Smart Radius and 'Smooth' to suit
Step 4
Now you have your selection, click Adjustment Layers and add
a Solid Colour layer.
Create a Solid Colour layer via the Adjustment Layers
Step 5
Choose a colour that you think will suit the sky for your picture. It doesn't matter if it looks really bright, because that will be adjusted in a minute. Once you’ve chosen the colour, hit OK and you’ll see it outputs to a mask.
Select an appropriate colour for your layer
Step 6
Change the Blend Mode to Overlay and the colour will look
much better. If it’s still not quite right, double click the blue square next
to the mask and drag your picker about until you find a better colour.
Change the Blend Mode to Overlay
Step 7
Once you’re happy, you can tidy up any missed or sloppy bits
using a soft black/white brush on your mask.
Tidy up sloppy areas using a soft brush on your mask
3. Choose Areas of Similar Colours
Step 1
Repeat the selection process detailed in the previous steps, this time with the carrot tops and melon. Leave out the cucumber for now so that everything isn’t the exact same shade of green. This time I changed Smooth to 2 px when refining the edges, but again, do what works best for you.
Refine Edge on the carrot tops
Step 2
Create a new Solid Colour layer with your selection again as
you did before, and choose a shade of green. At the moment, leave the Opacity of each colour at 100%. These can be adjusted later when all the colours are finished.
Create a Solid Colour layer and choose a shade of green
Step 3
Change the blending mode to Overlay and then adjust your colouring to suit. Do the same for the cucumber but use a different shade of green. Once the veggies are finished, move on to the skin tones.
Change the Blending Mode to OverlayOur progress so far
4. Skin Tones and Eyes
Step 1
Do the man and woman separately as it’s
unlikely they’d have the exact same skin colour; he’d probably be a little more
weather-beaten!
Select the skin and refine your edges as before. Then when
you’ve hit OK, press Q to get the Quick Mask selection up and then use the brush to colour out his eyes and any other areas that you won’t want to be skin-coloured. Press Q again and you’ll see that the parts you coloured red are now taken out of your selection.
Use Quick Mask to select any fiddly bits that you don't want to include in the selection
Step 2
When you’re choosing your skin tones, try a few to see which
look best but remember that as the blend mode will be Overlay, the colours aren’t
really ‘true’. So go for very muted pink/browns rather than peach colours, or
you’ll end up with orange glowing skin!
Opt for dull pinks and light browns rather than peach colours
Step 3
For the eyes, create a Solid Colour layer without any selection and choose a colour. Click on the mask and hit Control-I to invert the selection. Now paint over the eyes as with the other layers. As you can’t really see his eyes from behind the glasses, I dropped the Opacity to 40% so as to just give a hint of colour.
If you colour a photo where you can really see the eyes, remember to only colour the irises.
Create a solid colour layer with no pre-selectionSkin tones finished
5. Lips and Hair
Step 1
When you’ve finished the skin and eyes, you can add a little light and shade by making the lips a slightly different colour. Choose a red/brown colour and use a low opacity brush to add some colour.
Choose a slightly different shade to the skin when colouring lips
Step 2
For hair, try to look at the shading in the photo to get the nearest match, even though it’s sepia or black and white. I chose a dark colour for the man and lowered the Opacity to 90% to fade the colour out a little as he’s obviously an older man. The woman doesn’t look as if she has dyed hair, so I went with a dark grey.
Choose natural-looking hair colours and think about age when deciding on a colour
6. Finishing Touches
Finish up by choosing colours for the clothes, and then once you have your colours set you can start to tweak the opacityof the other layers and get them looking more natural.
Remember, less is more, and if you’re going for an ‘authentic’ look then be realistic about colours that would have been worn at the time and reduce the saturation to keep the ‘old photo’ look. If you just want to be wacky with colours, then forget what I just said and go for it!
Everything is coloured but looks a little too harsh
Awesome Work, You're Done!
When choosing your own photo to colourise, keep in mind that the more detailed it is, the more time-consuming and difficult it will be to colour. Try to pick images with large sections of the same colour first, and move on to more complex photos as the method becomes easier for you. This is a really fun process to do, so have fun with it and I'd love to see your colourised photos.
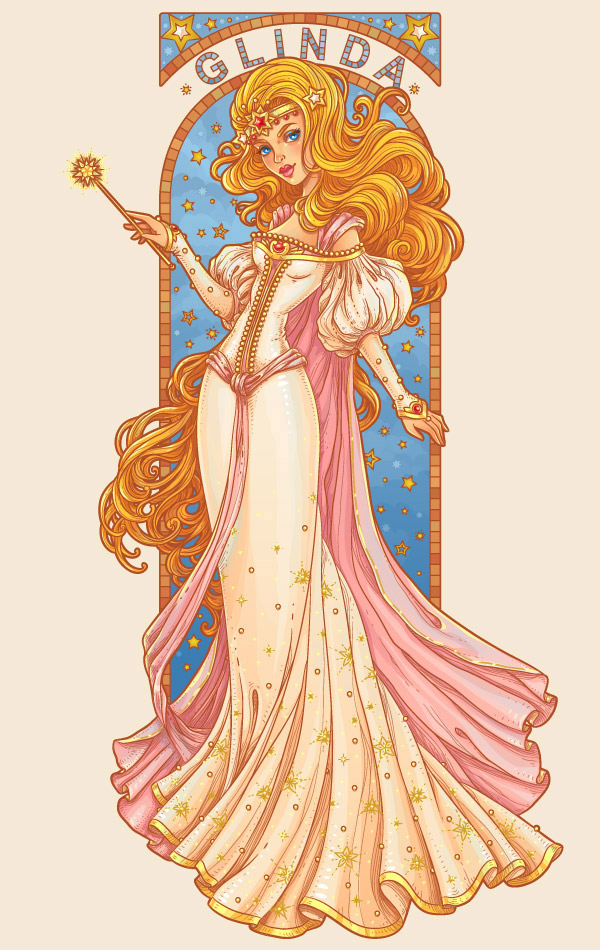
In this tutorial you'll learn to create a character from children's novel “The Wonderful Wizard of Oz”—the Good Witch of the South.
1. Make a
Sketch
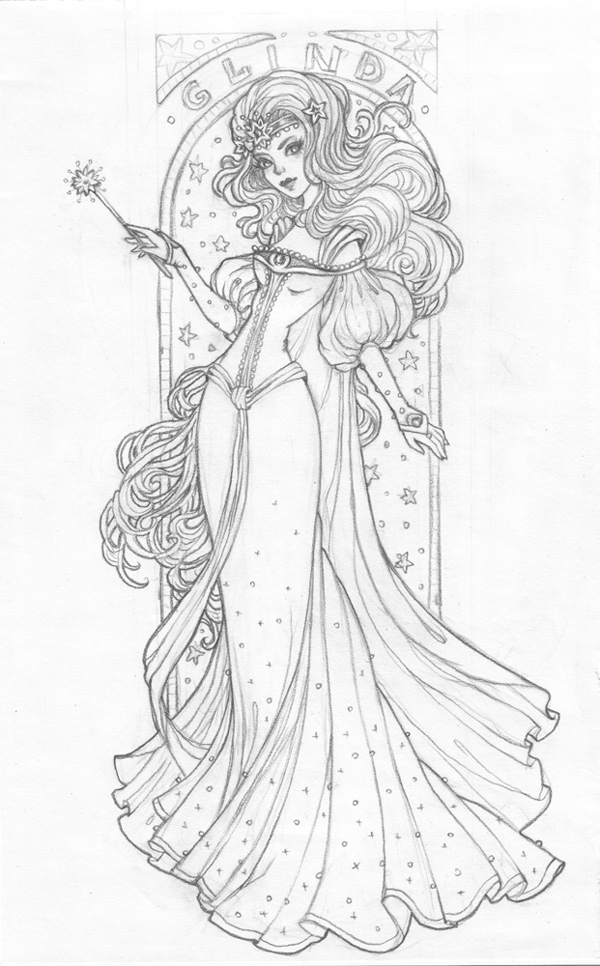
Step 1
At the beginning, let's draw a sketch. I was inspired
by artists who created in Art Nouveau style. To draw a sketch we need to use
recognizable features of our character. In the books, Glinda is the most
powerful sorceress of Oz. She is a beautiful young woman with long, wavy hair and big, blue eyes. She wears a beautiful ball dress with a plume behind her, a golden
crown with stars upon her head, and carries a magic wand that helps her cast
only good spells to protect Oz.
Step 2
Create aNew document, 600 x 950 px, RGB.
Then File > Place your sketch in
Adobe Illustrator. Change the
layer name to
"sketch". In the Layer Options
choose Template and change Dim Images to 50%.
2. Create a Brush and Draw the Contour of the
Character
Step 1
Create a New Layer for the lines. We'll
draw all lines in this layer, because all detail colors will be the same.
Step 2
Now let's create a
brush. Make a black ellipse with the Ellipse Tool (L) with 100% fill (Ellipse Options: Width: 100 px; Height: 3 px). Drag this shape to
the Brushes panel and go to New Brush > New Art Brush.
Then press OK,
and the window Art Brush Options will appear. Choose the Tints method.
Step 3
Let's draw the contour of our character. Choose the Paintbrush Tool (B), and make the trial line. In our case, we’ll see that the
line is too thick. Change its Weight
to 0.35 pt on the Stroke panel.
Step 4
The most convenient method is to start drawing the contour of the face. Draw
lines as smoothly as you like, following the sketch. Cut unnecessary pieces using the Scissors Tool (C), select the segment and press Delete.
Step 5
Next draw the hairstyle, making just the main lines. Later we'll add details
made of very thin lines.
Step 6
Let's create a brush
“string of beads” for the dress decoration. Use the ellipse from the diadem. Drag
it to the Brushes panel and create aNew Pattern Brush as shown below.
Step 7
Choose the brush and draw lines to decorate the bodice of the dress.
Step 8
Draw the entire
character using our first art brush. It's easier to make some of the long lines
on the dress folds using the Pen Tool
(P); otherwise use the Paintbrush
Tool (B).
Step 9
On the new layer draw
some stars for the skirt decoration. Select each of them and press Control-G.
Step 10
Duplicate these stars, pressing Alt,
and place them on the skirt randomly as you like. Delete unnecessary details on the creases using the Eraser Tool (Shift-E),diameter:
4-5 pt.
Step 11
Make the "lines" and "dress stars" layers invisible.
Now create a New Layer under
"lines", and here we'll draw the background lines.
Let's begin to create the archway by making a rectangle 280 x 580 px. Use the basic brush for
the lines, weight 1 pt. Select this rectangle and go Effect > Warp > Arc Upper.
On the Warp Options panel change theBend to 100%, and press OK.
Create the inner part of the archway this way, using a
rectangle 260 x 580 px.
Make a rectangle 280 x 74 px for the upper decorative arch and apply the options shown below.
Step 12
Now let's create a Pattern Brush for the arch mosaic. Draw a vertical line 10 px long and change the brush options as shown in the screenshot.
Draw the line exactly in the middle of the two arch lines and apply our
mosaic brush.
Step 13
Create a New Layer for the text. I chose Arial Bold font, because its letters
are convenient and simple for the mosaic pattern.
Type the word “GLINDA” on the circular arc using the Type Tool (T), and change the font size to
42 pt. Then press the right mouse button and choose Create Outlines. Change the Fill
to the Stroke.
Step 14
Now create a Pattern
Brush for the letters the same way as the previous brush was made for the
mosaic. Here use a vertical line 5.5 px long.
Draw the line in the middle of the letter shape and apply the brush we
have just created. Fill the empty spaces up using short, straight lines.
Step 15
Well, it's time to draw the stars for the background
decoration. Create a star using theStar Tool on a New Layer, choosing the size 4 x 8 px, 5 points. Cut the five internal points of the
star using the Scissors Tool (C).
Then create some additional stars using the first one.
Place some stars on the internal part of archway, changing their size
and angle of rotation as you wish. Add some circles for diversity in the
end.
Step 16
Now let's return to our character. Make the layers
"lines" and "dress stars" visible, but all the others,
including "sketch", invisible.
Create a New Layer over the
"lines"; here we'll draw thin lines. Choose our art brush and change
its Weight to 0.15 pt on the Stroke panel. We have to draw the lines
where the creases and the shadows are.
Step 17
Here is how the
character looks now.
3. Create the Main Shapes
Step 1
First let's color the contour of the character. Select all
lines and go to Object > Expand Appearance,
filling them with brown color. Select the thin strokes separately and change the Opacity to 70%. Fill the stars with gold color.
Fill the background lines with brown too.
Step 2
Now we need to create the swatch of the main colors.
In the books, Glinda is a redhead beauty, her dresses are white or pink, her
eye color is blue and the diadem is gold with red diamonds. Choose sky blue and brick colors for the archway.
Step 3
Now it's time to begin painting. Choose the colors
from your swatch. Use the Pen Tool (P) for convenience. Start drawing the main shape following the brush contour. If
required, use the Pathfinder panel to Unite shapes or Minus Front.
For a convenient work process, we'll create separate
layers for each part of the character and the background. Organize the layers as
shown in the screenshot below.
Step 4
Here's what we've got at this stage.
Step 5
It's time to make the outer contour of the character a
bit thicker. Create a New Layer.
Select all the layers with lines and main shapes of our character and copy them
by pressing Control-C. Then go to
the “outer contour” layer and press Control-F.
Now we'll go to the Pathfinder panel and press Unite.
Change the Fill
to the Stroke.On the Stroke panel
choose Align Stroke to Outside.
I noticed that the outer contour on the magic wand is unnecessary.
Delete the excess points using the Delete
Anchor Point Tool (-).
Step 6
Make the outer contour of the archway thicker following
this method. Select the arch shapes, and apply Expand Appearance. Change the Fill
to the Stroke and choose Align Stroke to Outside.
The main part of the drawing is done. Here is how the image
looks now.
4. Add Shadows and Highlights to the Character
Step 1
Let's add some volume to the face. First change the color of the lines of the eyes to make them more expressive. Delete the outline from the
white round shapes.
Then add some linear
gradients from the main skin color to peach color on the face.
Add the same gradients
on the chest and hands.
Step 2
Add some blushes to the nose and cheeks. Create a
radial gradient, reducing the Opacity to 0% on the outer slider. Then select all
blush shapes and change the Opacity
to 20%.
Step 3
Add some shadows to the face. Chose the brick color,
and reduce the Opacity to 5%. Draw the shapes one on the top of
the other using Pencil Tool (N) until
you get the desired result.
Step 4
Let's choose the color for the falling shades. Select the contour color using the Eyedropper Tool (I), reduce the Opacity to 50%, and draw some shadows under the eyes, lips, diadem and hair.
Step 5
Next let's add some highlights. Choose the
bright-yellow color and draw some highlight shapes on the places where light of
the magic wand has fallen.
Add
shades from the background. Select the blue color, change Opacity to 5% and draw
some shapes on the lighter part of the face.
Step 6
Now we'll get to work
on the eyes and lips. Draw the eye shadows using a blue color with 30% Opacity. Add some falling shades under
the eyelashes, and some bright twinkles.
Go to the layer with
lines, select the upper eye line, and fill it with the linear
gradient from
brown to dark-brown, and the bottom line from light-brown to brown.
Also change the color
of the lines of the lips. The upper part of the lips is shaded, so make it darker.
Make volume by drawing a shadow between the lips and adding some highlights to
the bottom part.
Add bright highlight to the eyebrows.
Step 7
Draw the same shadows and highlights on the hands and chest as
described above.
Step 8
Let's start coloring the hairstyle. Select the upper
part of the hair and fill it with linear gradient from yellow to orange, and the
back part of the hair from orange to brown.
Draw the shapes of the shadows, and then select them and press Unite
on the Pathfinder panel. Fill this
shape with vertical linear gradient from orange to brown, reducing the Opacity to 75%.
Next draw shapes for
the dark shadows, unite them and fill with a darker gradient.
Now draw the
highlights using the same steps. Fill the shape with the gradient
from light yellow to yellow, 80% Opacity.
In the end, add some blue shapes and gloss to the lightest area of the hair.
Use the same principles to draw the back part of the
hairstyle.
Step 9
It's
time to add highlights and shadows to the dress. First color it with vertical
linear gradient from ivory to cream. Apply the same gradient on the sleeves and
gloves.
Step 10
Now draw the shapes of the shadows, unite them and fill with gradient from
cream to peach, as you can see below.
Apply these
principles to draw dark shades and highlights, using darker or lighter
gradients respectively. Play around with the Opacity where possible.
Then add some blue shapes and white gloss to the lightest area of the dress.
Step 11
Now we'll draw the shawl and belt. They are of the
same color, so we'll draw them both at the same time, switching between layers.
First color them with the gradient from light pink to pink.
Next use appropriate gradients to draw shadows, fallen shades and highlights.
Don't forget about the blue shades and gloss.
Step 12
It's time to add highlights and shadows to the golden
details. We'll draw on the “decoration” layer.
Let's start from the diadem. Choose an orange color
for the shadows and bright yellow for the highlights. Add some blue shapes and
gloss. Then choose wine and peach colors for the red diamonds. For the white
stars apply the colors of the dress shadows.
Now we'll make volume on the beads as shown below. Select each of them and press Control-G. Place them on the proper
part of the diadem. Draw some shadows under the golden beads.
Step 13
We'll add some volume to the dress's decorative elements
and magic wand following this method.
Step 14
It's time for the final touch. Let's
add some gloss to the stars on the dress and draw the decorative line on the
shawl using our art brush.
Step 15
Finally our character is ready!
5. Add Shadows and Highlights to the Background
Step 1
First let's fill the blue archway with linear gradient
from dark to light color.
Step 2
Let's create some clouds. Draw random shapes, unite and
fill them with gradient as shown in the screenshot, reducing the Opacity to 50%.
Repeat this process a couple of times. Reduce the Opacity to 30% and 15% on the next two groups of shapes to
make these clouds airy.
Step 3
Select all stars on the background and fill them with
gold radial gradient.
Create little blue
stars to fill up the empty spaces of the arch. Draw the star made of two parts: a main shape with Opacity 100% and a dark-blue shape behind with Opacity 20%.
Then select both shapes and press Control-G.
Change their size and opacity, duplicate them, and move them as you
wish. Reduce the opacity of the bottom stars. The lower the
star, the less opacity it has.
Step 4
Let's decorate the upper part of arch with blue stars and add some volume to the gold stars.
Step 5
Now we'll make the mosaic more variegated. Create some
rectangles 10 x
10 px and fill them with darker and lighter tints than the main color.
Then place them on the cells randomly.
Color the mosaic on the letters the same way.
Wow! We're Finished!
We did a great job, and I hope you liked the process. Enjoy
and share your result!
Represent the Lollipop Guild and the Lullaby League with this cute illustration tutorial. We'll work together with a sketch, build up solid shapes, create line art, render our illustration, and create a simple background worthy of Oz itself. Journey over the rainbow for this super-cute chibi-style tutorial!
1. Start at the Top
Step 1
Let's start with the provided sketch, which you can download at the link to the right. I've opened it up in Adobe Illustrator CC and placed it on its own layer. It'll be used as a guideline for the rest of this tutorial. Alternatively, you can design your own characters and follow along with the techniques and steps outlined below to create a different, personalized design.
Step 2
Let's start with the Lullaby League girl's head!
On a New Layer, use the Ellipse Tool (L) to draw a circle in the skin tone of your choice.
Use the Direct Selection Tool (A) to pull down the bottom anchor point to form the chin.
Add two new anchor points in the lower half of the ellipse to form the jaw.
Adjust the handles of the anchor points as you see fit to give your character's head a cute but recognizable shape, as seen below.
Step 3
Let's draw some quick and easy ears and create outlines for the ears and head.
Draw an ellipse, as you did with the head.
Pull the bottom anchor point downward, more than was done with the head. Copy (Control-C) and Paste (Control-V) the ear.
Rotate (R) the ellipse to the left for the left ear and to the right for the right ear. Place each ear behind the head shape in the Layers panel.
For the outlines, either add dark brown strokes to each shape or Copy and Paste each shape and Align their corresponding object above them in the Layers panel.
Step 4
Let's focus a bit on the arms. Use the Pen Tool (P) or the Pencil Tool (N) (whichever you're more comfortable using) and trace each arm.
Since this character's arms are outstretched, I drew from the shoulder to the wrist as one shape.
The second shape, drawn with the Pencil Tool, was the hand. It's up to you whether your character has four fingers or five.
Copy, Paste, and Reflect the left arm to create the right arm. Group (Control-G) each arm's components together.
2. Draw the Dress
Step 1
I reduced the Opacity of the entire sketch layer in the Layers panel to about 40% or so. This makes it easier for me to trace my original sketch.
Using the Pencil Tool with Smoothing set to the middle or so, trace the ruffled collar of the dress.
Complete the shape, set the fill color to pink, and place it beneath the head but above the arms.
Step 2
I took the other dress parts in steps, all traced from the original sketch.
As we did above, the collar is below the head but above the arms.
The bodice of the dress is under the collar, but above the arms.
The top skirt is above the bodice but below the collar.
The bottom skirt is beneath the top skirt.
We'll better define these dress components in the next few steps.
Step 3
The ruffled side bits should be broken down into sections: top portions and undersides.
I drew a dark-pink shape and placed it beneath the skirt (as seen in the sketch itself). Starting with the top part of the side ruffle, I drew a shape that stopped at the first fold.
Repeat this process of drawing each shape up to where it stops at the fold, and use dark pink to indicate parts of the folded fabric that go beneath each ruffle.
Step 4
If you'd rather have a more symmetrical dress, you can do the following:
I deleted the right half of the skirt. You can do so by deleting nodes or placing another shape over each skirt component and hitting Minus Front in the Pathfinder panel. Group the left side together (do not include the collar and bodice).
Copy, Paste, and Reflect the group horizontally to create the right side. Align the group to the top edge of the left side.
Group together your dress parts for now and we'll get on to the legs.
3. Draw the Legs and Shoes
Step 1
Like many of the other components, trace the leg with the Pen Tool.
I did so in full and will draw the ballet shoe on top of it.
Step 2
For the shoe, I drew a large shape over the foot with the Pencil Tool.
I then selected the part of the pink blob that didn't intersect with the leg object with the Shape Builder Tool(Shift-M) and deleted it.
The ribbons of the ballet shoe were drawn with the Blob Brush Tool (Shift-B). You can draw them with whatever drawing tool you prefer, of course.
Group together all of your leg components.
Step 3
Copy, Paste, and Reflect the leg we drew in the previous step. Place it behind the first and place both legs beneath the dress components. I gave the arm group an outline as well by Uniting each arm's components and then Copying and Pasting the arms to create the outlines.
Step 4
The hair and the hat are more of the same: trace components of the design (hide the head so you can see the hair more easily and repeat with the hat).
For the hair, I decided to take it in sections: seven of them in total.
Each shape has a corresponding outline shape as well. I layered my objects in the following manner: outline, corresponding shape, next outline, next corresponding shape, etc.
Group together your hair components.
Step 5
Let's take a look at the full body design and each of its sections. I Grouped together each of these seven sections, which are made up of the following components:
The hat is made up of three pieces: brim, hat, and ruffle at the top.
The hair is made up of seven pieces which we created in the previous step.
The head is made up of two ears and one head.
The arms are just the two arms.
The top of the dress is made up of the collar, and the bodice and top of the skirt have been United in the Pathfinder panel.
The bottom section of the skirt is comprised of two pink objects and six dark-pink sections.
And finally, the legs are two legs and four shoe components (each leg's ribbons were United in the Pathfinder panel).
Each section is layered in the order seen above within the Layers panel.
4. Detail the Head
Step 1
Since I'm using a pressure-sensitive graphic tablet, I'm prone to creating line art with the Blob Brush Tool. My settings for the tool are seen below: Smooth with Pressure Enabled at 6 pt in size.
You are welcome to use the drawing tool of your choice and either trace the line art from the sketch, or create thick and thin lines with stroked paths and the Width Tool.
Step 2
I locked my body components layer for now and am working on a New Layer for line art. As we complete each section, I'll Group the line work together, place it within the main art layer we worked in previously, and then go back to the line art layer.
I placed the sketch layer above my body layer and set the Blending Mode to Multiply for the whole layer in the Transparency panel. Make sure the only unlocked layer is the line art layer while you work on creating line art.
You can see my layer order in the panel below.
Step 3
In the line art layer, begin to either trace the curls of the hair or draw your own.
Thicker lines belong on the outside of the hair and to define each hair section.
Work through each section one at a time.
I followed the contour of the bumpy curl shapes I created previously to add thin lines within the hair.
Group together all of your hair line art. Unlock the body layer and place the hair line art above the hair group.
Step 4
Let's take a look at my line art process in action. Working on the hat in the line art layer, I started with the thicker outline and then drew thin, curved lines in order to show how ruffled the brim of the hat is. Once again, Group together your hat line art and place the group above the hat group in the body layer.
Step 5
I kept the hat and hair visible in the body layer while I worked on the face. I outlined the head and ears again, giving the ears a bit more detail, and then set to work on the face itself, starting with the right eye.
Step 6
I filled in the eyes and drew some thick top lashes.
The mouth is a giant, open smile.
I drew the tongue with the Pencil Tool, allowing it to be a simply blob shape.
The teeth and the brown in the eyes were drawn on top of the other shapes, tracing the sketch layer with the Pen Tool and filling them in with their corresponding colors (white and brown respectively).
The nose is a single dot, and the eye's highlights are white hearts and circles. Group everything together and place it below the hair but above the head in the Layers panel.
5. Detail the Body
Step 1
Starting with the collar of the dress, I drew the bow in four pieces (two for the bow and two for the tails) and United them.
Then, I outlined the bow, drew a couple details on it, and drew lines for pleats in the collar.
Place the bow components over the collar pleats. The pleats will go above the collar in the Layers panel, and the bow will go below the head.
Step 2
Working on the top of the dress, we want to define the folds and pleats in the dress itself.
The collar was very, very pleated. The folds extend from top to bottom within the shape.
The dress pleats are a bit different. Some start at the waist and head all the way down to the bottom of the skirt.
Others start at the bottom of the skirt and stop around the center of the skirt itself.
Vary the pleat styles for each section of the skirt, Group together your line art, and place it above the skirt group but below the collar group in the Layers panel.
Step 3
For the bottom of the skirt, consider the sections defined in the sketch:
Some folds fold over cleanly.
Other folds in the skirt show their underside. These were defined with dark pink shapes.
Each section has two or three fold lines in them. Place this group of line work below the first skirt group but above the second.
Step 4
The ribbons on the shoes are folded and wrapped around the legs. Some of the lines on the ribbons travel across them entirely, while others stop in the middle.
The shoe itself just needs a line to separate it from the leg and another to show the seam at the opening.
Step 5
Let's take a look at my completed line art. I added a couple of details to each arm as well as defining the toe edge of the ballet shoes. Each line art group sits above its corresponding body section in the Layers section.
6. Render With Gradients
Step 1
Let's take a look at the general styles of gradients I'll be using to render the lullaby character.
All of the gradients go from 100% to 0% Opacity.
For shadows, gradients are Linear with Blending Modes set to Multiply. Colors are a darker hue than the one they're overlapping.
Blush is a Radial gradient also set to Multiply. Since it's blush, its color is pink.
Highlight shapes are either Radial or Linear, depending on what works best (on the face I chose radial gradients for highlights and on clothes I used mostly Linear gradients) with the Blending Mode set to Screen.
I also played with the Opacity of the shapes themselves, depending on how dark or light I wanted a shape to be.
Step 2
Like the line art, each gradient section is worked on in its own layer and then placed within the main body layer, beneath the line art but above the body shapes.
For the face, I drew—with the Pen Tool and Pencil Tool, depending on the control I wanted to have—shadow shapes to help define the cast shadow from the hair. These shapes follow the contour of the hair itself.
I drew ovals for the blush under the eyes, on the cheeks. There is a small ellipse below the nose with a shadow gradient (tan to light tan) and there are highlight shapes drawn on top of the nose and chin (Radial gradients set to Screen).
Step 3
I drew shadows on each hair section, defining cast shadows from each overlapping section as well as some of the curls in the hair. The gradients are Linear and go from dark yellow to the yellow of the hair itself. Group together shadow components.
The highlights were drawn on each curl with Radial gradients set to Screen. You can either use light yellow or the same yellow used for the hair. Group together your highlight shapes.
Place both groups above the hair but below the hair's line art in the Layers panel.
Step 4
The shadows on the body and clothes are fairly simple: they define cast shadows (like those on the arms) and folds (like those on the dress).
Work through each section creating groups of shadows and groups of highlights. Body shadows and highlights are hues of tan and peach (for my design) and the dress has various hues of pink. Take note of the direction of each gradient shape below. Use the Gradient Tool (G) to adjust your gradients' angles and radii, depending on the style of gradient you've created.
Step 5
Let's take a look at my gradient groups without the character's body.
The hair shows how the shadow shapes follow the contour of each hair section as well as some additional curls. The highlights show up as yellow versus light yellow when on white, so you can easily see them. Note how they stretch across the larger portions of each curl.
The face has shadow shapes behind the eyes, under the hair, on the ears, beneath the nose, and beneath the mouth. Blush appears on both cheeks and highlights appear on the nose and chin.
The top of the dress has shadow shapes that define the folds and pleats in the skirt as well as the cast shadow from the collar. Darker colors are closer to folds and objects that overlap. Highlights will be placed in the centers of folds to show the different in levels within the fabric.
Step 6
There isn't a ton of rendering to be done on this design. I added both shadows and highlights to the hat, showing how ruffly the top and brim are, as well as the curving shape of the hat itself. Layering transparent gradients is a great way to render an item quickly within an illustration.
The lower skirt shapes have more shadows on them since they're beneath the rest of the dress. Additionally, the legs have cast shadows from the dress and the shoes have stronger highlights than the other items, since ballet shoes tend to be made of satin.
Group together each of your gradient sections and place them above their body components and below their line art groups within the Layers panel.
7. Draw the Lollipop Guild Boy
Step 1
This process is a bit quicker, since we've done it previously. I'll be speeding up the tutorial, making note of alternate techniques, in order to complete the second character in fewer steps.
Copy and Paste the head from the Lullaby League girl.
Using the Direct Selection Tool, adjust the anchors and anchor handles to fit the head shape of the second character.
Alternatively, you can redraw the head, but I find it easiest to move the jaw and side of the head for a 3/4 view.
Step 2
The arms of this character benefit from being done in three pieces versus just two.
Firstly there are the hands drawn to the elbow. You can either draw them in one go or draw each hand and then the forearm, Uniting them in the Pathfinder panel after.
Give each section an outline (either adding a dark brown stroke to the objects or Copying and Pasting the objects and placing the stroked paths above the original object).
Step 3
Not every part of the arms shows in this design. Part of the character's right arm is covered by the giant lollipop stick and most of the body is covered by clothes.
I drew the shirt sleeves and shirt's body as three separate components with the Pen Tool and then United them.
The collar is comprised of two shapes, and the buttons are two circles as well. The shorts are a separate shape all their own too.
For this character, I opted to create the initial outlines by simply adding a stroke to the filled object in the Stroke panel with Caps and Corners set to Rounded.
Step 4
Like the character before this one, the body is broken down into a variety of sections:
Hair
Head
Lollipop Stick
Arms
Shirt
Shorts
Legs
To make sure the hand overlapped the lollipop stick, an additional hand shape was drawn over the stick, matching the first that is set in the group well below it.
8. Draw the Lollipop Guild Line Art
Step 1
Let's start up with the hair. Once again, you can follow along with the curls drawn in the sketch, or create your own. There are fewer sections (only three), so there's less to create this time around.
The hair curls up in the center and at the sides. Note the shorter lines drawn on the large section to the right, which shows the structure of the hair.
Step 2
The face is fairly simple as well. I'm using the Blob Brush Tool to draw all of these details, but you can use whatever drawing tool serves you best.
The eyes are kidney-like shapes with large half circles in the upper right corners.
The eyebrows are large check-mark shapes, and the mouth is a silly curve.
The blush is a pink scribble beneath the eyes.
Group together all of your face components and place them above the head in the Layers panel.
Step 3
Let's check out some of the clothing details:
The shirt has a couple lines drawn on the collar, details on the buttons, and some curves in the scallops of the shirt. You are welcome to draw the shirt's pattern and place it below the line art or keep your shirt a solid color.
The pants and socks have stitch-like details added to the right sides of each.
Step 4
Here's a quick shot of most of the line art isolated. I found it easiest to complete it all in one go and group it together so that when I created my gradient shapes they would go beneath the line art. You can use whichever technique for creating and ordering your line art within your Layers panel you like best.
Step 5
Here's a shot of the completed line art and completed body design with the sketch layer hidden. As you can see, I've added more details to the lollipop itself, including some sparkly stars, and some additional details on the shoes. From here, we're ready for this character's brief gradient section.
9. Render the Lollipop Guild Boy
Step 1
Focusing on the face first, I want to make sure the bald portion of the head is shiny with a highlight shape, and the hair is still casting a shadow on the right side of the face. The cheeks, nose, and chin are highlighted as well. Group your shadow and highlights from the face together and place them beneath the hair group and above the head group.
Step 2
Looking at the hair, notice how the highlights keep the hair looking shiny, as though this character smoothed it down and sculpted the curls with pomade. The shadows create depth between each section that's been defined by the line art.
Step 3
For the body, the shadows aren't as strong as the fold-filled dress worn by the Lullaby League girl.
Focus on the cast shadows from the head, collar, lollipop, and each section of clothing.
Emphasize the edges of the clothing, which is rougher in style than that of the ballerina, with shadow gradient shapes (note the sleeves).
The shadows and highlights on the shorts are brighter than the shirt. They're also grouped together and placed below the shirt components in the Layers panel.
The highlights on the shirt are mainly on the shoulder and chest portion of the shirt. If I placed a highlight on each scallop, it'd look more folded, which this design is not.
Continue with the shoes and legs, rendering it in the same manner as done with the character before this one.
10. Create the Background
Step 1
Each character is on its own locked layer. I've hidden the sketch layer and am working on a background layer beneath the two characters. Draw a large blue circle with the Ellipse Tool and four horizontal lines of varying lengths drawn with the Line Segment Tool (/).
Step 2
Draw several short, vertical lines between the horizontal ones to create bricks. Group the brick lines together and lock them in the Layers panel. Lock the blue background circle too.
Using the Pencil Tool or the Blob Brush Tool, draw a large, scribbly shape to create the base for the gold bricks.
Step 3
For sparkles, I used the Blob Brush Tool to draw circles, dots, and sparkle shapes in light yellow.
Next I layered some white sparkles above the light yellow ones.
Then, I used a medium yellow to complete the shiny, sparkling look of the bricks and Grouped all of these shapes together by selecting the entire section with the Selection Tool (V).
Place the sparkle group below the brick line art and unlock the other background components.
Step 4
To create a quick rainbow, draw six identical rectangles and set their colors to some version of a rainbow. Group the rectangles together and go to Effect > Warp > Arc with the following attributes:
Horizontal
Bend: 86%
Under Object, hit Expand Appearance.
Step 5
Rotate the rainbow and place it in the background of your design. I've hidden the characters for now so you can easily see my rainbow's placement.
Step 6
With your preferred drawing tool, draw a couple of white clouds on either side of your design.
Step 7
Draw circles, blobs, or half circles to create a series of green hills behind your characters. Add some little brown 'v's to create birds flying in the distance.
Step 8
Group together the blue circle, rainbow, birds, clouds, and hills. Copy and Paste the circle from the group and place it over the background group. Select both and Create a Clipping Mask (Control-7). Place the clipping group beneath the brick road components in the background layer.
Share Your Completed Design
Add some finishing touches of background line art and sparkles, or even go further and render your background with gradient shapes. Share your result from this tutorial or an illustration using the techniques of this tutorial in the comment section below!
"It's always best to start at the beginning—and all you do is follow the Yellow Brick Road." This tutorial will show you how to use a brick texture, a simple brush, and a couple of layer styles to create a Yellow Brick Road inspired text effect. Let's get started!
Tutorial Assets
The following assets were used during the production of this tutorial.
Create a new 1000 x 700 px document, and create the text in All Caps using the font SansBlack, the Size 230 px, and the Color#f1cc4c.
Set the Leading to 200, and the Kerning to Optical.
Step 2
Duplicate the text layer, change the copy's Fill value to 0, and then duplicate it.
2. Define the Patterns
Step 1
Open the BrickLargePainted0050 image, go to Image > Image Size, and change the dimensions to 350 x 350 px.
Step 2
Go to Edit > Define Pattern, and click OK.
Step 3
Open the Grass0035 image, resize it to 320 x 320px, and define the resized image as a pattern as well.
3. Style the Original Text Layer
Double click the original text layer to apply the following layer style:
Step 1
Add a Bevel and Emboss with these settings:
Size: 1
Highlight Mode: Soft Light
Opacity: 50%
Shadow Mode - Opacity: 10%
Step 2
Use the default Contour settings.
Step 3
Add a Texture with these settings:
Pattern: BrickLargePainted0050
Depth: 280%
Step 4
Add a Pattern Overlay with these settings:
Blend Mode: Color Burn
Pattern: BrickLargePainted0050
This will style the main text layer, adding a subtle texture.
4. Style the First Copy Text Layer
Double click the first copy text layer to apply the following layer style:
Step 1
Add a Bevel and Emboss with these settings:
Style: Chisel Hard
Check the Anti-aliased box
Highlight Mode: Soft Light
Opacity: 50%
Shadow Mode - Opacity: 45%
Step 2
Add a Contour with these settings:
Check the Anti-aliased box.
Step 3
Add a Texture with these settings:
Pattern: BrickLargePainted0050
Scale: 50%
Depth: 200%
This will add some more texturing and details to the text.
5. Style the Second Copy Text Layer
Double click the second copy text layer to apply the following layer style:
Step 1
Add a Bevel and Emboss with these settings:
Size: 100
Uncheck the Use Global Light box
Angle: 18
Altitude: 58
Check the Anti-aliased box
Highlight Mode - Opacity: 35%
Shadow Mode - Opacity: 27%
Step 2
Add a Contour with these settings:
Check the Anti-aliased box.
Step 3
Add a Texture with these settings:
Pattern: BrickLargePainted0050
Scale: 50%
Depth: 45%
Check the Invert box
This will add more coloring and detailing to the text.
6. Add the Grunge Texture
Step 1
Place the Grunge Texture 27 image on top of all text layers, and change its layer's Blend Mode to Color Burn.
Step 2
Click the Create new fill or adjustment layer icon at the bottom of the Layers panel and choose Levels.
Step 3
Click the Clip to layer icon, and change the Gamma value to 2.24.
7. Add the Grass Texture
Step 1
Create a new layer on top of all layers and call it Grass.
Pick the Paint Bucket Tool, and in the Options bar, choose the Pattern fill type, and use the Grass0035 pattern to fill the Grass layer.
Step 2
Add a Levels adjustment layer, click the Clip to layer icon, and change the Gamma value to 0.50.
Step 3
Command-click any text layer's thumbnail to create a selection, and go to Select > Inverse.
Step 4
With the Grass layer selected, click the Add vector mask icon at the bottom of the Layers panel.
8. Erase the Edges
Step 1
Right click any text layer and choose Create Work Path, and then click the Grass layer's mask thumbnail.
Step 2
Pick the Eraser Tool and choose the Edges brush tip, set the Foreground color to Black, and hit the Return key to stroke the edges with the brush tip.
An alternative way would be to pick the Direct Selection Tool, right click the work path, choose Stroke Path, and then choose Eraser from the Tool drop-down menu and click OK.
With the Direct Selection Tool selected, hit the Return key to get rid of the work path.
9. Add the Grass Shadow
Double click the Grass layer to add a Drop Shadow effect using the following settings:
Blend Mode: Linear Burn
Opacity: 15%
Uncheck the Use Global Light box
Angle: 60
Distance: 8
Spread: 5
Size: 1
This will add a subtle shadow to the grass layer.
10. Adjust the Coloring of the Final Result
Step 1
Click the Create new fill or adjustment layer icon and choose Gradient.
Use the Gradient shown below, change the Angle to a value around 26, and check the Dither box.
After that, change the Gradient layer's Blend Mode to Hard Light and its Opacity to 20%.
Step 2
Select all the layers you have, duplicate them, and go to Layer > Merge Layers.
Rename the merged layer to High Pass, and go to Filter > Convert for Smart Filters.
Step 3
Go to Filter > Other > High Pass, and change the Radius to 5.
Step 4
Change the High Pass layer's Blend Mode to Pin Light and its Opacity to 50%.
Step 5
Finally, add a Curves adjustment layer, and play around with the curve until you get a result you like.
You can adjust the Gradient, High Pass filter, and/or the Curves settings to get a final outcome you're happy with.
Congratulations! You're Done
In this tutorial, we created a couple of text layers, and used multiple layer styles to achieve the textured brick effect.
Then, we added the grass and used a work path with a simple grass brush to create the edges around the brick text.
Finally, we used a couple of adjustment layers and a filter to enhance the coloring and the look of the final result.
Please feel free to leave your comments, suggestions, and outcomes below.
Here's something I just cob-bled together. It was a-maize-ingly fun and I have a veritable corn-ucopia of Photoshop brush tricks to help you add texture to your illustrations. If you'll lend me your ear I'll show you how!
Here's our illustration. It looks pretty good, if I do say so myself, but a little flat.
In this tutorial I will take this guy from "Plain Grain" to "If I Only Had a Brain" in a few easy steps! We will be focusing on texturing his body with sack cloth, adding padding to the scarecrow and bird's nest with straw and adding a grain to the fence between Scarecrow's field and the Yellow Brick Road.
OK, enough with the corny jokes—let's get texturing!
Reference and Assets
The assets I will be using for this project are as follows:
Free Photoshop brushes from the wonderful Matt Heath (specifically MH 8B Shader 2)
Here's Scarecrow isolated from the rest of the illustration for clarity. Here are the areas we are going to be making lovely and rough.
Here's an example of the sack-cloth texture we wish to emulate. We won't be going this detailed, as the finer nuances wouldn't hold up at print size, plus it wouldn't fit in with the rest of the piece.
Step 2
Here we will start off with Scarecrow's abs in the "tummy" folder.
Step 3
Create a New Layer under the shadows layer (which I painted in earlier using a light blue on multiply) by pressing Control-Shift-N. Then right click it and set it to Clipping Mask.
Step 4
On this layer select a slightly lighter brown than the base and paint in horizontal lines which would follow the contours of the form.
Step 5
Next create a New Layer above that and draw in vertical contour lines. Note how I have curved them in to give the appearance of a belly button.
Step 6
Then select both these layers by holding Shift, and drag them onto the New Layer icon at the bottom of the Layers panel. This will create duplicates of these layers. Then in the Layer Blend Modes set the blending mode to Multiply on both the lower ones, and move them using the MoveTool (M).
Step 7
Next I will move on to the face texture. Here in the Head folder which I created earlier I have a really dark shadow layer, a blue shadow layer set to Multiply, an empty layer for our texture, and the base shape layer. The two shadow layers and the texture layer both clip to the base head shape. This enables us to paint loosely while still keeping clean edges.
Step 8
As before with the tummy, I draw horizontal contours round the face. Note how this now begins to look curved. I also drew contour lines around the ears for cuteness!
Step 9
Next I add in the vertical strokes.
Step 10
Carrying on the form design, keep doing contours on areas like the hands, neck and legs.
Step 11
Next, here's a wee trick for you. At the top of the Layers panel there's an icon that looks like a chess board next to the word Lock. With the crosshatched layers selected, press Control-E to merge them and click on the chess board. This will lock the transparency on that layer.
Now, using the MH 8B Shader 2 brush, paint in some light beige areas. I decided to give this scaredude a goatee so painted that in. This adds some cool dimension and depth.
... and here we have the scarecrow with his highlighted areas of sack cloth using the lock transparency method. He looks so rough and rugged! Next we pad out the nest with some straw and have some strands coming out of his sleeves, trousers and seams.
2. Straw Texture
Step 1
Here's the plan. We need some straw for this dude's stuffing, plus drawing texture is fun!
Here's some straw. To replicate this we will need:
tiny bits of straw
light, golden colours
strands
randomness
Thankfully this can be easily created with erratic brush strokes and a custom scatter brush! Let's start off with that scatter brush.
Step 2
Create a New Document by pressing Control-Shift-N. Set the Width and Height to 1000 px at 300 dpi.
Step 3
In that document, using black "paint", draw in some random dots and lines using the MH 8B Shader 2 brush.
Step 4
To create a brush in Photoshop go to Edit > Define Brush Preset and save the brush. Here's the brush straight out the box with no amendments.
Step 5
Under Brush Tip Shape in the Brush dialogue (F5 on the keyboard), tweak the spacing slider until the stroke resembles something like the second line.
Step 6
Under Shape Dynamics make sure that Size Jitter is set to Pen Pressure, Angle Jitter to around 11% and Pen Pressure, and Roundness Jitter is set to around 70% depending on preference. Then test out the brush again. It's starting to look good and bitty, but not quite right yet.
Step 7
Back in the Brush Tip Shape I change the Spacing of the brush so it's a little further apart. This looks good, so we save the brush by clicking on the square icon at the bottom of the Brush panel and call it something like straw_scatter.abr.
Step 8
OK, these birds don't look too comfortable, so let's add in some random straw lines using MH 8B Shader 2 in a fresh yellow hue in the Birds folder above the chicks.
Step 9
Add dots to imply seeds and lots of random lines moving out from the chicks.
Step 10
Add in smaller tufts of straw over the chicks layer.
Step 11
Now we get to use our Scatter Brush to imply loose straw. Using the same yellow colour as before, paint in random areas. Change the brush size quickly by pressing the [ and ] keys on your keyboard.
Step 12
For some more realism, add some loose parts under the hat layer using our scatter brush.
Step 13
Then by hand draw in some extra strands under the hat layer using Matt's MH 8B Shader. He's starting to look really rugged now!
Step 14
To make him look a little "burst", add straw coming from areas like the collar...
Step 15
... and the sleeve. Here I've added a few strands of straw to imply movement as the scarecrow waves. Use the scatter brush as much as you like, changing up the size using the [ ] keys on your keyboard.
Step 16
For fun I add in a light scatter of straw dust on the face for a straw beard.
Step 17
Then I select a dark brown and, using the scatter brush, I make the brush quite small and imply straw-like stubble. I add little areas all over the piece to give a carefree, loose feel.
3. Wood Texture
Now that our Scarecrow looks awesome, let's move on to his environment a little. The fence posts look a bit too plain.
As you can see from this reference image, wood has lots of different hues, a grain and some knots. Rather than draw in all the knots by hand, I will show you how I would create them using a scatter brush!
Step 1
Create a New Document by pressing Control-Shift-N, and set it to 2000 px by 2000 px at 300 dpi. We need this one to be slightly larger than the straw particles one, as they will be bigger on the final illustration.
Step 2
In our New Document, create a New Layer and, using the MH 8B Shader 2 Brush with black "paint" selected, draw in a couple of concentric circle sets to imply knots, plus a few dots and marks. Depending on your drawing style, these can be as detailed or as loose as you like. Here I've gone for loose. Then, once you are happy with your brush, go to Edit > Define Brush Preset and save your brush.
Step 3
In the Brush Presets (F5) change the Spacing to around 165%.
Step 4
In Shape Dynamics set the Size Jitter to Fade at 25%.
Step 5
Next, in Scattering, set Scatter to 1000% and to Pen Pressure and Count to around 3.
Step 6
Here I test out how the brush is looking, and it's pretty cool and random. I find it works better as a stamp than using a stroke to lay down the design. Again you can change the size of the brush dynamically by pressing the square brackets on your keyboard.
Step 7
Let's move on to applying the knots to the planks. Before this tutorial I had each plank set up with its own shadow layer set to clipping mask. Between each shadow/plank layer, create a New Layer and ensure it's set to Clipping Mask (right click on the layer and select Create Clipping Mask).
Step 8
In the Layer Blend Modes, set this layer to Multiply and colour-pick the brown of the plank by holding Alt and clicking on the plank. With our Knots brush selected, paint some knots over the plank. This might take a few tries. A quick way to go back a few steps is to press Control-Alt-Z.
Step 9
Once you've gone over all the planks in the same way, see how it looks. I felt the knots were too dark so I lowered the Layer Opacity to around 40%. To make the planks woodier, I draw in some grain which contours round the knots.
Step 10
Here's how all the planks look together. It's starting to look more wooden!
Step 11
On a New Layer above the wood, paint in some highlights by using a warm honey colour and the MH 8B Shader brush.
Step 12
Carry on over the piece adding thin, subtle highlights.
Step 13
Add fewer highlights in shadowed areas for a realistic appearance.
Step 14
To add a bit more depth I painted in some leaves from the overhanging shadows with a dark blue on a clipping layer set to multiply on the planks. This is looking pretty cool, and I'm feeling happy about it all.
Conclusion
Here we have our completed illustration! I have gone in and added some patches to his cheeks and grunge marks using Matt Heath's awesome brush on Multiply layers.
In this tutorial you have learned how to make brushes to create loose straw and knots, and learned how to use contours to show form in fabric.
You will be able to create your own textured illustrations in Photoshop—I'd love to see your results! If you would like to see any other textures covered in my tutorials, please leave a comment below.
Today’s tutorial is a little special since it’s a part of a larger series meant
to show some love for all of you Wizard of Oz fans out there. We’re going
to recreate a character from the story, and not just any character—we’re going
to have the honor of building Tin Man.
We
are going to be using some of Adobe Illustrator’s basic shapes combined with the Pen
Tool, but you shouldn’t worry, because the process is really straightforward. So if
you have some basic Illustrator knowledge, you should ace it!
OK, let’s jump into
Illustrator and start creating!
1. Set Up the Document
First
things first, let’s start by creating a New
Document by either going to File> New or using the Control-N keyboard
shortcut. We'll adjust some of its settings:
Number of Artboards: 1
Width:
800 px
Height:
600 px
Units: Pixels
And from the Advanced tab (which can be found under
the little right-facing arrow):
Color Mode:
RGB
Raster Effects:
High (300 ppi)
Align New Objects to Pixel Grid box: checked
2. Set Up
Our Layers
Once we’ve
created our little document, it’s time to layer it so that we can separate the different sections of the illustration, which will allow us to focus better
later on when we start adding details.
Open up the Layerspanel, and create three layers. Let’s name them so that we know which
one is which:
wood frame
character
axe
3. Create the
Wooden Frame
We will work our way up, from the wood frame layer all the way to the axe
one, making sure to lock all but the layer that we are currently on. This will
help you keep your shapes organized, while making things a lot easier to edit.
Step 1
The first layer that
we are going to work on will be the circular wooden frame, on top of which we
will then position the rest of our illustration.
So, assuming
that you’re on the wood frame layer, use the Ellipse Tool (L) to
create a 320 x 320 px circle, which we will color using #99847B.
We will then align the shape to the center of
our Artboard using the Horizontal and Vertical Align Center options found underneath the Align panel.
Step 2
Next, let’s give the shape an
outline by selecting it and then going to Object> Path > Offset Path and giving it an offset of 6 px.
Once you have the outline, change its color to
something darker (#453F3C) so that we can distinguish the two, and then select
both it and the previous shape and group them using the Control-G shortcut.
Step 3
We will be
creating a slighter smaller circle, just 280 x 280 px, which we will color using #806E67, and then position
on top of the previous one, making sure to center it, and then give it the same6 px outline.
As before, group the circle and its outline,
since in the next step we will start adding details that will overlap with some
of the shapes, making it harder to work if they aren’t grouped.
In case you’re
wondering why we added this second piece, the reason is that the
first circle will end up being our actual frame, while the smaller inner one
will act as a background. If you don’t see it yet, well, let’s change that by adding
some details.
Step 4
In this step we
will add the vertical lines that will give the impression that our background
is made out of wooden tiles.
To do that, simply select the Rectangle Tool (M) and create five 4 x 328 px shapes (#453F3C), which we
will position 48 px from one
another, making sure to group (Control-G)
and align them to the center of our circle afterwards.
Step 5
Once you have the first set of vertical lines,
we need to create a copy (Control-C >
Control-F) of them, which we will position towards the left side, so
that the elements of the two groups sit side by side.
Since these will act as
shadows, we need to change their color to black (#000000) and set the Blending Mode to Multiply while lowering the Opacity
to 20%.
Step 6
Now, since we want both the vertical lines and
shadows to cover up just the surface of the smaller circle, we will have to
select create a copy of the circle (not the outline) and paste it over them.
Once we have the copy in place, we need to select it and our lines and then right click > Make Clipping Mask.
This will mask the sections of the lines that go outside the surface of the
circle, which is exactly what we wanted.
Step 7
As soon as we mask the lines, we can cut (Control-X) and paste (Control-F) them inside the inner
circle group by double-clicking on it to enter Isolation Mode.
Step 8
Next, we need to add a small inner shadow, by
creating two circles, one 280 x 280 px one,
and one smaller 260 x 260 px one,
which we will then extract from the larger one using Pathfinder’s Minus Front function.
Once we have the resulting shape, change its color to black (#000000) and set
its Blending Mode to Multiply while lowering its Opacity to 20%.
Step 9
Following the same process as with the ring-like
shadow, we will be adding a circular highlight to the edge of the wooden frame (the
larger circle, not the outline) by creating a 320 x 320 px ellipse, from which we will cut out a smaller 312 x 312 px one.
We will then set the
resulting shape’s color to white (#FFFFFF) and change its Blending Mode to Overlay,
while lowering the Opacity to 30%. You should also make sure to
position the highlight inside of the larger circle group, since we will be
adding more details along the way, and this way it will be easier to keep track
of your shapes.
Step 10
Since we now have a circular highlight, how
about adding two vertical ones too? First, grab the Rectangle Tool (M) and create one wider 8 x 332 px shape, and one narrower 4 x 332 px one, position them 6 px from one another, and then place them in the
illustration, a little towards the right side.
Step 11
Now, as we did with the previous vertical lines,
we will mask the highlights, and then set their Blending Mode to Overlay
while lowering the Opacity to 30%.
Step 12
This next step
will require you to get a little creative, since we will start working on the
wood detail lines.
First we will
have to go inside of the larger circle group by double-clicking on it in order
to enter IsolationMode, where using the Pen Tool (P) we will start drawing little
curved lines. We have to make sure to set the weight of the lines to 2 px and color them using the same tint
used for the outline (#453F3C).
Once you’re done, your design should look
something like this.
Normally we would need to add the wood detail
lines to the inner section of our frame, but since we don’t have the silhouette
of our character drawn yet, it will be easier to leave it as it is for now, and
come back later on once we have everything laid out.
4. Create Tin Man
From this point
on, we will focus on creating the character, but I’m going to switch things up
a little bit.
If you've read some of my previous tutorials, you might have noticed that I usually go all
nuts with numbers, positioning, etc. While there’s nothing wrong with that, I
felt that for this tutorial, I had to do things a little bit differently since I
want to get you in a more creative state of mind, and actually see you express
yourself by giving you some pointers here and there.
That being said,
grab a cup of coffee or tea, and as the Great Oz put it, “You have plenty of
courage, all you need is confidence in yourself.”
Step 1
First, make sure
that you’re on the character layer, and using the Pen Tool (P) let’s start working on Tin Man’s metal collar by
drawing a trapeze-like shape that we will color using #CCC4C4.
As you can see, I’ve drawn a relatively large
shape in terms of width, and positioned it towards the bottom-center side of my
inner circles, since we will have to mask it later on.
Step 2
Next we need to add an outline to the collar by
selecting it and then going to Object> Path > Offset Path and applying an offset of 6 px to it. Since the outline has to stand out from the inner fill,
we will have to change its color to #453F3C.
Step 3
Once we have the bottom section of our collar,
we can start working on its top side by adding an ellipse shape that will act
as the inner section, and then give it that 6 px outline.
Step 4
Next, we will be
adding a subtle shadow to the top side of the inner collar element that we’ve
just created. I recommend you use the Pen
Tool (P) and draw a path that is narrower towards the top, but then comes
out wider toward the edges. Once you’ve drawn the path, simply change its color
to black (#000000) and then set its Blending
Mode to Multiply while lowering
the Opacity to 20%.
Since the shape will go outside of the surface
of the ellipse, we will need to create a copy of the ellipse itself and use it
as a clipping mask for our shadow.
Step 5
Using the Pen Tool (P) start adding some details
to the lower section of the collar by creating some highlights. Then use the Ellipse Tool (L) to add a little round
highlight that we will tilt slightly towards the left.
Make sure that once you’re done adding the
details, you position them underneath the top ellipse, by selecting the lower
part of the collar and the highlights and then right click > Arrange > Send to Back.
Step 6
Once you’re done
adding the highlights, we need to add the little bolts and the vertical divider.
First grab the Ellipse Tool (L) and
create four 6 x 6 px circles (#453F3C)
and position them evenly at a distance of 4 px from one another. Group the bolts (Control-G) and then align them to the center of the bottom section of our collar,
pushing them a little towards the right side.
Add a 4 x 48 px rectangle (#453F3C) to their
right and a smaller 2 x 48 px shadow
right next to the divider.
Also, at this point it would be a good idea to
select all of the collar’s shapes and group them (Control-G) so
that things don’t end up flying around.
Quick note: keep in mind that some of the values indicated
above might vary since your dimensions will be different from mine. That being
said, don’t get discouraged—try to use what I’ve used, and adjust the shapes
as you need to.
Step 7
Since we’re done
working on the collar, we can now start focusing on the neck.
As always, the
first thing we need to do is create the main fill section. Draw a
rectangle and push its top anchor points slightly towards the inside.
Color the shape using #CCC4C4 and then position
it towards the bottom-center of the collar’s ellipse.
Step 8
Once you have the base for the neck in place, give it
an outline, and set the new shape’s color to #453F3C. It might be a good idea
to group the two (Control-G) since
we will have to make some adjustments in the next step.
Step 9
At this point, you might have noticed that the
bottom sides of our neck’s inner shape and outline are going outside the
ellipse’s surface, which is something that we need to correct.
The simplest solution is to select and
create a copy of the collar’s ellipse (not the outline) and then remove its
top anchor point by selection and pressing Delete. Then using the Pen Tool (P) continue drawing the shape,
creating a top section that goes over the top side of our neck’s outline. Then
we simply select both the neck and the outline and create a clipping mask.
Step 10
Once we’ve fixed
the neck, we can start adding some details such as the horizontal line dividers
and some highlights and shadows. Please keep in mind that once you start working
on the details you first have to go inside the neck group, since otherwise you
might lose things.
Also, you will have to group all of your details
and mask them using the neck's inner section, since otherwise they will go
outside its surface.
Step 11
Since we’re
basically done with the neck, we can now move on to the head itself.
I started
working on the head by first drawing a 92
x 134 px rectangle with a 46 px
Corner Radius which I then adjusted by playing with its anchor points.
The shape that
you will be going for will have a slightly flatter top section, while the
bottom one will look a little elongated.
Take your time and play around with it until you
have a nice looking shape, and then color it using #CCC4C4 and position it above
the neck so that it goes ever so slightly over it.
Step 12
Give the head an outline, and then start adding
the eyes, nose and mouth to it.
Step 13
Once you have
the eyes, mouth and nose in place, it’s time to start adding the ears.
In my
illustration, I’ve created the ears by drawing two 10 x 26 px rectangles (#968F8E) with a 5 px Corner Radius, to which I’ve applied a 6 px offset path effect in order to get the outlines.
I then changed the outline color to #453F3C and
positioned a pair on each side using the eyes as reference points, making sure
to send them to the back of the head itself.
Step 14
As soon as we’re
done creating the ears, we can start drawing the funnel hat.
So, using the Pen Tool (P), start tracing the bottom section of the hat, making it
just a couple of pixels wider than the head itself. Color the shape using #968F8Eand then give it an outline.
Step 15
Next, we will continue by drawing the top
section of the hat. We will have to make sure that the bottom anchor points
align themselves nicely with the top ones on the shape that we’ve just created.
Once you’ve traced the shape, color it using #7B7472 and of course, give it an
outline.
Step 16
Since the
original hat had a handle, we need to make sure to add one to ours as well.
Using the Ellipse Tool (L) create a 28 x 28 px circle (#968F8E), and then
flip its fill with its stroke by pressing Shift-X.
Since our circle
should now be a ring, we need to adjust its weight by setting it to 4 px. Then, simply expand the shape by
going to Object > Expand > Fill
and Stroke and give the resulting shape an offset path of 6 px.
Finally, group (Control-G) both the fill and outline and position the handle
to the right of the hat.
Step 17
Once we’ve finished working on the hat, we can
start adding finer details to our character, by adding highlights, shadows, and
a couple of bolts and dividers to give it that metal look. Take your time, and
be as detailed as possible.
Step 18
Once you’ve finished adding the details, you
might notice that the bottom section of the collar is going outside the
surface of the interior wood section. Since we want it to be framed inside it,
we will first group (Control-G) all
the elements that form our character and then mask it using a 280 x 280 px circle that we will
position on top.
Step 19
But hold on,
something feels wrong, as if we’re missing a piece.
Well Dorothy, we
are. Since I thought we should first focus on the main components of the
character, I left the cherry for the end. If you still don’t know what I’m
talking about, I’ll let you know—it’s the bow.
So get back in there, and draw a nice-looking
bow, which we will color using #ED7161 and then position over the collar
towards its bottom side.
Step 20
Before we move
on to the last piece of our illustration, we will first have to take a couple
of minutes and work on our wood lines, which we need to position within the
second circle group. As before, use a 2
px stroke weight and play around until you have some nice-looking lines.
Now, since the details need to go onto the wood
frame layer, you will have to lock the character one, and work inside the
previously mentioned one.
5. Create the
Axe
We are now down
to our last segment of the illustration, which is Tin Man’s signature piece,
the axe.
If you've read the
story then you know that Tin Man (which should actually be Tin Woodsman), wasn’t
originally made out of metal. Instead he was a real person like me and you, named
Nick Chopper. He used to make his living by chopping down trees in
the forests of Oz.
Now, to make a
long story short, he had some beef with the Wicked Witch of the East which
enchanted his axe in such a way that it chopped off his limbs one by one, but
instead of dying he somehow magically replaced them with tin prosthetic limbs.
Ok, so you now
know why the axe is so important. Let's start creating it.
Step 1
First let’s lock
all the other layers, all but the axe one, and using the Pen Tool (P) start drawing the wooden handle.
Try to get a
more organic feel to it, and once you have something that you think looks nice,
color it using #806E67 and give it a 6
px outline (#453F3C) using the offset path effect.
With both the inner section and outline
selected, group them (Control-G) and
then position them towards the bottom side of the wooden frame so that they end
up masking about half of the surface of the bow.
Now, in case
your outline gets a little funky like mine did, don’t worry—we will
make that side overlap with the blade, so everything will turn out fine.
Step 2
Okay, so now that we have the handle, how about adding some details to it, such as the wood lines, a top highlight and a bottom
shadow?
Step 3
Let’s start
working on the blade, by creating a 24 x
40 px rectangle (#B1A9A9) with a Corner
Radius of 2 px. We will adjust
the shape by selecting its bottom center anchor points using the Direct Selection Tool (A) and then
deleting them by pressing Delete.
Then, using the Pen Tool (P), continue the shape by drawing the bottom section of
the blade, making sure to close the path that you’ve traced.
Step 4
Once you have a nice-looking blade, give it an
outline and then position it on the right side of the handle, making sure to mask
any imperfections created by the handle’s outline.
That's It, Folks!
Start adding a couple of highlights and shadows to the blade, and you should be all done.
I hope that you had fun doing this little tutorial, and I’m looking forward to seeing your final results, so don’t keep me waiting!
If you've ever wanted to set off to see the Wizard, you'll need to follow the Yellow Brick Road. And if you can't find one nearby, you can always make one of your very own. Follow this tutorial to make a seamless Yellow Brick Road and Poppy Field pattern, to help you channel your inner Dorothy. You get bonus points for wearing sparkly shoes while you draw.
1. Set Up the Road
Let's get some curvy lines going to represent the base of our road. Technically the Yellow Brick Road has only one swirly beginning, but the shape was too fun not to use, so I decided to include it into the pattern.
Step 1
Draw some nice flowing freehand swirls to serve as the base for your road. If you can't achieve the line smoothness you want when you're drawing freehand, zoom in and smooth out the line bit by bit, using the Hard Round Brush Tool and the Eraser Tool in turn.
Drawing nice curves isn't easy, but I urge you to practice it whenever you can—you will get better with effort.
Step 2
Make a copy of your swirls by pressing Control-J, and slide them to the right in a straight line by holding down the Shift key while you drag. Change the color of the copied layer by clicking on the Fx button at the bottom of the Layers panel and choosing Overlay from the drop-down menu. This will help you see how the edges of the two copies fit together, and which parts you need to redraw in order to make them seamlessly flow together.
Step 3
Once the two sets of swirls flow together neatly, delete the copy layer and select a section from the left side of your main swirl layer. We want to fold the swirls in on themselves to create our starting pattern tile.
Step 4
Holding down the Shift key, drag the selection in a straight line until it reaches the correct position, i.e. until it matches up with the right side of your swirls. You now have a horizontally repeating design with perfectly straight edges, and you can place Guides at the sides of your design.
To place Guides, make sure your Rulers are visible. If they're not, you can make them appear by selecting View > Rulers from the Menu Bar. Then you can simply click on the ruler and drag to pull out a Guide.
Step 5
When you're setting your Guides, they will often snap to the edge of your artwork on their own. However, this snap is not always accurate, so it will save you a lot of grief later on if you take the time to zoom down as much as possible with the Zoom Tool and make sure the Guide is set to perfectly align with the edge of your lines.
If the Guide is even just a third of a pixel's width off, it can mess up your repeat later on.
Step 6
Once you have moved the left edge of your line work over to the right side, it's possible that some fragment of the lines will still be sticking out beyond the right Guide. Use the same method to move it over to the left side—select it with the Rectangle Selection Tool, and Shift-drag it until it touches the inner side of your left Guide.
You've effectively folded in the sides of the tile, and now you have a finished horizontal repeat. Remember this set of steps, because you will be using it a few more times during the tutorial.
Step 7
To work out the vertical repeat, we'll do the same thing we did with the horizontal—click Control-J to make a copy of our line work, Shift-drag up or down until they rest comfortably against each other, and then adjust the original line work to flow more smoothly into the copy.
Always make your adjustments on the original tile, because you will discard the copy when this step is done.
Step 8
Once the lines are looking good, we'll use the Rectangle Selection Tool to grab the bottom part of the line work and Shift-drag it upwards until it lies smoothly against the top part of the design.
Step 9
Set a pair of horizontal Guides against the top and bottom of the line work, and your tile is officially completed.
2. Define the Bricks
Ok, so we have a road map for laying down our Yellow Brick Road. Let's try to bring it to life.
Step 1
Using the Overlay function from the Fx menu on the bottom part of the Layers panel, set the colors of the background and the lines to something more fitting for our theme. Setting colors through the Overlay function means that you will always be able to adjust them with a single click, so you don't need to worry too much about the exact tones.
Use a Hard Round Brush Tool set to a relatively small size to close off your swirl shapes, so you can fill them in more easily. Your Guides will get in the way, so hide them (uncheck Menu Bar > View > Show > Guides). You can also use the shortcut Control-; to hide the guides.
Step 2
Use the Magic Wand Tool to select the spaces inside your now closed lines. Then go to Menu Bar > Select > Modify > Expand and set it to expand your selection by two or three pixels.
Step 3
Click Alt-Delete to fill the selection. Now you have a base for your road. Because you expanded your selection, you won't get any ugly pixel-thin gaps between your line and your fill.
Step 4
Turn on your Guides again (Menu Bar > View > Show > Guides) and use them to help you neatly cut away the excess road base.
Step 5
Once you're done removing the excess from the outside of the Guides, use the Zoom Tool to check once again that the guides are positioned correctly. The easiest way is to check in just two places—the top right corner and the bottom left corner. That way you check all four guides with just two zooms.
As you can see, I had removed one pixel too many from the right side of my road base, so I needed to pull my right Guide one pixel inwards.
Step 6
Using Control-J, make eight copies of your road base layer and slot them in place around your main tile. This will help give you a framework when you're laying in the details on your road, and it will also show you if you have any errors in your tile repeat.
Merge all of these into a single layer (hold down the Shift key while selecting to select multiple layers at once, and then click Control-E to merge) and set its color to something similar to your background color, so it's not distracting.
Step 7
On a new Layer, draw rough lines to indicate how your bricks will flow. This will help guide you when you're zoomed in close and drawing the individual bricks.
Step 8
Use the Zoom Tool to zoom down and start drawing in bricks on a new Layer, following the guiding lines you drew. Once all the bricks are drawn, you can discard the layer with the guiding lines.
There are many different versions of the Yellow Brick Road, some with a more neat and uniform look and some with more random and fun bricks. I chose a more flexible brick layout to make it easier to fit the curves and swirls of my road.
Step 9
Once all the bricks are drawn, adjust the colors of the road base layer and the brick face layer to whatever looks best to you. The base should be dark, and the brick faces should be a medium tone that will let us add both shadows and highlights on top.
Step 10
Make a copy of the brick face layer and give it a darker color. Move it 10 to 30 pixels below the brick face layer, to create some thickness for your bricks. Choose a thickness that looks best to you.
Step 11
Since it now looks as if the brick face layer is floating above its own shadow, let's close up that gap between them. Make a copy of the bottom brick layer, and move it two or three pixels up. Then make another copy, and move it up. Keep doing this until it looks as if the brick sides are solid.
Merge all the copied layers into one, and play with their color once again to see what suits them best.
Step 12
Now let's add some sparkle to our road! Select the brick face layer (Control-click on the Layer Thumbnail on the Layer panel) and then hide the selection so it doesn't get in your way (Control-H). Now you can paint on the brick faces without affecting the rest of your piece.
Pick any spatter brush, texture brush, or soft brush you like, and choose a color slightly warmer and lighter than your brick face color. Lightly go over the edge of the brick road that is closer to you.
I won't keep repeating 'make a new layer, make a new layer', and you don't strictly have to, but making a new layer for every new color you use is the best way to ensure that you can always go back and change things easily. It could save you a lot of heartache down the line.
Step 13
Now let's do the reverse—pick a slightly darker color and go over the other side of the road. This will give the road a bit of dimension.
Step 14
Now make a new layer and set its Blending Mode to Soft Light (Layer panel> Blending Modes > Soft Light). Set your Foreground Color to white (you can't do it through Overlay this time, because Blending Modes don't work on layers with a Color Overlay).
Pick up the Hard Round Brush Tool and start drawing in highlights on individual bricks. It does take a while, but they will look so pretty afterwards! Because your layer is set to blend with the colors below, the highlight will look slightly different on each brick depending on its color.
Once all this is done, you have a super pretty Yellow Brick Road!
3. Add Some Grass
Now let's give it some nice surroundings.
Step 1
Pick a shade of green slightly darker than your background, and with the Hard Round Brush Tool start drawing in some grass. You don't have to be particularly meticulous about this, so feel free to go fast and don't strive to make it too even. It's grass! It should be messy!
Make sure some blades reach up above the bricks on the near side of your road, but none should be reaching over the far side of the road.
Step 2
Pick a new shade of green, this time a little lighter than your background color. Add more grass.
Step 3
Finally pick a third, darkest shade of green. Use it more sparingly and randomly than the first two, and draw shorter blades of grass. It adds a nice bit of depth.
Step 4
To give the road some extra weight, let's make a copy of our brick face layer, move it below all the brick layers, and change its color to that last, darkest green we used on the grass.
Move the layer a few pixels up and to the left, and lower its Opacity to around 65%. This will give you a nice shadow on the ground.
Since you're moving this layer, a part of it will now be sticking outside your guides. Any time some of your drawing sticks outside the guides, remember to fold it back in just like we did in the first section.
4. Add the Poppies
And finally it's time to add some pretty flowers!
Step 1
First let's draw the outer petals—pick a nice bright red and draw some petal shapes. A poppy usually has four petals, but some of them will be facing towards us and some of them will be facing away from us. At this stage draw only the petals that are facing away from us.
Step 2
Now let's pick a slightly different shade of red and draw the petals that are facing towards us. You can choose to make the inner side of the poppies lighter or darker than the outer side—either can work. I've made mine lighter on the inside.
Step 3
Now add some black around the center of each flower, and on the base of each petal. Pure black looks a bit harsh, so I chose a nice chocolate brown instead.
Step 4
Pick a new shade of green and draw in the characteristic poppy pistils. The way I drew mine was to first paint them in solid, and then use a Hard Eraser Tool to chisel out their details.
Step 5
The flowers are still looking a bit flat, so let's give them some more details. I picked a somewhat darker tone of red to draw fine veins on the inner petals, and to add some shadows on the outer petals.
5. Multiply the Poppies and Finish Up
Now we've drawn one nice batch of poppies, but we don't necessarily want to draw a hundred more. Let's spread them around a bit more effectively.
Step 1
Use Control-J to make a copy of each of your poppy layers, and then group them all together and use Control-E to merge them into one. Now you have a little bunch of poppies you can copy and use Edit > Transform > Flip or Rotate to put them in a few different places without having them appear samey.
Step 2
Make a new bunch of poppies, and use the same technique as above to move them to a few different places.
Step 3
Once it becomes difficult to fit in new bunches of poppies, take single flowers and spread them around to fill in any remaining gaps. You can choose how busy you want to make your poppy field, but I'd suggest leaving some parts sparser than others, to give it a nicer flow.
Once all your poppies are in place, zoom in close and use the darkest shade of green you used on the grass to draw the poppy stems and leaves. Their bottom parts will stand out awkwardly from the surrounding grass, so use a Hard Eraser Tool set to a small size to eat away at the bottom parts of the stems, making it seem as if other blades of grass are in front of them.
Step 4
Your poppy field is looking really sweet! Make a new layer, set its Blending Mode to Overlay and set your Foreground Color to pale yellow. Pick a Soft Round Brush with a feathered edge and randomly paint in some large spots. If the effect is too stark, bring the layer opacity down to whatever feels nicer.
This effect seems so subtle it can almost be hard to spot, but if you try turning it on and off you'll see the subtle, rich texture it's adding to the piece.
Step 5
Finally if you feel like it, you can add another layer with its Blending Mode set to Overlay and add one final highlight to your road, making it seem sunnier. Paint in crescent shapes along the curves of the road with a Hard Round Brush and then eat away their edges using a Soft Round Brush with its Opacity lowered to around 30%.
And There It Is!
You've made a seamless Yellow Brick Road with Poppy Field pattern. You can use it as a digital wallpaper, you can print it out and use it for scrapbooking, or you could have it printed on fabric or wrapping paper and make a special surprise for that special Wizard of Oz fan in your life.
Hope you had fun making it! Here's the final image once more:
And here is a zoomed out version showing more of the repeat. Fun, right?
The Wonderful Wizard of Oz is one of the most popular fairy-tale novels for children, which is also loved by millions of adults for its fantastic, magical atmosphere. In this tutorial we’ll be creating a colorful portrait of Cowardly Lion, using a stock photo to create a realistic, outlined look. We’ll be adding some grungy and lighting effects, creating a stylish thematic poster with the Cowardly Lion. Let’s start!
File > Place the photo in your
Adobe Illustrator document and position it so that the lion’s head is in the
center of your Artboard. I’ve set the Artboard size to 700 x 800 px. You can change the Artboard size anytime with the help
of the Artboard Tool (Shift-O).
Double-click the layer containing the lion
photo in the Layers panel and check the Dim
Images to box, turning our reference image into a semi-transparent
template.
Create a New Layer on top of the sketch layer for the outline.
Step 2
Let’s start from the eye of the lion. We’ll
be using the Blob Brush Tool (Shift-B).
You can actually use the Paintbrush Tool
(B) as it is more versatile and easy to edit, because it allows you to draw separate paths and then adjust each path, using the Direct
Selection Tool (A). However, the Blob
Brush Tool (Shift-B) is closer to real-life drawing, as if you were
using a marker. The drawback of this tool is that you’re drawing with
shapes, which are harder to edit. However, they look more natural, so it’s up to
you to decide which tool to pick.
You can see the settings of my Blob Brush Tool (Shift-B) in the
screenshot below. I’m using a digital tablet, so I enable the Pressure feature next to the Size slider.
We start outlining the eye, changing the
width of the lines by varying the pressure. Press harder on your tablet to get
a thicker line and use a very light pressure to get a thin line. You can also
change the size of the brush, using the [
and ] keys.
Step 3
Add more details, adding small, thin strokes
around the eye for the fur. Follow the direction of the lion’s hair by looking
at the photo.
Step 4
Move to the nose and mouth of our lion. Note that we’re outlining only the left part of the face, because later we’ll
make a mirrored copy, creating a symmetrical portrait.
Don’t worry if the lines overlap at this step, because we'll
fix that as well.
Step 5
Use curved strokes to add a bearded part
under the mouth.
Step 6
Let’s move to the ears of our lion. The ear's outline looks more rough and wavy, so let’s change the Fidelity of our Blob Brush
Tool (Shift-B), moving the slider closer to Accurate on the left side. Now we can make even more natural
strokes with minor details.
Step 7
Draw out the lion’s mane around the face
(only from the left side of the head). Then select all the created lines, Group(Control-G) them and double-click the Reflect
Tool (O) to open the Reflect
options window. Flip the image over the Vertical
Axis and use the Copy button to
create the right side of the lion’s head.
Use the reference photo to place the outlined
copy in the proper position, moving the right eye to the same place as in
the photo. You will notice that some other parts (the mouth and nose) may overlap with the left half of the outlined image,
but don’t worry about that.
Step 8
Select the copy of the outlines on the right side and double-click it to Isolate
Selected Group. Select the nose lines and move them to the right, placing
the nose in the proper position. Do the same for the mouth and the beard.
Step 9
Adjust the position of the mane on the
right side of the image. Redraw some parts of the mane in order to make the image
more versatile and not completely symmetrical.
Step 10
Let’s rotate the lion’s brows upside-down
to make him look more cowardly. In order to increase this effect, let’s also
add a small arched line at the outer edges of the eyes.
Step 11
Use the Guides to locate the center of the
lion’s face and to position the elements symmetrically. Press Control-R to show the Rulers. Click on the left side Ruler and drag the Guide to your Artboard, placing it in the middle of the lion’s
face. Add minor details to the nose, defining its center.
Step 12
If you zoom in, you may find some of the
lines overlap. Let’s see how we can get rid of the unwanted pieces outside the lines. Select two overlapping lines and take the Shape Builder Tool (Shift-M). Hover the mouse cursor over the
unwanted piece and click it while holding Alt
to delete it.
Step 13
Use the Delete Anchor Point Tool (-) to delete the unneeded anchor points
and the Direct Selection Tool (A) to
move the points around, making the shapes fit each other.
2. Color the Created Outlines
Let’s enliven our image by adding colors! Firstly,
we will build a basic color scheme with flat colors, creating the overall look
of our lion. Then we’ll add more accents and use gradients for shadows and
overtones, making the image more realistic.
Step 1
Create a New Layer under the outline layer. Place the reference image of the
lion next to the Artboard and use the Eyedropper
Tool (I) to pick the basic light-beige color from the photo.
Take the Pencil Tool (N) and start filling the upper part of the mane with
color. You don’t need to make the hair line repeat exactly the same form as the outlines
that we’ve created previously. Just make the shapes fit each other. Move along
the edge of the mane, adding colored spots, but leaving the center of the lion's face blank for now.
You can see the settings of my Pencil Tool (N) in the screenshot
below.
Step 2
When you've made enough beige shapes around
the face, select them and Unite in
the Pathfinder panel, creating a
merged shape with an empty space in the center.
Step 3
Draw a light-beige shape for the center of
the face and Send it to Back
(Control-Shift-[), placing it beneath the mane. Pick a light-brown color
from the reference photo and add darker accents to the portrait, drawing brown
hair shapes along the cheekbones, on the forehead and on the ears.
Step 4
Move to the bottom part of the face,
filling the inner part of the nose and mouth with dark-brown color and placing lighter greyish-pink shapes on top, adding depth to the elements.
Step 5
Now let’s enliven the eyes! We’re still
using the Pencil Tool (N) here. Create
a dark-brown base in the shape of an eye. Add a thin, light-grey, wavy shape along
the lower eyelid, making it look moist.
Draw a circle for the iris. And let’s
make it more true to life by applying a radial gradient with a bright-orange center
and a light-yellow edge.
We can also add depth to the eye by placing
a semi-transparent shadow under the upper eyelid. Draw a slightly arched shape
at the top part of the eye and fill it with a vertical linear gradient from dark brown
on top to white at the bottom. Switch to Multiply
Blending Mode in the Transparency
panel, thus making the white part of the gradient transparent and turning
the shape into a subtle shadow.
Step 6
Finish up with the eye by adding a few
glossy highlights, filling them with horizontal linear gradients from
light yellow to black. Switch to Screen
Blending Mode to turn the black parts transparent, making the eyes vivid
and shiny.
Step 7
Let’s make the portrait more three-dimensional and textured by
adding highlights around the eyes and nose of our lion. Make the edges
of the highlights rough, depicting separate hairs of the fur, and use the same
yellow-black linear gradients and Screen
Blending Mode to make the shapes semi-transparent.
Let's add more depth to the
portrait by changing the flat base colors of the mane to subtle gradients of the same shades, making the bottom part of the head darker than the top part.
Step 8
Let’s make the colors more vivid by increasing the saturation. Make the colors of the mane and the central part
of the face brighter by making them more yellowish. And add more orange tints to the ears and around the
cheekbones.
I’ve decided to delete the black outlines of the mane along the edges of the portrait, thus adding more air to the image and making
it less “noisy”.
Step 9
Let’s adjust the outlines a bit more,
making them fit the color palette of our lion. Select the black outlines that we have on the top layer. Unite the
selected outlines in the Pathfinder
and right-click to open a context menu. Choose Make Compound Path (or press Control-8),
combining all the separate pieces of the outlines into one single object.
Finally, apply a linear gradient to the outlines from
dark-purple in the center to dark-orange at the edge.
This is how our lion looks at this step.
Step 10
Let’s make the lion look proud and stately by adding
volume to his mane, making it bigger and furrier. Grab the Pencil Tool (N) and draw another hairy shape around the head. Send it to Back (Control-Shift-[), placing it beneath the head, and fill
it with bright radial gradient from yellow in the center to deep-orange at the
edge, making it darker than the basic color of the mane and thus emphasizing
the face.
Step 11
And draw another layer of hair beneath the
previous one, making the mane more detailed. Fill it with lighter radial
gradient to separate the hair shapes from each other, adding dimension to our
image.
3. Work on the Background and Add Details
Let’s form a simple background and add some
intricate details to our portrait, turning it into a poster dedicated to The
Wonderful Wizard of Oz.
Step 1
First of all, make a New Layer and use the Rectangle
Tool (M) to make a rectangle the same size as our Artboard (in our case it is 700 x 800 px). Fill the shape with radial
gradient from light-beige in the center to darker-beige at the edges, thus
creating the effect of a subtle vignette.
Step 2
Let’s add some details, which are closely
connected to the Wizard of Oz story. Remember the Courage Medal that the
Cowardly Lion received from the Wizard of Oz?
We won’t be depicting the medal itself;
however, it will help us to get inspired and to use some of its elements for
our poster, such as the red stripes and the blue ribbon.
Take the Rectangle Tool (M) and draw a narrow vertical stripe the height of
our Artboard. Hold Alt-Shift and drag the stripe to the right, creating a copy.
Press Control-D several times, creating more copies.
Finally, select all the stripes and Group(Control-G) them.Apply a radial gradient to our group of stripes, from
bright-red in the center to dark-red at the edges, making the stripes look
shiny and smooth.
Step 3
Copy the bottom hair shape of the lion’s mane and Paste it in Back (Control-C> Control-B). Make the copy a bit larger and switch its color to a
radial gradient from dark-red in the center to white at the edges. Apply Multiply Blending Mode, turning the shape into a subtle shadow in order to make the head stand out
against the background.
This is how the overall composition looks
at this step.
Step 4
Now let’s add some spots and splatter to
our poster, creating a grungy, retro effect. There are two ways to do
it. The first and easier way is using the built-in Adobe Illustrator artistic
brushes, which you can find in the Brushes
Library of your Brushes panel
(click the Brushes Libraries Menu icon
and go to Artistic > Artistic_Ink or
Artistic_Watercolor).
The second way is more time-consuming, but
at the same time, it is much more creative and interesting. So if you want to put more spirit into your image, let’s work with a traditional medium a bit.
Use ink, watercolors, gouache or
whatever you like to create splashes and splatter on paper. I use black ink and
a common brush to make a lot of small, textured spots by making the ink drip on
the paper from the tip of the brush. You can also use a toothbrush to get a nice
splatter effect.
Scan your image or use your phone to make a
photo, but make sure that you have enough light, so that the background is more
or less clean, without any shadow.
Open your image in Adobe Photoshop and press Control-L
to open the Levels options window
(or go to Image > Adjustments >
Levels). And from here, let’s try to give our image as much contrast as possible by pulling the left black slider to the right, making the dark parts of the
image darker. And pull the right white slider to the left, lightening the white
areas even more.
That’s how it looks now: we have solid
black spots on a pure-white background.
Step 5
Save your image as JPEG and File > Place it in Adobe
Illustrator. Now we have the Image Trace
function available in the top control panel.
Select the High
Fidelity Photo preset from the drop-down Image Trace list and then, after the image is traced, click the Image Trace Panel button, which
appeared in the control panel on top.
Here, in the Image Trace option panel, move the Paths and Corners
sliders to 100% to get as much detail as possible. As for the Colors slider, let's set the colors
value to 1, because we have only one color: black. Set the Noise value to 1 px as well.
Leave all other settings as default and Expand the image from the top control
panel, turning the traced result into vector shapes.
Step 6
Create a New Layer between layers, containing the background and the lion’s
head. And start adding the grungy spots that we’ve just created.
Step 7
Fill some of the spots with linear
gradients from orange to white and from red to white, and switch to Multiply Blending Mode, making the
spots semi-transparent.
Fill other shapes with dark-burgundy color, applyingScreen mode, thus creating light, faded
spots above the background.
Step 8
Create another New Layer, this time placing it on top of the lion’s head. Add more
splashes above the face and around the head, filling the shapes with
semi-transparent gradients in Multiply
mode.
Place two round spots above the eyes of the lion and fill them with
radial gradients from white in the center to orange at the edges. Apply Multiply Blending Mode, making the
centers of the spots transparent.
Step 9
Now let’s render a bright ribbon in the
bottom of our poster. Start by making a narrow stripe with the help of the Rectangle Tool (M) and fill it with
horizontal linear gradient from dark-lilac at the edges to vivid-blue in the center.
Take the Pen Tool (P) and
form a small dark triangle at the bottom left part of the ribbon. The Smart Guides (View > Smart Guides)
are really helpful at this step, when you need to position the objects one to another and to
make them fit each other.
Add a smaller rectangle beneath the shapes,
forming a fold of the ribbon.
Step 10
Select both the small triangle and the
fold, and use the Reflect Tool (O)
to flip the elements over the Vertical
Axis. Press the Copy button and
move the created copy to the opposite side of the ribbon.
Step 11
Now let’s add a title to our ribbon. Use
an intricate font with serifs, for example Trajan Pro 3 or a free font
Playfair Display, and type COURAGE. Object > Expand
Appearance, turning the text into a set of separate vector letters.
And let’s make the letters golden by
applying a complex vertical linear gradient, made of six colors, from
dark-brown at the edges to light-yellow and orange in the middle.
Make the title more three-dimensional by going toObject > Path > Offset Path
and applying a 2 px Offset value.
Fill the created shape with a vertical linear gradient from beige at the edges
to light-yellow (almost white) in the center.
Step 12
Place the title above the ribbon and add
another Offset shape with 2 px Offset value. Fill the shape with
dark-blue color and switch to Multiply
Blending Mode, creating a shadow beneath the letters and making them stand
out more against the ribbon.
Let’s make our ribbon slightly bent. Select
both the ribbon and the title and Group(Control-G) them. Go to Effect > Warp > Arc. Move the
slider to the left, setting the Horizontal
Bend value to -20%, making the
ribbon arched.
Step 13
Object > Expand the ribbon and place it in the bottom part of our
poster, making the composition look complete. Add a subtle shadow beneath the
ribbon in the same way as we did for the lion’s head, by placing the copy of
the ribbon beneath the basic shape, filling it with red-white linear gradient
and switching it to Multiply Blending
Mode.
Brave as a Blizzard
Great job! We’ve finished our Cowardly
Lion’s portrait, and so he gained his courage!
I hope you’ve got inspired while
following this tutorial and discovered some new coloring and texturing techniques, which will be
helpful for your designs and artwork!
You can go even further and add more shiny details
to the poster by placing some colorful decorative sparks here and there. Check
out Part 4, Steps 3and 4 of the tutorial How to Create a Winter Candle Lantern in Adobe Illustrator to find out how to create those glowing sparks and make them more colorful!
Filter Forge is a plugin for Photoshop that allows you to build your own filters. In honor of our Wizard of Oz celebration, what better way to run it through its paces than by creating a yellow brick road?
1. Obtain the Plugin
Filter Forge can run as either a plugin for Photoshop or a standalone piece of software. Either way, it will still need to be installed. There's even a free 30-day trial version so you can try it out to see if it's right for you. Head on over to www.filterforge.com to get things started.
2. Use a Starter Brick Filter
One of the most impressive features of Filter Forge is the ability to create custom filters with the Filter Editor. This feature is a node-based editor that requires no coding at all! The available nodes are logical, intuitive, and robust.
Step 1
Open Photoshop and create a new document with File > New. This file will hold the base texture maps for our 3D rendered road and will require a lot of pixel area. Enter a Width of 2000 pixels and a Height of 2500 pixels and a Resolution of 72 pixels/inch.
Step 2
Open the plugin with Filter > Filter Forge > Filter Forge 4. The plugin will open in its own window. The main portion of the window is the preview area. To the left is the library filled with several factory preset textures and filters. Unfortunately, there's no Yellow Brick Road filter included. Instead of crafting one from scratch, use the Filter Library: Download more filters link at the top of the window to browse the online library.
Step 3
Search for the Castle Bricks filter and click on the Open this filter in Filter Forge button to automatically download and open the filter.
Step 4
Castle Bricks is an impressive brick texture and will serve well as the basis to build the pavement for the favored highway of Oz. But it won't work in its present form, so it will require some modifications.
3. Use the Filter Editor
It's time to pop the hood on this filter and take a look at how things work.
Step 1
Press the Filter Editor button and choose the Edit this filter option to begin editing the network of nodes that makes up this filter. When the Filter Editor opens, the main window becomes a workspace for the network of nodes that controls how this filter works. It may look intimidating and confusing at first, but it's really quite simple and remarkably easy to use.
Step 2
The color of the bricks is an integral part of the Yellow Brick Road. The color is right there in the name! So these dull gray stones just won't do.
Click on the Bricks Color node and the left panel will display the settings for that node. Click on the color chip to change it to a bright yellow, #FFF404(the bricks in the preview will appear multi-colored, but don't panic—those will be changed soon enough).
Step 3
Likewise, change the Mortar Color to a dark brown, #58410F.
Step 4
Click on the primary Bricks node and set the H Range (Hue) to 5, L Range (Lightness) to 20 and S Range (Saturation) to 50.
Step 5
Click on the Bricks Bond node and set the Value to 4. This adjusts how the brick pattern is situated. This value adds in a bit of imperfection so the arrangement doesn't look quite so mechanically perfect.
Step 6
Currently the Result node shows the bricks as a brilliant blue. That's the direct opposite of what is needed! The reason for this is the Invert node near the top of the network. Select that node and Delete it.
Step 7
When the node is deleted, the inputs and outputs are broken and need to be remapped. The right edge of the primary Bricks node has a large green arrow—this is the output of that node. Click and drag on that arrow to connect it to the input of the Blend node that the Invert node was previously connected to.
Step 8
Press the Components button to open a library of component nodes. Click on the Noise category, and drag a Perlin Noise component onto the main workspace.
Step 9
In the Perlin Noise settings, set the Roughness to 75 and Contrast to 64.
Step 10
Then map the output of the Perlin Noise node to the Foreground input of the Blend node. This blends the noise with the brick color and provides a less mechanical appearance by adding a bit of grunge into the brick color. This is the equivalent of using layer blending modes in Photoshop.
4. Add Texture and Depth
The filter is generating a good yellow hue for the road, so let's turn some attention to the roughness of the surface. The bottom cluster of nodes controls the depth and texture for the bricks.
Step 1
Adjust the Slider Control for the Bricks Roughness to 10.
Step 2
Open the Components panel again and look into the Noise category. Drag a Stones component onto the work space and set the Roughness to 76.
Step 3
Drag a Blending component from the Processing category onto the work space. Then map the Perlin Noise output to the Blend's Background input. Map the Stones output to the Blend's Foreground input. Map the Blend output to the Bricks input. This blends both of the textures together into a unique combination to give the bricks a rough surface.
Step 4
Add a Slider Control component from the Controls category. Set the name to Mortar Width and the Value to 6. Then map the output of this control to the Mortar Width input of both Bricks nodes. This way changes to the Mortar Width will be updated in both Bricks nodes.
Step 5
At this point, the network should look something similar to this. Don't worry if your nodes are in different places—they are easy to move around, and the position doesn't matter. It's the connections that are important.
Step 6
Press the Save Filter button to return to the primary interface of Filter Forge. The filter preview updates to reflect the new filter settings.
Step 7
Go to the Settings tab and set the Size, pixels to 500 to reduce the physical size of the bricks in the final texture. Click the Seamless Tiling option (the Size will auto-adjust when you engage this option to make sure the texture can tile properly).
Step 8
The bricks appear very dark at the moment, so go to the Lighting tab and change the Environment texture to Forest. Set the Brightness to 200 and the Surface Height to 35.
Step 9
At this point, if you want just a basic texture to work with in Photoshop, press the Apply button and Filter Forge will render out the texture. But if you want to generate maps to use in the 3D feature-set, continue to the next series of steps.
5. Use 3D Texture Maps
Filter Forge can generate several different types of texture maps that can be used to define specific properties of 3D elements in Photoshop and any other 3D program.
Step 1
While still in the Filter Forge interface, go to Filter > Render Maps > Diffuse Map. Then click Apply and the program renders out a texture to be used just for the colorization of the 3D road.
Step 2
Once the filter is finished rendering into Photoshop, make sure there are no bright magenta areas that need to be cropped out (this only happens if the document dimensions don't work with the seamless tiling parameters), and save this file as YellowBrickColor.jpg.
Step 3
Run the Filter Forge plugin again and this time set the Filter > Render Maps > Bump Map. Apply this setting and save the result as YellowBrickBump.jpg.
Step 4
Run the Filter Forge plugin again and this time set the Filter > Render Maps > Normal Map. Apply this setting and save the result as YellowBrickNormal.jpg.
Step 5
Open the attached OzLandscape.jpg file in Photoshop. This is a composite landscape image that will serve as the basis for our Lemon-hued Highway adventure!
Step 6
Add a new layer with Layer > New > Layer (Shift-Control-N) for the road. Use the Rectangular Marquee Tool (M) to create a tall, narrow selection, and Fill it with White.
Step 7
Go to 3D > New 3D Extrusion From Selected Layer. Photoshop switches to the 3D interface and turns the filled rectangle into a 3D box. In the Properties panel, set the Extrusion Depth to 10 px to make the box very flat.
Step 8
Use the Move Tool (V) and the 3D transform widget to Rotate and Scale the box until it fits into the scene as a basic roadway.
Step 9
In the 3D panel find the Road Front Inflation Material. Then look in the Properties panel and click on the document icon next to Diffuse. Select Replace Texture and load YellowBrickColor.jpg.
Step 10
Click on the document icon again and select Edit UV Properties. In the Scale section, set the U/X to 125% and the V/Y to 20%.
Those settings adjust the scale of the brick texture along the 3D object so the bricks appear to be life-size and not stretched.
Step 11
Next, assign the YellowBrickBump.jpg file to the Bump setting and adjust the BumpScale to 5%. Set the UV Properties to match the settings used in the Diffuse Map.
Step 12
Likewise assign the YellowBrickNormal.jpg to the Normal map, using the same UV Properties.
Step 13
Select Infinite Light 1 in the 3D panel. Use the on-screen light direction widget to rotate the light to match the angle of the lighting in the scene. In the Properties panel set the light's Color to a pale yellow, Intensity to 110% and Shadow Softness to 10%.
Step 14
Create a selection around the 3D road and go to 3D > Render (Alt-Shift-Control-R).Photoshop combines all the texture information and the lighting into a final render of our Yellow Brick Road!
6. Photo Manipulation
The rendering of the 3D road completes the involvement of the Filter Forge plugin for this project. The following steps are traditional Photoshop techniques to composite the render into the scene and complete the final image.
Step 1
Control click on the 3D Road layer to create a selection, and then go to Layer > New > New Layer Via Copy (Control-J) to copy the pixels to a new layer. This creates a rasterized version of the render without losing the 3D information. Name the new layer Road Render and hide the original 3D Layer.
Step 2
Create a copy of the Road Render layer with Layer > New > New Layer Via Copy (Control-J) and move it further "back" into the scenery by scaling it slightly smaller and moving it upwards. Then go to Edit > Transform > Warp and use the warp cage to shape the road around the curve in the photo.
Step 3
For both road layers, goto Layer > Layer Mask > Hide All to conceal the entire layer. Then use a Soft Round Brush with white paint on the masks to reveal the pavement only along the roadway.
Step 4
Open the Brush panel Window > Brush (F5) and make the following brush settings.
Brush Tip Shape Settings:
Brush tip to Chalk 36 pixels
Spacing: 33%
Shape Dynamics:
Size Jitter: 22%
Angle Jitter: 100%
Scattering Settings:
Scatter: 76%
Both Axes option enabled
Step 5
Add a New Layer for the Shadow Area and set the Blend Mode to Darken. Use the newly defined brush at 40% Opacity with a dark green paint #243400 to add shadows to the edge of the roadway.
Step 6
Add another New Layer for Grasses. Use the Clone Stamp Tool (S) with the Dune Brush preset to sample pixels from the grassy field and clone them onto the foreground edge of the roadway so the road appears to be behind blades of grass.
Step 7
Add a New Layer for the Distant Road and use a Soft Round Brush tip at a very low brush size, around 6 pixels, with bright yellow paint #ffff2a to carefully trace along the roadway in the distance. Change the blending mode to Overlay and reduce the Opacity to 74%.
Step 8
Create a selection of the roadway by Shift-Control-clicking on both layer masks for the Road Render layers. Then add a Curves adjustment layer and create a hill-shaped curve as shown below to brighten up the yellow road.
Step 9
Add another New Layer for Sun Rays. Use the same custom brush that was used to add the shadows to the roadway, but this time use it at 100% Opacity and white paint. Create a mass of brush marks in the center of the canvas.
Step 10
Go to Filter > Blur > Radial Blur and set the Blur Method to Zoom and the Amount to 100. If the effect is not strong enough the first time, run this same filter twice.
Step 11
Set the Blend Mode to Screen and use Edit > Free Transform (Control-T) to scale the light streaks up and re-position the effect so it is directly over the sun in the photo.
Step 12
For the finishing effect, create a merged layer at the top of the stack by holding down Alt and going to Layer > Merge Visible. Then go to Filter > Camera Raw Filter (Control-Shift-A). In the Basic tab set the Clarity to +64 and the Vibrance to +18.
Switch to the Effects Tab and in the Post Crop Vignette section set the Amountto -33. Then press OK to apply the filter.
And You are Done!
Click your heels together three times because you are finished! Congratulations on a fine piece of digital artwork. This piece would have been much more difficult to accomplish without the help of the Filter Forge plugin. The ability to creatively craft your own filters and use them as 3D render maps can unlock new worlds of wondrous possibilities.
How did your custom filter turn out? Share your image below in the comments!
Want More?
Are you inspired to tackle more
photo manipulation projects? Want to try your hand at some custom
Photoshop brushes? Check out my profile here at Tuts+ for my other Tutorials, Quick Tips, and Courses.
In this tutorial I'll show you how to create an inspired Emerald City based on The Wizard of Oz, with royal buildings, a poppy field, a yellow brick road and a green gate. You'll learn how to enhance the color and lighting, use texture, create depth of field, and use drawing and painting as well as advanced compositing techniques.
Tutorial Assets
The following assets were used during the production of this tutorial:
I just love the magnificent and gorgeous buildings as well as the fantasy atmosphere of the city, and I want to recreate this scene on a bright, sunny autumn day. There will be lots of steps, and some techniques will be repeated or done in the same way, so I'll go into more detail in the first stages and be shorter in the later ones.
First create a new 1800 x 1500 px document in Photoshop with the settings below:
Step 2
Open the sky image. Select a part of the sky only using the Rectangular Marquee Tool (M).
Drag the sky into our white canvas using the Move Tool (V).
Step 3
Create an adjustment layer to change the sky color. Go to Layer > New Adjustment Layer > Color Balance:
On this layer mask, select the Brush Tool (B) with a soft, round one
with black color (soft black brush) to reduce the yellow on the
top of the sky.
Step 4
Use a Curves adjustment layer to brighten the sky.
2. Add the Grass
Step 1
Open the grass image. Select a part of the grass in the middle using the Rectangular Marquee Tool.
Add it to the lower section of the working document using the Move Tool.
Step 2
Use a Hue/Saturation adjustment layer (set as Clipping Mask) to desaturate the grass green.
Step 3
Use a Curves adjustment layer and increase the lightness in order to make the grass less dull.
On its layer mask, use a soft black brush to reduce the brightness in
the foreground and the right side. We're aiming to make the main light come
from the left.
3. Make the Wall
Step 1
Create a new 3000 x 3000 px document and fill it with any colors you like.
Press Control-Shift-N to make a new layer and fill it with an
illuminating emerald color (#36684a).
Step 2
Open the wall image. Drag the wall into the canvas using the Move Tool and place it on the right.
Change this layer mode to Soft Light 50%.
Step 3
Duplicate this layer and flip it horizontally by choosing Edit >
Transform > Flip Horizontal. Place this in the left side.
Save the result as a JPG file for your future use.
Step 4
Open the wall texture created in the previous step. Use the Rectangular Marquee Tool to select a part from this texture.
Place it in the middle section of the grass and use the Free Transform Tool (Control-T) with the Warp mode to bend the top of it as shown below.
Step 5
Duplicate this layer several times and arrange them along the ground to create the wall form. Leave some distance between the biggest wall parts in the middle for
the gate. Use Control-T to resize and bend these parts to vary the
curves and sizes.
Step 6
Select
all the wall layers and press Control-G to make a group for them. Change
the group mode from Pass Through to Normal 100%. Use a Curves
adjustment layer for all of the wall layers (set as Clipping Mask)
which are located on the left to brighten them to fit the main light
source. The nearer the left, the brighter the wall.
Step 7
Create a Curves adjustment layer within the wall group to brighten the wall sections.
Use a soft black brush on this layer mask to reduce the lightness on the right ones and some lower areas of the left ones.
Step 8
Make another Curves adjustment layer to darken the walls a bit.
Apply brush masking on this layer mask to reveal the light on the left ones and the top of the right ones.
Step 9
The wall still looks flat, so make a new layer above the wall group, changing the mode to Overlay 100% and filling with 50% gray.
Activate the Dodge and Burn Tool (O) with Midtones Range, Exposure about 10–15% to paint more details for the walls. You can see how I did it
with Normal mode and the result with Overlay mode.
Step 10
Right
click the wall group, and choose Duplicate Group. Right click it again,
choose Merge Group, and we have the wall selection. Make a new layer
above this one. Load the wall selection by holding Control and clicking
the thumbnail layer.
Go to Edit > Stroke and pick the color #fae284.
Step 11
Double click this layer, and choose Bevel and Emboss.
Step 12
Add a mask to this layer and use a hard black brush to remove the stroke at the bottom as we don't need it.
4. Make the Gate
Step 1
Come back to the wall texture. Use the Pen Tool (P) to draw a shape like a gate on this layer.
Press Control-Enter to turn this path into a selection.
Right
click this selection, and choose Layer via Copy. We have this shape on a new
transparent layer (I turned off the texture background temporarily
and made a new white fill layer between the background and the shape to
help you see the process clearly). Name it "1".
Step 2
Duplicate this layer and use Control-T to make it smaller.
Create a Curves adjustment layer (set as Clipping Mask) to darken this
shape and make it visible on the previous one. Name it "2".
Step 3
To make another part of the gate, draw another shape on the texture
background and copy it into a new layer as we did with the first shape.
Move this layer on top of the layers and use a Curves adjustment layer
to brighten it. Place it onto the existing portal and name it "3".
Step 4
Duplicate the "3" layer and move it under "2" and above "1". Make it narrower using Control-T.
Use a Curves adjustment layer to darken this shape and it becomes the inner shade. Name it "4".
Step 5
Make a new layer above "2" and load its selection. Go to Edit > Stroke and pick the color #ad8932.
Step 6
Load the "3" selection and stroke it with a brighter color (#f5dd7d) and width of 15px.
Step 7
Double click this layer, and choose Bevel and Emboss. Set the color of Highlight Mode to white and Shadow Mode to #5b4d0e.
Step 8
Make a new layer and draw a line from the top to the bottom of "2" using
the Pen Tool. Right click it and stroke it with the color #f6d77b, and
remember to uncheck Simulate Pressure.
Apply the Bevel and Emboss effect with the same settings as in the previous step.
Step 9
Duplicate this layer and move it to the right a bit. Align these lines in the center of the door.
Step 10
Make a
group for these two lines and use a Curves adjustment layer to darken
them a little. On this layer mask, use a soft black brush to make the
lower part of the lines brighter (the top is more hidden so it should
be darker).
Step 11
Come back to the "1" layer. Add a mask to this layer and remove the bottom using a hard black brush.
Step 12
Hide the background and the fill layer and press Control-Shift-Alt-E to
merge all transparent layers (the gate parts) into a new one.
Move the merged gate into our main document and place it between the
wall sides (the space we've left while adding the wall sections).
Step 13
To make the gate pattern, double click this portal layer, and choose Pattern Overlay. Load Texture Fill 2 and pick Web.
Step 14
To make the gate shadow on the wall (the light comes from left to
right so the gate should cast shadow on the right), create a new
layer under the gate one. Use the Polygonal Lasso Tool (L) to make a
selection beside the right side of the gate and fill it with black.
Lower the opacity of this layer to 80% and soften the shadow by choosingFilter > Blur > Gaussian Blur and changing the Radius to 1px:
Add a mask to this layer and use a soft black brush to reduce the opacity of this shadow.
Step 15
Use the same method to make the shadow of the left side of the gate cast on the ground.
Step 16
Use a Curves adjustment layer to brighten the gate, especially the
left where it's illuminated by the light. On this layer mask, use a soft
black brush to hide the light and create the shadow of the left on the
hidden door area.
Step 17
Use another Curves adjustment layer to strengthen the shadow. Paint on the rest of the gate to maintain the lightness there.
5. Add the First Building
Step 1
From this stage on, we will be creating the buildings behind the wall
and setting these layers below the wall and gate ones. We'll be using
different elements of different castles, churches, domes and monuments to
composite into the fresh ones. The aim is to avoid uniform buildings, but to allow the viewer to see some commonalities in color, structure and details. There will be two main color schemes: green/cyan and
yellow/golden.
Open the castle 3 image. Select a part of this castle using the Polygonal Lasso Tool:
Add it behind the gate and flip it horizontally to fit the light source of the background.
Step 2
Select the big dome from this castle and add it to the top of the existing one. Set this layer under the existing layer.
Step 3
Make a group for these layers. Use a Hue/Saturation adjustment layer to desaturate them.
Step 4
Use a Channel Mixer adjustment layer to change the building color.
Step 5
Create a Hue/Saturation adjustment layer and change the Master settings:
Step 6
Use another Channel Mixer adjustment layer to turn the building color golden.
Paint on the mask of this layer with a hard black brush to reveal the cyan, especially the wall of the building to create an emerald building with golden columns.
Step 7
Use a Levels adjustment layer to increase the highlight.
6. Add the Second Building
Step 1
Isolate the monument and place it on the left edge of the wall.
Step 2
Make a new layer (set as Clipping Mask), change the mode to Overlay 100%
and fill with 50% gray. Use the Dodge Tool to brighten the left of this
building as it looks too dark at the moment.
Step 3
Use a Channel Mixer adjustment layer to change the building color.
Use this layer mask to reveal the golden details (ornaments) of this building.
Step 4
Create a Curves adjustment layer and increase the lightness. Paint on the layer mask to maintain the shade there.
7. Add the Third Building
Step 1
Open the church 2 image. Extract the top of the church put it on the
right side of the scene. Flip the bright side of the dome to the left.
Step 2
Select the dome of the church and add it to the top of the building 2.
Use Control-T to distort it to fit the form of that building.
Add a mask to this layer and use a soft black brush to blend the top part with the existing building.
Step 3
Select the globe on top of the building from the original image, and place it onto the top of building 2.
Use a layer mask to remove the bottom of this globe.
Step 4
Create a Channel Mixer adjustment layer to alter the globe color.
Step 5
Make a group for these layers, and use a Hue/Saturation adjustment layer and change the Cyans settings:
Step 6
Create another Channel Mixer adjustment layer to add emerald to the
building parts. Erase the columns and the globes to keep their original color.
Step 7
Use a Curves adjustment layer to give some light to the building. Apply
brush masking on the dark side of the building to maintain the shade there.
Step 8
Make a Levels adjustment layer to increase the highlight. Keep the shade of the building and globe by erasing the darker parts.
8. Add the Fourth Building
Step 1
Open
the church 3 image. Select the top with the dome and place it on the two
sides of the wall. Add the dome to the top of the center building
(first building).
Step 2
Group these layers into a new folder. Use a Hue/Saturation adjustment layer to alter their color.
Reveal the original color of the gold lines on the domes by using the Hue/Saturation layer mask.
Step 3
Make a Channel Mixer adjustment layer to give some vibrant golden color to the building parts.
Use this layer mask to reveal the emerald areas on the top and the windows and leave the gold visible on the columns and strokes.
Step 4
Create a Curves adjustment layer to increase the highlight, especially
on the domes. After that, erase the rest using this layer mask.
9. Add the Wall Columns
Step 1
Open the column image. Select the higher part of the column and add it
to the connection between the two wall sections. Duplicate them several times,
use Control-T to vary their size, and add them to other wall connections. The farther from the viewer, the smaller the column.
Set these layers above the wall and stroke ones.
Step 2
You can see that most of the columns are higher than the wall. To delete the
higher parts, add a mask to each of these layers and work on it using a hard black
brush.
Step 3
Take a lower part of the column in the original image and place it onto one of the
building parts in the previous stage (building 4) which lacks the top.
Step 4
Make a group for all of these layers. Use a Color Balance adjustment layer to bring some saturation to them.
Step 5
Use a Curves adjustment layer to brighten the columns.
Use a soft black brush to maintain the shade on the darker side of the columns.
Step 6
Make another Curves adjustment layer to strengthen the shade.
Erase on the brighter side of them to keep the brightness there, especially the ones near the light.
Step 7
Make the columns' shadow in the same way as the gate's.
The farther from the light, the longer and softer the shadow.
10. Add the Fifth Building
Step 1
Open the church 1 image. Select two domes to place behind the existing buildings.
Step 2
Make a group for these layers and use a Channel Mixer adjustment layer
to change the building color, especially the domes. On this layer mask,
erase the lower parts using a soft black brush.
Step 3
Add a Hue/Saturation adjustment layer and change the Master settings:
Step 4
Use a Curves adjustment layer to brighten the buildings. Apply erasing on the layer mask to keep the shade on the darker sides.
Step 5
Create a Curves adjustment layer to make the shade on the buildings stronger. Erase the bright areas using its layer mask.
Step 6
Select
the tower from the original image and place it under the existing
buildings (not in this group). Duplicate this layer and move it to the other side of the wall.
Step 7
Make a new folder for all of these layers including the existing group.
Use a Channel Mixer adjustment layer and change the Reds settings:
And here is the result after masking:
Step 8
Make a Color Balance adjustment layer and enhance the color of the building by changing the Midtones and Highlight settings:
11. Add the Sixth Building
Step 1
Open the tower 1 image and isolate the top to add behind all the existing ones.
Step 2
We're going to do the same with the other buildings. First use a Channel
Mixer adjustment layer and bring the Red value of Reds up to +65. Erase
this adjustment layer effect on the lower part of the building to avoid a
color cast look.
Step 3
Make a Curves adjustment layer to bring more shade to the darker part of
the building. Use a layer mask to bring the original lightness back to the front.
Step 4
Increase the light on the building by adding another Curves adjustment
layer. The screenshot below shows the result after masking off the
shade.
12. Add the Seventh Building
Step 1
Open the tower 2 image and cut out the tower using the Polygonal Lasso
Tool. Place it behind building 2 and then duplicate it to add behind building 1. Use a layer mask to remove the top of the duplicated
tower (don't worry, we'll add another top to it later).
Step 2
Use a Channel Mixer adjustment layer and change the Reds and Blues settings:
Use the layer mask to get the result below:
Step 3
Use a Hue/Saturation adjustment layer to increase the vibrance of the parts which have been masked off in the previous steps.
Step 4
Add a Curves adjustment layer and increase the lightness. Apply erasing to the parts which are less illuminated.
Step 5
Increase the highlight using another Curves adjustment layer. Here is the result after using this layer mask.
Step 6
Open the dome 1 image. Take the highest part and add it to the building which lacks the top.
Step 7
Here are the results with Hue/Saturation, Channel Mixer and Curves (after masking).
13. Add the Eighth Building
Step 1
Open the castle 1 image. Select the highest tower to place behind building 2.
Step 2
Select the lower part of this tower and another building to combine into a new one. Place them near the right side of the wall.
Step 3
Group all of these layers and make a Hue/Saturation adjustment layer inside the group. Use its layer mask as usual.
Step 4
Add two Curves adjustment layers to refine the light and contrast of the
buildings. The results are shown in the screenshots below:
Step 5
Use a Channel Mixer adjustment layer for the top of the second building
(the combined one). Here is the result after working on this layer mask (the selected part shows the masking area):
14. Add the Ninth Building
Step 1
Open
the castle 2 image. Take two domes and add them to two sides
of the walls and behind most of the existing buildings. Use Control-T to make one of them smaller than the other.
Step 2
Apply Channel Mixer and Curves adjustment layers to match the color and light of these with the other elements.
15. Add the Tenth Building
Step 1
Open the dome 4 image. Select a dome and place it behind building 9.
Step 2
Apply Channel Mixer, Hue/Saturation and Curves:
16. Add the Missing Details
Step 1
Open the dome 2 image. Select the dome part only and add it to the one
of the buildings in the building 3 group which lacks the top. Set this layer under the
building 1 group.
Step 2
Duplicate this layer and move it to the top of building 1. Use Control-T with the Warp mode to bend it as shown below:
Use a layer mask to remove some outside details of this part:
Step 3
Group these layers and use two Hue/Saturation adjustment layers to add some vibrant gold/cyan to these dome parts.
Step 4
Make a Curves adjustment layer to bring more light to these details.
Step 5
Open
the church 3 image again. Take the top part of the dome and add it to
the top of one of the buildings in the building 5 group. Place it inside the fourth building group,
below the adjustment layers so it has the same effect with the elements
inside this group. Use a layer mask on the Channel Mixer adjustment
layers to reveal the golden tone as we've done with the layers in the fourth building group.
Add a mask to this building layer and remove its top using a hard black brush.
Step 6
Open the castle 1 image again. Select a part from its top to add to the
top of building 1. Set this layer above the existing buildings ones
and apply the same adjustment layers and masking method done with the eighth group of buildings.
Step 7
Come back to the church 3 image again and select the highest part of the
dome to complete the first building. Apply the same adjustment layers and masking method we used with the fourth building layers.
Step 8
Open the dome 3 image. Take the small globe on the top to add to the top of the columns, and duplicate them several times according to the number of the
columns. Vary their size to match the size of the columns.
Step 9
Make a group for these globe layers. Create a Color Balance adjustment layer and change the Midtones settings:
Step 10
Use a Curves adjustment layer and increase the lightness. Apply masking to
make the ones on the right a bit darker than those on the left.
17. Add the Landscapes
Step 1
Place
the landscape 1 image behind the grass, and use a layer mask to remove
its sky, reveal the existing sky, and make the tops of the mountains fade a
bit into the sky.
Step 2
Change the landscape color using a Color Balance adjustment layer:
Step 3
Use a Curves adjustment layer to increase the haze and match the landscape contrast with the background.
Step 4
Add landscape 2 above landscape 1, and use a layer mask to blend it
with the grass. Leave some tree bushes on the sides, and reduce the
opacity of the trees in its background. The aim is to add some depth of
field to the whole scene.
Step 5
Use a Curves adjustment layer to match the brightness of landscape 2 with the background.
18. Add the Trees and Bushes
Step 1
Open the tree 1 image and drag it into our working document using the Move Tool. Place it on the left and behind all the buildings.
Step 2
Use a Hue/Saturation adjustment layer to turn the tree color into a red one.
Step 3
Make a Curves adjustment layer to brighten the tree a bit:
Step 4
Duplicate this tree layer and bring it to the top of the layers, placing it
beside building 1. Use a layer mask to erase the lower part of the
tree and make it stand inside the wall.
Step 5
Make it brighter using a Curves adjustment layer.
Step 6
Add tree 2 to the left edge of the scene and the front of the first building.
Step 7
Change the color of these trees using a Hue/Saturation adjustment layer.
Step 8
Make a group for trees 2 and use a Curves adjustment layer to brighten them.
Step 9
Add tree 3 using a similar method:
Step 10
Add tree 4 to the ground, near the left edge of the image. Use the familiar method to match it with the scene.
Step 11
Make its shadow as we did with the other elements.
Step 12
Add tree 5 to the right side using the same method.
Step 13
Place tree 6 on the right edge to hide some details in the background.
Step 14
Isolate the bush and place it near the gate, using the Warp Tool to tweak its form as shown below:
Duplicate this layer twice and arrange the bushes along the wall.
Step 15
Make a shadow for them as we did with the other elements.
Step 16
Use some adjustment layers to change the color, light and shade. I won't
say in detail as it has been repeated too much through this tutorial.
Step 17
Open
the tree 7 image and cut out the trunk only to cover the right edge of
the scene. Use the Warp Tool to bend it as shown below. Set this layer
above all the existing ones.
Step 18
Use some adjustment layers for this tree:
Step 19
Open the leaves image and cut the leaves part to add to the top of tree 7. Use a layer mask to blend the leaves with that tree.
Step 20
Make some adjustment layers for the leaves, giving them more red and vibrance.
19. Add the Poppy Field
Step 1
Place
the poppy field image onto the ground area. Use a layer mask to remove
its background and blend it with the existing ground. Set this layer
above the gate ones.
Step 2
Create a new layer and activate the Clone Tool (S). Use this tool to clone the poppy to the selected parts to hide some unwanted areas there.
Step 3
Make a Curves adjustment layer to enhance the light and contrast of the field.
20. Add the Yellow Brick Road
Step 1
First use the Pen Tool to draw a curvy shape like a road running along the field to the gate. Fill it with any color you like, but better choose a bright one,
such as a yellow like mine. We'll be using it as a guide.
Step 2
Open the brick texture image and drag it into our main document. Place
it in the foreground and use Control-T with the Warp mode to bend the
brick following the curve of the shape:
Load the shape selection and on the brick layer, click the Add layer
mask button at the bottom of the Layers panel. We have the result:
Step 3
Use the same method to make the parts of the road and fill the shape with the brick texture, remembering that the further from the viewer, the smaller the bricks.
Step 4
Add some adjustment layers to turn the road color into a yellow one.
Step 5
To make the road look more realistic, make a group for all the brick
layers. Add a mask to this group and use a hard black brush (better
use a tablet pen) to paint on the edges of the road to show some poppies
and blades of grass:
Step 6
Create a new layer and use a soft black brush to paint the shadow of the
poppies on the road. Lower the brush opacity to achieve a more realistic
result.
21. Add the Ornaments
Step 1
Isolate ornament 1 and add it to the middle of the door. Use a layer
mask to remove the sides of this ornament and make it look like a big decorated key.
Double click this layer, and choose Drop Shadow:
Step 2
Use some adjustment layers for this ornament.
Step 3
Use the same method to add ornament 2 to the bottom sides of the door.
Step 4
Do the same with ornament 3 and place it in the middle of the sides of the door.
Step 5
Repeat the same steps with ornament 4 that is located on top of the gate.
22. Add the Oz Text
Step 1
Make a new layer and activate the Type Tool (T). Choose Arial font with 10
pt and type the O letter with the color #f8ae43. Move the O to the middle of ornament 1.
Type the Z letter on a separate layer and move it to the middle space of the O.
Step 2
On each of these layers, apply Layers Styles with the settings below. Set the color of shadow in Inner Shadow to #fbf039.
Step 3
Make a group for the text layers. Use a Curves adjustment layer to change the contrast of the letters.
Step 4
Add a mask to this group and blend the bottom of the O letter with ornament 1.
Step 5
Come back to the gate layer and use the Clone Tool on a separate layer to remove the lines shown inside the "OZ" letters.
23. The Final Adjustment
Step 1
Make a new layer on top of the layers and use a soft brush with the
color #190600 to paint on the top left of the scene. Change this layer
mode to Linear Dodge 100%.
Step 2
On a new layer, use a soft white brush to paint glowing light on the top of the buildings and gate.
Step 3
Make a Selective Color adjustment layer and change the Yellows and Cyans settings:
Step 4
Create a Curves adjustment layer to darken the whole scene. Keep the brightness of the left side using this layer mask.
Step 5
Go to Layer > New Fill Layer > Solid Color and pick the color #fcef84.
Lower the Opacity of this layer to 30% and reduce the effect on the
right side and some of the buildings. Leave the hazy light on the buildings at the back to enhance the depth of field.
Step 6
Make a Gradient Map adjustment layer and pick the colors #6d463b and #367a8e. Change this layer mode to Soft Light 100%.
Step 7
Use a Color Balance adjustment layer to bring more vibrance to the scene.
Step 8
Create a new layer and set the mode to Hard Light 100%. Use a soft brush
with the color #f9dd89 to paint more light for the left, especially on
the buildings located there, to give them a dreamy, fantasy light effect.
Step 9
To
increase the scene contrast, use a soft black brush with the Opacity
about 30–40% to paint on the right side and the bottom left to darken
these areas. Change this layer mode to Soft Light 100%.
Step 10
Come back to the trees 2 group and make a shadow for the tree in the left edge (I forgot this detail!).
Congratulations, You're Done!
I hope you enjoyed this tutorial didn't become too sleepy before you finished reading it! As always, you're very welcome to share your comments and feedback in the box below. Enjoy Photoshopping!
Transform your youngster into the Great and Powerful Wizard of Oz! And pay no attention to that person behind the Photoshop...
1. Gather the Resources
The throne room of the Great and Powerful Wizard of Oz was visually distinctive in the film. Curtains in the background, some sort of throne or altar structure, smoke and fire, and of course the giant, green, floating head!
Step 1
Download the WizardOzResources.zip file attached to this tutorial. Inside you will find four images that we will use to create the throne room setting:
Remember seeing the huge, disembodied head of the Wizard the first time you watched the Wizard of Oz? It was scary and intimidating! It certainly wasn't smiling.
So coach your child to pose for a few shots, and ask them to express some negative emotions with facial features. Try for things like disdain, contempt, or disgust to get some interesting expressions.
2. Set the Scene
Before releasing our smaller counterpart into the wonderful world of Photoshop, let's set up the throne room first.
Step 1
Open the image of the stage curtain. It's in the attachment for this tutorial and it's called antique-2896_1920.jpg. The color needs to be changed to green, so add a Hue/Saturation adjustment layer and check the colorize box. Set the Hue to 122, Saturation to 32 and Lightness to -43.
Step 2
Create more dramatic contrast to the curtain image by adding a Curves adjustment layer and creating a slight S-shape for the curve.
Step 3
Open the organ image, called antique-2896_1920.jpg. Use the Polygonal Lasso Tool (L) to create a careful selection around the main structure of the pipe organ. Then go to Edit > Copy (Control-C).
Step 4
Return to the curtain image and use Edit > Paste (Control-V) to deposit the organ into our throne room scene. It comes in way too large, so use Edit > Free Transform (Control-T) to see the transform handles, which can be used to scale the layer down to fit.
Step 5
The organ is way too bright. Add a Curves adjustment layer and clip it to the organ layer with Layer > Create Clipping Mask (Alt-Control-G). Then adjust the curve by adding a central point to the line and dragging it downwards.
Step 6
The red hues of the organ need to be toned down so they are not as noticeable. Add a Hue/Saturation adjustment layer and change the target color from Master to Red. Then set the Hue to +9, Saturation to -38, and Lightness to -40. Clip this adjustment layer to the last Curves adjustment layer with Layer > Create Clipping Mask (Alt-Control-G).
Step 7
Open the Fire1.jpg image and drag it over to drop onto the throne room document. Then use Free Transform (Control-T) to scale and rotate the fire into place at the bottom of the image. Set the blending mode to Linear Dodge (Add) and reduce the Opacity to 95%.
Step 8
Open the Steam1.jpg image use the same process to place the smoke into the throne room document. For the smoke, use a blend mode of Screen and an Opacity to 64%.
Step 9
Duplicate the smoke layer with Layer > Duplicate Layer. Then flip the copy horizontally with Edit > Transform > Flip Horizontal and position the layer on the other side of the fire. Use the Edit > Transform > Warp to give the smoke a slightly different shape so it isn't an obvious reflection of the first layer.
Step 10
Before handing the project over to the younger member of this creative team, open the photo you two have chosen to use for the project. Then close any other documents that are open except the main throne room we have been working on.
3. Hey Kids!
First of all, thanks for helping out! Have you had a chance to watch the Wizard of Oz movie with your parents? It was probably one of their favorites as a kid. Your parent has already set up a scene where we can turn you into the great floating head of the Wizard of Oz! So let's get started.
Step 1
You should see the picture of you open in a program called Photoshop. To the left side of the screen is a Tool Bar. In it, look for a little brush that has a dotted line around it—this is the Quick Selection Tool (W). Use it to "paint" a selection of your head. You should see a blinking line of dots showing the selection.
Step 2
Near the top of the screen, look for a Refine Edge button. Press that to get a new window with a bunch of settings. Change the Radius setting to 3 px, the Smooth setting to 15, the Feather setting to 5 px, and the Shift Edge setting to -20%. Then press OK.
Step 3
Looking at your photo again, we want to copy the selected area. So go to the top menus and find Edit > Copy (Control-C).
Step 4
Look along the top of the screen for some tabs. These are showing the documents that are open in Photoshop. There should only be two right now: your photo, and the Oz Throne Room scene. Click on the throne room's tab to see that document.
Step 5
Now go to Edit > Paste (Control-V) to paste the selection of your face over the throne room scene. If you look in the Layers panel you can see that this is on a layer by itself called Layer 1.
Step 6
While still looking at the Layers panel, right click on the layer containing your face and choose Convert to Smart Object. This makes that layer safer to edit in creative ways.
Step 7
Go to the menus at the top and choose Edit > Free Transform. You will see a box around your face on the screen. Click and drag on the corners to resize it until your face fits into the scene like you remember the glowing face of the Great Wizard!
Step 8
Do you remember how huge the Wizard's head was? We can make yours just like that too! Go to Edit > Transform > Warp to get a different set of handles around your face layer. These let you drag on the corners and intersections to change the shape of the layer. Make the top part of your head really, really big, and your neck rather thin too.
Step 9
Now to add that mysterious emerald glow. Go to Image > Adjustments > Hue/Saturation(Control-U). When the settings box comes up, check the Colorize box and set the Hue to 120, Saturation to 70, and Lightness to -40. Then click OK.
Step 10
Look again at the Layers panel and find a setting near the top of the panel that says Normal. This is called the Blending Mode. Change it to Lighten so that your face looks as if it's made of light and you can see the smoke showing through it.
Step 11
Now go to Layer > Layer Mask > Reveal All. You won't see anything looking different, but now there's another little white box next to the small picture of you in the Layers panel. This is the mask thumbnail. This will help us control how the edges look around your head.
Step 12
Next grab the Brush Tool (B) from the tool bar on the left. Then right click to get the brush options and select the Soft Round Brush. Make sure your paint color is black, and then use this brush like an eraser to paint out the hard edges around your hair and neck, or any other areas that don't quite look right.
Great Work!
Nicely done. Your image should look something like this now.
4. Finish Effects
Now that we have our wizard looking on, let's add a few subtle effects to the scene to finish it up. Work together on this part. If the child feel confident enough to follow the steps, encourage them to do so, but be ready to help out if they get stuck!
Step 1
Add a new layer under the Fire layer for Painted Smoke. Use a Soft Round Brush with a midtone grey and low opacity to build up some haze behind the smoke and give it more substance.
Step 2
Switch to black paint and add some darkening effects behind the fire to help it stand out more. Be careful here—it's just to add contrast to the flame, not shadows to the scene.
Step 3
Add another layer and grab the Gradient Tool (G), setting it to the Foreground to Transparent preset and Radial shape. Hold down the Alt key to sample an orange color from the fire. Then create the gradient radiating up from the flame. Set the layer blend mode to Color Dodge and the Opacity to 60%.
You Are Done!
All Hail the newly crowned Great and Powerful Wizard of Oz! Just don't pull back that curtain!
How did your new wizard come out? Show us in the comments below!
Want More?
I hope you and your child had as much fun with this project as my daughter and I did! I've got more Photoshop for Kids! tutorials along with some photo manipulation projects, custom brushes, and even more Photoshop fun. Check out my profile here at Tuts+ for my other tutorials, quick tips, and courses.
"I'll Get You My Pretty" has taken on a whole new meaning in this tutorial. The Wicked Witch of the West now dons a stylish collection of haute couture clothing to be rivaled only by her fabulously evil attitude. Join me in a maddening ride through form and color as we create a stunning witch and her entourage of flying monkeys.
1. Stage the Sketch
Using my scanner at 200 dpi to catch as much of the detail as possible, I've captured this image from my sketchbook.
We'll be working with a clean line quality from Photoshop and now we can begin to work. I'm working in Adobe Illustrator in RGB mode at a size of 11 x 17 inches for this specific project.
I'll label my first layer as "Sketch" and lock the layer to make sure I'm not accidentally working on this layer. We'll be loosely following this as our guideline.
2. Add Initial Body Lines
Step 1
Using my Pen Tool (P) with a Stroke line weight of 2 pt, I've started to outline the contours of her face. You'll find that most of my forms start face first. You of course are welcome to start any way you'd like, but it allows me to map out the rest of my composition.
Step 2
While we are working on this vector, we'll play with the Line Weight by utilizing our Width Tool (Shift-W). I like to start with a rather thin Stroke line, usually around 0.15 pt, and expand it where needed.
Step 3
I'll be switching colors periodically while making my Stroke lines. This is in an effort to make it more visible. Had I stayed with a darker line, it would have been more difficult to see over the pencil sketch.
Step 4
Here you can see that I've made my lashes with a Strokeweight of 0.25 pt, which will for the most part be the smallest weight we'll comfortably use for this project.
Step 5
I've recolored the project to make it easier to see the differences between the details.
3. Put in Body Line Details
Step 1
You'll notice that I will lower the Transparency in order to see the sketch directly underneath. Normally 40–50% will do the trick.
Step 2
Here, I'm showing the clean version, without the Sketch. It makes a world of difference, doesn't it?
Step 3
At this stage I'm continuing showing the clean version over the sketch. You can see that we have plenty to complete, but our end result will be easier to color and scale.
4. Continue With the Intricate Details of the Witch's Body
Step 1
An easy way to make cleavage is to utilize the Width Tool. It's quick and a nice adjustable method for making the perfect "set".
Step 2
During this step, I've made progress with the cape, fingers, hair, and feathers. I'm using relatively small Stroke lines made with my Pen Tool (P) and following the Sketch to develop my clean version of the project.
Step 3
At this point, I've started to add my dress details. I'm putting together simple shapes that can be easily colored later.
It may seem complex, but the pearls really are just small circles made by the Ellipse Tool (L).
Step 4
I have also taken a bit of time to make my emerald crystals. The Stroke weight is quite a bit thicker. It's about 2.5 pt in thickness. It's a small detail, so this will allow the crystals to be more visible.
Step 5
Here, we can see all of our detail brought into the upper half of the Witch's body. We've added folds to the scarf connected to the hat, as well as starting our clouds in the sky.
Step 6
Next, I've added a Layer to include our Gradient background. Sometimes, it's helpful to step back to see how far along you are. I gain perspective this way.
5. Add Background Elements
Step 1
The next step is to begin a new Layer to incorporate the background elements. This will be separate from the Gradient layer as well, to make working easier. Please note that I lock all of my unused Layers to prevent any selection errors.
Step 2
I've proceeded to add the Emerald City buildings and Yellow Brick Road. I'm making my bricks via freehand, so don't think that you have to be completely accurate here. Even a few imperfections will add character.
Step 3
During this step, I have made very simple flowers which I have then Grouped (Control-G) to make it easier to manage them.
I've made a few little flower clusters here and there, but I'm doing this with a minimalist approach. I will not push for a detailed poppy field this time around, simply because it will be fully readable as a field once we've colored it.
6. Build a Hot Air Balloon and a Tornado
Step 1
The next step is to make our hot air balloon. I've started with a simple Ellipse (L) and will Unite the upper and lower halves to make a full balloon shape.
Step 2
After finishing the hot air balloon lines, I've turned on my Gradient layer to see how my colors will look behind it. This isn't the final color, but it allows me to visually rule out this color and experiment with the next.
Step 3
The previous sketch had an angular tornado. I didn't feel that this worked with the composition, and therefore didn't read well. Using a series of simple curves, I mimicked the previous tornado and came up with a much better representation.
7. Add a Thick Stroke to the Witch
Step 1
At this point, we're ready to create a nice thick Stroke of about 2.5 pt around our Witch. I suggest making a duplicate of all of her parts and Uniting the pieces while creating the line work with Rounded Caps and Rounded Join Corners. These settings will be found on your Pathfinder tab.
Step 2
Once you've applied your Stroke line, your Witch will look more pronounced. We're trying to achieve an almost Art Nouveau look.
8. Add Monkeys
On a separate Layer, we'll start working on our Flying Monkeys. The Stroke line will be 1.75 pt, just a hair thinner than the Witch, to allow her to remain our focal point.
9. Layers of Composition
Once we've made all of our initial lines, we can see just how many Layers we made. You can see in this step the clean version on top of the sketch, as well as the clean version by itself. We honestly could leave it as it is, but what would be the fun in that?
10. Separate the Line Work From the Fill
From here, we'll do our prep work to make way for our colors. I recommend making duplicates to work from and saving a copy of your originals just in case, since this is where it gets a little tricky. Put all of your vectors on one Layer and make sure to select all of your Paths. Expand only your Strokes. In your Pathfinder tab, click Divide and this should jigsaw all of the layers together.
Once you're at this stage, create a new Layer. Select either the white or colored Fill and in your Task bar, hit Select > Same > Fill Color. This will highlight all the pieces associated with that particular color.
Take your mouse or pen and select the space on your Layer in the Layers tab that is located next to the small circle on the right hand side of it. Drag to the empty Layer. This should drag all Fill layers of that color to the new Layer. Hide the Layer with the white Fill. I've recolored the necessary lines black. We're now ready to color!
11. Add Initial Color
Step 1
Now that we have our black lines, we have two options. We can utilize the white Fill that's already there and edit the colors, or we can make a New Layer to create all of our new shades. Here, I'm showing you how to utilize the already separated white Fill.
Step 2
With this step, I have decided to create all of the under color. I'm using two color Gradients for most of my work. I try to keep it under three for a project with this much detail.
12. Add Background and Foreground Elements
For the buildings, I'm sticking to a similar color palette as the dress. I'm attempting to keep a theme going throughout our artwork.
13. Add Large Gradient Elements
Since the grass initially was this color, I decided to stick with it for our crystal ball. I've added feathers to her hat, as well as the initial monkey fur color. Try to block in the larger colors first before starting on the details.
14. Create Glowing Smoke
For the Witch's smoke, I'll be doing a two-step process. Once I have my initial color blocked in under the black line, I'll return to the my black line Layer and I'll edit the colors of some of my lines. Doing so with the smoke gives it a very eerie feel, and allows it to stand apart from the rest of the composition.
15. Continuation of the Glowing Smoke
Step 1
I've only begun to work out the smoke outlines. Be very careful of small pieces that you might miss along the way.
Step 2
Once you've finished putting in the larger amounts of color, you can go back in and add organic curves to enhance our billowy smoke.
Step 3
Add a bit of smoke also to parts of the dress. I like to think of this Witch as melting into her own magic, so don't be afraid to allow your colors to mix together.
16. Add Details to the Dress
Step 1
Add small accents using the color from our crystal ball, and take advantage of your ability to use Transparencies in order to add to the dress details.
Step 2
This could be a very flat-looking piece, so we need to incorporate light and dark treatments. I'm using the colors taken from the smoke to enhance her body. I've used a Feather effect with a Radius of 0.3 in and an Opacity of 30%.
17. Add Details to the Face
Step 1
Details to the face are a must. Since this is a fabulous, fashion-forward Witch, we'll give her daring ruby red lips and just a hint of eye shadow.
Step 2
We've also gone as far as to enhance her chest. I imagine this woman thinks that beauty is pain, therefore she's most likely alright with the lack of oxygen.
Step 3
At this stage, I've decided that her hair was a bit too dark for the overall project. There's a bit more blue to the general deep-green mix previously used.
18. Finish the Details of the Hot Air Balloon and Sky
Step 1
By this stage, we're ready to add the hot air balloon colors and clouds. We can also add a few layers of color to the entire sky to give it a dreamy sunset appearance.
Step 2
I also want to note that the color of the background has changed to incorporate light and dark, but in a more dramatic fashion.
19. Add Lighting Details
Step 1
Make sure to add light to your composition. The smallest detail can be overlooked, but when you give it a bit more attention, it can turn into a game changer. The feathers were a bit tedious, but well worth the patience!
Step 2
I'm now ready to add color to the tornado and hot air balloon's line work. By using the colors of our sky, we've managed to incorporate more light without much effort.
Step 3
The Emerald City wouldn't be the same if it wasn't a spiraling metropolis of glittering green, so we'll add a bit of glow to give it that dream-like look.
I've also designed a few circular light rays, which was a popular touch in most propaganda posters in the 1930s and 1940s. I like to mingle new and old ideas. It creates a whole new look that becomes more relatable to a wider scope of people. Both the glow and light rays have been placed in a Mask to keep our beautiful edges flawless.
20. Add Rays of Light Behind the Hot Air Balloon
Since I'm enjoying the finished look of the Emerald City, I thought I'd carry the theme over to the hot air balloon.
21. Add Details to the Monkey
With our sweet but completely devious monkeys, we'll add hair details and teeth. It doesn't take much detailing at this point, since we took all of that time to create the line work.
22. Add Additional Lighting
We'll finish off our yellow brick road with just a bit of our glowy green. I love the idea that as you approach the city, it becomes a whole new source of light.
If you need to recolor the Symbol, merely double-click on the Symbol in your Symbols tab and recolor your artwork. This will be linked to any that you have previously put into your composition, so keep that in mind.
24. Add the Last Rays of Light to the Emerald Crystals
My final act of insanity is to incorporate our rays of light into our emerald crystals as well. You can Mask these for a cleaner presentation around your composition.
I'm Melting...
Hopefully you've made it past the lions, tigers, and bears, and your end result is just as fun and festive. Remember to make room for fun, and nothing has to be exact to look perfect in your eyes. The purpose is to enjoy what you do and explore the vector world at your own pace. Thanks for taking another "sizable" journey with me. Stay fabulously colorful, friends!