Quantcast
Channel: Envato Tuts+ Design & Illustration
Viewing all 6352 articles
Browse latest View live

How to Use Drop Shadows in Photoshop

$
0
0

Photoshop layer styles are a popular way to add effects, such as drop shadows and strokes, to layers in a non-destructive way. With the right knowledge and experience, any effect can be achieved. To achieve these effects, however, you need to understand what each setting does and how they can be combined to achieve a certain look. In this series by John Shaver from Design Panoply, we will explain every aspect of Photoshop’s layer styles feature and show you how to unlock their potential. In this article, Part 2: How to Use Drop Shadows in Photoshop we will explain the Drop Shadow settings, what they each do, and how we can use them to create different effects. Let’s take a look!


What Are Drop Shadows Used For?

The traditional use for a drop shadow is to simulate 3D depth in a 2D image. This is done by creating an offset shadow behind an object to indicate that the object is hovering above the background in 3D space.

Below you will see an example of how a drop shadow can indicate how big the light source is and where it is coming from, as well as how far away an object is from the background. By changing only the settings of the shadow, you can dramatically change the look of an image.


The Layer Styles Drop Shadow Dialog Box

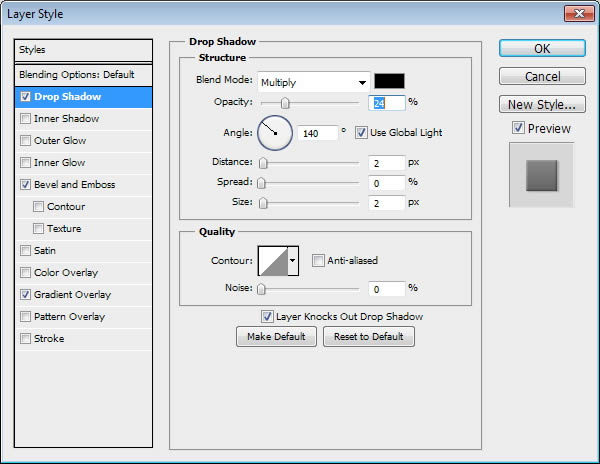
The Drop Shadow Dialog Box is a good place to start for beginners because the settings are pretty basic and will give you an overall feel of how to use the rest of the effects as well. A subtle drop shadow is also one of the best effects to give your design a little pick-me-up.


Blend Mode

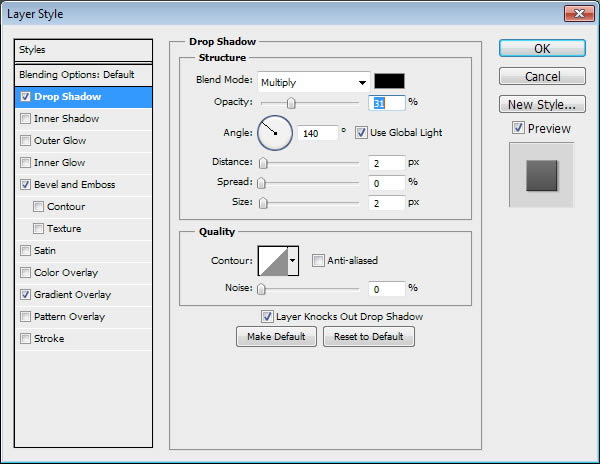
The Blend Mode allows you to set the blending mode for your shadow. Typically you will want this to be Multiply or Linear Burn, so that your shadow darkens the layer that is behind it.

If you are unfamiliar with how all the different Blending Modes work, I highly recommend checking out the Blending Is Fun Basix tutorial.

This is also where you set the color of your shadow by clicking the color block next to the Blend Mode dropdown menu. By default, the shadow color will be black, but you can add a tint of color or even try something outrageous to get special effects.

In the following example, you can see that the color of the shadow on the left is black, while the color of the shadow on the right is a dark maroon color. This creates the result you see below. One simple change can make a totally different looking style.


Opacity

The Opacity slider allows you to specify how transparent your shadow will be. A setting of 0% is completely see through while 100% is completely opaque.

In the following example, you can see that simply by changing the opacity from 25% to 60%, the shadow becomes much more prominent.


Angle

The Angle spinner and corresponding box allow you to change the apparent angle that the light source comes from. By turning the "Use Global Light" checkbox on, any changes you make to the angle of the drop shadow will also change the angle of the light sources used in other effects like Bevel and Emboss, Inner Shadow, etc. By leaving it unchecked, you can change the light angle for the drop shadow independently of other effects.

The recommended setting is "checked" for most cases, because we want to have a uniform light source for the most cohesive looking effect.

In the following example, changing the angle of the light source changes the way in which the shadow falls, and since "Use Global Light" is checked, it also changed the light angle for the Bevel and Emboss effect as well.


Distance

The Distance slider changes the apparent distance between the subject and the background. The effect is achieved by altering the distance between the subject and the drop shadow itself.

In the following example, increasing the distance gives the effect that the text on the left is hovering just above the background while the text on the right is farther away.


Spread

The Spread slider changes the falloff of the shadow in a linear fashion, or in other words, how gradually it fades out at the edges.

For a typical drop shadow, you will normally want to leave this at 0%, but for harder shadows you should increase it, and for shadows with hard edges or even extra strokes you can set it all the way to 100%.

In the following example, increasing the spread percentage changes the falloff of the shadow so that it stays darker longer as it fades out at the edge.


Size

The Size slider changes the apparent size of the shadow. When it is set to 0, the shadow is exactly the same size as the shape of the object. As you increase the size, the shadow grows in 1 pixel increments.

In the following example, increasing the size of the shadow gives us flexibility over controlling not only the overall size of the shadow, but the softness of it as well.


Contour

The Contour shapes allow you to change the falloff of the shadow in a non linear fashion. By choosing different curve profiles, you can get the shadow to fade out in different ways.

The only time this is really useful is when you are trying to achieve special glow or abstract effects.

In addition, the "Anti-aliased" checkbox allows you to improve the quality of the shadow falloff with a very slight drop in performance. The performance decrease is negligible, so we recommend always keeping the box checked.

In the following example, changing the Contour shape to an inverted "U" results in an odd looking "halo" shadow effect.


Noise

The Noise slider is a useful tool to give your shadow a gritty feel. If you are creating a style that is going to resemble dirt or concrete, adding some noise can help the overall effect. For a totally smooth shadow, leave it at 0%.

In the following example, setting the noise to only 15% gives us a pretty substantial amount of grit in the shadow. A good range to use is 0%-25%, as going higher than 25% can often result in a very unnatural look.


Knock it Out

What in the world does "Layer Knocks Out Drop Shadow" mean? It is simple once you understand the concept, but can be tricky for beginners because it only applies in certain situations. Luckily, this setting is almost always better left checked.

When you create a new layer and apply a drop shadow to it, you are looking at two things, the layer contents, and the layer style. If you recall from Part 1 of our guide, you can hide the layer contents while still showing the layer style by setting the "Fill" in the Layers Palette to 0% for a given layer.

In the following example, both sets of text have their "Fill" set to 0%, but the one on the left has the "Layer Knocks Out Drop Shadow" checkbox checked, while the one on the right does not. The result is that the text on the left creates a type of transparency mask (or "knocks out" the drop shadow), which does not allow the drop shadow to show through. Alternatively, the text on the right does not "knock out" the drop shadow, allowing it to show through.


Saving and Loading Default Settings

You can save and load default settings for each effect in the Layer Styles dialog box. By clicking "Make Default", Photoshop will store whatever settings are currently active as the new default settings for that effect.

By clicking "Reset to Default", Photoshop will then load whatever settings were last saved. This allows you to experiment and simply reload custom default settings if you want to start over.


One for the Road

Until next time, this free, exclusive layer style and accompanying .PSD will allow you to experiment with your own Drop Shadow settings.


Which Tuts+ Site Should We Launch Next?

$
0
0

We’re planning our next few Tuts+ sites, and would love your opinion and advice on which topics you think we should cover next! We’d be really grateful if you could take a minute to answer our quick poll and share your thoughts…


Have Your Say

We’ve been considering lots of different ideas for our next Tuts+ sites over the past few weeks, and wanted to also ask the opinion of our awesome community!

A selection of different concepts are included in the poll to the right, along with the option for you to submit your own ideas as well.

The important thing to note is that these are just ideas. Some of these are close to making our final cut, and others aren’t… We’d love to hear what you think, to help guide our decision.

Thanks for taking the time to offer your suggestion — I can’t wait to see what you have to say!

Win a 6-Month Tuts+ Premium Membership

Our poll will be running for the next couple of weeks, and we’ll be choosing one respondent at random to receive a six-month Tuts+ Premium membership!

To be entered into the giveaway, just leave a comment on this post to go into a bit more detail about your site suggestion. We’ll choose one comment at random to win the Tuts+ Premium membership when the poll ends.

Best of luck!


Test Your Photoshop Knowledge #9

$
0
0

We know how much you guys like to test your knowledge of Photoshop so today we are giving you an opportunity to do so with another quiz from Martin Perhiniak. Please take a moment to complete this 10-question quiz and see if you’re prepared to pass our test! Good luck!

Editor’s note: this quiz is for Photoshop CS5.


New Brush Features in Photoshop CS6

$
0
0

The Brush Panel in Photoshop CS6 includes plenty of new features. In this episode of our Introduction to Photoshop CS6 series we will explain how to work with Live Pen Tilt Preview, Brush Projection, as well as the new Erodible Tip and Airbrush brushes. Let’s get started!


The Photo Manipulations of Alla Mingalyova (AKA AllaD8)

Create a Surreal and Dreamy Photo Manipulation in Photoshop – Tuts+ Premium Tutorial

$
0
0

In this Tuts+ Premium tutorial, author Marcela Bolivar will explain how create a surreal and dreamy photo manipulation using atmosphere, lighting, masks, textures, and custom brushes. This tutorial is available exclusively to Tuts+ Premium Members. If you are looking to take your photo manipulation skills to the next level then Log in or Join Now to get started!

Tuts+ Premium Members can login now for instant access to this tutorial. Membership to Tuts+ Premium gets you access to hundreds of exclusive premium tutorials, top selling ebooks, in-depth courses, member forums, and much more. To learn more about Tuts+ Premium, Take the Tour or Join Today.


Use Split Frequency Healing to Retouch a Photo in Photoshop

$
0
0

Split Frequency Healing is a technique that you can use in Photoshop that will allow you retouch photos without affecting the photo’s respective tone or texture. In this tutorial, commercial retoucher, Daniel Meadows, who has worked for clients such as Harper’s Bazaar, Elle, Marie Claire, Chanel, and L’Oreal Paris, will explain this technique and how it can be used in your workflow. Let’s get started!

Special thanks to Dubai Photographer, Sherif Mokbel for providing the photography for this tutorial.


Tutorial Assets

The following assets were used during the production of this tutorial.


Before You Begin

Let’s take a look at the image that we’ll be using for this tutorial. Below you’ll see a typical example of markup you might receive from a client. It might be a jpeg like this, a scan of a pen-annotated print or simply a set of instructions or suggestions, but ultimately you’ll be expected to deliver on a set brief.

We have instructions to clean up the image, a little liquify for a more pleasing curve to the back and waist, and to remove the purple-blue tone from the model’s legs. I’ll cover the techniques you’ll need to complete the shot over the course of several tutorials. Remember not to deviate too far from what your client is asking for, run it by them first. If you think a background color change is really going to make the subject pop, try discussing your ideas, especially if it’s for a portfolio project. If it’s a commercial or editorial job however and the art director wants neutral white, he or she of course, gets white.

There are quite a few ways to achieve a similar result in Photoshop, and I’ll be going through a number of them, often focusing on one in particular and giving a couple of alternatives you might want to try.

The first step we’re going to follow in completing this shot is the healing, the ‘basic cleanup.’ For this we’re going to be mostly using the clone stamp (S), but we’ll do it a little differently to the way the software intended. Be sure to start off using the key commands for your tools, you’ll save yourself a lot of time in the long run. When you’re trying to meet an unreasonable deadline and your left hand is bringing up every tool and command without giving it a thought you’ll thank me for it. Take a look at the look at the shot we have to work with:

The lighting’s a blessing, the well defined shadows and highlights give us a great guide to follow when we come to carving, but we’ll get to that. The skin is very good, with just enough marks and texture variance to give us a good run at the exercise. Remember that with high end commercial retouching you’re going to be getting professional models with great skin, great lighting, make up, wardrobe etc. It isn’t about changing the shot, or the model, it’s about perfecting it. Here’s a close up of the kind of texture variations I mentioned:

It might be instinctive to head straight for the clone stamp or healing tools, but the clone stamp will carry luminosity and tone with it, causing problems in light to shadow or vice versa. The healing tools carry the texture and then attempt to approximate the tone and luminosity with an algorithm. What if there was a way of cloning nothing but the texture, ignoring the luminosity and tone, and simply replacing a piece of texture elsewhere? Well we’ve got one, and it’s called frequency separation.


Split Frequency Healing

Now we’re going to split the image into its low and high frequencies. To get a better idea of what that means, take a look at this blog post regarding the reason for the famous ‘Mona Lisa Smile.’

It was very clear to me that when I looked at her mouth, she wasn’t smiling as much as when I looked at her eyes.

Da Vinci’s Mona Lisa smiles in the blurry low frequency, but not in the high frequency texture. Look directly at the lips in the full image on the left, and then at the shadow that suggests a more pronounced smile in the blurred image to the right:

To split an RGB image into it’s low and high frequencies do the following. Create two copies of your background layer (when we’ve finished the following steps, one will be low, one high, and the original background image is kept for reference).

You’ll notice I’ve renamed them to ‘LF’ and ‘HF.’ As you might expect, to achieve the low frequency image, we use a blur. Gaussian Blur the LF layer at a radius of around 15.

The interesting bit is how we turn the HF layer into one that contains only the high frequency data, so we can view it together with the low frequency layer as one composite image. For an 8bit image, select the HF layer, head to Image > Apply Image, and use the following settings:

For 16bit images use the settings in this box:

Hit ok and you’ll have an image that looks like this:

In that layer is all the sharp, high frequency texture detail we’ve been hoping to isolate, against a neutral grey. To tell Photoshop to ignore the unhelpful grey, set the Layer Mode to Linear Light:

Our image should now look like the image below which is indistinguishable from the original (the eagle-eyed amongst you might notice a barely perceptible difference if you look very closely).

If you switch off the Background layer for a moment and toggle the visibility between just the LF and just the HF layers, you’ll notice that the image we now have is a true composite, one layer without the other doesn’t work.

But together we get the full image. The benefit we have now is that we can clone and heal on just the HF, or ‘texture’ layer without affecting the tones, and we also have the opportunity to fix tones and luminosity on the LF layer without ever affecting the texture.

Grab your Clone Stamp (S), making sure it is set to ‘Current Layer’ (we don’t want to carry any of the low frequency information onto the texture layer):

And begin to remove any blemishes by Alt (Mac: Opt)-clicking an area of good texture and painting over the areas of poor texture:

As you can see, the overall tone and lighting has remained, with only the texture affected. It’s not something we can usually do with the Clone Stamp, and the Healing Brush can fall short.

You may notice that this method fails when dealing with hard edges, and areas where there is a dominant tone beneath the texture, such as the rather extreme example below:

For this reason, it’s necessary to start a new layer above your frequency layers, and clone over any problem areas this way. Don’t forget to set the Clone Stamp’s Sample back to Current & Below.


Healing Completed

And here’s a close up of the skin after nothing but some careful cloning, 95% of which was done on the high frequency layer:


Conclusion

At this point, we’ve improved the condition of the model’s skin so we don’t have to worry about print size, we know the blemishes are gone and for many purposes this is far enough. Not for us of course, in the next tutorial we’re going to head into dodging and burning, locally adjusting luminosity to even out tones. Please share and post your comments, and I’ll see you soon!


Create Storybook Illustrations Using Photoshop and Filter Forge 3

$
0
0

For many professional illustrators, Photoshop is the tool of choice to create hand-drawn digital artwork or paintings. With the right knowledge and skills, it can be used to create stunning works of art. With that said, we’re not all professional illustrators. In this tutorial we will explain how to achieve similar results by applying Filter Forge effects to quick hand-drawn sketches. Let’s get started!


Filter Forge is a powerful third-party plugin that allows you to apply over 4,000 amazing effects to your images, and even create your own. To learn more about Filter Forge, you can visit their website, download the trial version of the software, or check out their filter gallery.

Editor’s note: This tutorial was sponsored by Filter Forge.


Using Paragraph and Character Styles in Photoshop CS6

$
0
0

In this past, working with a lot of text in Photoshop was a hassle. Global changes to text simply could not be made easily. In Photoshop CS6, Adobe has given us new ways to manage our text. This episode of our Introduction to Photoshop CS6 series will explain the new Paragraph and Character style panels. Let’s take a look!


Quick Tip: Create a Metallic Copper Text Effect Using Layer Styles in Photoshop

$
0
0

In this tutorial we will explain how to create a metallic copper text effect using layer styles in Photoshop. Let’s get started!


Tutorial Assets

The following assets were used during the production of this tutorial.


Step 1

Create a new file. Set Width and Height to 700 px and the resolution to 72 PPI. Name: Angel text


Step 2

Fill the canvas with the Concrete Bunker texture.


Step 3

Marge the concrete bunker texture to the background.


Step 4

Go to menu > Image > Adjustments > Hue/Saturation > use the values as shown below.


Step 5

Apply Sharpen twice: Go to menu > Filter > Sharpen > Sharpen. Add Noise: Go to menu > Filter > Noise > Add Noise > use the values as shown in the pop-up, in the left side of the image below. Create a new empty layer over the background; fill it with color code #252829. Apply Blend mode "Color" as shown in the menu, in the right side of the image below. Finally merge it to the background (Command/Ctrl+E).


Step 6

Type the word “Angel” using the “Argel Font”, font size 310 pt, tracking 0. Select the letter “A” and set tracking to 40. All values as shown in the image below.


Step 7

Using the "Move Tool", select the text and background layer, then click the align commands: "Align Horizontal Center" and "Align Vertical Center" on the top menu to center it.


Step 8

Apply a Layer Style on the text layer (right click over the layer > Blending Options). Set Blending Options step by step as shown in the image below and click ok.

Note: to edit the Gloss Contour in the Bevel and Emboss step: click the contour thumbnail to open the Contour Editor pop-up > click in the contour mesh to add points and enter values for Input and Output.


Step 9

Copy the image “Palace Balls” from the browser, paste it over the text layer “Angel” and rename the image layer to “Reflection01.” Using the "Move Tool," select "Reflection01" image layer and background layer, then click the align commands: "Align Bottom Edges" and "Align Left Edges" on the top menu, as shown in the image below.


Step 10

Select “Reflection01″ image layer and using the “Rectangular Marquee Tool”, right click over the picture and choose “Free Transform”. Then lock the proportions with the loop icon “Maintain Aspect Ratio” on the top menu, as shown in the image below and reduce Width and Height to 70%, set Horizontal Position to 1099.2 px and set Vertical Position to -7.8 px and press enter.


Step 11

Apply a Layer Style on “Reflection01″ image layer (right click over the layer > Blending Options) and apply Gradient Overlay values as shown below and click ok, to get a metal copper tone.

Step 12

Apply Sharpen thrice: Go to menu > Filter > Sharpen > Sharpen (remember repeat this step three times).


Step 13

Reduce Noise: Go to menu > Filter > Noise > Reduce Noise. Using the values as shown below.


Step 14

Duplicate layer “Reflection01″ and rename to “Reflection02.” After renaming it apply: Blend mode to Lighten and Opacity to 50% as shown below.


Step 15

To achieve a stunning reflection effect, select “Reflection02″ image layer and using the “Rectangular Marquee Tool”, right click over the picture and choose: Free Transform > Flip Horizontal > and reduce Width to -90% and Height to 90%, set Horizontal Position to 513 px and set Vertical Position to 108 px as shown below and press enter.


Step 16

Select the two image layers and go to menu > Layer > Create Clipping Mask. To put the reflections inside the layer font. Finally, select the two image and text layers to link them by clicking over the "Link Layers" icon at the bottom of the layers palette. To have the final text effect linked.


Final Image


Introduction to the New Oil Paint Filter in Photoshop CS6

$
0
0

Filters are a powerful tool in Photoshop to help you apply quick effects to your images. The Oil Paint filter in Photoshop CS6 will give any image a painted look. In this tutorial, we will introduce you to this new filter. Let’s get started!


Tuts+ Live Workshops: Photoshop Training in London

$
0
0

I’m incredibly excited to let you know about a series of live Photoshop workshops we have planned over the next few months, in conjunction with Martin Perhiniak. They’ll be taking place in London, UK, and it’s a great chance to take your Photoshop training to the next level! Read on to find out more, and book your place…


Professional Face-to-Face Training

Martin Perhiniak is one of our most popular authors on Psdtuts+, a Certified Adobe Design Master and Instructor, and an incredibly talented teacher. Martin has worked with companies like Disney, Warner Brothers, Cartoon Network, Sony Pictures, Mattel, and DC Comics. He will be running a series of Tuts+ Live Workshops over the next three months, giving you the chance to become a Photoshop expert.

The workshops are taking place in London, UK, in a state of the art learning environment (here’s a video of the training centre), and over each two-day course you’ll learn everything you need to know about a particular area of Photoshop. We’ll even provide an iMac, second screen, and a tablet for you to use during the course!

It’s an amazing opportunity to take your Photoshop career to the next level, learning skills that will make you a better creative professional. If you’re wanting to take the first step into being a full-time Photoshop professional, these workshops are the perfect start.


Dates, Prices, and Topics

Workshop Dates Price
Digital Art 26-27th May £497 +VAT Book Your Place
Graphic Design 9th-10th June £497 +VAT Book Your Place
Photo Retouching 4th-5th August £497 +VAT Book Your Place

Digital Art

Have you ever imagined yourself working on blockbuster movies or computer games? Designing characters, monsters, weapons, cities, castles, spaceships and planets? In this intense but fun two-day workshop, you can learn all the techniques used by professional digital artists. Topics covered will be:

  • Digital art basics & theory
  • Brushes
  • Finding and using references & inspiration
  • Using a tablet
  • Digital sketching and painting techniques
  • Portraits and dynamic character poses
  • Concept art projects
  • Vehicle, character, monster, weapon, and environment design
  • Matte painting projects
  • Futuristic and fantasy cityscape

You’ll need a basic understanding of Photoshop for this course. If you are not confident, you can prepare for the course by watching Martin’s Photoshop Basix series!

Digital Art 26-27th May £497 +VAT Book Your Place

Graphic Design

Have you ever wanted to learn all the best practices used by a professional graphic designer? This is the best place and time for you to do that. You can learn everything you need to know through real life design examples, which makes the training extremely useful and exciting. Topics covered will be:

  • Logo design workflow and project
  • Brochure design workflow and project
  • Poster design workflow and project
  • Product packaging design workflow and project
  • Identity design workflow and project
  • Album cover design workflow and project

You’ll need a basic understanding of Photoshop for this course. If you are not confident, you can prepare for the course by watching Martin’s Photoshop Basix series!

Graphic Design 9th-10th June £497 +VAT Book Your Place

Photo Retouching

In this two-day course, you’ll learn all the most advanced retouch skills you need for professional work in several fields in the industry. The techniques we cover in this special course are used by high-end fashion photo retouchers, digital artists, professional photographers and graphic designers. Topics covered will be:

  • High-end portrait retouch
  • Skin softening, and changing hair and eye colour
  • Modifying facial and body features
  • Artistic portrait effects
  • Removing unwanted elements
  • Extending photos for better composition
  • Professional sharpening and noise-reduction
  • Creating the perfect group shot
  • Photo montage techniques
  • HDR techniques
  • Adding colour to black and white photographs
  • Vintage and colour pop effects
  • Restoring old photographs & cleaning up backgrounds
  • Working with Camera RAW files
  • Retouching landscape photographs
  • Professional fashion/wedding shoot retouch and montage project

You’ll need a basic understanding of Photoshop for this course. If you are not confident, you can prepare for the course by watching Martin’s Photoshop Basix series!

Photo Retouching 4th-5th August £497 +VAT Book Your Place

Have Your Say & Win!

While our first set of workshops are taking place in London, we’d love to have your thoughts on how we can continue this project. Let us know where you think other live workshops should be held, if you’d like to participate in an online workshop, and what topics you think we should cover:

Take our thirty second survey

We’ll pick a random respondent to win a three month Tuts+ Premium membership on Friday 31st May!


Awesome Illustrations of Mike Lim (Daarken)

$
0
0

In this article we will take a look at the work of Mike Lim. Lim is a concept artist who has worked for several well-known clients including Mythic Entertainment, Blizzard, and more. His artwork is full of scary monsters, dwarfs, knights, and even a skull or two. Let’s take a look!


Mass Effect 3 and Kingdoms of Amalur Promo


Hero’s Call


Black Fire Pass


Nicodemus


Kingdoms of Amalur: Reckoning


Omens of War


Skaven Master Moulder


Dark Sun


Signs of Faith


A Deadly Encounter


The Edge of Night


Poised


Dwarf Slayer


Warhammer Fantasy Roleplay


Create a Red Riding Hood Themed Photo Manipulation in Photoshop

$
0
0

In this Tuts+ Premium tutorial, author Wojciech Magierski will explain how to create a Red Riding Hood themed photo manipulation in Photoshop. This tutorial is available exclusively to Tuts+ Premium Members. If you are looking to take your photo manipulation skills to the next level then Log in or Join Now to get started!

Tuts+ Premium Members can login now for instant access to this tutorial. Membership to Tuts+ Premium gets you access to hundreds of exclusive premium tutorials, top selling ebooks, in-depth courses, member forums, and much more. To learn more about Tuts+ Premium, Take the Tour or Join Today.


Last Chance: Digital Art Workshop This Weekend — Save 30%!

$
0
0

Just in case you didn’t spot our announcement about the first Tuts+ Live Workshops at the end of last week, I wanted to let you know that this is your last chance to purchase a ticket for the digital art workshop running this weekend!

Read on for an exclusive introduction to this series of Tuts+ Live Workshops, and details on how to book.


A Video Introduction

I this video, our course instructor (Martin Perhiniak) will walk you through the contents of the workshop, and explain how helpful it can be to your future career as a digital artist!


Professional Face-to-Face Training

Martin Perhiniak is one of our most popular authors on Psdtuts+, a Certified Adobe Design Master and Instructor, and an incredibly talented teacher. Martin has worked with companies like Disney, Warner Brothers, Cartoon Network, Sony Pictures, Mattel, and DC Comics. He will be running a series of Tuts+ Live Workshops over the next three months, giving you the chance to become a Photoshop expert.

The workshops are taking place in London, UK, in a state of the art learning environment (here’s a video of the training centre), and over each two-day course you’ll learn everything you need to know about a particular area of Photoshop. We’ll even provide an iMac, second screen, and a tablet for you to use during the course!

It’s an amazing opportunity to take your Photoshop career to the next level, learning skills that will make you a better creative professional. If you’re wanting to take the first step into being a full-time Photoshop professional, these workshops are the perfect start.


Dates, Prices, and Topics

We have an exclusive offer for Tuts+ readers, saving you 30% on the price of the Digital Art Workshop! Just book using the link below, and Martin will send you a discount code for your ticket.

Workshop Dates Price
Digital Art 26-27th May £350 +VAT (was £497!) Last Chance to Book!
Graphic Design 9th-10th June £497 +VAT Book Your Place
Photo Retouching 4th-5th August £497 +VAT Book Your Place

If you’d like to find out more about what each workshop involves, check out our in-depth overview of the different workshops on offer.


Have Your Say & Win!

We’d love to have your thoughts on how we should continue this project. Should future live workshops be held online instead? Or in a city near you? Take our thirty second survey and we’ll pick a random respondent to win a three month Tuts+ Premium membership on Friday 31st May!

Give us your feedback on Tuts+ Live Workshops!


How to Draw a Leica Camera in Photoshop

$
0
0

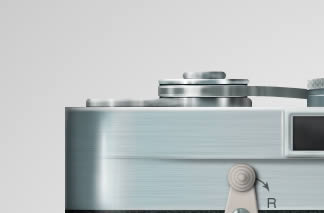
Leica is considered one of the most prestigious camera brands. In this tutorial, we will draw one of the most notable Leica cameras in Photoshop, the Leica M1. Let’s get started!


Step 1: Background and Floor

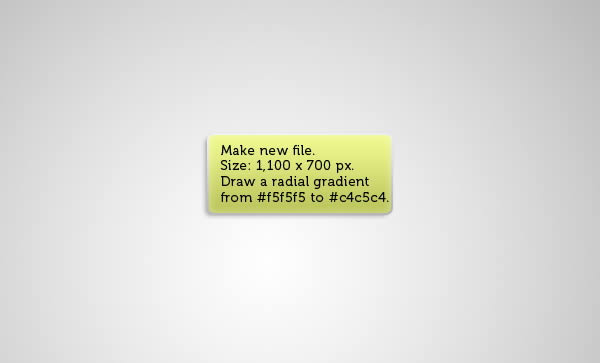
Make new file (Command/Ctrl + N) and set its size to 110 × 700 px. Activate gradient tool. Set its mode to radial from #f5f5f5 to #c4c5c4.

Draw a Leica Camera in Photoshop

Step 2

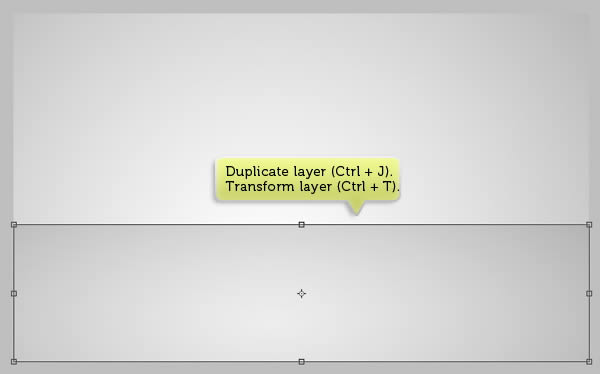
Duplicate layer by pressing Command/Ctrl + J. Hit Command/Ctrl + T to transform it. Pull upper handle down to convert it into a floor.

Draw a Leica Camera in Photoshop

Step 3

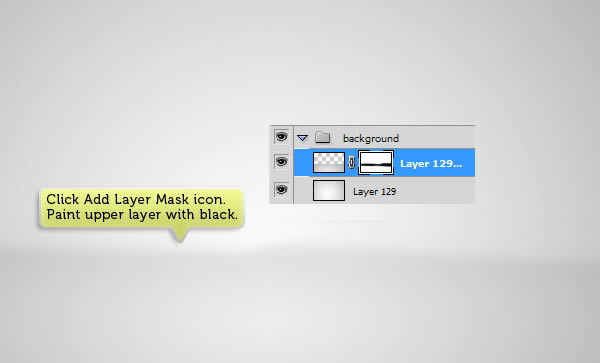
On layers panel, click Add Layer Mask icon to add layer mask. Paint upper mask with black until it fades onto the background.

Draw a Leica Camera in Photoshop

Step 4: Basic Shape

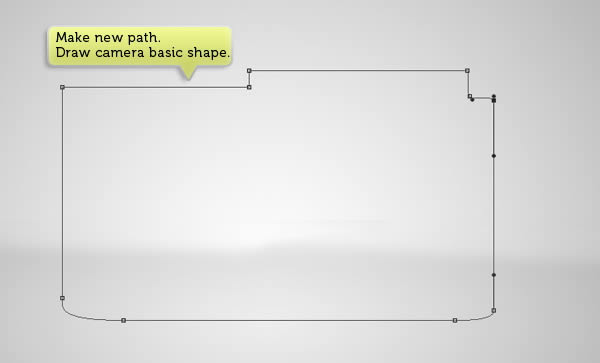
Open Paths panel. Click new path icon. Use pen tool to draw camera basic path.

Draw a Leica Camera in Photoshop

Step 5

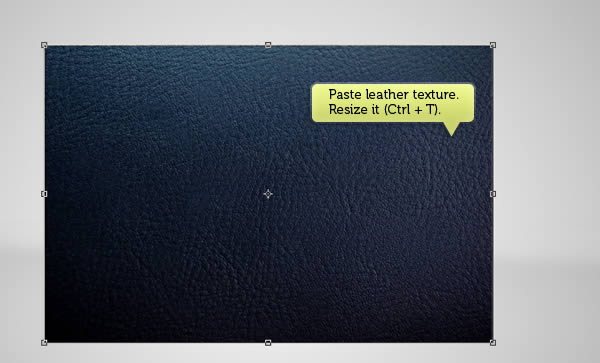
Grab a leather texture from Design Instruct freebies section. Below, we use Leather Texture 04 from the collection.

Draw a Leica Camera in Photoshop

Step 6

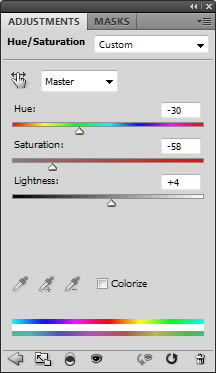
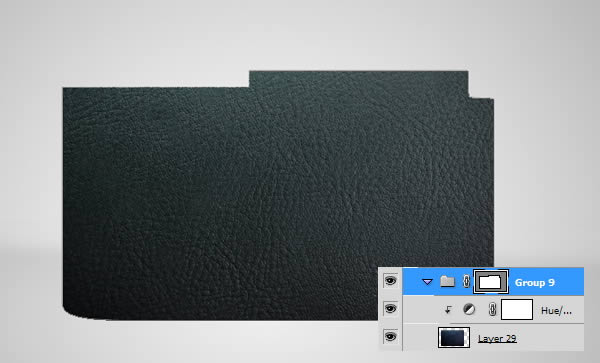
Current leather color doesn’t fit the camera appearance. We need to change its color to gray. Add new adjustment layer Hue/Saturation and use below settings.

Draw a Leica Camera in Photoshop

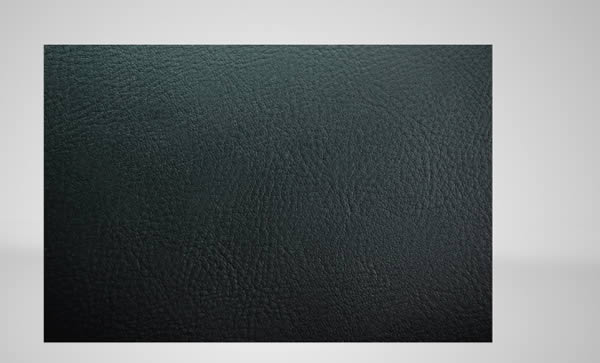
This is the result after we add Hue/Saturation.

Draw a Leica Camera in Photoshop

Step 7

Copy basic camera path and place it on top of the leather texture.

Draw a Leica Camera in Photoshop

Step 8

Select leather texture and adjustment layer. Hit Command/Ctrl + G to place them inside a group layer. Click Layer > Vector Mask > Current Path. The leather texture is now goes inside the path. From this point onward until Step 29, make sure to place all new layer inside this group layer.

Draw a Leica Camera in Photoshop

Step 9: Metal Parts

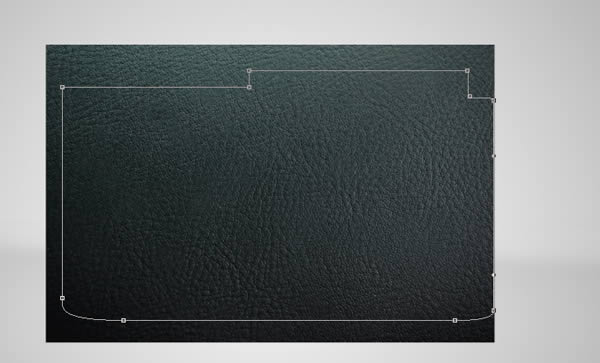
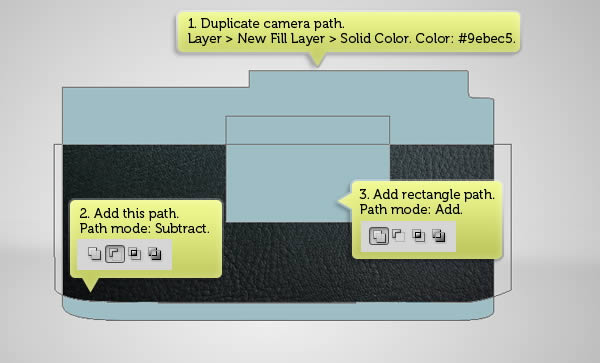
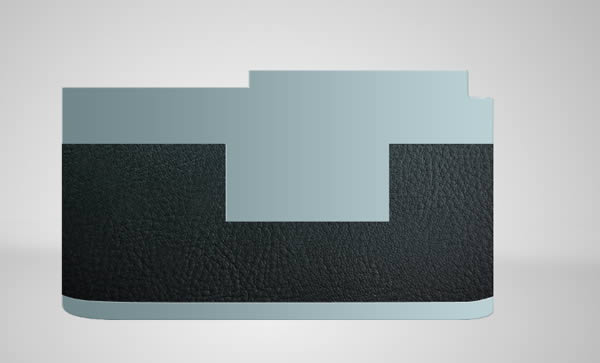
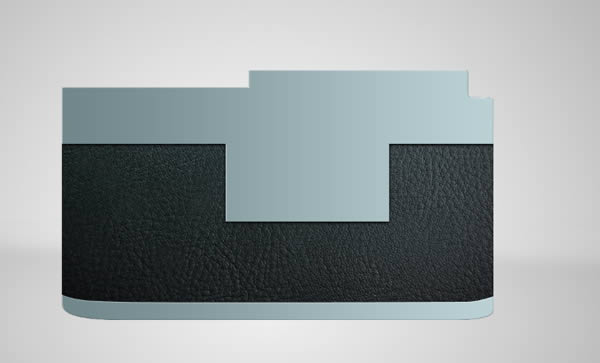
Duplicate camera path. Click Layer > New Fill Layer > Solid Color. Select color #9ebec5. Add a rectangular path on middle of the path. Modify its bottom side to turn it into a curve. Set its mode to Subtract. Add a rectangular path and set its mode to Add to Shape. See picture below to see the shape that you need to make.

Draw a Leica Camera in Photoshop

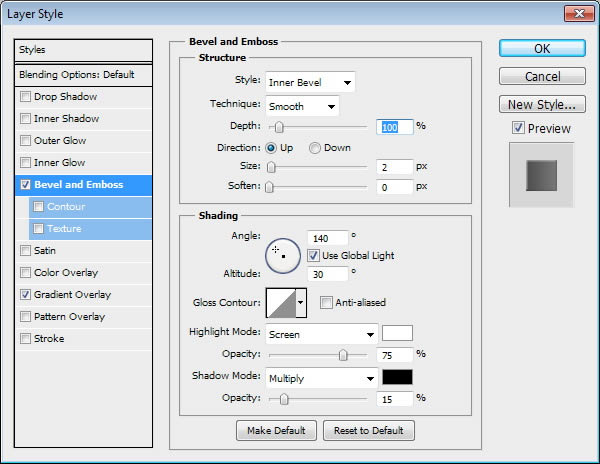
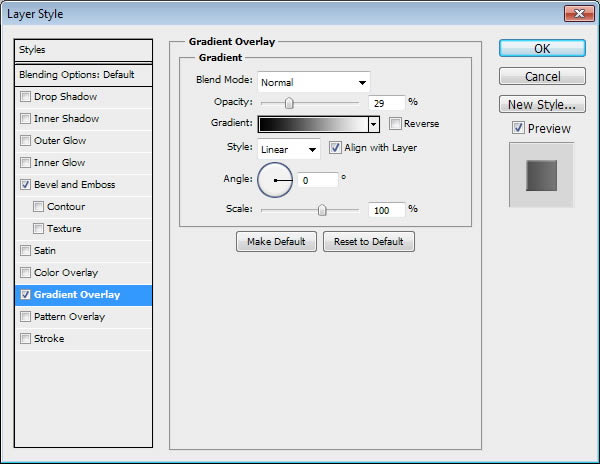
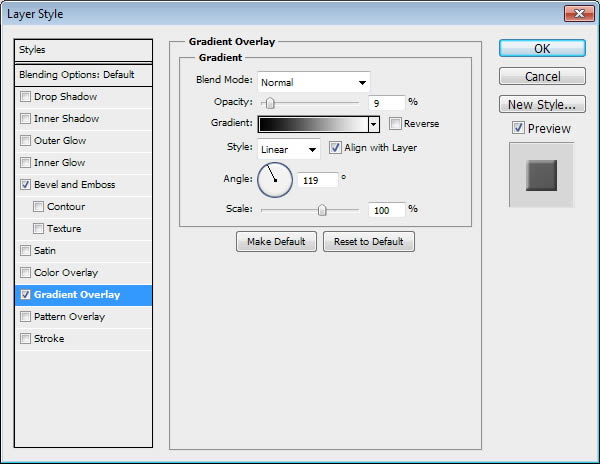
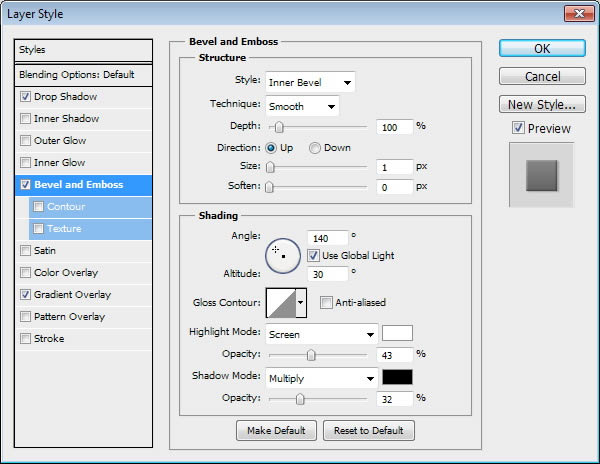
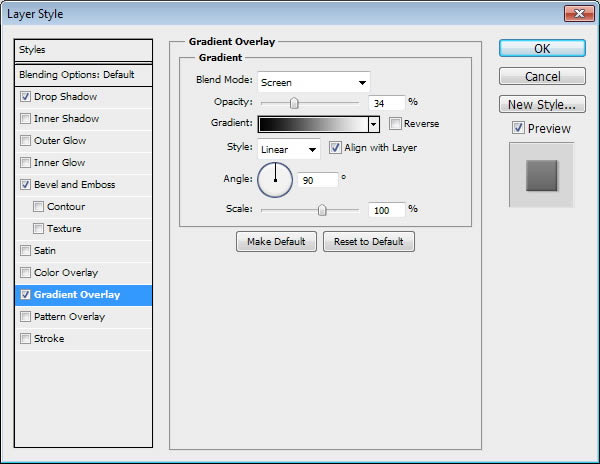
Add Layer Style Bevel and Emboss and Gradient Overlay.

Draw a Leica Camera in Photoshop

This is the result we have. This shape is going to be metal part of the camera.

Draw a Leica Camera in Photoshop

Step 10

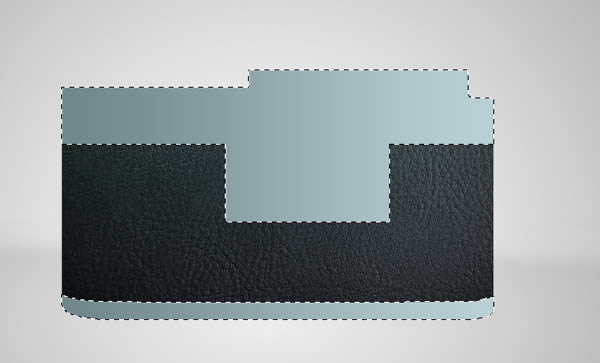
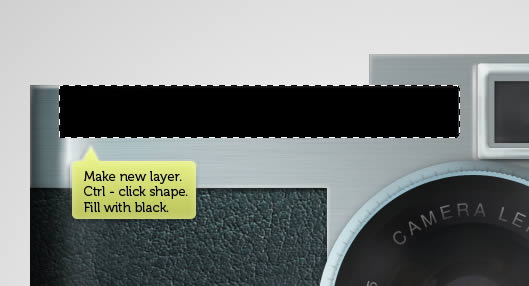
In Layers panel, Command/Ctrl-click layer shape to make new selection based on its shape.

Draw a Leica Camera in Photoshop

Step 11

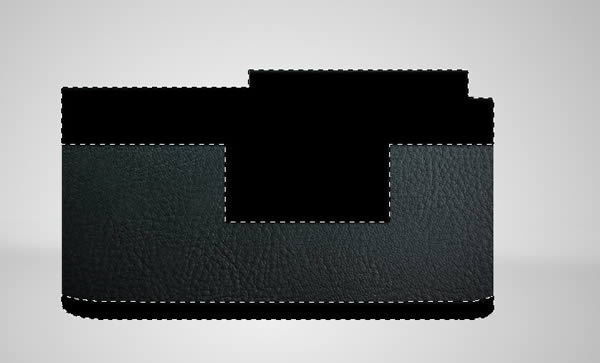
Make new layer. Fill selection with black.

Draw a Leica Camera in Photoshop

Step 12

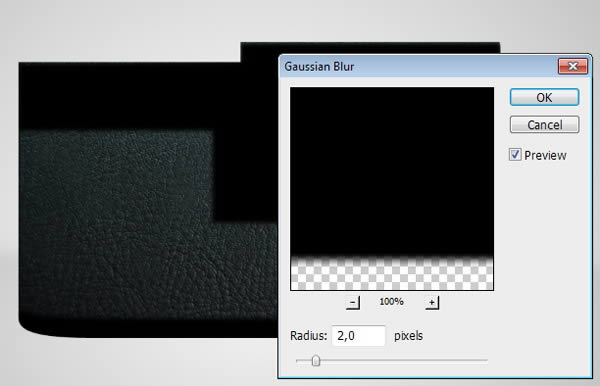
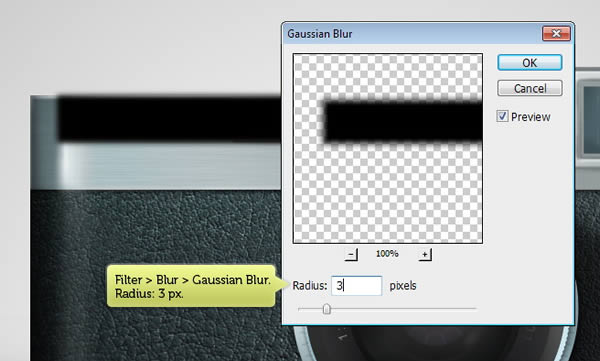
Soften it by adding Gaussian Blur (Filter > Blur > Gaussian Blur).

Draw a Leica Camera in Photoshop

Step 13

Hit Command/Ctrl + [ to place the layer under previous layer shape. Move the shadow down a few pixel.

Draw a Leica Camera in Photoshop

Step 14

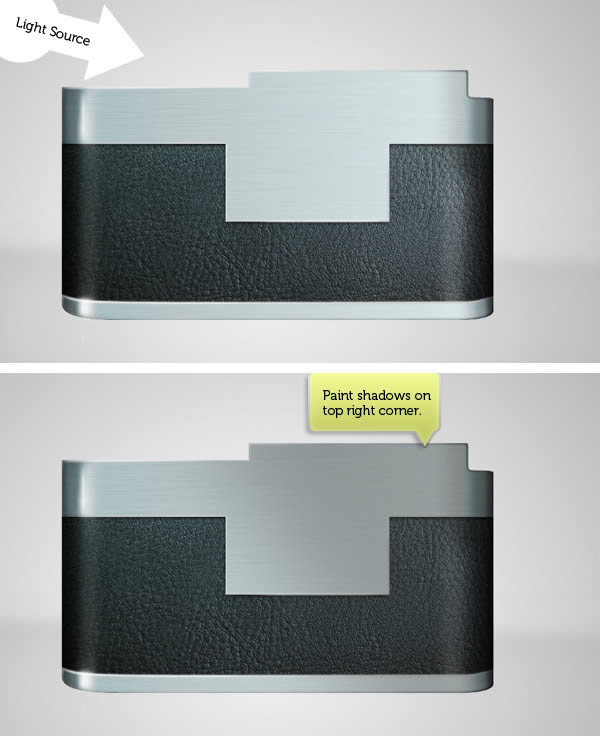
Make new layer and then activate brush tool. Manually, paint black as shadows on left and right side of the camera.

Draw a Leica Camera in Photoshop

Step 15

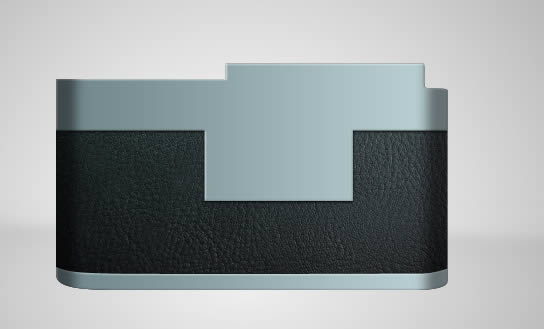
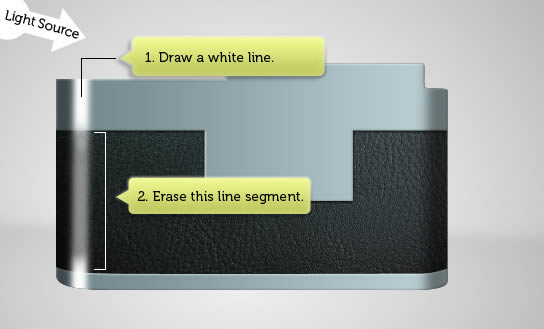
Repeat previous step, this time use white for highlights. We want to place the source light on left side of the camera. So, draw a white line on left side of the camera. Use eraser tool with 0% hardness and 20% opacity to erase highlights on its leather texture.

Draw a Leica Camera in Photoshop

Step 16

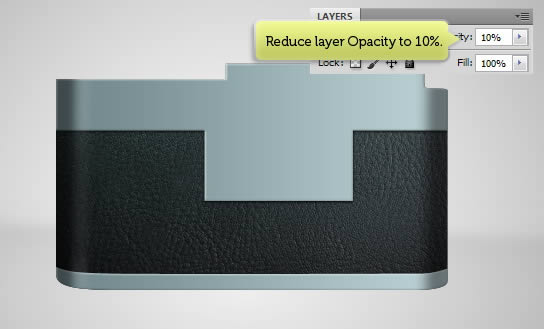
Reduce layer Opacity to 10%. This is enough to add subtle highlight onto the camera.

Draw a Leica Camera in Photoshop

Step 17

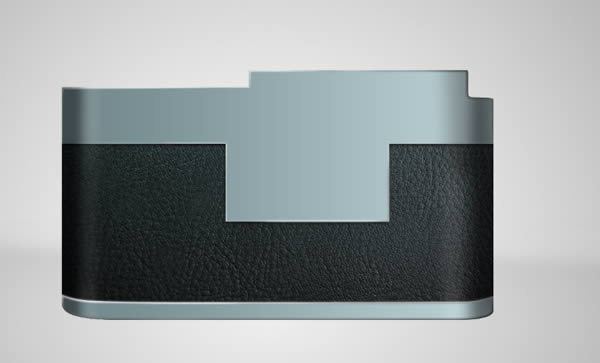
Add another highlight on right side of the camera using same technique. This time set its Opacity to lower than 10%. Remember that highlight on left side needs to be more stronger because the light source is placed on top left side too.

Draw a Leica Camera in Photoshop

Step 18

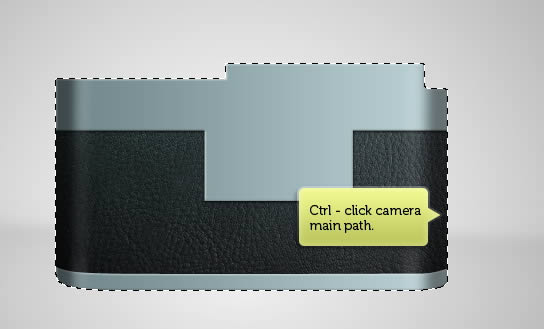
Command/Ctrl-click camera main path to make new selection based on its shape.

Draw a Leica Camera in Photoshop

Step 19

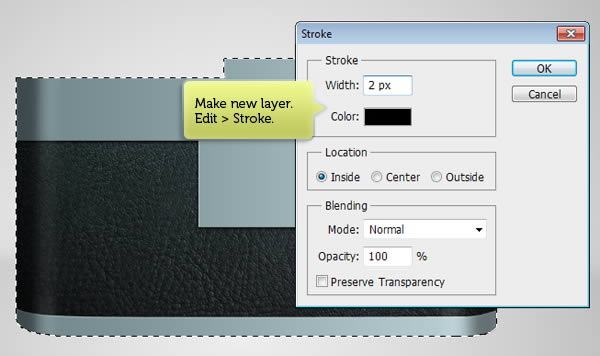
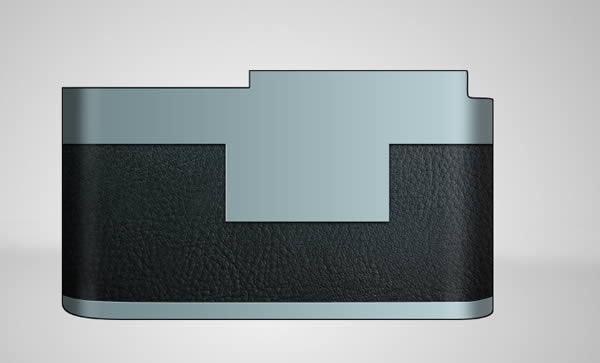
Make new layer. Click Edit > Stroke. Select black as its color with width 2 px.

Draw a Leica Camera in Photoshop

Step 20

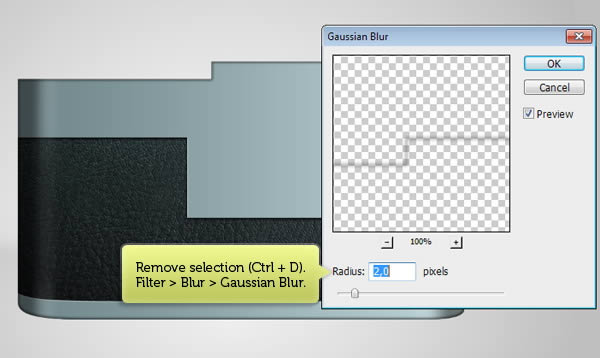
Deselect by pressing Command/Ctrl + D. Click Filter > Blur > Gaussian Blur to soften the line. Use soft eraser to erase parts of the line. This line will be shadows on camera’s edge.

Draw a Leica Camera in Photoshop

Step 21

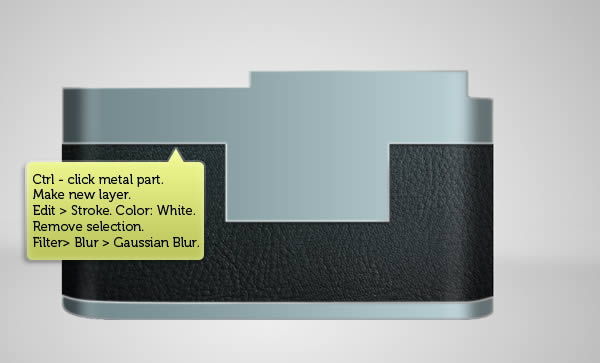
Let’s repeat previous, but this time for highlight on the metal part. Command/Ctrl-click metal part layer to make new selection. make new layer. Click Edit > Stroke and choose white color. Remove selection and then soften it using Gaussian Blur.

Draw a Leica Camera in Photoshop

Step 22

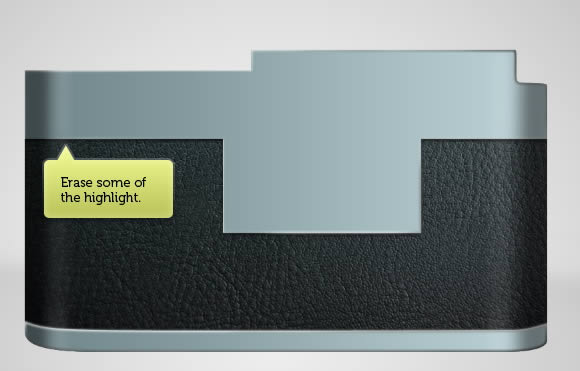
Use Eraser tool to erase some part of the highlight line.

Draw a Leica Camera in Photoshop

Step 23: Add Metal Texture

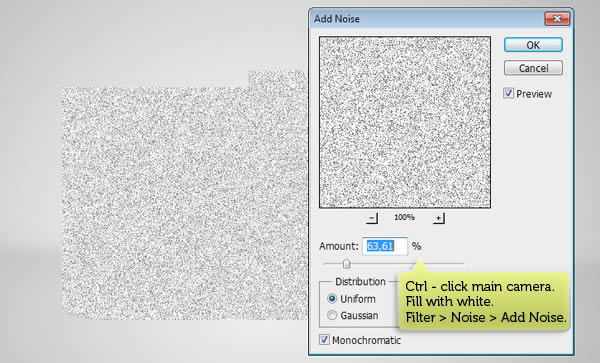
Make new layer and then fill it with white. Click Edit > Fill, select white color and then click OK. Click Filter > Noise > Add Noise.

Draw a Leica Camera in Photoshop

Step 24

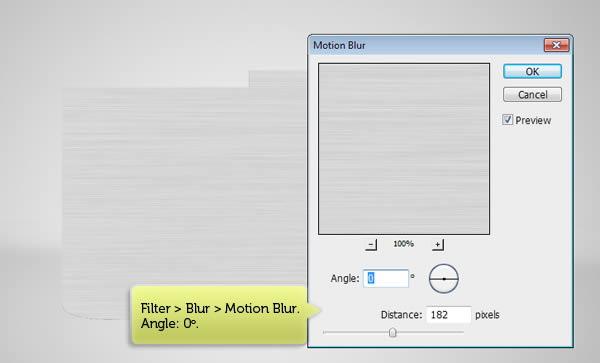
Click Filter > Blur > Motion Blur. Set angle to 0° with very big distance size.

Draw a Leica Camera in Photoshop

Step 25

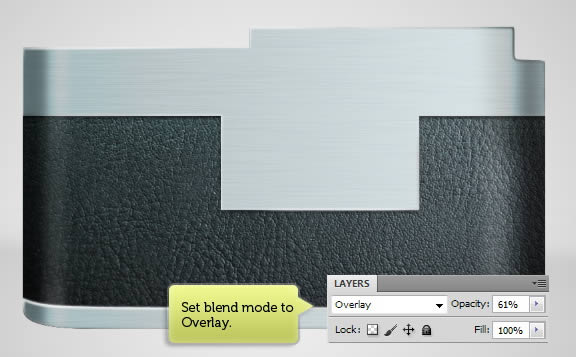
Change layers blend mode to Overlay and reduce its Opacity.

Draw a Leica Camera in Photoshop

Step 26: Add Highlights

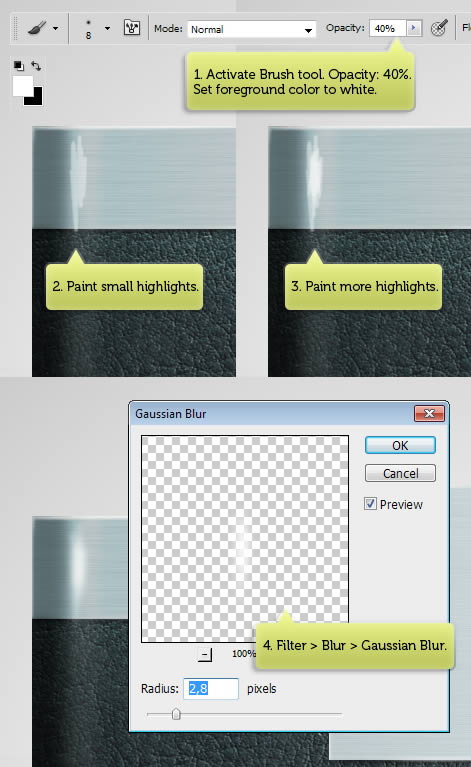
Let’s add some soft highlights onto the camerea. Activate Brush tool and set its Opacity to 40%. Change background color to white. Make new layer and then draw small highlights on top left of the camera. Don’t worry if the result looks too rough. Soften it by applying Gaussian Blur (Filter > Blur > Gaussian Blur).

Draw a Leica Camera in Photoshop

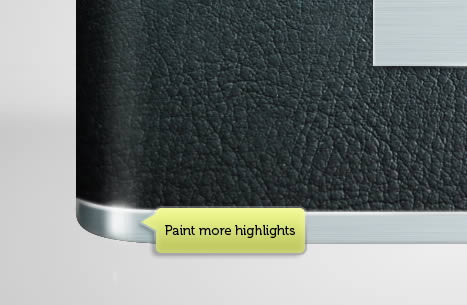
Repeat this steps on other areas of the camera.

Draw a Leica Camera in Photoshop

Step 27

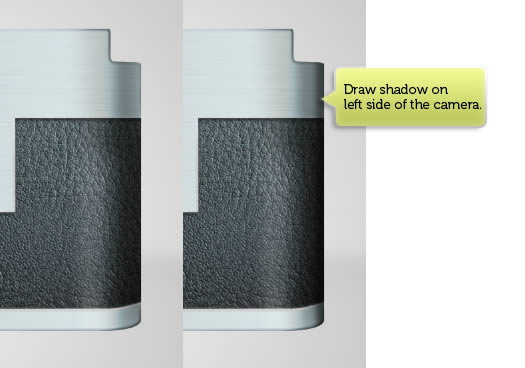
Make new and paint shadow on left side of the camera. Make sure to use a big and soft brush.

Draw a Leica Camera in Photoshop

Step 28

Make new layer. Draw big shadow on right side of the camera. Reduce layer Opacity until the result is natural.

Draw a Leica Camera in Photoshop

Step 29: Lens

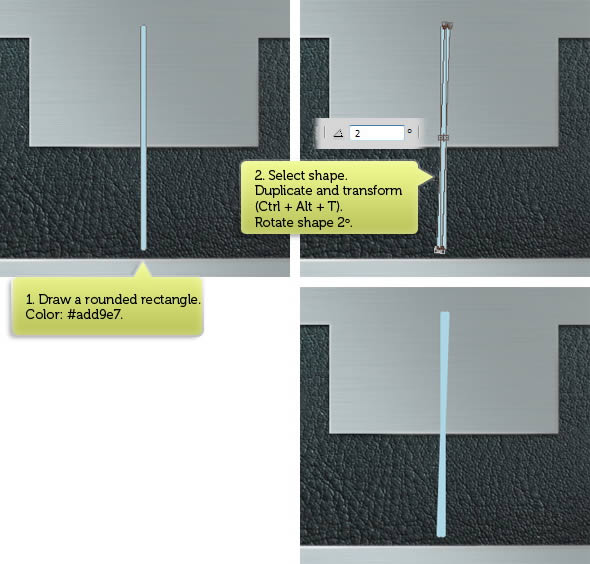
Make a new separate group for drawing lenses. Draw a thin rounded rectangle with color #add9e7. Select shape using Path Selection tool and hit Command/Ctrl + Alt + T to duplicate and transform it. In the option bar, set angle to 2°.

Draw a Leica Camera in Photoshop

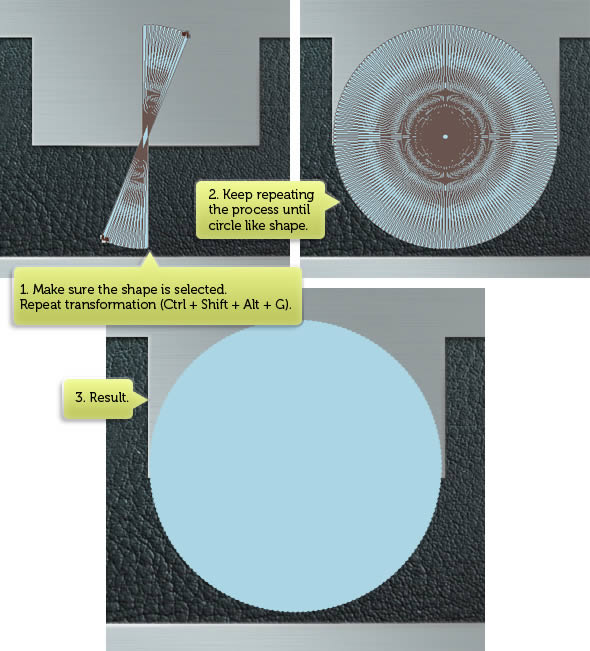
Make sure the new path is selected. Hit Command/Ctrl + Shift + Alt + G to repeat the transformation. Keep doing this until we have a full circle shape.

Draw a Leica Camera in Photoshop

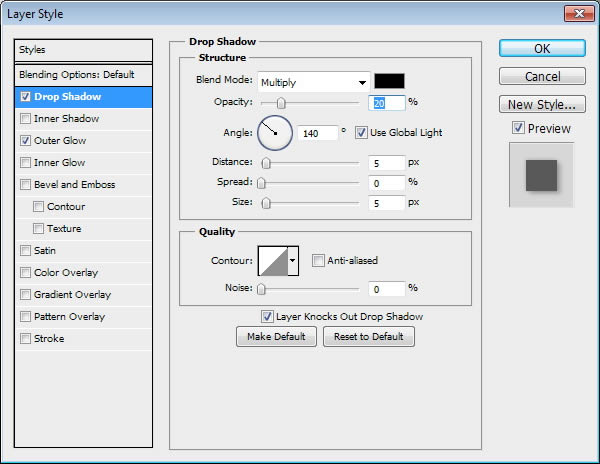
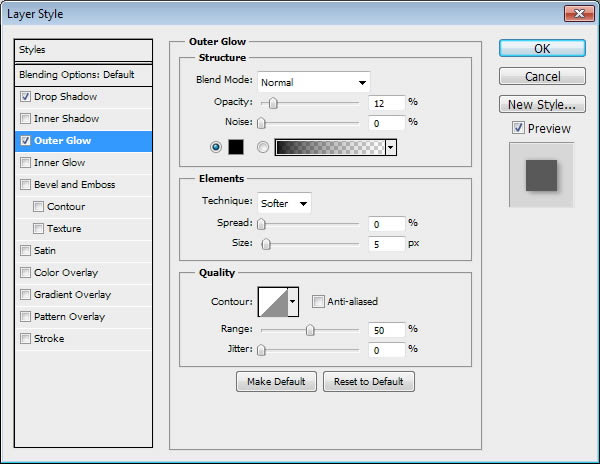
Add Drop Shadow and Outer Glow with following settings.

Draw a Leica Camera in Photoshop

Step 30

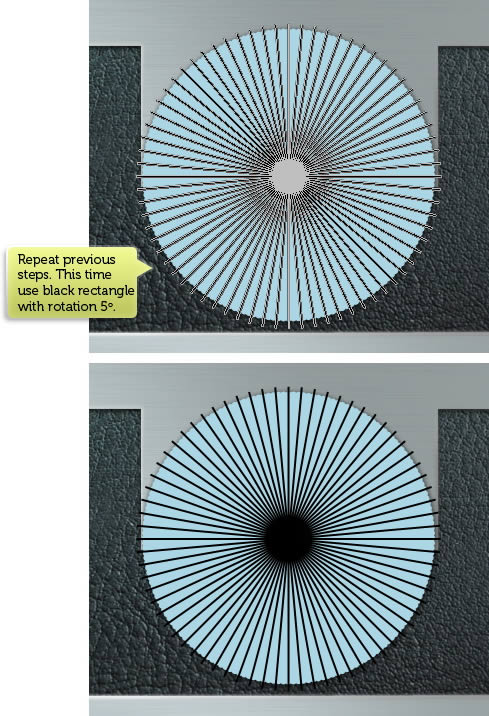
Repeat previous steps, but this time draw a black rectangle with angle 5°.

Draw a Leica Camera in Photoshop

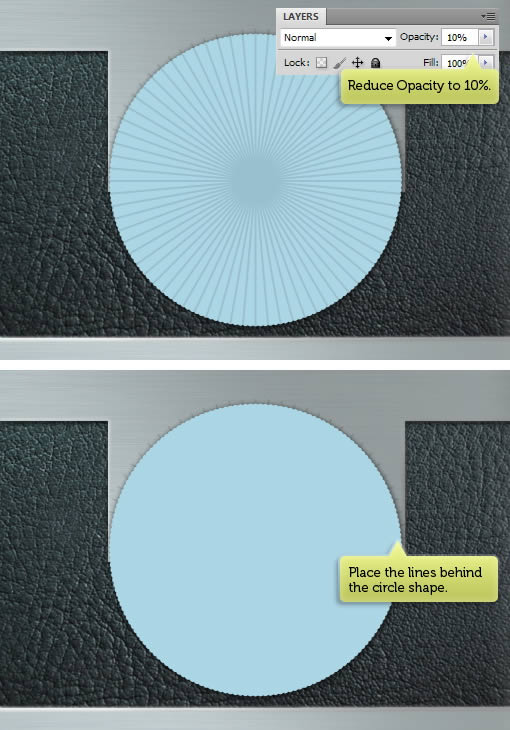
Reduce layers Opacity to 10%. Hit Command/Ctrl + [ to move the layer down and place it under previous circle shape.

Draw a Leica Camera in Photoshop

Step 31

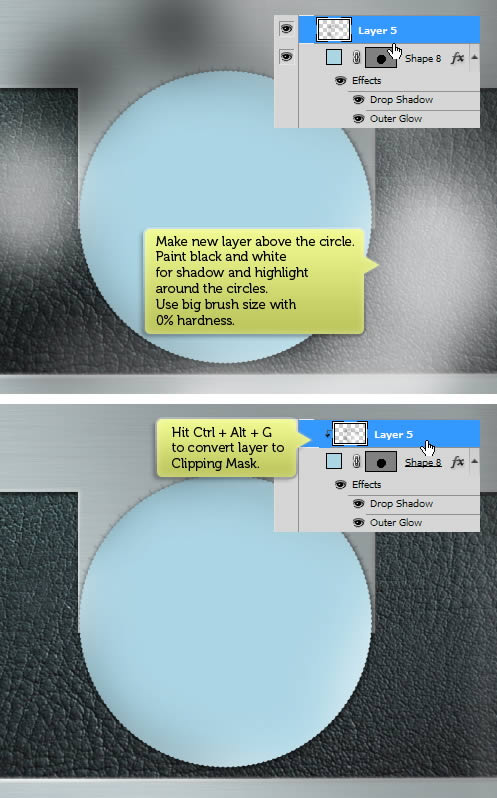
Make new layer on top of circle shape. Dab white and black on its edge using a soft big brush. Hit Command/Ctrl + Alt + G to convert the layer into a Clipping Mask. This way, the pixels will goes inside the shape.

Draw a Leica Camera in Photoshop

Step 32

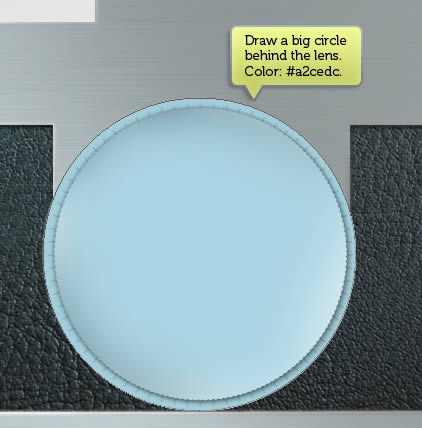
Draw bigger circle behind the lens and lines. Use #a2cedc for its color.

Draw a Leica Camera in Photoshop

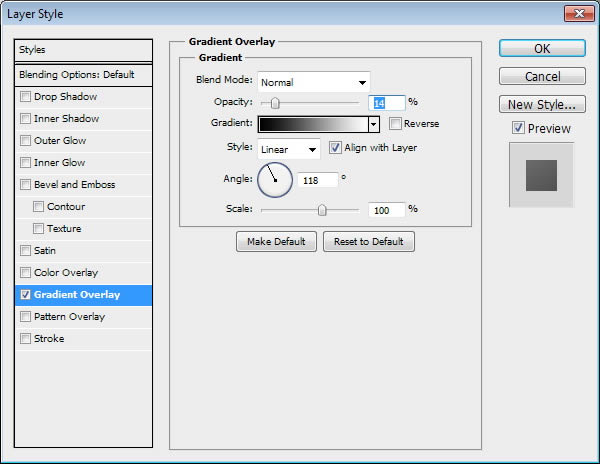
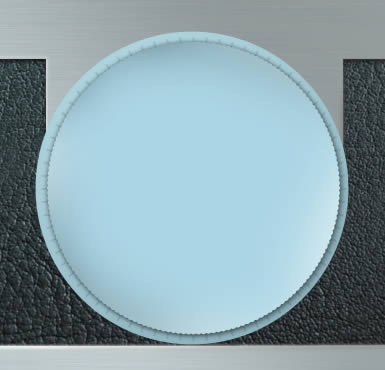
Douible click layer and activate Gradient Overlay with following settings.

Draw a Leica Camera in Photoshop

Step 33

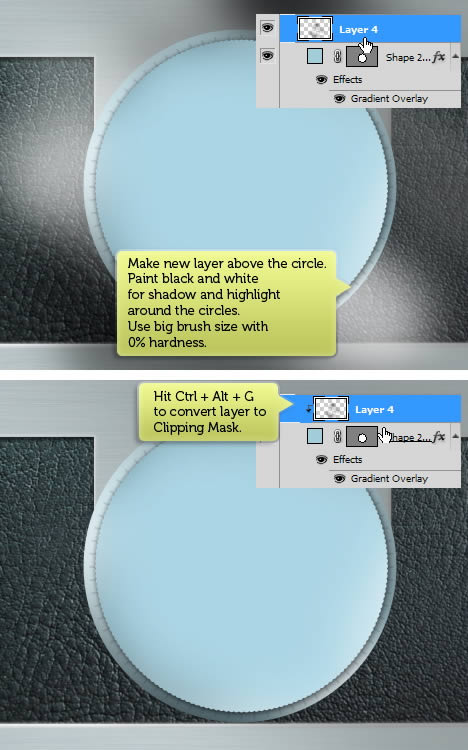
Make new layer right above the circle and dab white and black using soft big brush. Convert the layer to Clipping Mask (Command/Ctrl + Alt + G).

Draw a Leica Camera in Photoshop

Step 34

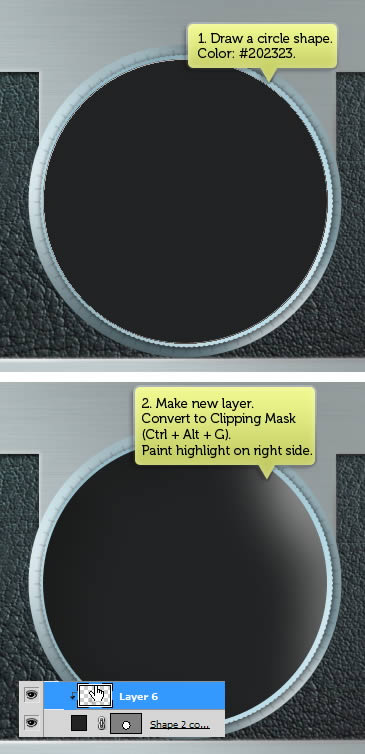
Draw a circle shape with color #202323. Make new layer and dab white on its right side. Convert layer to Clipping Mask by pressing Command/Ctrl + Alt + G.

Draw a Leica Camera in Photoshop

Step 35

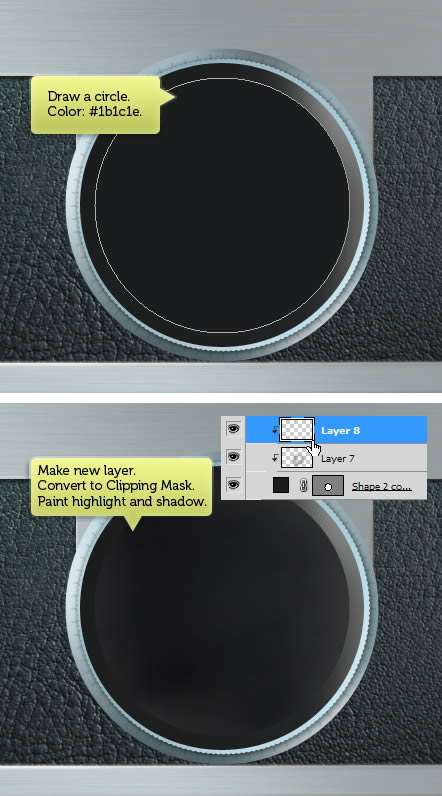
Draw smaller circle with color #1b1c1e. Make new layer, convert it to Clipping mask and then dab black and white on its edge.

Draw a Leica Camera in Photoshop

Step 36

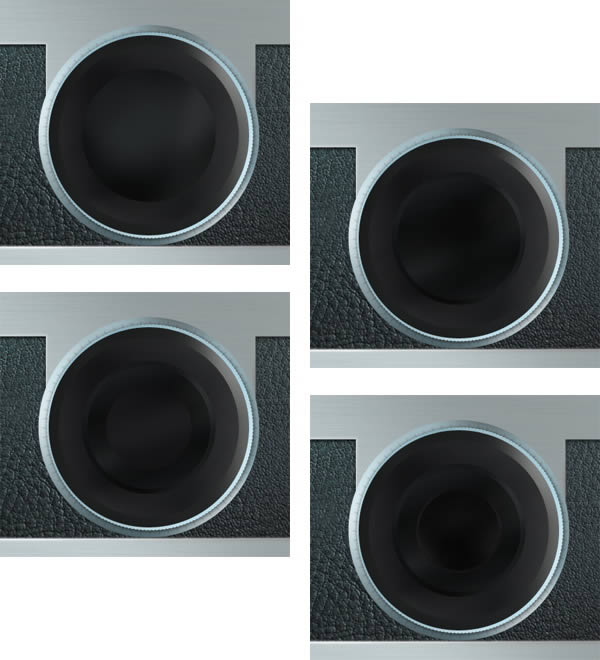
You should now understand the process. Repeat this a few times until we get a complete set of circles inside the lens.

Draw a Leica Camera in Photoshop

Step 37

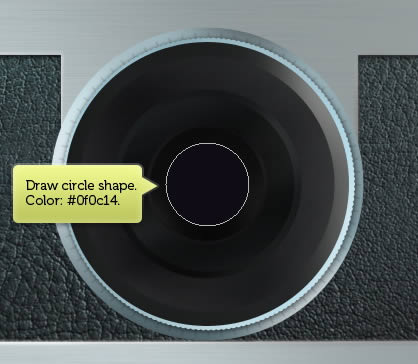
Draw smaller circle again with color #0f0c14.

Draw a Leica Camera in Photoshop

Add subtle Gradient Overlay.

Draw a Leica Camera in Photoshop

Step 38

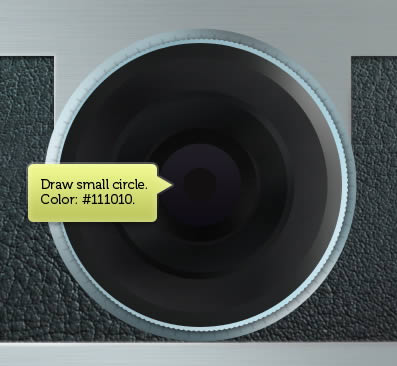
Draw a small circle with color #111010.

Draw a Leica Camera in Photoshop

Step 39

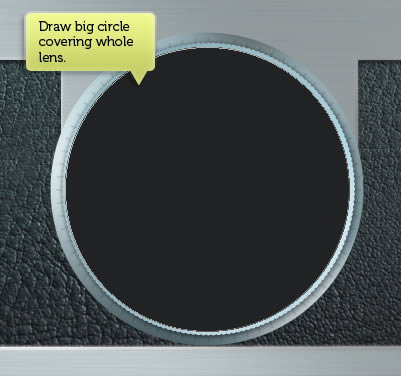
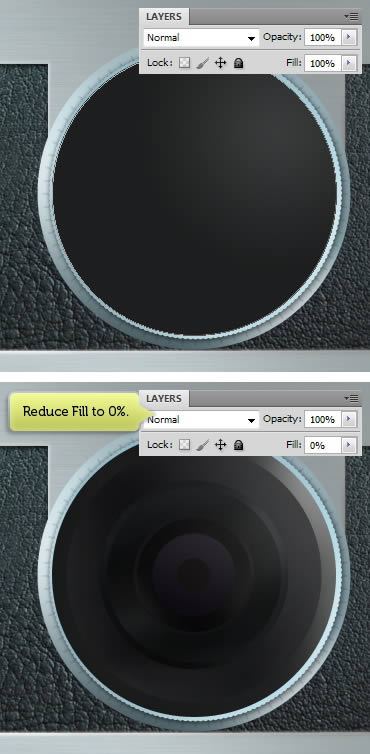
Draw a big circle covering whole lens. You can use any color for this shape.

Draw a Leica Camera in Photoshop

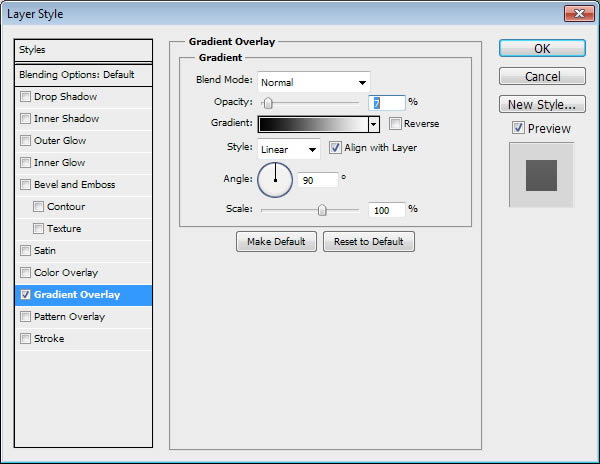
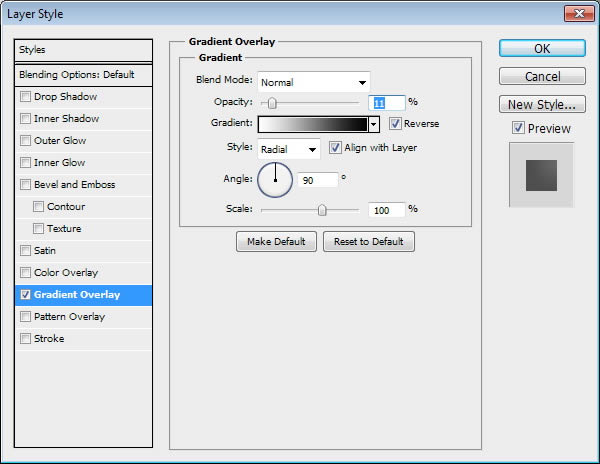
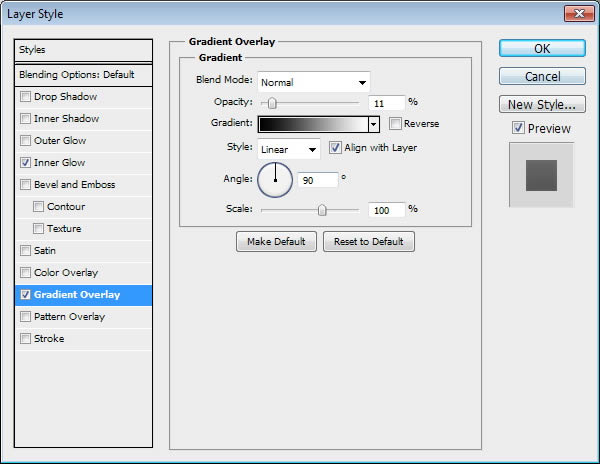
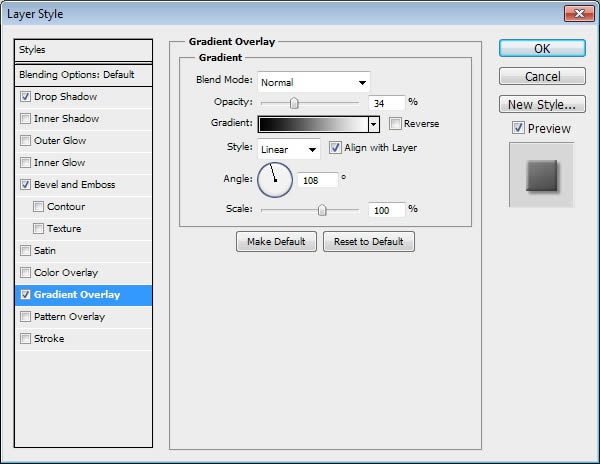
Double click layer shape and add subtle Gradient Overlay with Opacity 11% from black to white.

Draw a Leica Camera in Photoshop

Reduce Fill layer to 0%. This way, we can reveal the lens and add subtle gradient on top of it.

Draw a Leica Camera in Photoshop

Step 40

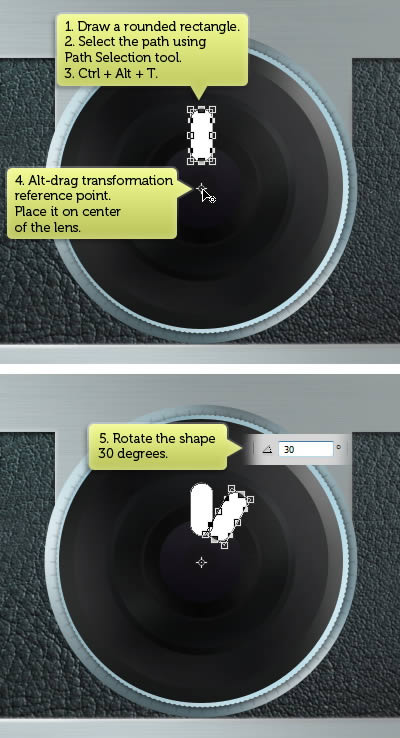
Draw a rounded rectangle. Select the path using Path Selection Tool. Hit Command/Ctrl + Alt + T to duplicate and transform the shape. Alt-drag transformation reference point and place it on center of the lens. Rotate the shape for 30°.

Draw a Leica Camera in Photoshop

Step 41

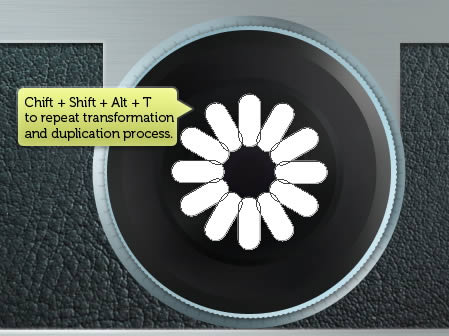
Repeat the process by pressing Command/Ctrl + Shift + Alt + T. See picture below to see the result.

Draw a Leica Camera in Photoshop

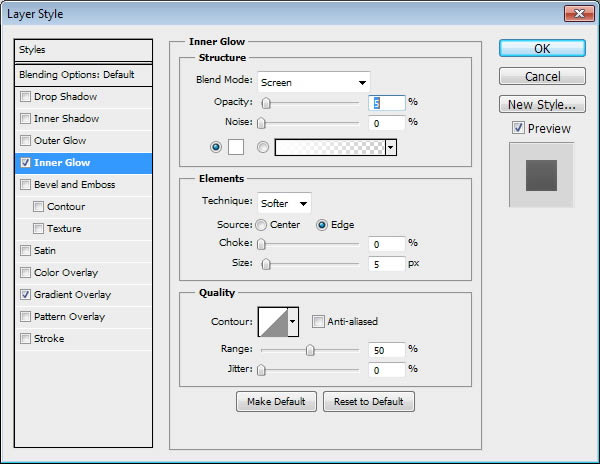
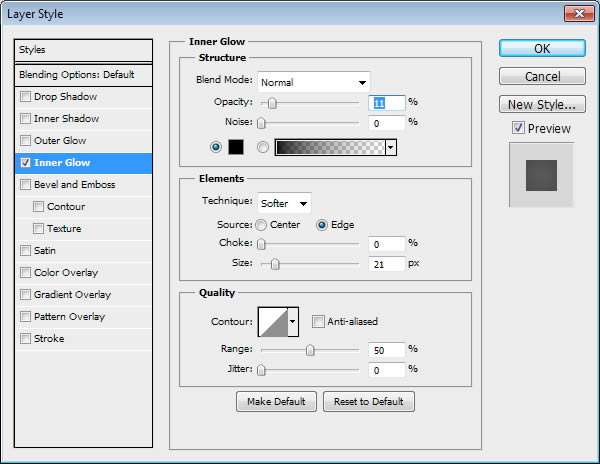
Add layer style Inner Glow and Gradient Overlay.

Draw a Leica Camera in Photoshop

Step 42

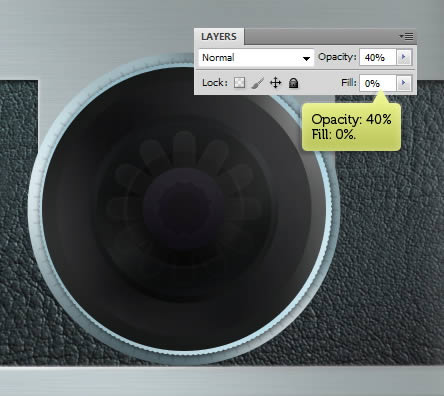
Reduce Opacity to 40% and Fill to 0%.

Draw a Leica Camera in Photoshop

Step 43

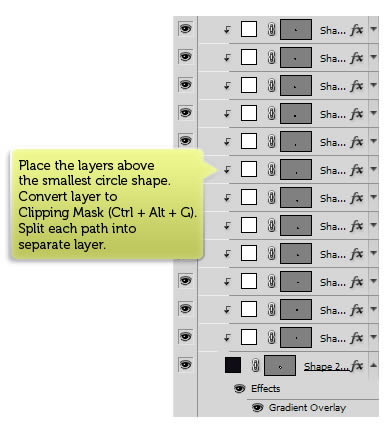
Place the layer on top of small circle shape we made in Step 37. Convert layer to Clipping Mask by pressing Command/Ctrl + Alt + G. Split each path into separate layers.

Draw a Leica Camera in Photoshop

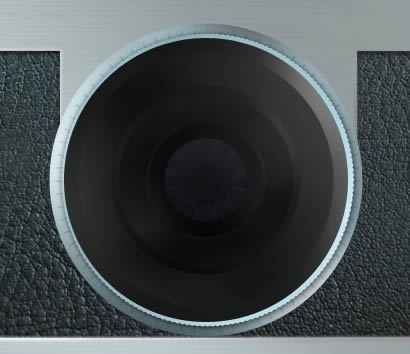
This what we will have after we split each path into separate layer shape.

Draw a Leica Camera in Photoshop

Step 44

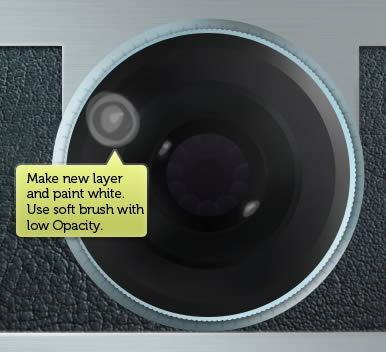
Let’s add highlights inside the lens. Make new layer and place it above all layers. Use soft brush to draw white spot on the lens. Don’t worry is the result is very harsh, we can fix it easily.

Draw a Leica Camera in Photoshop

Step 45

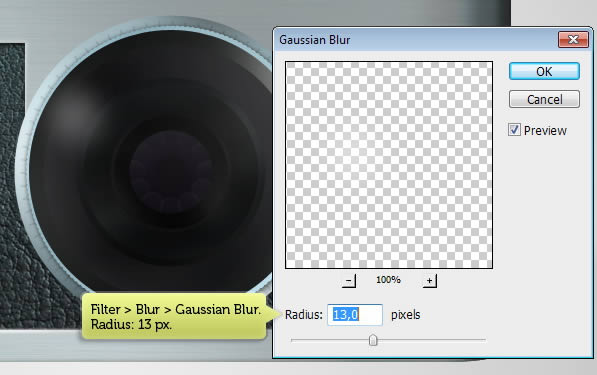
Add Gaussian Blur to soften the highlight we have just manually drawn.

Draw a Leica Camera in Photoshop

Step 46

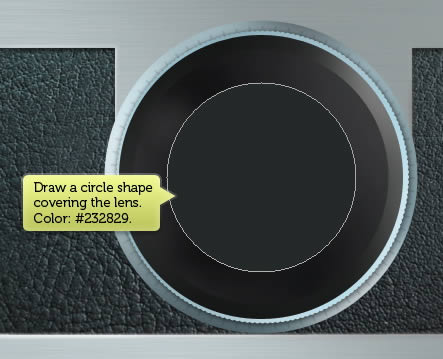
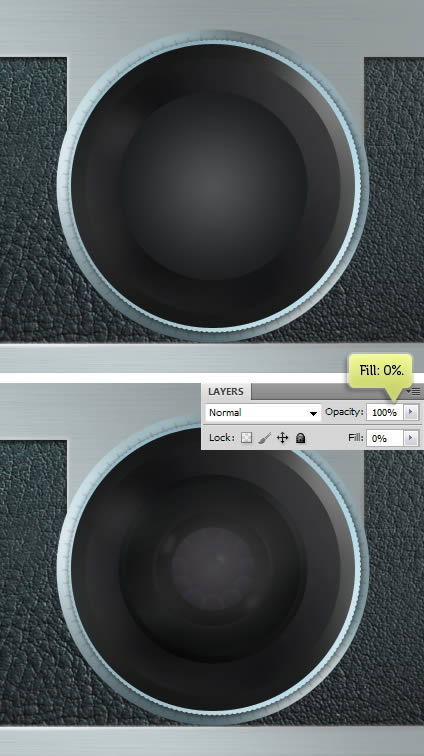
Draw a circle shape covering the lens.

Draw a Leica Camera in Photoshop

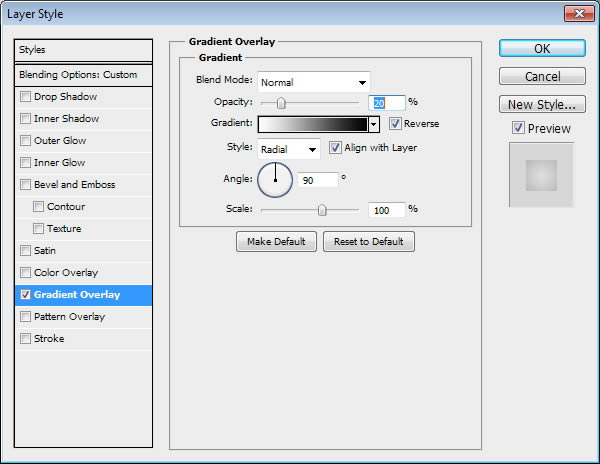
Add layer style Gradient Overlay. Set its mode to radial from black to white.

Draw a Leica Camera in Photoshop

This is the result. Change Fill layer to 0% to reveal the lens underneath the shape.

Draw a Leica Camera in Photoshop

Step 47

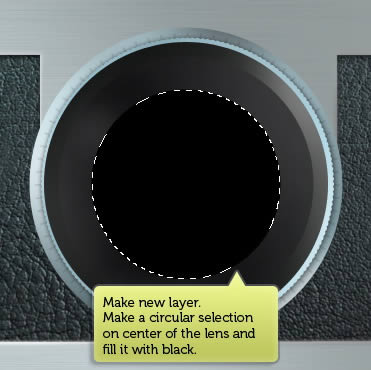
Make a new layer. Draw a circular selection on venter of the lens and fill it with black.

Draw a Leica Camera in Photoshop

Step 48

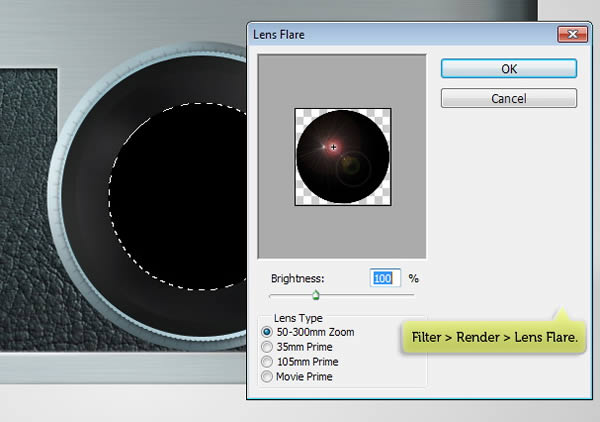
Click FIlter > Render > Lens Flare.

Draw a Leica Camera in Photoshop

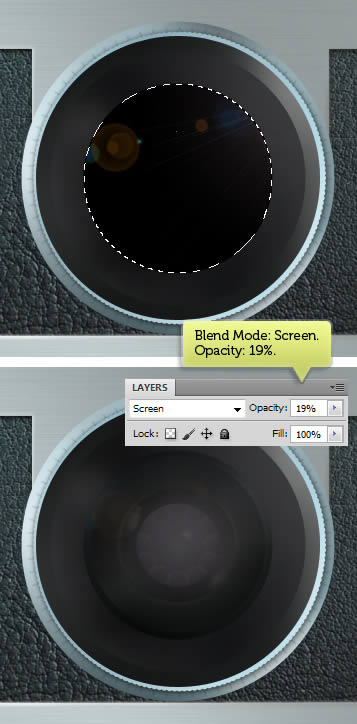
Change layer’s blend mode to Screen and reduce Opacity to 19%.

Draw a Leica Camera in Photoshop

Step 49

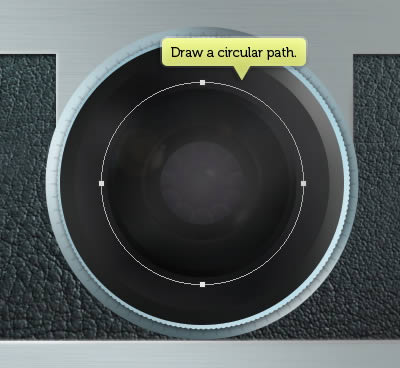
Draw a circular path using ellipse tool.

Draw a Leica Camera in Photoshop

Step 50

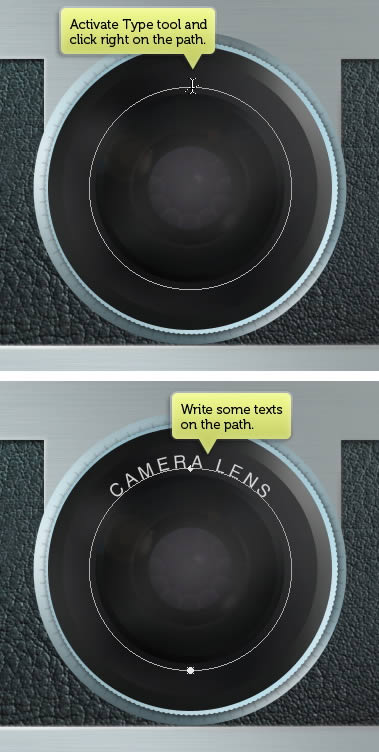
Activate Type tool and click right on the path. Remember to do it exactly on the path, not inside or outside the path. If you do it correctly, your text direction will follow the path curvature.

Draw a Leica Camera in Photoshop

Step 51

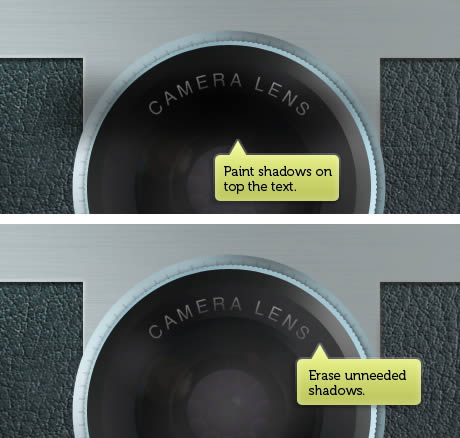
Make new layer above the text and then paint some shadows. Erase unneeded shadow using Eraser tool.

Draw a Leica Camera in Photoshop

Step 52

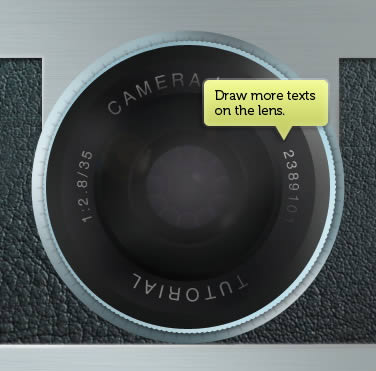
Repeat the steps above to add more texts on the lens.

Draw a Leica Camera in Photoshop

Step 53

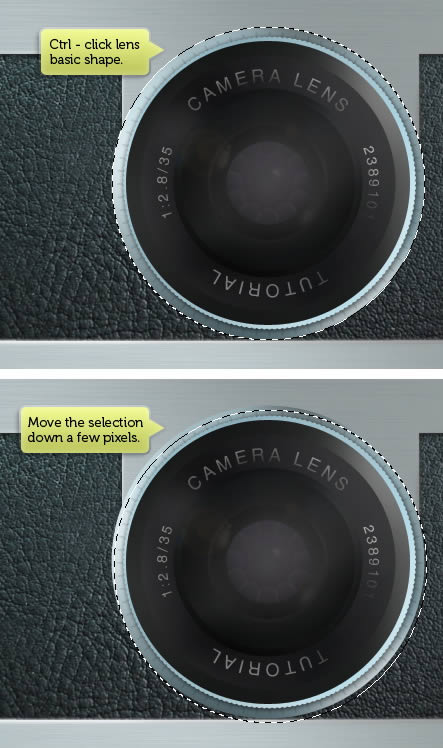
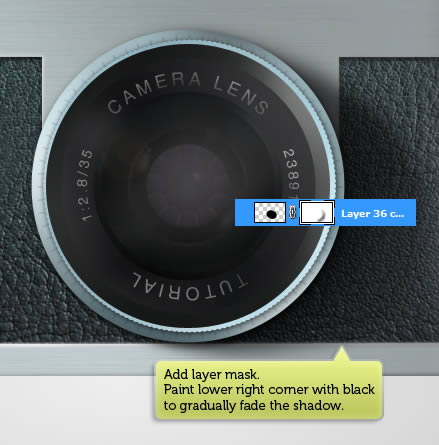
The lens is currently appears flat. We need to add shadow to give it depth. Command/Ctrl-click lens basic shape to make new selection based on its shape. Make sure marquee tool is selected and then hit down a few times to move the selection down.

Draw a Leica Camera in Photoshop

Step 54

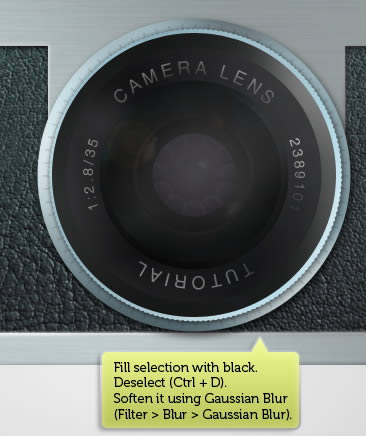
Make new selection and place it under the lens. Fill selection with black. Deselect (Command/Ctrl + D) and then soften it using Gaussian Blur.

Draw a Leica Camera in Photoshop

Step 55

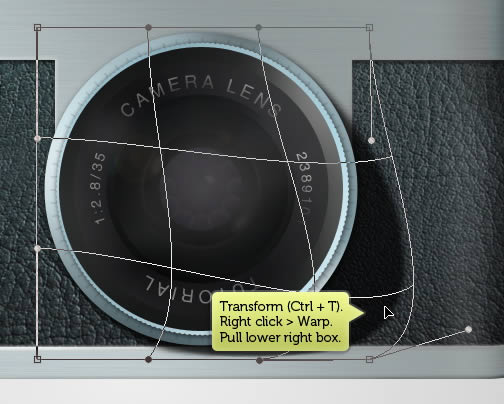
Hit Command/Ctrl + T to perform transformation. Right click and select Warp. Pull lower right box.

Draw a Leica Camera in Photoshop

Step 56

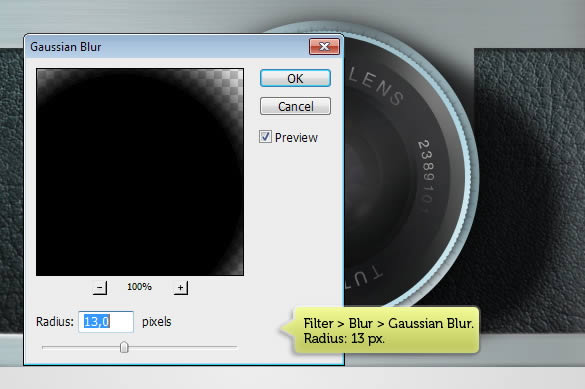
Warp transformation sometimes add rough edges. To fix it, we need to soften it again using Gaussian Blur. This time use bigger radius.

Draw a Leica Camera in Photoshop

Step 57

Add layer mask and then paint lower right corner of the shadow with black until it fades onto the camera base.

Draw a Leica Camera in Photoshop

Step 58

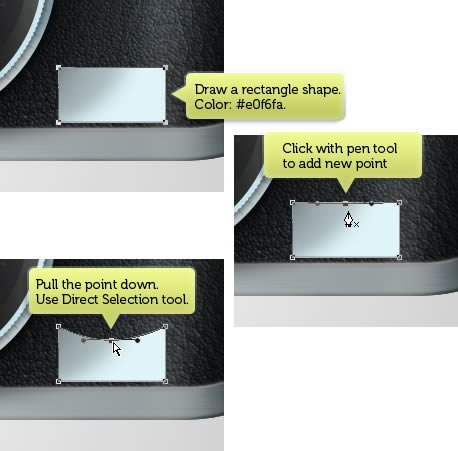
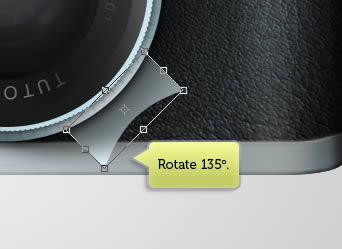
Draw a rectangle shape on lower right of the lens with color #e0f6fa. Activate pen tool then click and drag its middle top side to add new point. Use Direct selection to select it and drag it down until we get a curve.

Draw a Leica Camera in Photoshop

Step 59

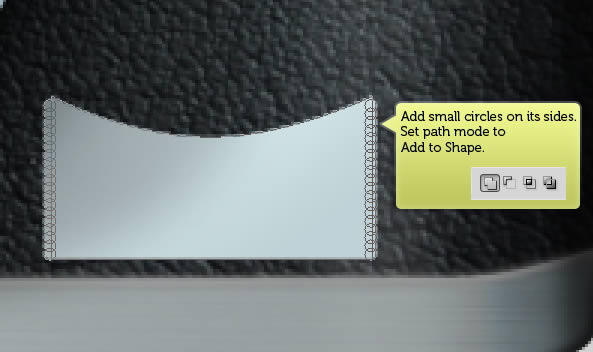
Add some circles on left and right side of the shape. Make sure to set its mode to Add to Shape in the Option Bar.

Draw a Leica Camera in Photoshop

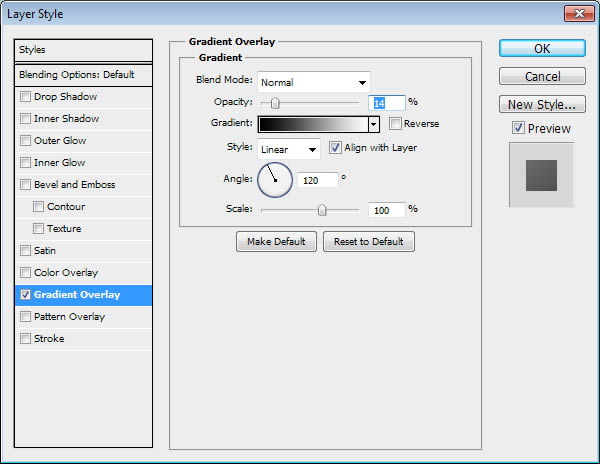
Add Gradient Overlay onto the layer shape.

Draw a Leica Camera in Photoshop

Step 60

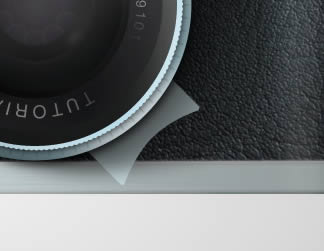
Rotate the shape 135°.

Draw a Leica Camera in Photoshop

Step 61

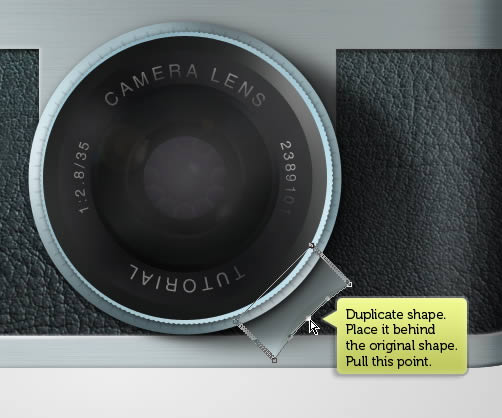
Duplicate shape by pressing Command/Ctrl + J. Place it behind the original shape. Pull its middle point down. See picture below to see the result.

Draw a Leica Camera in Photoshop

Step 62

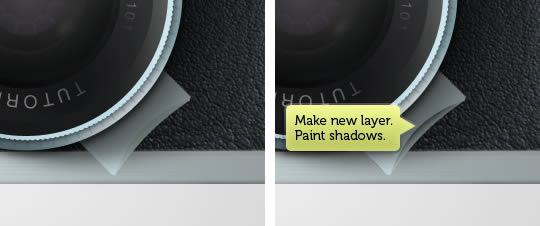
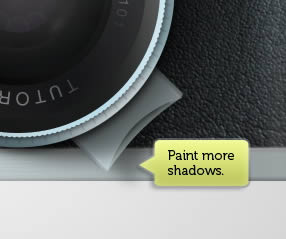
Make new layer and then paint shadows on top of the duplicated shape.

Draw a Leica Camera in Photoshop

Step 63

Make new layer again and put it behind the lens. Paint our previous shape shadow on the camera.

Draw a Leica Camera in Photoshop

Step 64: View Finder

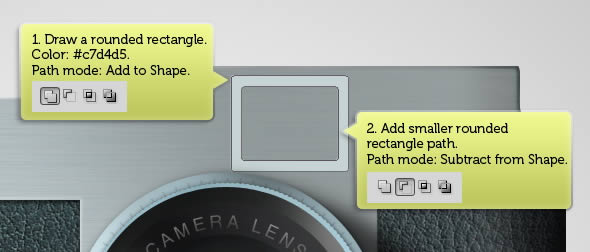
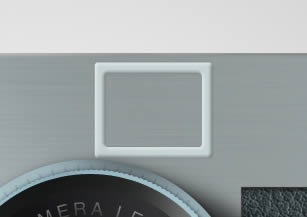
Draw a rounded rectangle with color #c7d4d5. Inside the shape, draw smaller rounded rectangle and set its mode to Subtract from Shape.

Draw a Leica Camera in Photoshop

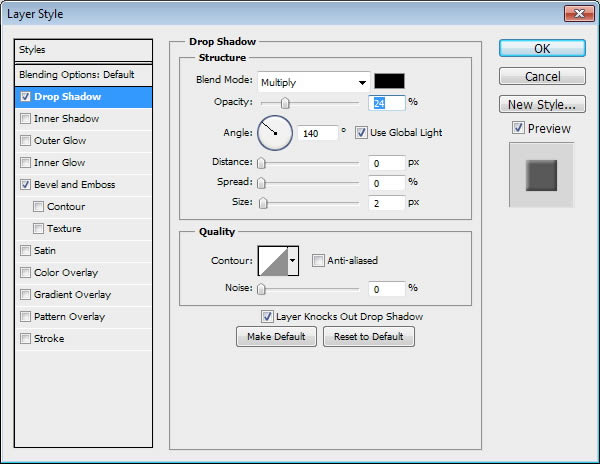
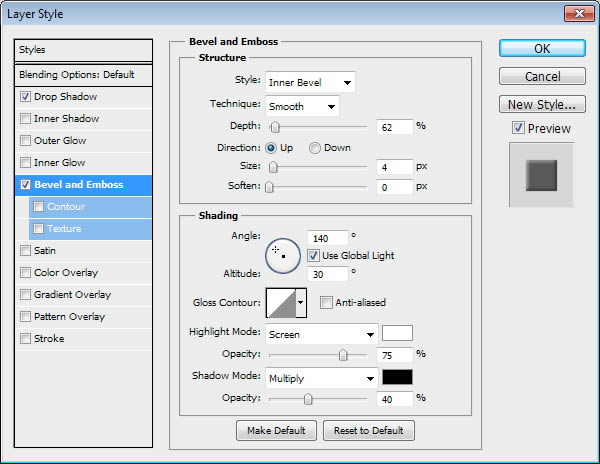
Double click layer to open Layer Style dialog box. Add Drop Shadow and Bevel and Emboss.

Draw a Leica Camera in Photoshop

Step 65

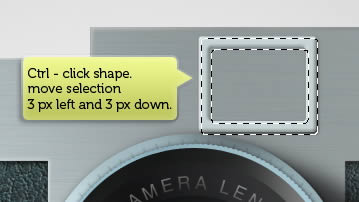
Command/Ctrl-click shape and move the selection 3 pixels left and down. Make new layer and place it under the shape. Fill selection with black.

Draw a Leica Camera in Photoshop

Step 66

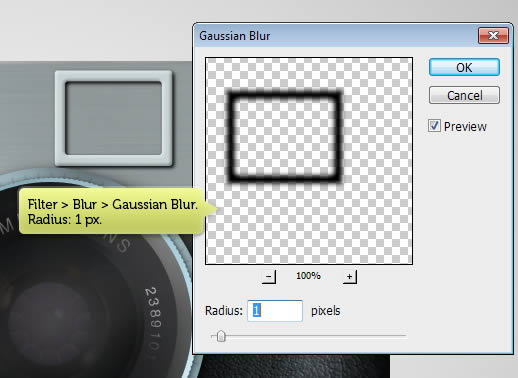
Click Filter > Blur > Gaussian Blur to soften it.

Draw a Leica Camera in Photoshop

Step 67

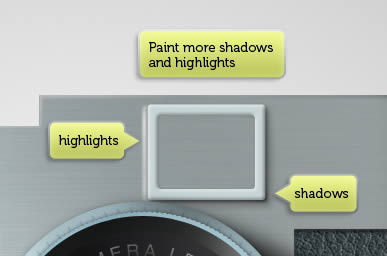
Make new layer again. Activate brush tool with small brush size. Paint needed highlights and shadows. While painting this, make sure to remember that our light source is in upper right corner of the canvas.

Draw a Leica Camera in Photoshop

Step 68

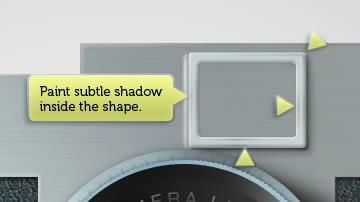
Make new layer, this time place it on top of the shape. Paint subtle shadow inside the shape.

Draw a Leica Camera in Photoshop

Step 69

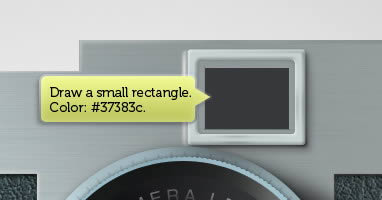
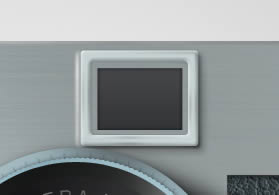
Draw a small rectangle inside the frame. Set its color to #37383c.

Draw a Leica Camera in Photoshop

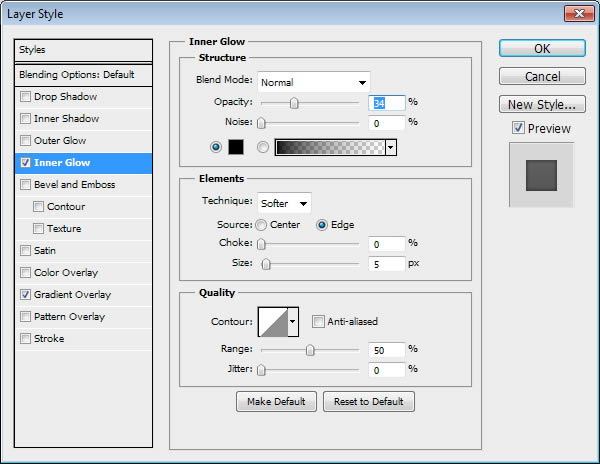
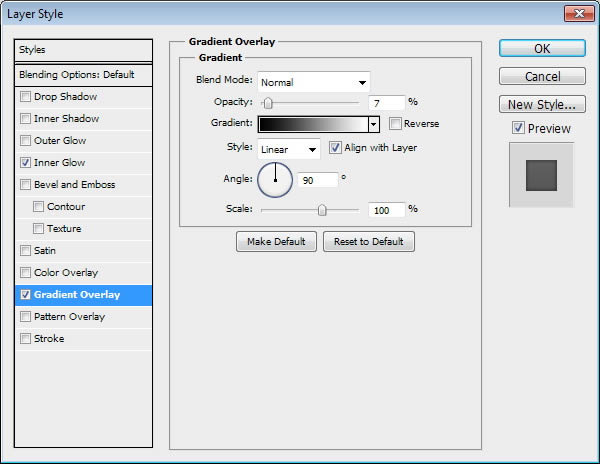
Add layer style Inner Glow and Gradient Overlay.

Draw a Leica Camera in Photoshop

Here’s the result.

Draw a Leica Camera in Photoshop

Step 70

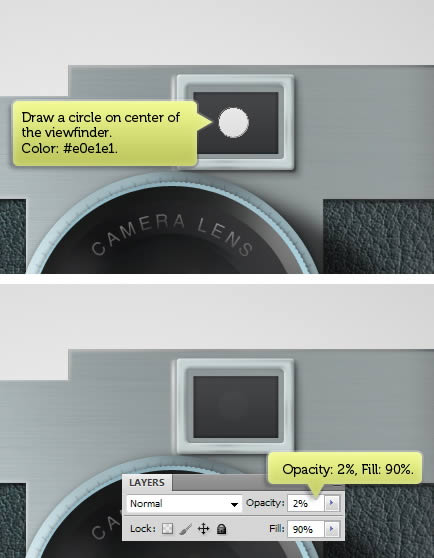
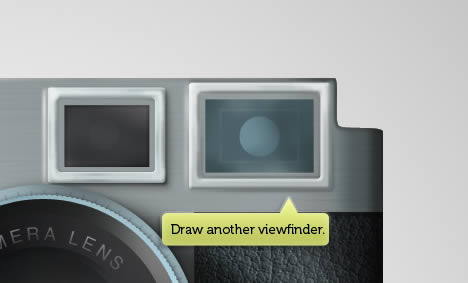
Draw a small circle on center of the viewfinder with color #e0e1e1. Reduce its Opacity and Fill to 2% and 90%. With these settings, the circle seems to be inside the viewfinder glass.

Draw a Leica Camera in Photoshop

Step 71

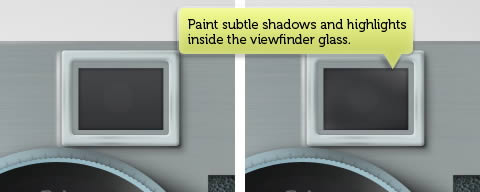
Make new layer. Paint subtle shadows and highlights inside the viewfinder glass. Use very soft brush with low Opacity, no more than 5%. Remember, we want it to be very subtle.

Draw a Leica Camera in Photoshop

Step 72

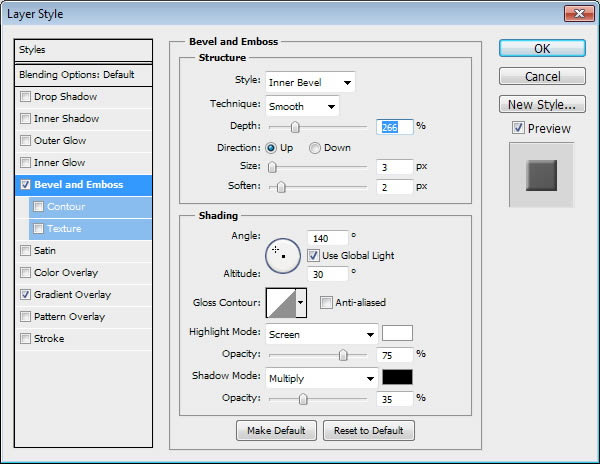
Activate the viewfinder glass. In Layers panel, double click it to open Layer Styles dialog box. Activate Bevel and Emboss and Gradient Overlay.

Draw a Leica Camera in Photoshop

Step 73

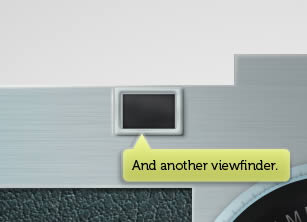
Use same technique to draw another viewfinder on left and right side of the camera.

Draw a Leica Camera in Photoshop

For the left side, you can simply duplicate the first viewfinder and resize it.

Draw a Leica Camera in Photoshop

Step 74

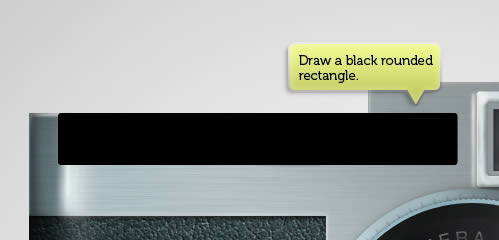
Draw a black rounded rectangle on top of the small viewfinder.

Draw a Leica Camera in Photoshop

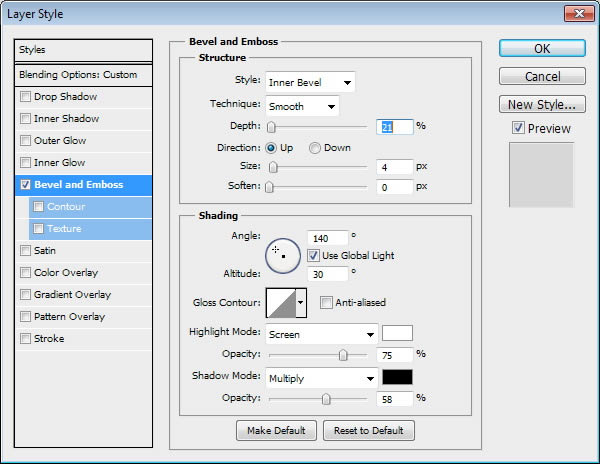
Add Bevel and Emboss.

Draw a Leica Camera in Photoshop

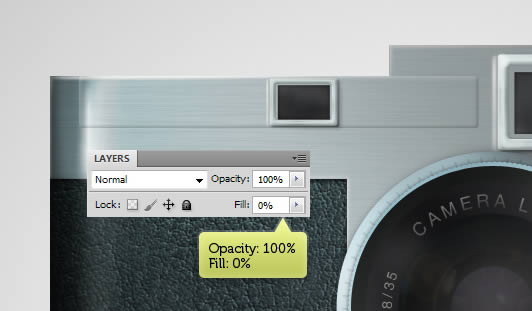
Reduce Fill layer to 0%.

Draw a Leica Camera in Photoshop

Step 75

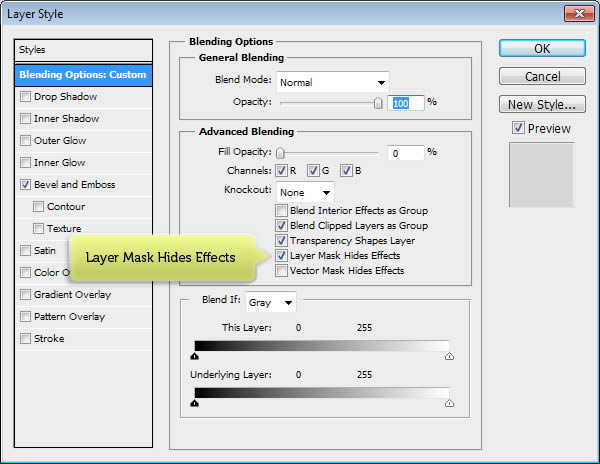
Double click layer to open Layer Style dialog box again. Activate Layer Mask Hides Effects.

Draw a Leica Camera in Photoshop

Step 76

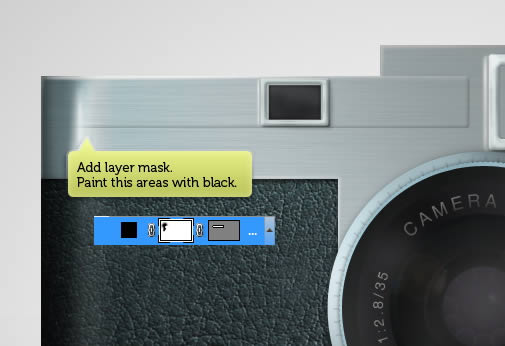
Click Add Layer Mask icon to add layer mask and then left side of the shape with black. We want the Bevel effect fades onto left side of the camera body.

Draw a Leica Camera in Photoshop

Step 77

Make new layer. Command/Ctrl-click shape to make new selection based on its shape. Fill it with black.

Draw a Leica Camera in Photoshop

Step 78

Hit Command/Ctrl + D to deselect. Click Filter > Blur > Gaussian Blur to soften the black pixels.

Draw a Leica Camera in Photoshop

Step 79

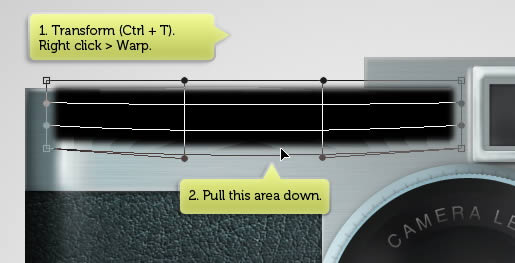
Hit Command/Ctrl + T to transform the shadow. Right click and select Warp. Pull down lower area.

Draw a Leica Camera in Photoshop

Step 80

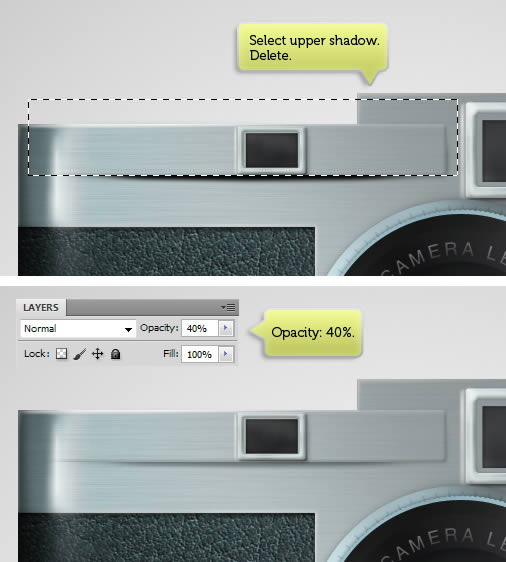
Select upper shadow and then hit Delete key. Reduce its Opacity to 40%.

Draw a Leica Camera in Photoshop

Step 81

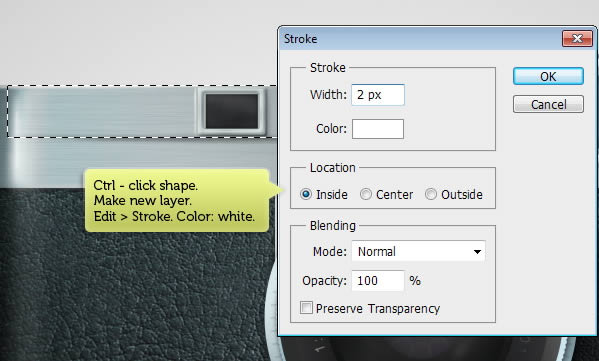
Command/Ctrl-click shape we have made in Step 74. Make new layer and then click Edit > Stroke. Set its color to white.

Draw a Leica Camera in Photoshop

Step 82

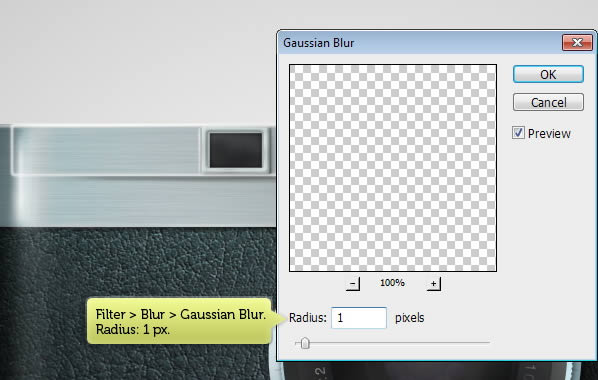
Soften the stroke by applying Gaussian Blur.

Draw a Leica Camera in Photoshop

Step 83

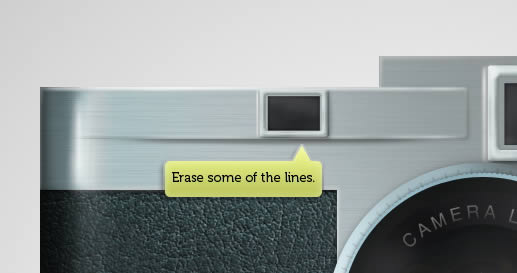
Erase some of stroke line.

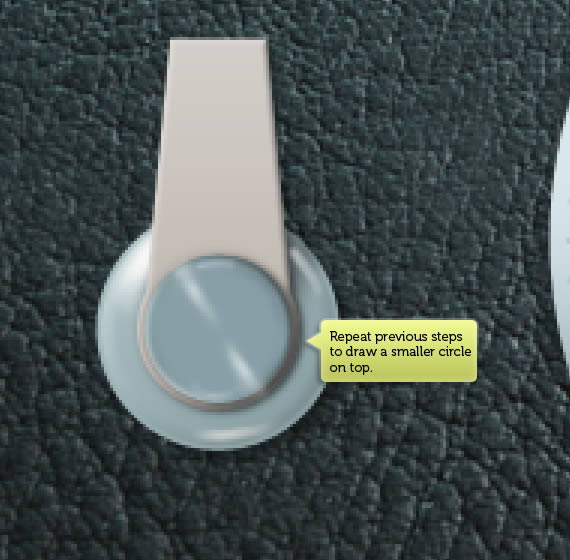
Draw a Leica Camera in Photoshop

Step 84: Draw Switch

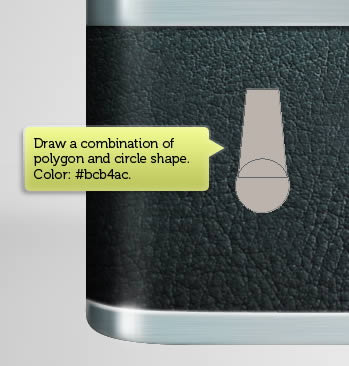
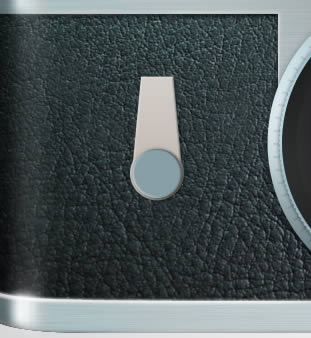
Draw a circle shape with color #bcb4ac. Add a polygon path on top of it with mode Add to Path.

Draw a Leica Camera in Photoshop

Add Layer Style Drop, Bevel and Emboss, and Gradient Overlay.

Draw a Leica Camera in Photoshop

Step 85

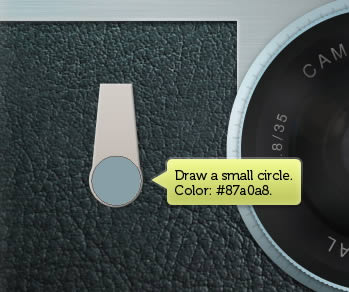
On top of the shape, draw a circle with color: #87a0a8.

Draw a Leica Camera in Photoshop

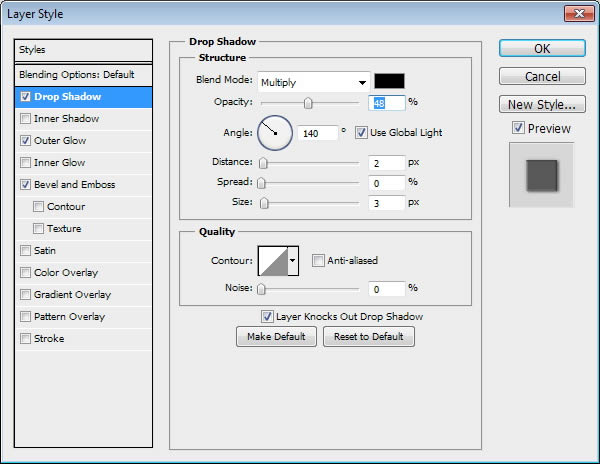
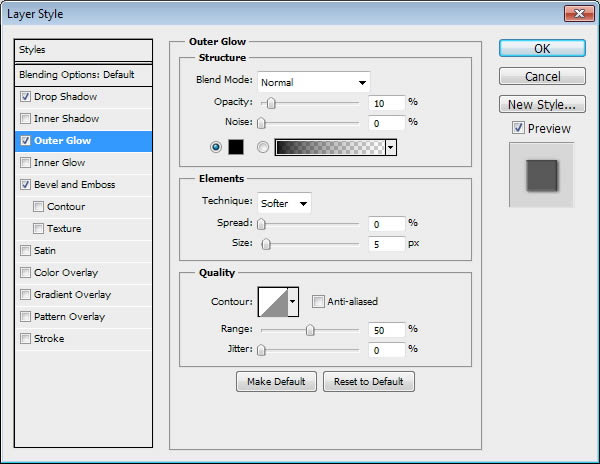
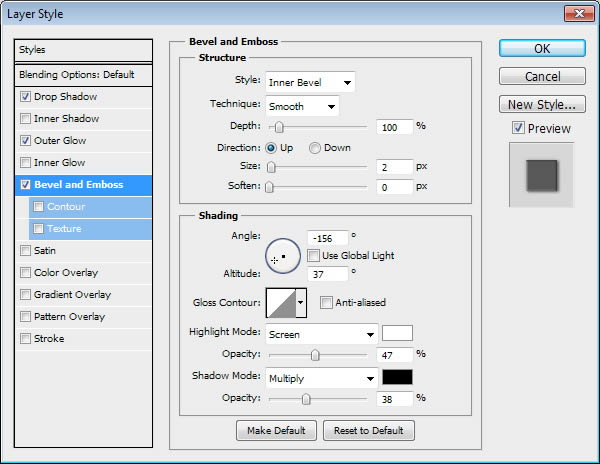
Add Drop Shadow, Outer Glow, and Bevel and Emboss with following settings.

Draw a Leica Camera in Photoshop

Step 86

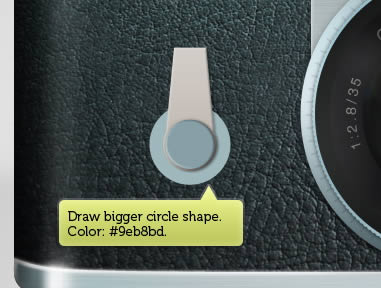
Draw bigger circle, this time with color #9eb8bd. Place behind both previous shapes.

Draw a Leica Camera in Photoshop

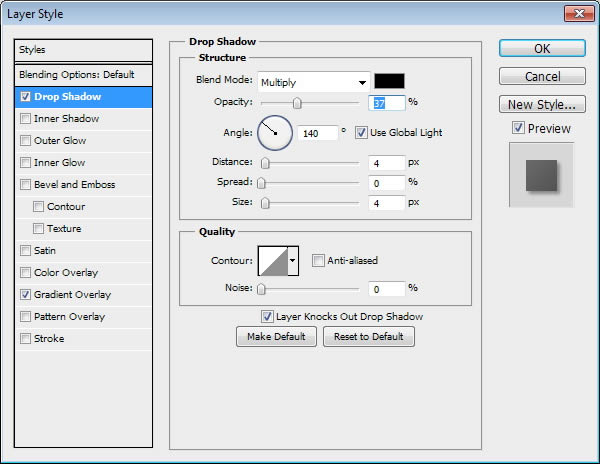
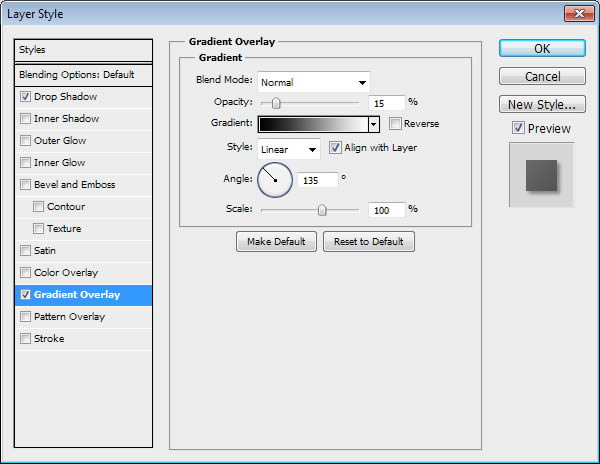
Double click layer shape to open Layer Style dialog box. Activate Drop Shadow and Gradient Overlay.

Draw a Leica Camera in Photoshop

Step 87

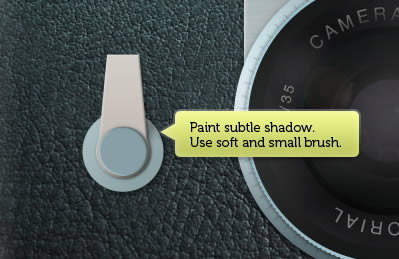
Make new layer and paint subtle shadow behind the dial.

Draw a Leica Camera in Photoshop

Step 88

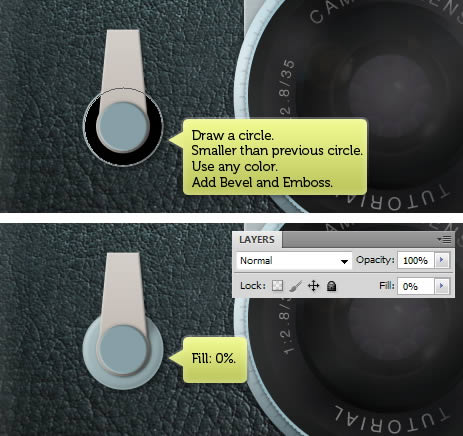
Draw a circle, smaller than the previous one.

Draw a Leica Camera in Photoshop

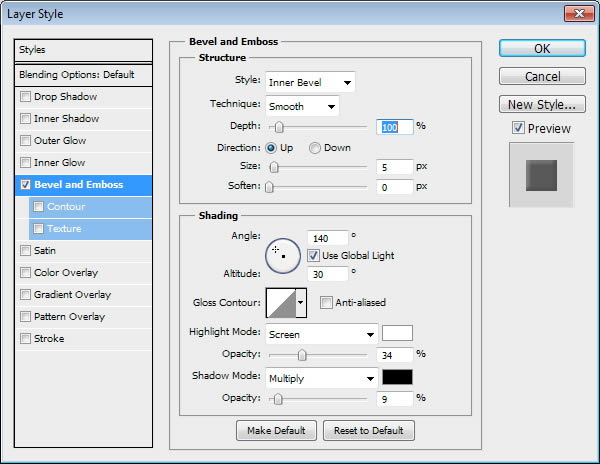
Add Bevel and Emboss

Draw a Leica Camera in Photoshop

Step 89

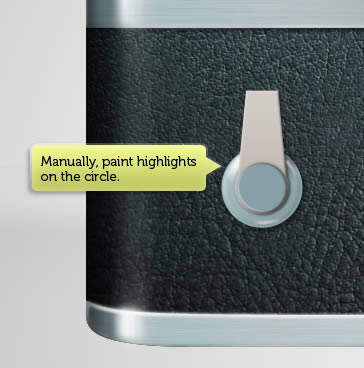
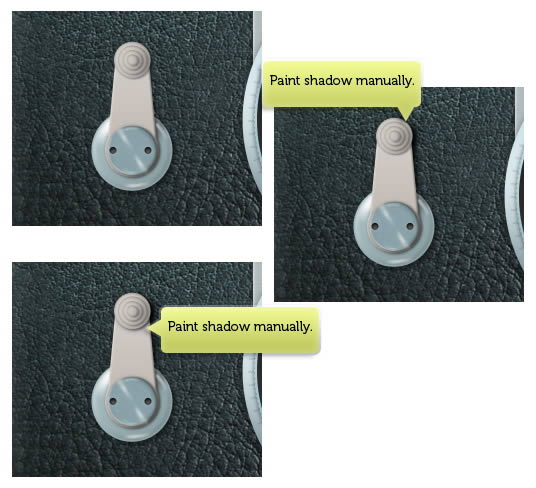
Make new layer and then manually paint highlights on the circle.

Draw a Leica Camera in Photoshop

Draw another highlight on the smaller circle.

Draw a Leica Camera in Photoshop

Step 90

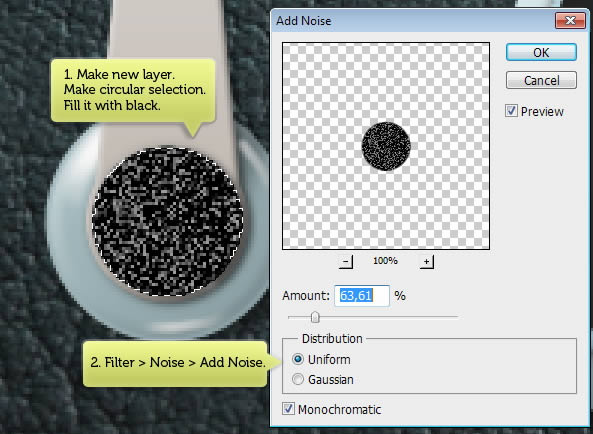
Make new layer and make circular selection covering top of the circle shape. Fill it with black and then click Filter > Noise > Add Noise.

Draw a Leica Camera in Photoshop

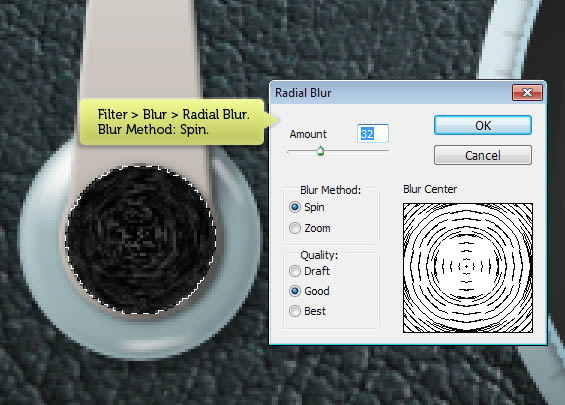
Click Filter > Blur > Radial Blur and select Spin for its blur method.

Draw a Leica Camera in Photoshop

Step 91

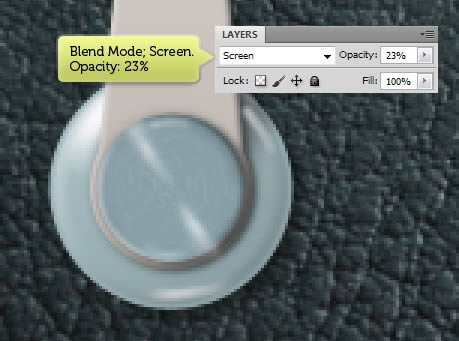
Change layer’s blend mode to Screen and reduce its Opacity.

Draw a Leica Camera in Photoshop

Below is the result in 100% magnification.

Draw a Leica Camera in Photoshop

Step 92

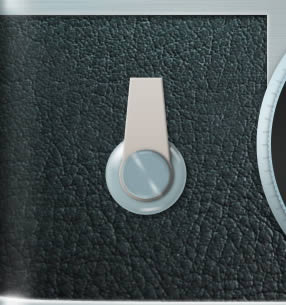
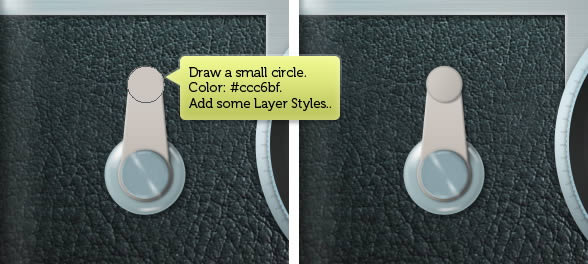
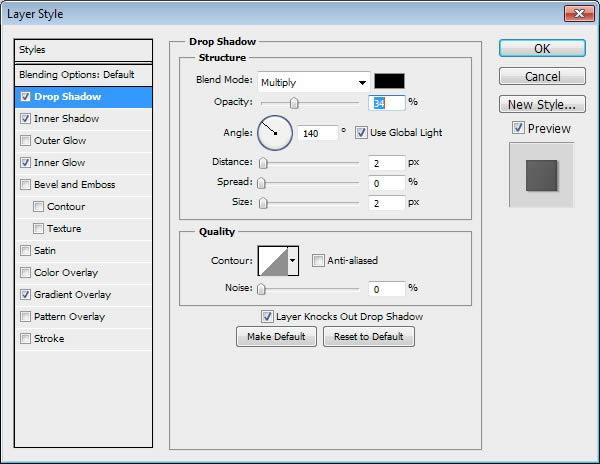
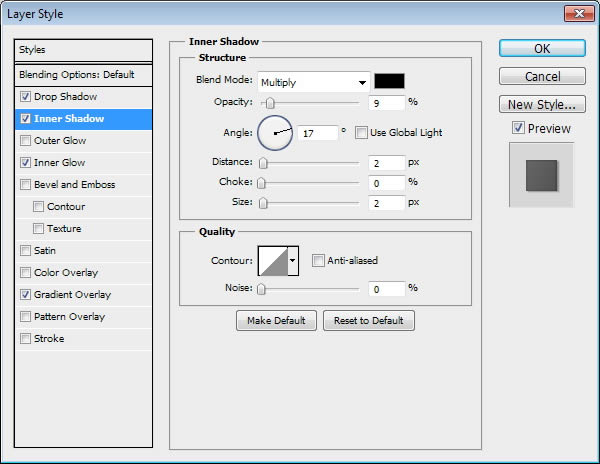
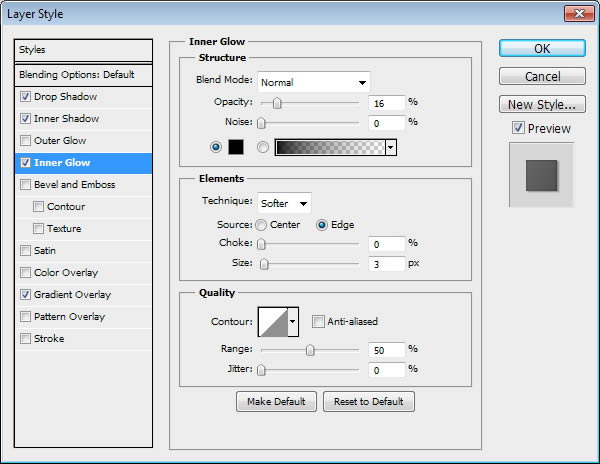
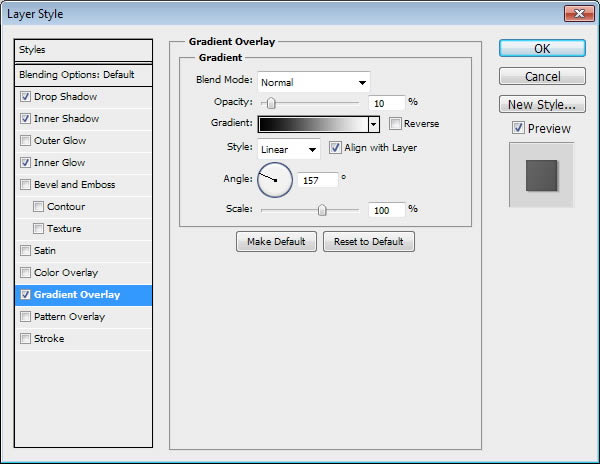
Draw a small circle with color #ccc6bf. Add Drop Shadow, Inner Glow, Inner Shadow, and Gradient Overlay with following settings.

Draw a Leica Camera in Photoshop

Step 93

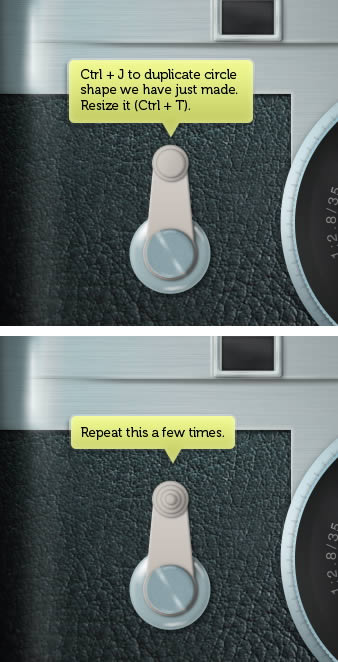
Duplicate the shape by pressing Command/Ctrl + J. hit Command/Ctrl + T to resize it. Repeat this process a few times.

Draw a Leica Camera in Photoshop

Step 94

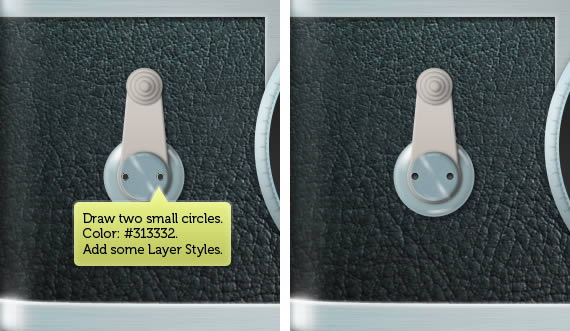
Draw two small dark circles shape on the dial. Add following Layer Styles.

Draw a Leica Camera in Photoshop

Step 95

Make new layer and place it under the set of circles. Use soft brush tool to paint soft shadow on the camera body.

Draw a Leica Camera in Photoshop

Step 96

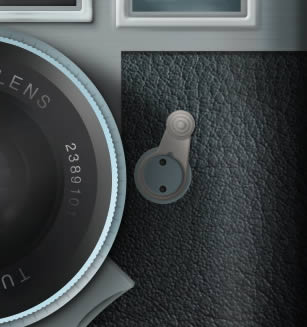
Repeat this process to draw another switch on the camera.

Draw a Leica Camera in Photoshop

Step 97: Screw

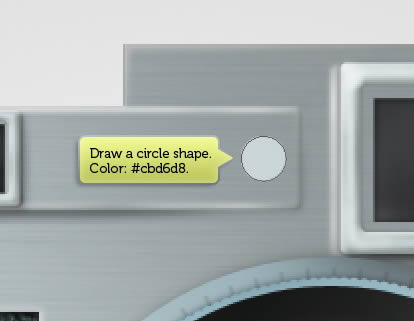
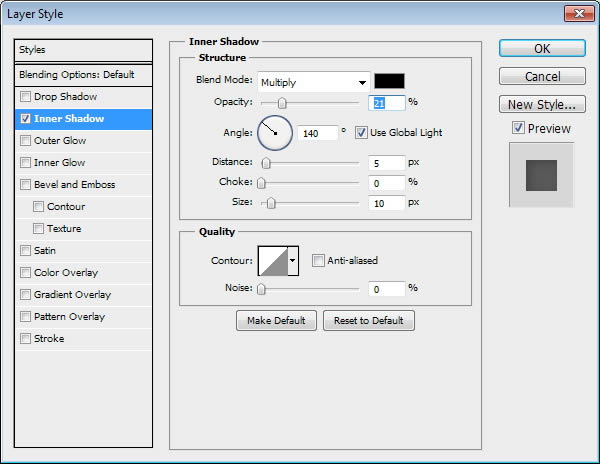
Draw a small circle shape with color #cbd6d8. Add Inner Shadow.

Draw a Leica Camera in Photoshop

Step 98

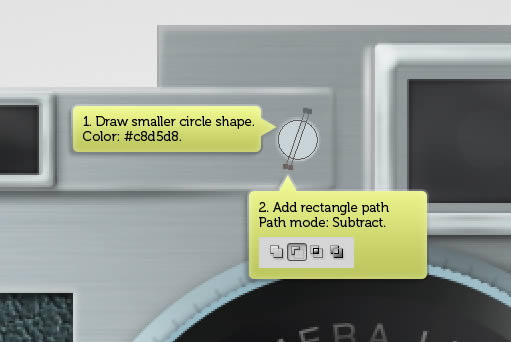
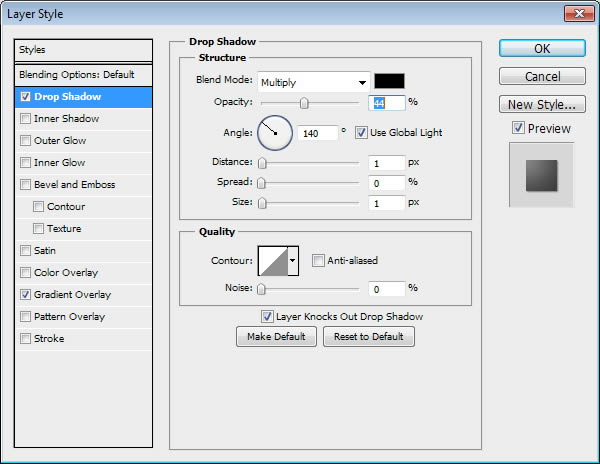
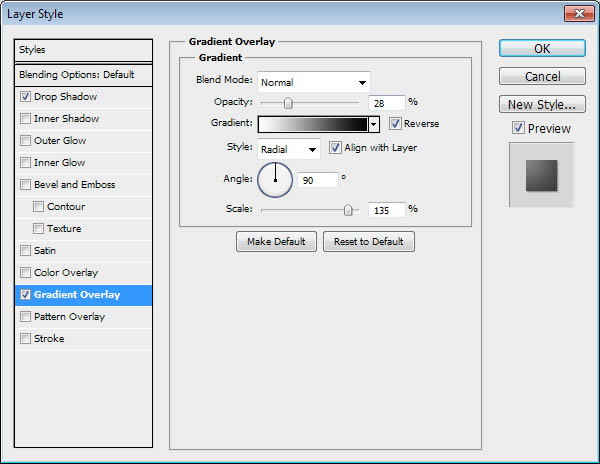
Draw smaller circle shape with color #c8d5d8. Add rectangle path with path mode Subtract. To convert it into a screw we need to add following Layer Styles.

Draw a Leica Camera in Photoshop

Step 99

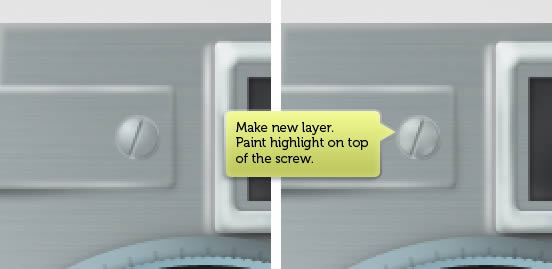
Make new layer and then manually paint subtle highlight on the screw.

Draw a Leica Camera in Photoshop

Step 100

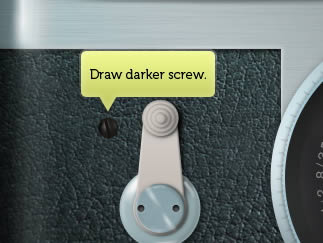
Use same techniques to draw a dark screw.

Draw a Leica Camera in Photoshop

Step 101

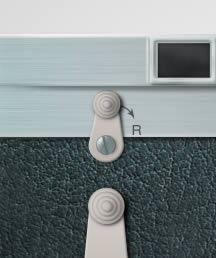
Make below switch using combinations of techiques that we have learnt earlier.

Draw a Leica Camera in Photoshop

Step 102

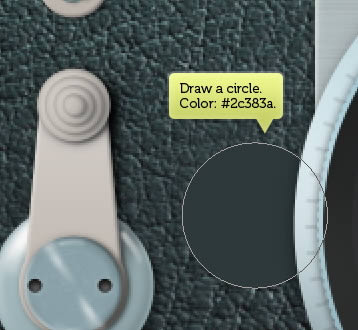
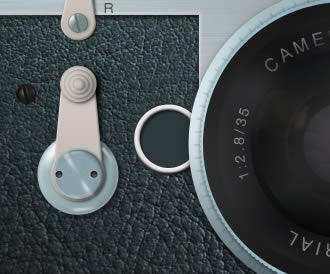
Draw a circle with color #2c383a.

Draw a Leica Camera in Photoshop

Step 103

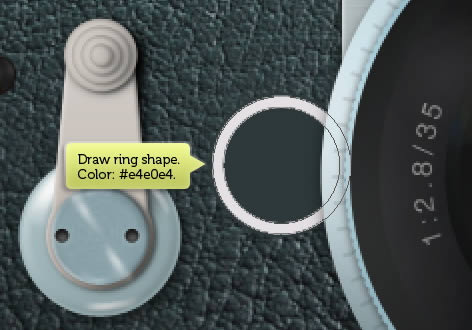
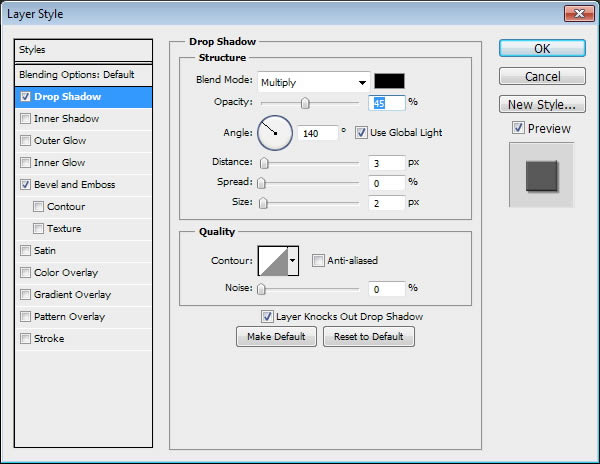
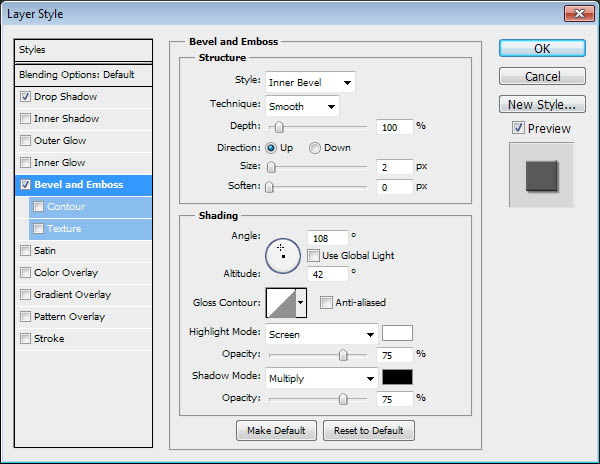
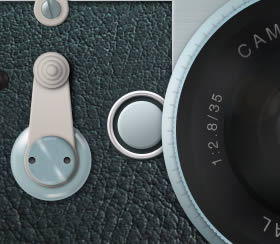
Draw a ring shape with color #e4e0e4. To do this, you just need to draw a circle and add smaller circle inside it and set its mode to Subtract. Add Drop Shadow and Bevel and Emboss with following settings.

Draw a Leica Camera in Photoshop

Step 104

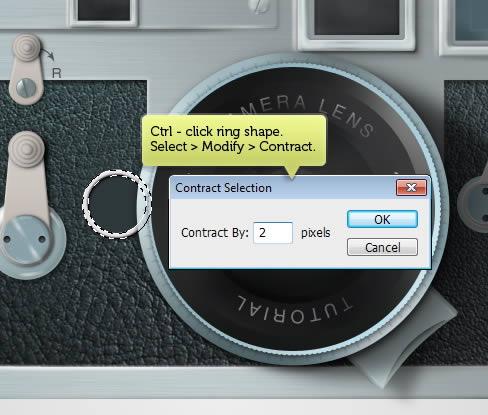
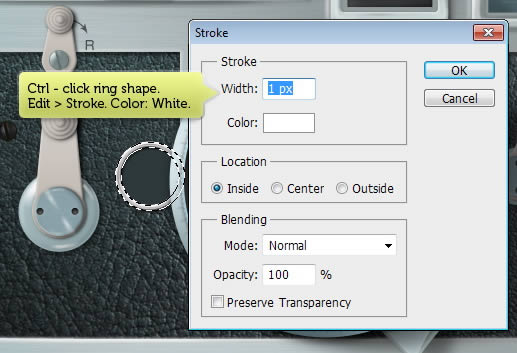
Command/Ctrl-click ring shape to make a new selection based on its shape. Click Select > Modify > Contract to reduce the selection size.

Draw a Leica Camera in Photoshop

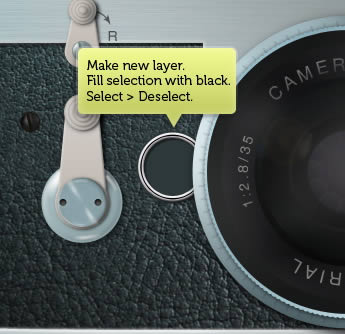
Step 105

Make new layer and then fill selection with black. Hit Command/Ctrl + D to deselect.

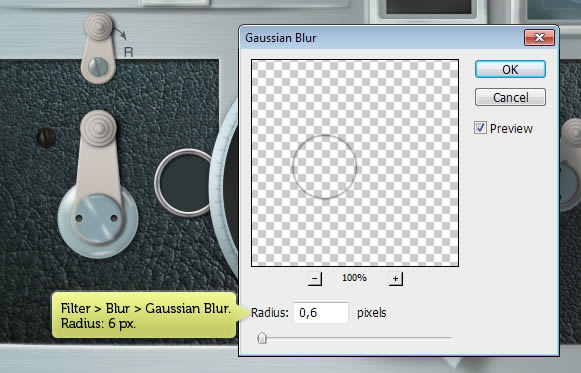
Draw a Leica Camera in Photoshop

Step 106

Add Gaussian Blur filter to soften it.

Draw a Leica Camera in Photoshop

Step 107

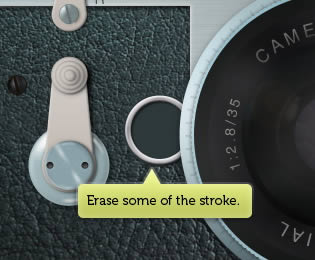
Erase some of the line stroke using soft eraser tool.

Draw a Leica Camera in Photoshop

Step 108

Make new layer. Command/Ctrl-click ring shape and click Edit > Stroke. Set its color to white.

Draw a Leica Camera in Photoshop

Step 109

Erase some of the white lines.

Draw a Leica Camera in Photoshop

Step 110

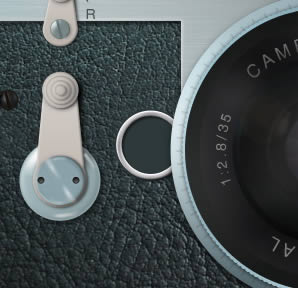
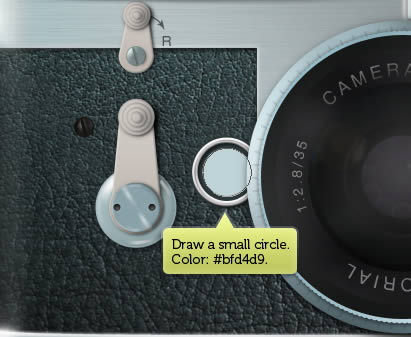
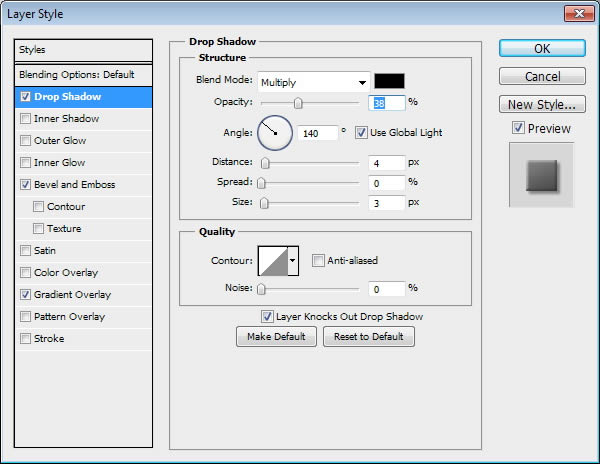
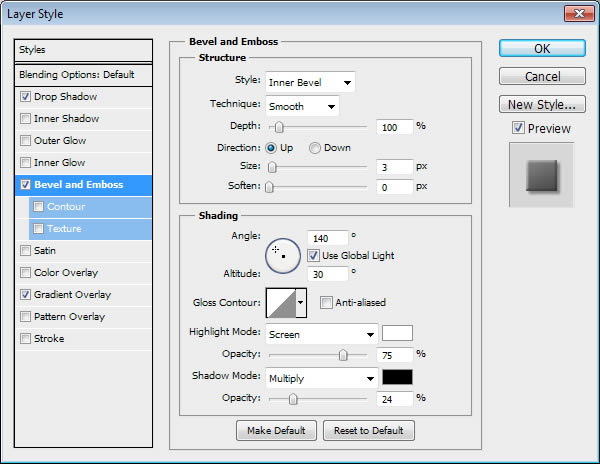
Draw a small circle inside the ring shape. Set its color to #bfd4d9. Add following Layer Styles.

Draw a Leica Camera in Photoshop

Step 111

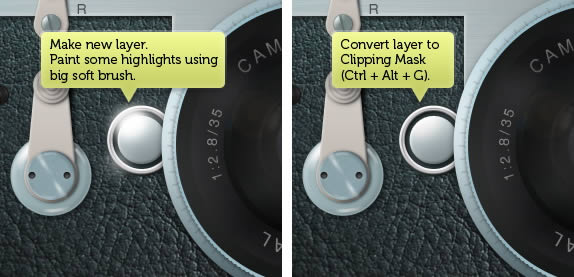
Make new layer and then paint highlight on the shape. Convert layer to Clipping Mask by pressing Command/Ctrl + Alt + G.

Draw a Leica Camera in Photoshop

Step 112

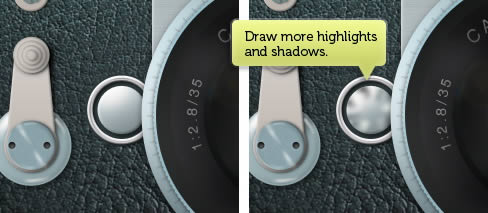
Make new layer and paint some highlights and shadows on top of the shape.

Draw a Leica Camera in Photoshop

Step 113

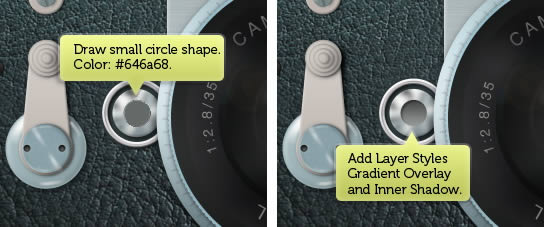
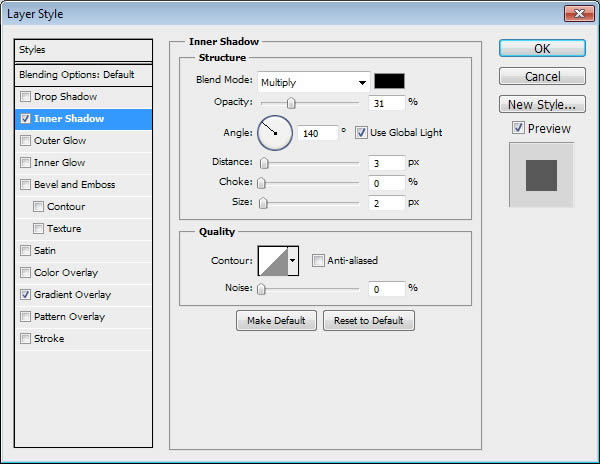
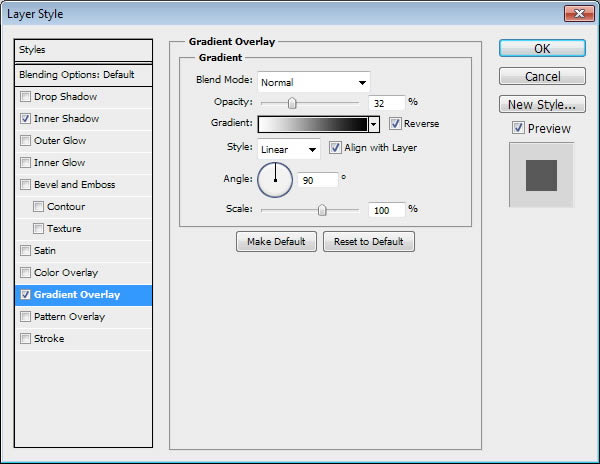
Draw a small circle shape with color #646a68. Add Gradient Overlay and Inner Shadow.

Draw a Leica Camera in Photoshop

Step 114

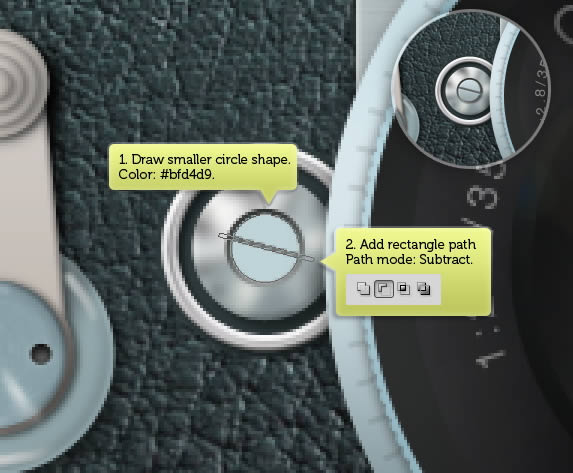
Draw smaller circle shape with color #bfd4d9. Add a rectangle path on its center and set its mode to Subtract. Add Drop Shadow, Bevel and Emboss, and Gradient Overlay.

Draw a Leica Camera in Photoshop

Step 115: Draw Speed Dials

Draw a rounded rectangle behind the camera and add Gradient Overlay.

Draw a Leica Camera in Photoshop

Step 116

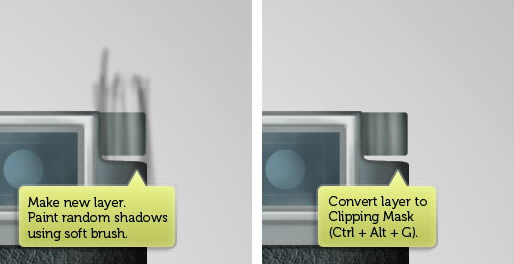
Make new layer on top of the shape. Set foreground color to black and then paint random shadow using soft brush. Convert layer to Clipping Mask.

Draw a Leica Camera in Photoshop

Step 117

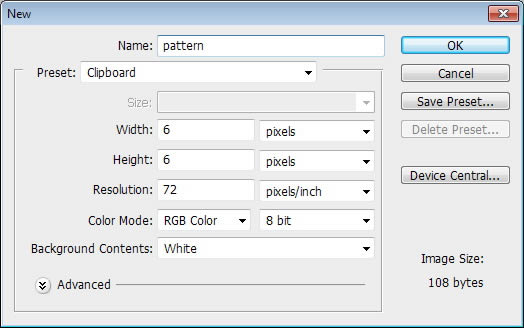
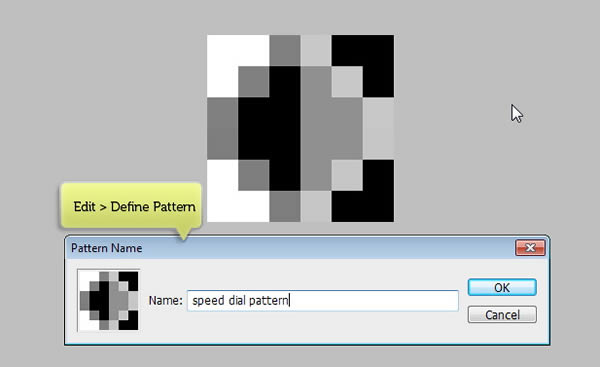
Make a new file with canvas size 6 × 6 pixels.

Draw a Leica Camera in Photoshop

Step 118

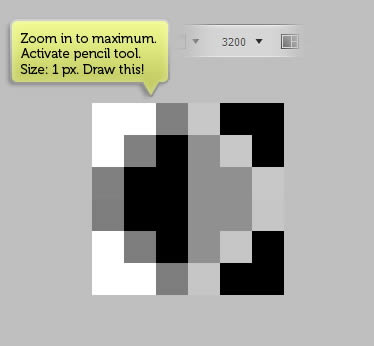
Zoom in to maximum using zoom tool. Activate pencil tool with brush size 1 px. Draw below pattern using only black, white, and gray color.

Draw a Leica Camera in Photoshop

Step 119

Click Edit > Define Pattern to save the image as a pattern.

Draw a Leica Camera in Photoshop

Step 120

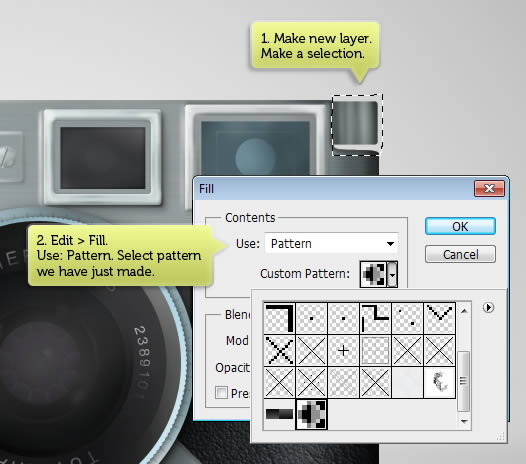
Make new layer. Place layer right above the dial shape. Draw a selection covering the camera dial. Click Edit > Fill. Activate Use: Pattern. Select pattern we have just made earlier.

Draw a Leica Camera in Photoshop

Step 121

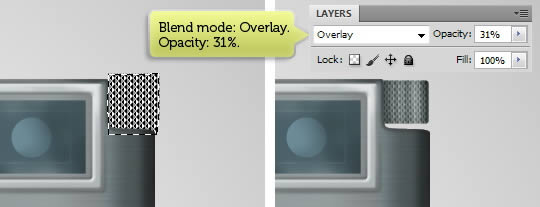
Convert layer to Clipping Mask by pressing Command/Ctrl + Alt G. Change layers blend mode to Overlay and reduce its Opacity.

Draw a Leica Camera in Photoshop

Step 122

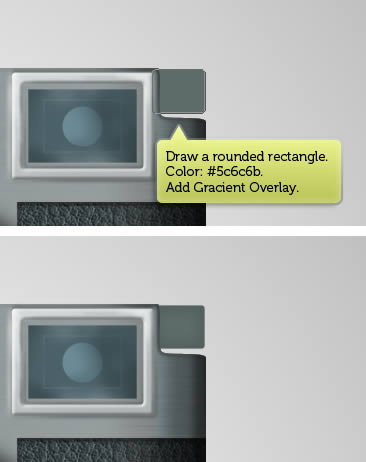
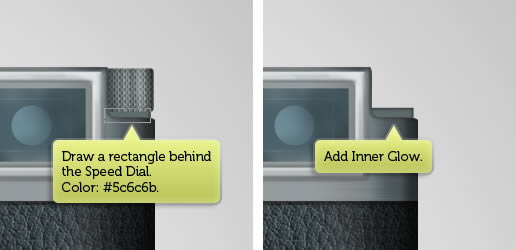
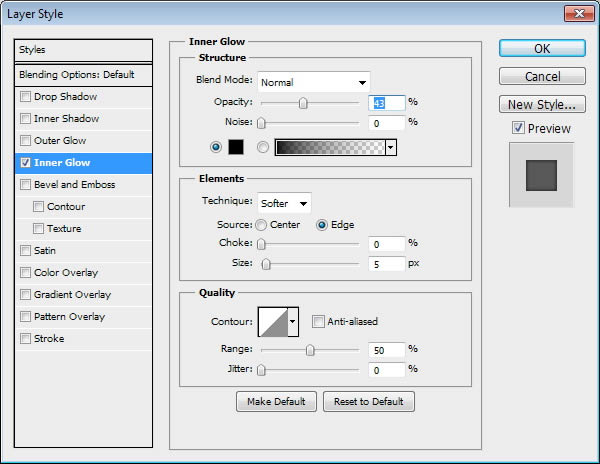
Draw a rectangle behind the Speed Dial with color #5c6c6b. Add Layer Style Inner Glow.

Draw a Leica Camera in Photoshop

Step 123

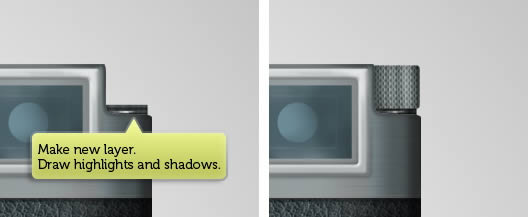
Make new layer. Draw some highlights and shadows on new layer.

Draw a Leica Camera in Photoshop

Step 124

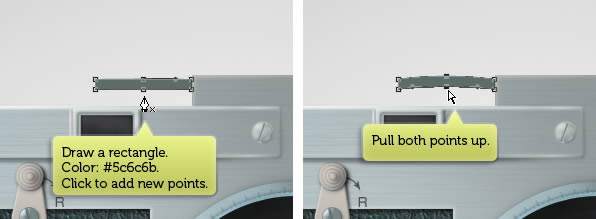
Draw a rectangle with color: #5c6c6b. Click the middle its upper and lower side to add new points. Select both new points and move them up.

Draw a Leica Camera in Photoshop

Step 125

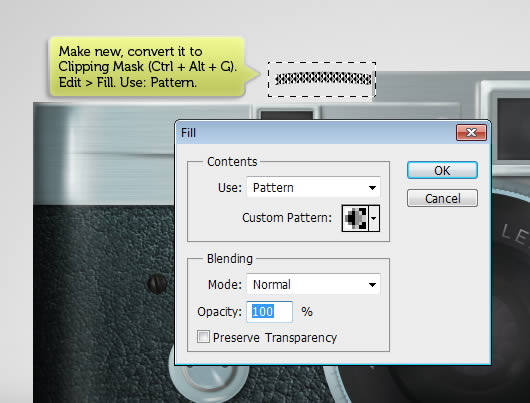
Make new layer and then convert it to Clipping Mask. Click Edit > Fill, select Use: Pattern and select pattern we have made earlier.

Draw a Leica Camera in Photoshop

Step 126

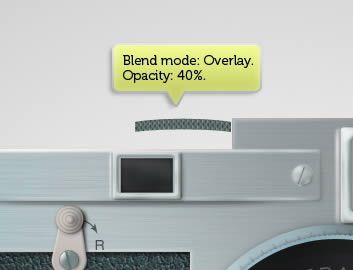
Set blend mode to Overlay with Opacity 40%.

Draw a Leica Camera in Photoshop

Step 127

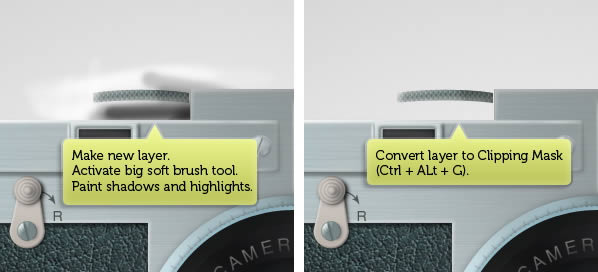
Make new layer. Activate big brush tool and then paint some highlights and shadows. Convert layer to Clipping Mask. This way, all the highlights and shadows go inside the shape.

Draw a Leica Camera in Photoshop

Step 128

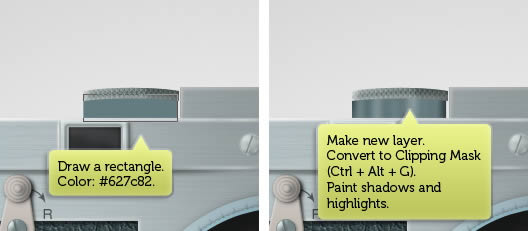
Draw a rectangle behind previous shape with color #627c82. Make new layer and then convert it to Clipping Mask. Paint some highlights and shadows.

Draw a Leica Camera in Photoshop

Step 129

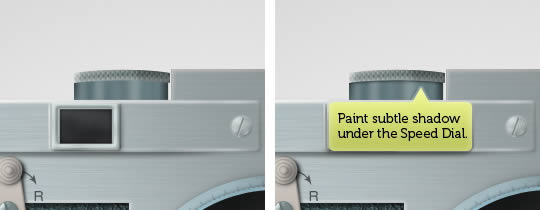
Paint subtle shadow under the speed dial.

Draw a Leica Camera in Photoshop

Step 130

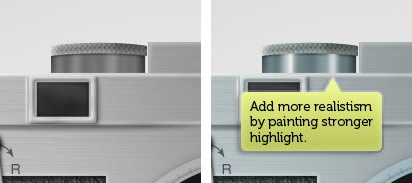
Add more realism to the shape by painting stronger highlight.

Draw a Leica Camera in Photoshop

Step 131

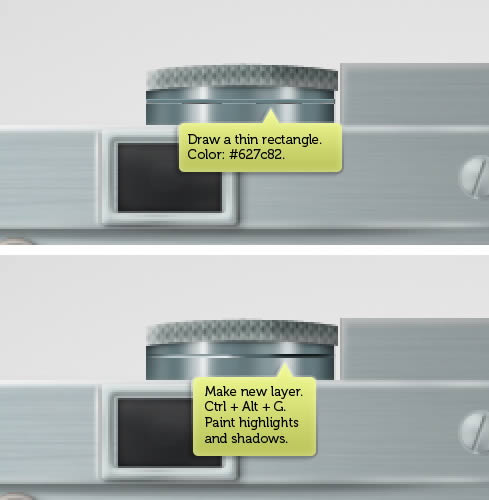
Draw a thin rectangle. Make new layer and paint small highlight and shadow inside the shape. Convert the layer into a Clipping Mask.

Draw a Leica Camera in Photoshop

Step 132: Shutter

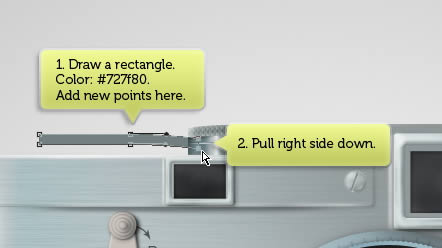
Draw a rectangle with color #727f80. Click half of its upper and lower side to add new points. Pull the right side down using Direct Selection tool. See picture below for reference.

Draw a Leica Camera in Photoshop

Step 133

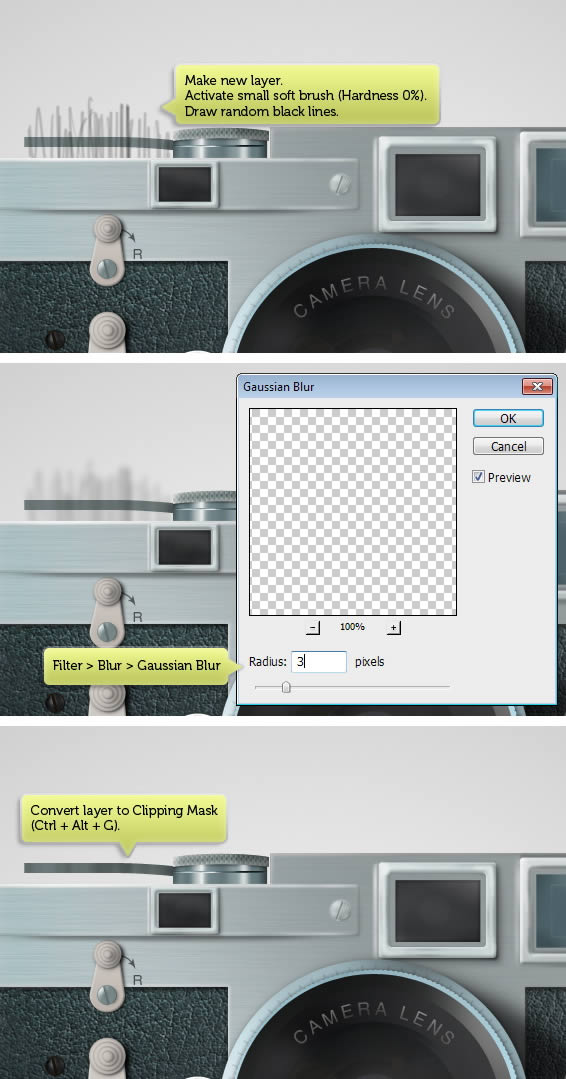
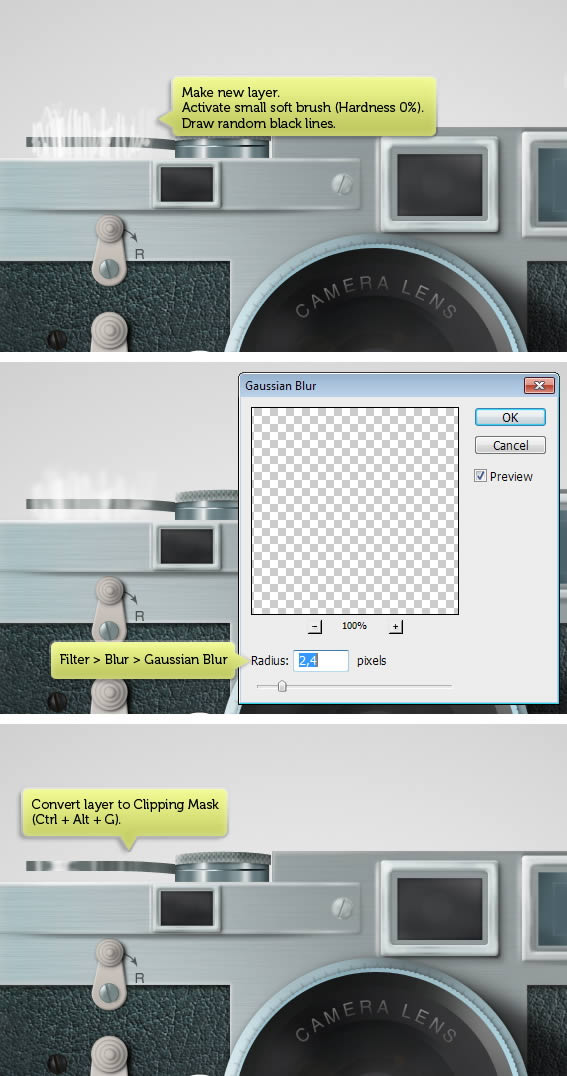
Make new layer and then activate a small soft brush with Hardness 0%. Draw some black lines on top of the shape. Soften the lines by adding Gaussian Blur. Convert the layer to Clipping Mask by pressing Command/Ctrl + Alt + G.

Draw a Leica Camera in Photoshop

Step 134

Earlier, we have paint shadows. Now, let’s working on its highlight. Do the same thing, but this time use white for the color.

Draw a Leica Camera in Photoshop

Step 135

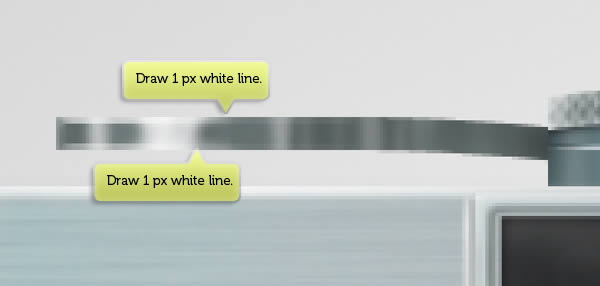
Zoom closer and draw 1 px white line on upper and lower side.

Draw a Leica Camera in Photoshop

Step 136

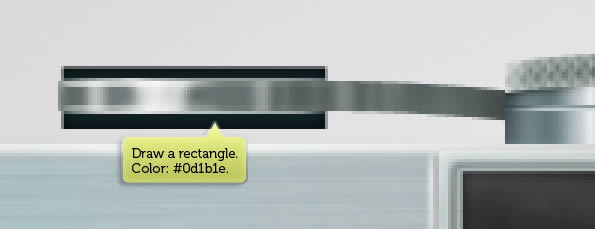
Draw a dark rectangle behind the shape.

Draw a Leica Camera in Photoshop

Step 137

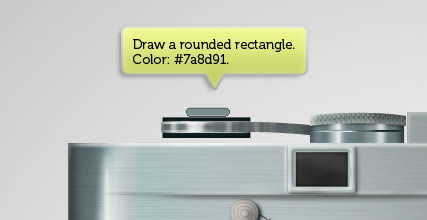
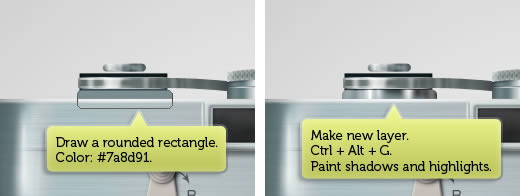
On its top, draw a rounded rectangle with color #7a8d91 to be used for the camera shutter.

Draw a Leica Camera in Photoshop

Step 138

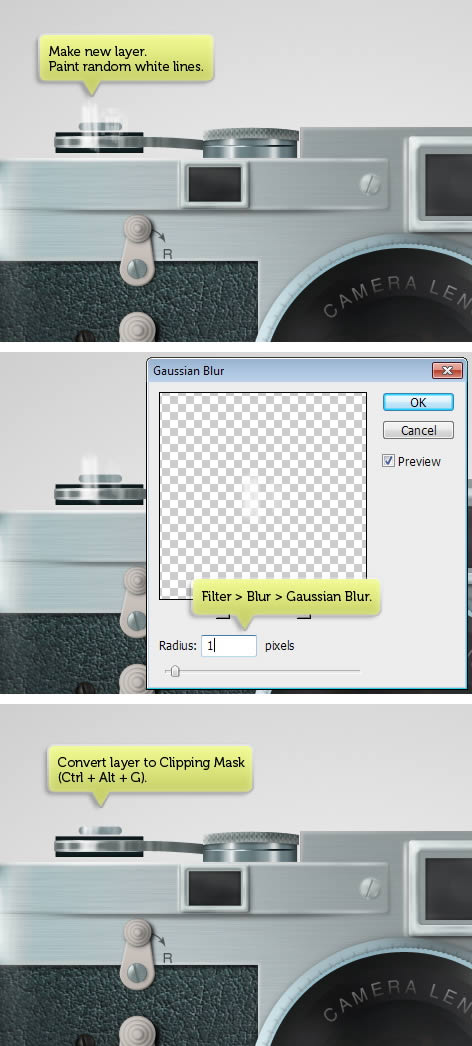
Make a new layer and then paint white random lines. Soften them using Gaussian Blur. Convert layer to Clipping Mask.

Draw a Leica Camera in Photoshop

Step 139

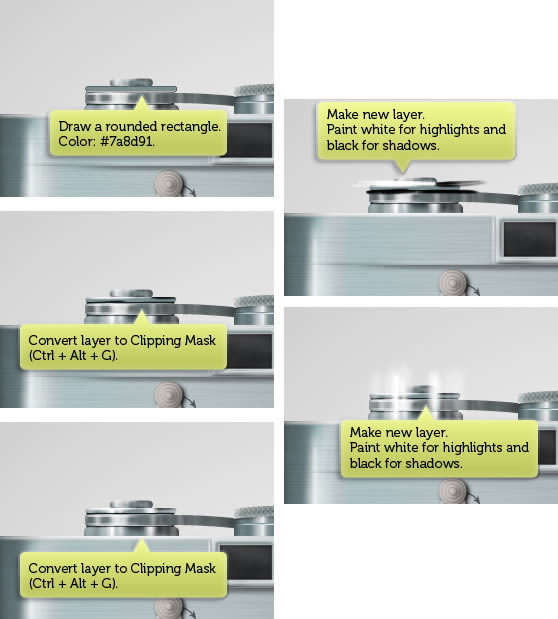
Draw a rounded rectangle. Use same techniques to add highlight and shadows onto the shape.

Draw a Leica Camera in Photoshop

Step 140

Draw another rounded rectangle, this time thinner, and then make new layer. Paint its highlight and shadow.

Draw a Leica Camera in Photoshop

Step 141

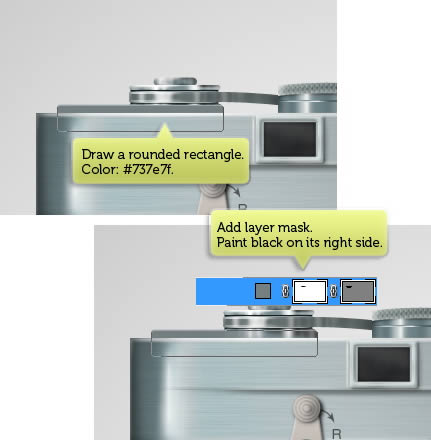
Draw a rounded rectangle with color #737e7f. Add layer mask and then paint black on its right until it fades onto the shape behind it. See picture below for reference on its position.

Draw a Leica Camera in Photoshop

Step 142

Repeat techniques we have learnt earlier to paint its highlight and shadow.

Draw a Leica Camera in Photoshop

Step 143: Add More Highlights

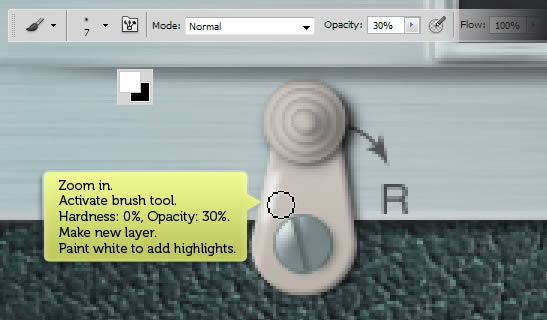
Our current camera is still too flat. If you look everything closely, you will notice that there is no perfect lighting in real life. There are always random light reflections everywhere. So, that’s what we’re going to do. Add highlight onto our camera. Make new layer and then activate brush tool with 0% Hardness. Manually paint white highlight on some elements on the camera.

Draw a Leica Camera in Photoshop

Below you can see the difference before and after adding the highlights. You can see this subtle difference really adds more realism onto the object.

Draw a Leica Camera in Photoshop

Step 144: Shadow

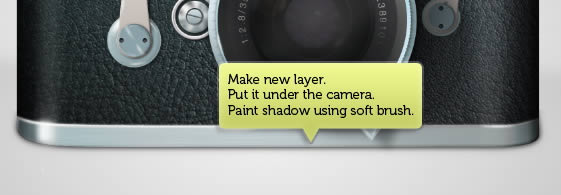
Make new layer and then put it under the camera. Use soft brush to draw camera shadow on the floor.

Draw a Leica Camera in Photoshop

Step 145

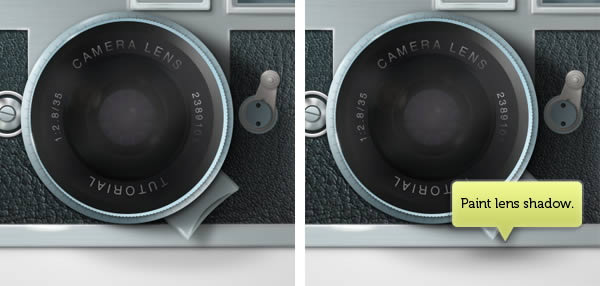
Remember that we need more shadow under the lens.

Draw a Leica Camera in Photoshop

Step 146

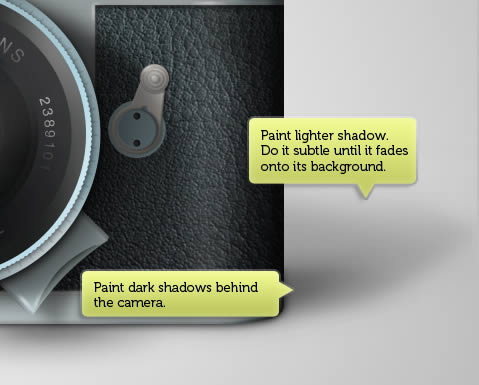
Paint dark shadow right behind the camera. Make sure to match its direction with our light source position. Paint lighter shadow further away from the camera. Make sure to do this patiently until the shadow fades perfectly onto the floor.

Draw a Leica Camera in Photoshop

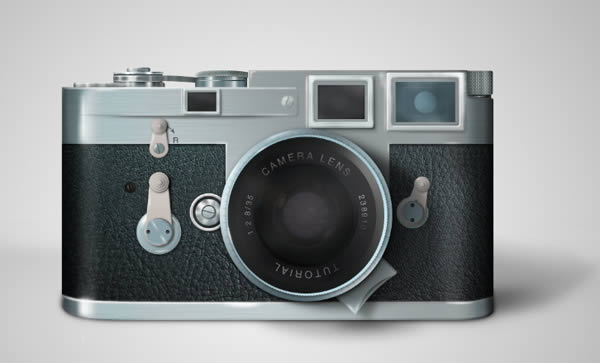
Final Image

Below is the final result. I hope you learn something new from this tutorial. If you have any questions, feel free to ask in the comment form below. I’d be glad to help you.

Preview


What’s New on Tuts+ Premium?

$
0
0

One of the best things about Tuts+ Premium is that we are always adding new content. In addition to the loads of content that our site editors publish each month, Tuts+ Premium also includes in-depth courses, ebooks, and forums. Today, we wanted to let you know about a couple of exciting new items that may be of interest to our readers on Psdtuts; the addition of Thread’s Not Dead, an "essential strategy guide for dominating the t-shirt design business" and a new Advanced Digital Painting Course.


Thread’s Not Dead

What if the most prolific and influential people in the modern t-shirt design scene got together and discussed everything they wished they knew when they started? That’s exactly what we have here.

Inside these 10 chapters are 117 pages of essential strategy pulled from the success and failures of some of the best in the biz. The book’s author, Jeff Finley, is a veteran designer and one of the founders at GoMedia.

Key topics include design, freelancing, band merchandise, personal branding, marketing, sales, printing & production, retail, e-commerce, and more.


Advanced Digital Painting by Matt Kohr

This 12-lesson course by veteran instructor and concept artist Matt Kohr shows the entire illustration process from line-art to final, focusing on visual problem solving. While this course will briefly address the tools and commands used, its primary aim is to explain the creative and technical process behind it.


Quick Tip: Create a Mech-Inspired Text Effect in Photoshop Using Layer Styles

$
0
0

In this quick tutorial we will show you how to create mech-inspired text effect using layer styles in Photoshop. Let’s get started!


Tutorial Assets

The following assets were used during the production of this tutorial.


Step 1

First create a new .PSD document, 600 x 400 pixels in RGB mode, 72 DPI with any background color. Now prepare your assets. Install the SF Sports Night fonts into your computer and open all .PAT files.


Step 2

Now go to Menu > Layer > Layer Style > Blending Options and use the settings below. You can also access Blending Options with two faster ways. First and the fastest way is to double click on the layer in your layers menu. Other way is to right click on the layer in your layers menu and choose Blending Options. When you are done with all the settings below, don’t forget to hit “OK” in the Blending Options window!


Step 3

Now we can start making our text effect. First choose the type tool and change font to SF Sports Night NS AltUpright, size around 175 pt and anti-aliasing Sharp. Now type your text somewhere in the center of the image. You can write any word, but in this tutorial I’ll use "MECH".


Step 4

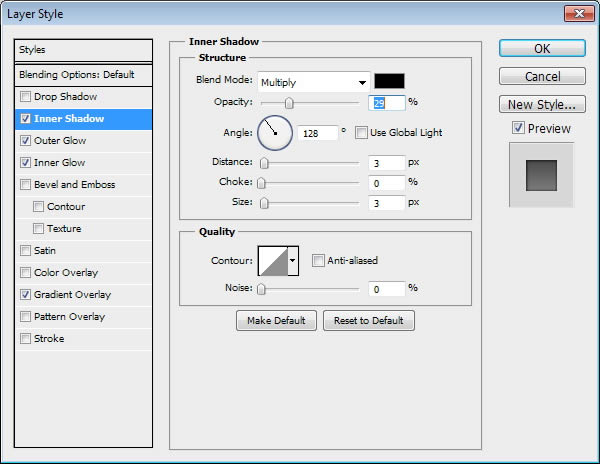
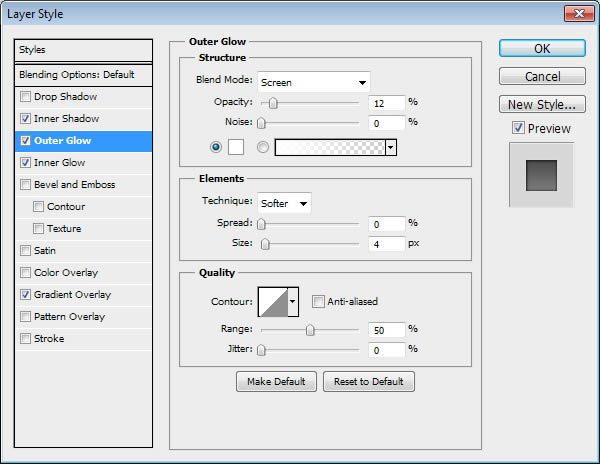
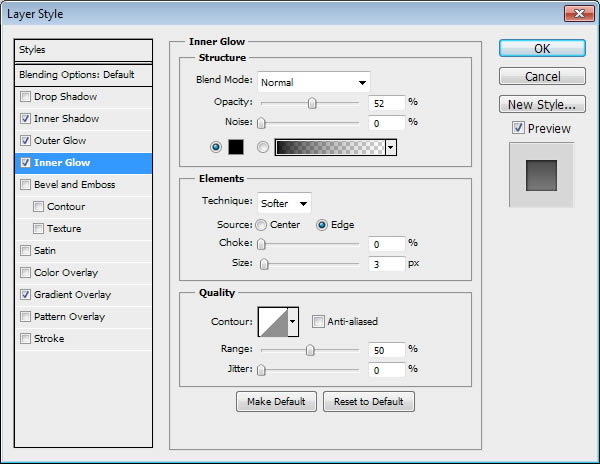
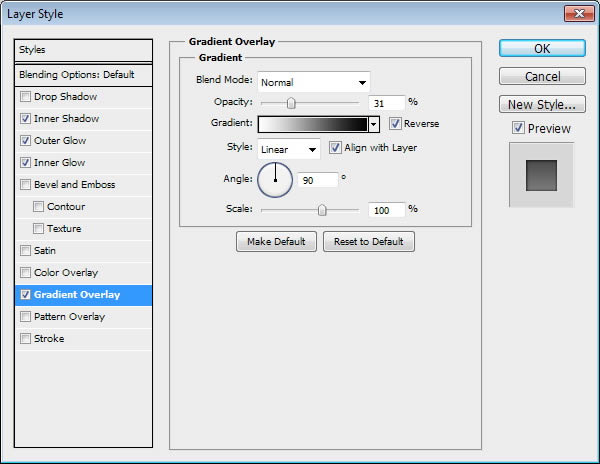
Finally we are ready to start with our text style. Go to Menu > Layer > Layer Style > Blending Options and use the settings below on our text. You can also use the quicker methods to access Blending Options from "Step 2" of this tutorial. When you are done with all the settings below, don’t forget to hit "OK" in the Blending Options window! This text layer will add some shadows and lights into the final result.


Step 4

We are almost there. Now we need to duplicate our text layer. Select the text layer in layer menu and go to Menu > Layer > Duplicate layer and name it as you wish. Now go to Menu > Layer > Layer Style > Clear Layer Style as we will make different style for this layer. Finally go to Menu > Layer > Layer Style > Blending Options and use the settings below on our text. Again, you can use the quicker methods to access Blending Options from "Step 2" of this tutorial. When you are done with all the settings below, don’t forget to hit "OK" in the Blending Options window! This is the main text effect layer and must be on top of the second text layer.


Conclusion

Now you are finished. TIP: Now you can rewrite the text with something else (in both text layers) and the effect will still remain same. You can also play with different fonts.


The Kickstart Guide to Breaking Into Freelance Illustration

$
0
0

A career in freelance illustration is much more than drawing pretty pictures. As much as you’d like to spend the entire day sitting in front of Adobe Photoshop or Illustrator, you’ll also need to learn about selling yourself, keeping your portfolio fresh, and all the administrative tasks that we love to hate. In this article, our friends at Freelance Switch will introduce you to five talented freelance illustrators who will share some incredibly useful advice about working in the industry.


Is the Creative Cloud the Best Choice for You?

$
0
0

Recently, Adobe released the Creative Cloud, a subscription service that will allow you to use all of Adobe’s Creative Suite applications, and more, for just $49.99 per month. The Creative Cloud is a radical deviation from Adobe’s traditional pricing structure, and a model that many think will completely change the industry. In this article we will take a look at the pricing model for the Creative Cloud to help you decide if it’s the right decision for you.

Back in 2011, before we had ever heard of the Creative Cloud, we asked our readers in an article, if they thought that Photoshop was too expensive. As you can imagine, this article inspired a passionate debate about Adobe’s pricing structure and whether or not it was fair to consumers. Back then, a lot of our readers felt that Adobe products were just too expensive, and as a result, they simply could not afford to purchase Adobe’s products.

The Creative Cloud, however, significantly reduces this barrier. Users no longer have to pay for a full license up front. They can now subscribe to individual applications like Photoshop for just $19.99 per month or purchase a subscription to the full creative cloud, which includes all of Adobe’s Creative Suite apps, and more, for just $49.99 per month. This means users can now choose the option that works best for them. They can pay for a license up front, or choose to spread out the payments over time.

This brings up an important question; which plan makes the best sense? Before we answer that question however, it’s important to first talk a bit about Adobe’s traditional pricing structure. A traditional license to Photoshop CS6 is $699. Photoshop CS6 Extended costs $999. If you needed more than one Adobe application, suites start at $1,299. This is a lot of money for the average hobbyist, or to some one just getting started in the industry; and as we said earlier, many users simply can’t afford it.

Adobe clearly needed more options for it’s consumers but how could they offer their high quality products to their users, at a reduced price, and still manage to run a profit? Well, that’s where the Creative Cloud comes in. Users can now get individual access to their products for just $19.99 per month or access to the entire Creative Cloud for just $49.99 per month. This makes Adobe products much more appealing to users who simply can’t afford the initial investment of a traditional license.

With that said, many of our readers have asked us which model makes the most sense over time. $49.99 per month sounds like a fantastic bargain but how do the numbers work out 2, 5, or 10 years from now? Well, let’s take a look.

In the charts below, we looked at a potential user’s total investment in Adobe products over time. In the first chart, we compared a traditional Photoshop CS6 license to an individual subscription to Photoshop CS6 through the cloud, over a 9-year period. We took into account the cost of an upgrade at 2-year intervals. As you can see, users who subscribe to the cloud have an advantage over traditional license holders for about 4 years. After that time, it becomes more economical to have purchased a traditional license.

So what does this mean in real numbers? It means that at the end of a 9-year period, a person subscribing to an individual subscription to Photoshop will have paid $700 more than a person who purchased an individual license and then upgraded every 2 years.

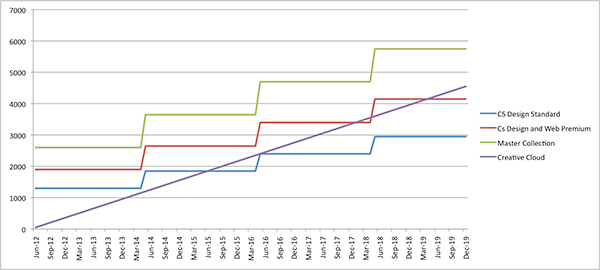
What about users who subscribed to the full Creative Cloud at $49.99 per month? The chart below compares the full Creative Cloud to Adobe’s family of Creative Suites. We looked at CS Design standard that costs $1,299 to buy and $549 to upgrade. CS Design and Web Premium which costs $1,899 to buy and $749 to upgrade, and the Master Collection which costs $2,599 to buy and $1049 to upgrade. Like our previous chart, we took into consideration an upgrade every 2 years.

Editor’s note: these numbers are based on the upgrade from CS5 to CS6.

What we found was that Creative Cloud is a far better deal that puchasing a license for the Master Collection. As you can see, at no point during the 7-year period that we reviewed would a Creative Cloud subscriber end up paying out more money than a traditional license holder.

On the other hand, Creative Cloud customers do eventually end up paying out more money than traditional CS Design Standard and CS Design and Web Premium Customers. How much time does it take? That depends on the suite that you’re comparing it to. It will take about 3 years for a Creative Cloud customer to pay more money than a CS Design Standard customer, 5-7 years for a Creative Cloud customer to surpass a CS Design and Web Premium customer.

So what does this mean in real numbers? It means that after 7.5 years, a Creative Cloud customer will have spent $1,603 more than a CS Design Standard Customer, and $403 more than CS Design and Web Premium customers. A traditional license is usually a better deal, unless you need everything included in the Master Collection.

Now that we know how the numbers work out, it’s time to make a decision. Is the Creative Cloud a good deal, or not? Well, that really depends on your perspective. How do you use Adobe’s products? Which products do you need? Are you a professional designer, a student, or a hobbyist? Is this a long or short-term investment? These are all questions that you will need to answer before you make your decision.

If you can’t afford a traditional license to Adobe’s products, then you don’t really have a choice. At $49.99, the cloud is a bargain, and your only option. You’ll be able to use their products for a low monthly fee without having to invest a lot of money up front.

If you are a student, the Creative Cloud is a fantastic deal. You can get a student discount for just $29.99 per month and get access to all of Adobe’s Creative suite products at a fraction of the cost of a traditional license. You’ll be able to evaluate the software, and decide if design is the industry you want to be in, without having to make a huge initial investment in software.

If you’re trying to learn the software but you’re not enrolled in school, the Creative Cloud is also a smart option. You’ll be able to download the software, learn how to use it, and then decide if the software is for you.

If you’re a hobbyist, it really depends on what your hobby is. If you’re a photographer who just needs Photoshop, it might be in your best interest to buy a traditional license as opposed to subscribing to an individual subscription or to getting a subscription to the entire cloud. You might also want to consider how serious you are about the hobby. Will you only be needing Photoshop for a few months, or for several years? If you only need a handful of applications, and don’t need access to everything in the Master Collection, then it might be best to purchase a license to CS Design Standard or CS Design and Web Premium. It really depends on your needs. You’ll have to decide for yourself which is the best option.

If you’re a professional designer, it depends on your needs. If you only need Photoshop, InDesign, and Illustrator then it might be a better idea to purchase a license for CS Design Standard. If you need a few more apps or want Photoshop Extended, then maybe a traditional license to Design and Web Premium is the way to go. If you need all of Adobe apps, then it seems that the Creative Cloud is the best choice.

If you’re a design firm, again, it depends on your needs and depends on what type of design that your firm does. Do you need access to all of Adobe’s products? If so, the cloud seems to be the way to go.


Conclusion

We understand that all of our readers are different and you are all looking at the Creative Cloud from a different perspective. For some of you, the Creative Cloud is a fantastic opportunity to explore everything that Adobe has to offer its users. For others, the Creative Cloud might not be a very good fit.

That’s what we love about the Creative Cloud. Adobe has realized that their users use their products in different ways, and therefore, have different needs. From our perspective, the Creative Cloud is really about adding more choices. You can choose to buy a traditional license for a large up front sum of money, or you can purchase a subscription to the full Creative Cloud for just $49.99 per month and spread out the payments over time.

Does the Creative Cloud cost more in the long term? That depends on what license you’re comparing it to. For several of the licenses, it does, for the Master Collection it does not.

So what’s the verdict? Is the Creative Cloud a good or a bad thing? Are the pricing options fair or not? In our opinion, the cloud is a fantastic new option. The design community has complained about the high cost of Adobe products for a long time. The Creative Cloud addresses those concerns in a way that is fair to both Adobe and its users. Ultimately, the Creative Cloud gives us more options, it will allow more users to earn a living off Adobe products, it will slow piracy, and hopefully make Adobe a more profitable company. It’s a win/win/win.

With that said, we would love to hear your thoughts. Do you like the new pricing model? Is the cloud the best fit for you? We would love to hear your perspective.

Editor’s note: when we originally published this article, we based our calculations off a potential upgrade from CS5.5. This produced some slightly incorrect conclusions. Since then, we updated our numbers to instead include an upgrade from CS5. This should more accurately reflect a typical user upgrade over a 2-year period.


Viewing all 6352 articles
Browse latest View live