
Always wanted to create your very own Minecraft character skin, but never knew exactly where to start? Well, today it’s your lucky day since I’m going to give you an in-depth look at the entire process, showing you how to take a basic template and turn it into a finished usable product.
If that sounds interesting, quickly grab a fresh cup of coffee and let’s
get crafty!
Before we start, I wanted to point out that the entire project is a follow-up to an older tutorial, where I showed you how to create an isometric Minecraft character using Affinity Designer’s powerful Isometric Grid.
Today, we’re going to switch things up by taking that finished character and translating it to Adobe Illustrator, using a custom template that I’ve put together.
At this point, some of you might point out that there are a bunch of online editors that allow you to achieve a similar result, but since I like to have full control over the creative process from start to finish, I took the time to put together a custom template that I’ve attached in order to make things easier.
If you wanted to recreate the tutorial in Affinity, don’t worry, since I’ve created a separate template for you too so that everybody can partake and enjoy themselves.
Also, don't forget you can always expand the project by heading over to GraphicRiver, where you'll find a great selection of vector pixel art.
That being said, let’s shift our focus back to the project and jump
straight into it.
1. How to Load the Resource File
Before we start working on the actual skin, we have to take a couple of moments and prepare by loading the resource template.
So, assuming you've already downloaded it, open it up either by loading it from within Illustrator (File > Open and then going to the folder where you downloaded it) or by double-clicking directly on the file.

As soon as the file is loaded, you’ll be able to see the actual template, which consists of a basic 64 x 64 px wireframe spread of the entire character’s body, which has been carefully labeled so that you know exactly what each shape is.

2. How to Set Up a New Project File
Since we don’t want to alter the template file, we’re going to take a couple of moments and save it as a new project of its own (File > Save as), making sure to give it a custom name so that we can distinguish it later on from other designed skins.

3. How to Use Custom Layers
If you open up the Layers panel, you can see that I took the time to set up a few separate layers for each body section, which I’ve individually labeled so that you can easily use them to gradually build the character.

The guides layer itself has a few sub-layers that you can turn off and on in order to identify and isolate a specific section of the body, if you want to keep the design process as clean as possible.

When you start working on the actual project, I recommend you lock all the layers except the one that you’re currently on, in order to be able to focus on one section at a time, which will help streamline the entire design process.
That being said, let’s move on to the actual creative process, where we will see how easy it is to make a custom character skin using nothing more than a couple of simple rectangles.

4. How to Create the Main Body Shapes
As soon as our new project file is all set up, we can start working on the actual skin, and we will do so by laying out its main shapes.
Step 1
Select the Rectangle Tool (M)
and, using #95693D as your Fill
color, start drawing over each of the different guides, making sure to position the
resulting shapes onto their respective layer.

Step 2
Now, since I already have a character that I’ve created in Affinity Designer, I’m going to copy (Control-C) and paste (Control-F) the design into Illustrator, and then use the Eyedropper Tool (I) to pick and apply colors to the different body parts of the skin by holding down the Alt key and then simply clicking on them.

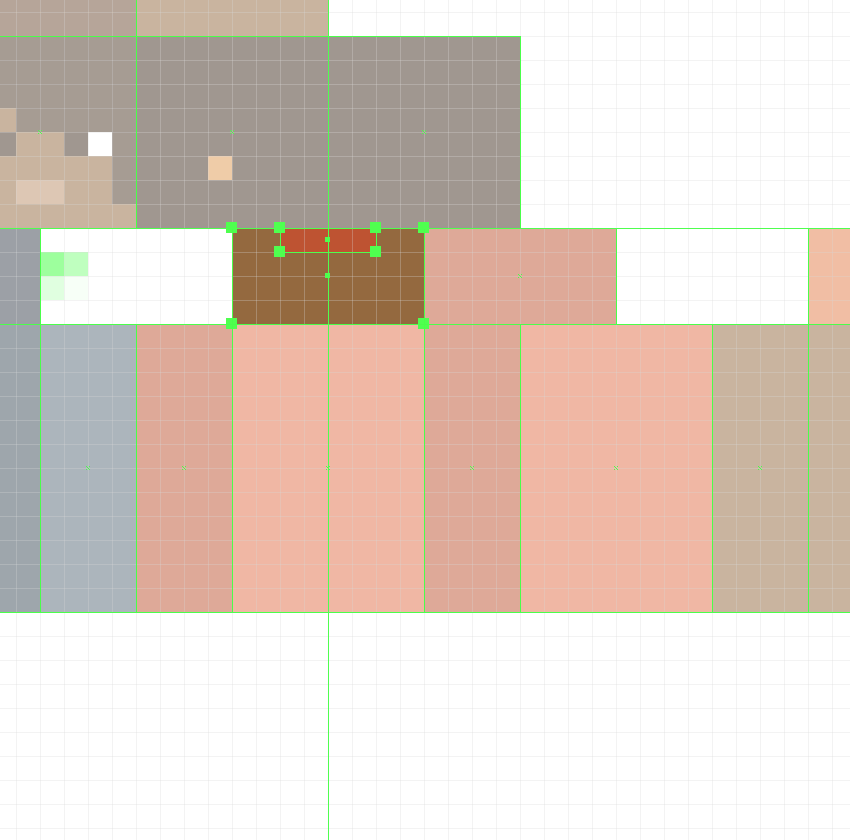
5. How to Add Details to the Character’s Head
Once we have all our body sections laid out, we can gradually add details to them, and we will do so starting with the head. So, assuming you’re on the right layer (that would be the seventh one), zoom in on the top section of the Artboard and let’s jump straight into it.
Step 1
Turn on Pixel Preview mode
(Alt-Control-Y), and then draw the
mouth using a 2 x 1 px rectangle
which we will color using #BC9069 and then center align to the front face,
positioning it at a distance of 1 px from
its bottom edge.

Step 2
Add the right eye using two 1 x 1
px squares horizontally stacked next to one another, coloring the left one
using #FFFFFF and the right one using #402C1B. Once you’re done, select and
group the two together using the Control-G
keyboard shortcut, positioning them as seen in the reference image.

Step 3
Create the left eye using a copy (Control-C> Control-F) of the one that we’ve just finished working on, which we will vertically reflect (right click> Transform > Reflect > Vertical) and then position on the opposite side of the face.

Step 4
Using a couple of #4D3723 colored rectangles, draw the front section of
the hair, following the reference image as your main guide. Take your time, and
once you’re done, select and group (Control-G)
all of the front face’s composing shapes together before moving on to the next
one.

Step 5
Move on to the left section of the head, and create the little earring
using a 1 x 1 px rectangle which we will
color using #E09A50 and then position at a distance of 3 px from the larger square’s left edge and 2 px from its bottom one.

Step 6
Add the back hair segment to the bottom section of the head using an 8 x 4 px rectangle (#402C1B), on top of which
we will add a smaller 4 x 2 px one
(#95693D), which we will group (Control-G)
and then position as seen in the reference image. Once you’re done, select and
group (Control-G) all of the current
section’s shapes together, doing the same for the entire head afterwards.

Quick note: this step is kind of optional if you’re dealing with characters that have short hair, since when you load the skin within the game and move the head around, it doesn’t look weird as it would if you’re dealing with longer hair.
6. How to Add Details to the Character’s Torso
Once we’ve finished adding details to the head, we can move down a layer and focus on the torso, which we will gradually refine one section at a time.
Step 1
Start working on the top section of the torso by adding the back section
of the blouse’s neck using a 4 x 1 px rectangle,
which we will color using #BF522E and then center align to the underlying
shape’s top edge.
Step 2
Add the hair segments using two 2
x 4 px rectangles (#4D3723), which we will position onto the sides as seen
in the reference image. Once you’re done, select and group (Control-G) all of the current section’s
composing shapes together before moving on to the next one.

Step 3
Move down to the front section of the torso, and create the neck cutout
using a 4 x 2 px rectangle (#95693D)
vertically stacked on top of a smaller 2
x 1 px one (#95693D), which we will group (Control-G) and then center align to the underlying shape’s top
edge.

Step 4
Quickly draw the necklace using a couple of #E09A50 colored rectangles,
which we will group (Control-G) and
position onto the neck cutout as seen in the reference image.

Step 5
Add the hair segments using two 2
x 4 px rectangles (#4D3723) vertically stacked on top of two smaller 1 x 2 px ones (#4D3723), which we will
individually group (Control-G) and
then position onto the sides of the neck cutout. Once you have the shapes in
place, select and group (Control-G) all
of them together before moving on to the next section.

Step 6
Move over to the back section of the torso, and then quickly add the
hair segments using three 1 px tall
rectangles which we will color using #4D3723 and then position as seen in the
reference image. Once you’re done, make sure you select and group (Control-G) all three of them together, doing the same for the entire section afterwards.

Step 7
Finish off the current section by adding the belt using a 24 x 1 px rectangle, which we will color
using #37404D and then position at a distance of 1 px from the torso’s bottom edge.

7. How to Add Details to the Character’s Arms
Now that we’ve finished working to the torso, we can move on down to the next layer (that would be the fourth one) and gradually add details to the arms, starting with the right one.
Step 1
Create the outer side section of the blouse’s sleeve using a 4 x 8 px rectangle, which we will color
using #BF522E and then align to the underlying shape’s top edge, making sure to
select and group (Control-G) the two
together afterwards.

Step 2
Draw the front section of the sleeve using a larger 4 x 6 px rectangle (#E37047) followed by two smaller ones (#E37047),
which we will group (Control-G) and then
position as seen in the reference image. Once you’re done, select and group all
of the current side’s composing shapes using the Control-G keyboard shortcut.

Step 3
Add the inner side section of the sleeve using a 4 x 6 px rectangle, which we will color using #BF522E and then align
to the underlying shape’s top edge, making sure to select and group (Control-G) them together afterwards.

Step 4
Create the back section of the sleeve using a copy (Control-C > Control-F) of the front, which we will vertically reflect (right click > Transform > Reflect> Vertical) and then position onto the corresponding arm section, making sure to delete the underlying shapes afterwards.

Step 5
Since we now have a finished version of the right arm, we can quickly create the left one using a copy (Control-C) of it, which we will paste (Control-F) onto the fifth layer and then adjust by double-clicking on it to enter Isolation Mode and then swapping the different sides as seen in the reference image. Once you’re done, exit Isolation Mode by pressingEscape, making sure to remove the shapes underneath before moving on to the next step.

Step 6
Add the hair segment to the top section of the left sleeve (the
shoulder) using a 1 x 4 px rectangle, which we will color using #6D4B31 and then position on its left edge, making
sure to select and group the two together afterwards using the Control-G keyboard shortcut.

Step 7
Finish off the current body part by adding the hair segment to the front
of the sleeve using a 1 x 2 px rectangle
(#4D3723), which we will position as seen in the reference image. Once you’re
done, select and group all of the shapes together using the Control-G keyboard shortcut.

8. How to Add Details to the Character’s Legs
Once we’ve finished adding details to the character’s arms, we can move on to the third layer, where we will focus on refining the legs, starting with the left one.
Step 1
Create the boot’s inner side section using a 4 x 5 px rectangle, which we will color using #37404D and then
bottom align to the underlying shape, making sure to select and group (Control-G) the two together afterwards.

Step 2
Draw the front section of the boot using a couple of #37404D colored
rectangles, which we will group (Control-G)
and position as seen in the reference image.

Step 3
Add the little corner of the blouse using a 2 x 1 px rectangle (#E37047) vertically stacked on top of a smaller1 x 1 px one (#E37047), which we
will group (Control-G) and then
align to the underlying shape’s top-right corner. Once you’re done, select and
group (Control-G) all of the current
section’s composing shapes before moving on to the next one.
Step 4
Add the outer side section of the boot using a 4 x 5 px rectangle (#37404D), which we will center align to the
larger shape’s bottom edge, making sure to group (Control-G) the two together afterwards.

Step 5
Create the side segment of the blouse’s lower corner using a 4 x 2 px rectangle, which we will color
using #E37047 and then align to the top edge of the larger underlying shape.
Once you’re done, select and group (Control-G)
all of the current section’s composing shapes before moving on to the next one.

Step 6
Add the back details to the leg using a copy (Control-C > Control-F) of the front one, which we will position on the right and then adjust as seen in the reference image. Once you’re done, select and group (Control-G) all of the leg’s composing sections before moving on to the next step.

Step 7
Finish off the skin by adding the details to the right leg using a copy (Control-C) of the one that we’ve just finished working on, which we will paste (Control-F) onto the appropriate layer (that would be the second one) and then adjust by swapping out its sections as seen in the reference image. Once you’re done, don’t forget to remove the underlying shapes before hitting that save button.

9. How to Export the Skin
Okay, so we now have a fully working skin, which means that all we need to do is export it so that we can then bring it into Minecraft.
Step 1
Before you create the actual export, you’ll have to open the Layers panel and hide the guides layer, otherwise your skin will end up having impurities.

Step 2
As soon as the guides are hidden, you can easily export the final design by going to File > Export > Save for Web (or by using the Alt-Shift-Control-S keyboard shortcut), where we will want to set the File Format to PNG-24, making sure to check the Transparency option.

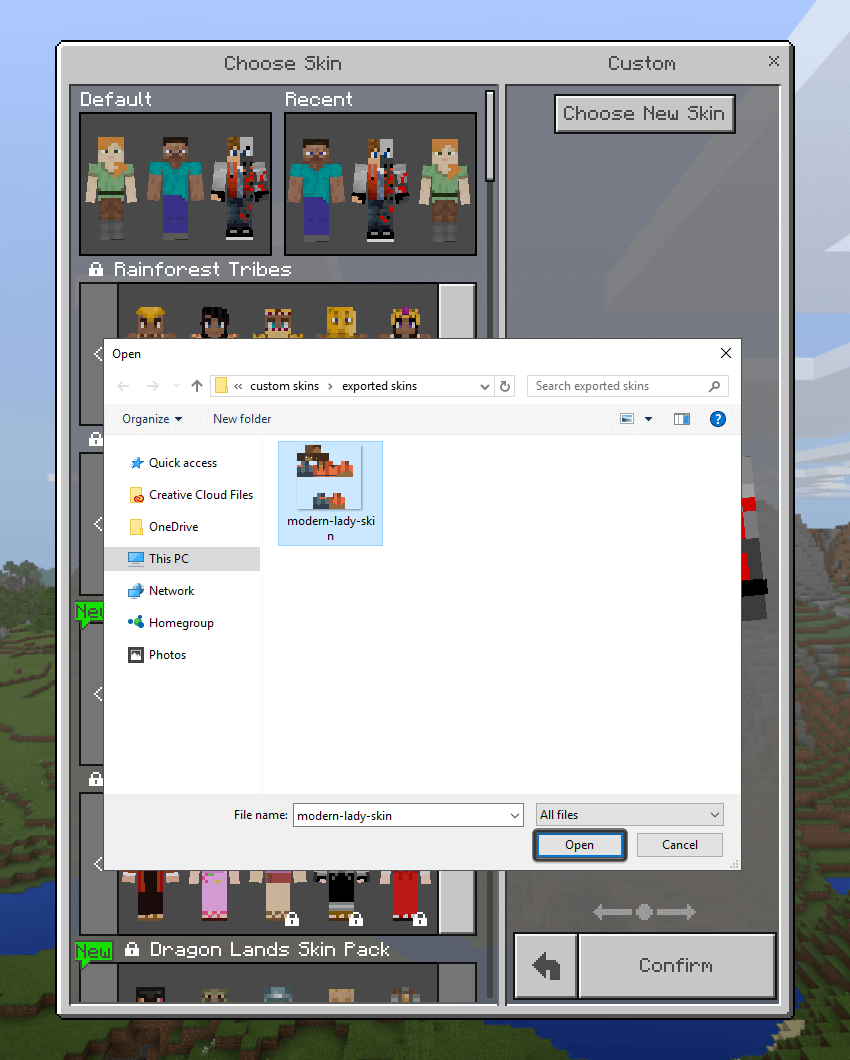
10. How to Import the Skin Into Minecraft
Now that we have our exported design, all we need to do is launch the game and upload this pretty gal!
Step 1
Once the game has finished loading, click on the little hanger icon found within the bottom-right section of the main window, right underneath your user name and character preview.

Step 2
A new window should pop up, giving you the option of choosing a new skin.

Step 3
Navigate to the folder where you exported the skin and then simply double click on it in order to upload it within the game.
Step 4
The game will then ask you to choose the correct model type for your skin, which in our case is the one on the right with the thicker arms.

Step 5
After that, all you need to do is click on the Confirm button, and then you can start playing with your custom made skin that you put together.

It’s a Wrap!
There you have it, fellow Minecraft players, a nice and easy tutorial on how to create your very own custom skin, using nothing more than a few rectangles.
As always, I hope you had fun working on the project, and most importantly learned something new and useful along the way.
If you have any questions, feel free to post them within the comments area and I’ll get back to you as soon as I can!

